 We’ve experimented with dip dying several times here on ABM. It’s so fun and something that can be done in just a few hours at home.
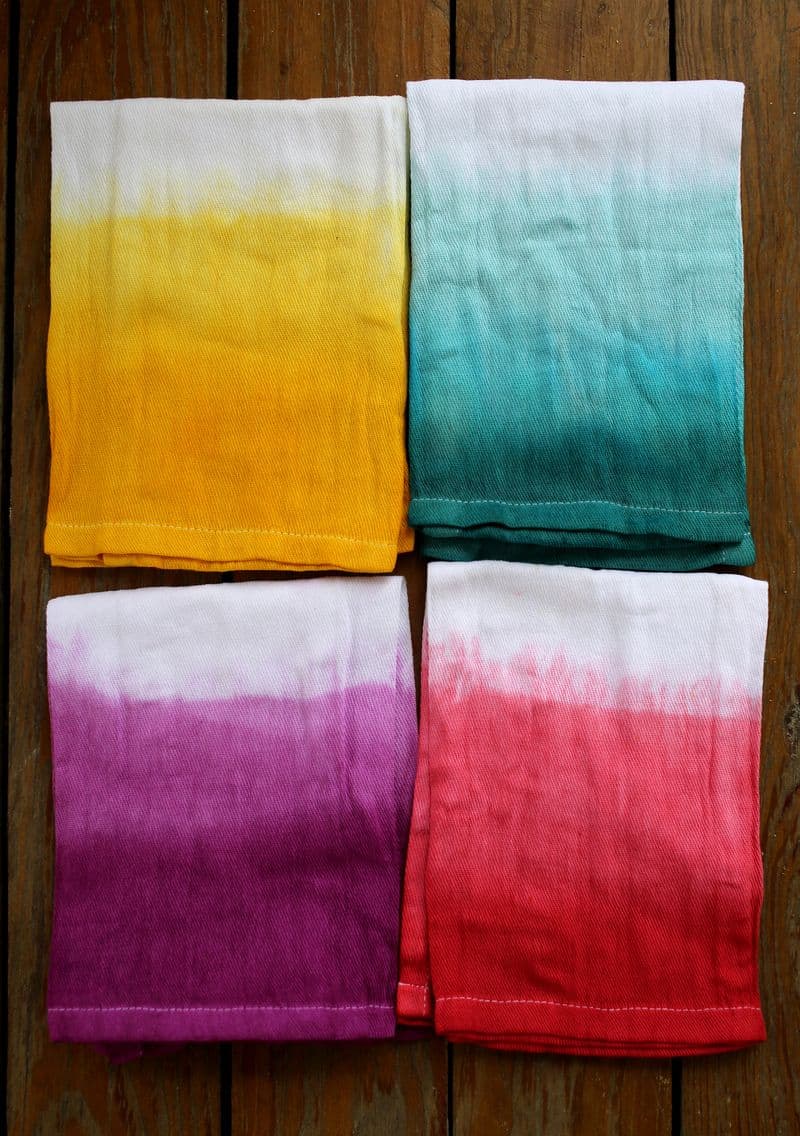
The effect is beautiful, delicate and unique to each piece! When creating this napkin set (we got our 8-pack of white napkins from Target), we experimented with several different techniques, dye times and colors to find the prettiest and longest lasting results.
Follow these instructions carefully, and you can machine wash these napkins too!
Related: How to Tie-Dye – Beginner’s Guide, Weaving for Beginners
 Step 1: We used the stove top method for dip dyeing and added 1 part dye to 8 parts water and 1/8 cup of salt to help set the dye.
You can use liquid or powder dye, we used both. Once the dye is hot, wet your napkin with water and fold your napkin in half. Dip the bottom 2/3 of your folded napkin into the dye, leaving the top folded edge un-dyed.
 Step 2: Rinse the napkin in cold water as you squeeze out excess dye, but make sure to rinse with the folded white area of the napkin at the top near the faucet so all the extra dye drains away from your white area.
 Step 3: Allow the napkin to dry on a drying rack while you add more dye to your original dye mixture. You’ll want to increase the dye ratio to about 3 parts dye to 8 parts water, but you can do more or less depending on how dark you want the final color.
Once the napkin is halfway dry, dip the bottom third into the darker dye and repeat the rinsing process again.
The salt that we mixed in with the dye should help set the color, so you should be able to machine wash your napkins on a delicate cycle (with cold water) with minimal loss of dye (make sure to wash the napkins separately from other items the first few times through the machine).


 Fun, right?! I love these napkins and can’t wait to host a backyard party now!
 We tried this same technique on a plain white tank top. Yea… we’re a little addicted now! 🙂
xo. Elsie
Hey! I know this is totally random but do you remember where you got your flatware? I have been scouring for the perfect set (I’m moving into my first apartment soon!) and LOVE yours!
A great post. Inwould be trying to do the same over the weekend and gift it to my wife. Will mail the final pictures to you.
Till then cya from www.shoestringtravel.in
Damn we love this style. should carry a shawl like this on our next trip.
Wow what a cool “ombre” effect eh? Would love to try dip dye.
Hi ladies,
Thanks for posting this DIY! I loved it so much it inspired my latest blog post (www.annekeforbes.com/dip-dye-diy). It was a lot trickier than I’d expected, but turned out well in the end. I hope you’ll have a look and fill me in on how you were able to achieve such even colour and transition.
Sincerely,
Anneke
What brand of dye did you use?
Jenna- it’s true that this project has been done quite a lot online (and in retail stores- these were actually inspired by something we saw in a retail store) I should check through my old pins more often, but this project was totally a coincidence and not some kind of sly “copy cat” thing. We love Design Sponge and credit them here constantly for all kinds of stuff. I am approving your comment and responding to it just so you can see that we’re not hiding anything. 🙂 Similar projects happen in the DIY/blog world all the time. We try to credit others when the idea or technique came from them and we appreciate it when other do the same. With that said, we don’t always remember everything we’ve seen/pinned… especially when it’s a major trend that’s popping up everywhere. 🙂 Hope that makes sense! We really do try very VERY hard to always be fair and honest around here. That is very important to us. 🙂
I think you did a great job with these, it just seems really unfair that you don’t give credit where credit is due. You pinned ths exact idea 7 months ago on Pinterest from designsponge.com …I know you won’t approve this comment but please give the ones you found the idea from the recognition they deserve. You would have wanted it when you were starting out and not some big name blog like you are now. Don’t take the as a personal attack, I really do enjoy your blog, but please, please, treat others how you’d like to be treated. God bless.
Beautiful! I really need to try this!
Love the idea of all of the colors, and the simple ways to make napkins!
Sarah
www.etsy.com/shop/owleyevintage
I love that simple gold flatware! Pretty please tell me where it is from! 🙂
cool 😉
Valentina
http://valentinaduracinsky.blogspot.com/
Hi Melissa-
they’re the rose gold set from west elm. 😀
Can you tell me that brand of your gold flatware? I love it!
I made them this weekend for my friends Bridal Shower. They came out beautiful and she loved them. Thank you for the idea!!
These are just as BEAUTÉ as you guys <3 I'm addicted too!
I aboslolutely love these! Such a lovely effect. I’d love to do this to a whole table cloth!
Apparently this technique is liked and accepted by my boyfriend. He said he’d definitely like it in the house so I’m going to make some tea towels like this!
LOVE IT!!!!
So creative!!
raspberry-notes.blogspot.com