 What is it about cardboard and wrapping paper that is so bewitching to a kiddo? I remember forsaking all other toys any time a big ol’ cardboard box entered my childhood home. If you had given me the choice of a fort made of cardboard and duct tape versus one of those Fisher Price playhouses, I would have chosen the shoddily assembled cardboard version every time.
Recently I’ve noticed the same tendencies in my own child. I’ve been saving recycled toy ideas to make for Lucy on my Kiddo Activities and Kiddo Pinterest boards, arming myself with project ideas to encourage this make-do mentality in her play some day soon. I can’t wait until she’s ready for scissors and glue, but in the meantime, I thought she’d really enjoy a Mama-made playhouse—and boy, did she ever!
 We don’t have lots of space in our home, so I knew I wanted the playhouse to be easily disassembled and stored behind our big dining room cabinet when not in use. Originally I was thinking I’d use tempered masonite because it’s inexpensive, thin, and lightweight. But in the end, I decided foam board would be the quickest/easiest material to work with since all I needed to cut it was my trusty X-Acto blade. A foam board playhouse certainly won’t last forever, but if Lucy plays with it often enough, I’ll definitely consider using these pieces as a template for a masonite version that she can use outside too.
Is this playhouse recycled? Well, no, it’s not. But it sure was cheap and lots of fun for both Lucy and me, so I’d say it’s a big win!
 I drew out the measurements I used so you can make your own cardboard playhouse without all the guess work. (Click to print.) But if you are working with smaller pieces of cardboard or an actual box, why not come up with your own design?
 It’s very helpful to have a t-square when marking out the measurements for each panel of the house so you don’t have to measure down from each side of the board to get straight lines. I also don’t recommend using a marker as I did, but I wanted the photos to show the lines clearly. I’d use a pencil instead so your lines won’t be visible if they don’t all get cut away.
 I used household objects as guides for the round shapes in the playhouse like the window, the arched doorway, and the doorknob. After cutting out the door, you’ll want to cut away a little extra around it so that it will easily open without getting stuck inside the opening where you cut it from.
 Once all of your pieces are cut out, you’re ready to slide it all together! I was able to assemble the entire house without any assistance, though it would have been nice to have some help standing up the two sides of the house while I slipped on the front or back panel.

 I used white duct tape as a door hinge, but I recommend using duct tape to wrap where you will be taping first, so if the door pulls in the wrong direction (which it will if kids are using it), the tape of the hinge won’t pull the outer layer off the foamboard.

 I think Lucy’s favorite part of the playhouse has been filling it with all of her toys, and then throwing them out the window and into a basket she has placed outside the house. Her poor Teddy sure has been through a lot since I built the house! But at least I can testify to the fact that my toddler is quite the baller.
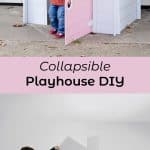
 We loved the simple white style of the playhouse, but decided to jazz it up a little bit with the addition of paint, gingerbreading, shingles, and a little more detail drew on with a Sharpie paint pen. There are so many ways you can go with this—it’s really a lot of fun!
I used this pink floral spray paint for the gingerbreading and door, and used a regular brown spray paint (I believe Rustoleum brand?) for the shingles. I used hot glue to hold the shingles in place and rubber cement for the gingerbreading.
 Part of the appeal of a white foam board playhouse is that you can decorate it however you want! I plan on getting inside there with Lucy and some magic markers and letting her interior design the joint to her heart’s content. –Mandi
Credits // Author and Photography: Mandi Johnson.
Hi, I am wondering if the roof measures are correct? I am interpreting them as 6″ in from one end make a slot .25″ wide and 2.5″ in from the other side make another .25″ wide slot. That should leave 32.5″ between the 2 slots?? for an overall measurement of 39″. Am I reading this wrong?
I am coming up with an overall measure of 41.5
So nice
Hi! Im Ross a father to a very cute beautiful daughter and full time graphic designer by profession>. Your doll house project has given me an idea to start a small business since where I live, the supermarkets don’t offer doll houses. I see these playhouses as an escape from the gadgets that our kids use everyday. Thank you for posting this.
this is awesome! my parents built me one in the early 90’s.
Amazing idea! I plan on putting the decorations on with velcro so that they can be changed for different seasons and holidays. Thanks for the plans!
I want to make this right now I’m so excited about it. Where can you find foam board so large? I plan on using velcro for the decorations so it can be changed for different seasons and holidays!
This is wonderful! What is the thickness of your foam board, and how did you know how wide to cut the “slide in’s?” My husband and I are going to make this with tempered masonite, so I’m trying to figure out how wide to cut the “slide in’s.” Thanks for sharing!!!
My four year old (well, almost five) will love it. Actually, she may even like making the darn thing too. She is in pre-k three full days a week, so my wife is looking for projects. Hmm…
so cute!
xx nikki
www.dream-in-neon.com
Love this idea. When i first saw the post I thought there is no way I could make that, but really you guys made it look easy. My kids would really enjoy this house. Here is to hoping mine comes out as cute and not lop sided.
There’s an art supply/craft store in my area called Pat Catans. They have huge sheets of foam board! -Mandi
This is a wonderful idea! It makes me want to have kids so I can make one!
Thanks Mandi- I will have to give it a try!
This looks so amazing! I am already getting ideas for my little boy, possibly involving a castle to raid. Thank you so much for posting this!
Where were you able to find foam board in that size?
Getting to draw whatever you want on the walls? Why didn’t I have this as a kid? 😉
http://everydayingrace.blogspot.ca/
I wish wish l had a young girl, even my two grand kids are to big, l just love it and am thinking of doing a smaller one for the house and have flowers growing from the bottom birds on the sides, ideas are all over my head. But its about time l woke up and smelt the air.
Thanks for posting it,
Jill
That’s so beautiful! I love the idea of an indoor playhouse. So spiders (usually) to clean out of it before they play!
This is so cool guys! I might as well try a bigger version of this. You know for the adults who are kids at heart. Haha. 🙂
http://annescribblesanddoodles.blogspot.com
This is really cute! It’s taking the refrigerator box playhouse to the next level for sure. Great work, Mandi!