")
")
 close up") One thing we miss so much from our last house was the floor to ceiling bookshelves we had built into our living room. We own lots of books, so having storage for them is important. But also, as a child who grew up loving Beauty and the Beast, big bookshelves will always have my heart. There’s just something so cozy about them to me!
One thing we miss so much from our last house was the floor to ceiling bookshelves we had built into our living room. We own lots of books, so having storage for them is important. But also, as a child who grew up loving Beauty and the Beast, big bookshelves will always have my heart. There’s just something so cozy about them to me!
Anyway, we moved. And I love our new house, but there was no wall of built-in bookshelves waiting for us. I didn’t want our books just sitting inside moving boxes for months while we figured out what we wanted to do with them. So I unpacked them and put them onto two small bookshelves that we had inherited from the studio house. Since they were free to us, I wasn’t going to complain, but they certainly looked temporary as they weren’t large enough to hold all our books and they just didn’t fill out the space at all.
See:

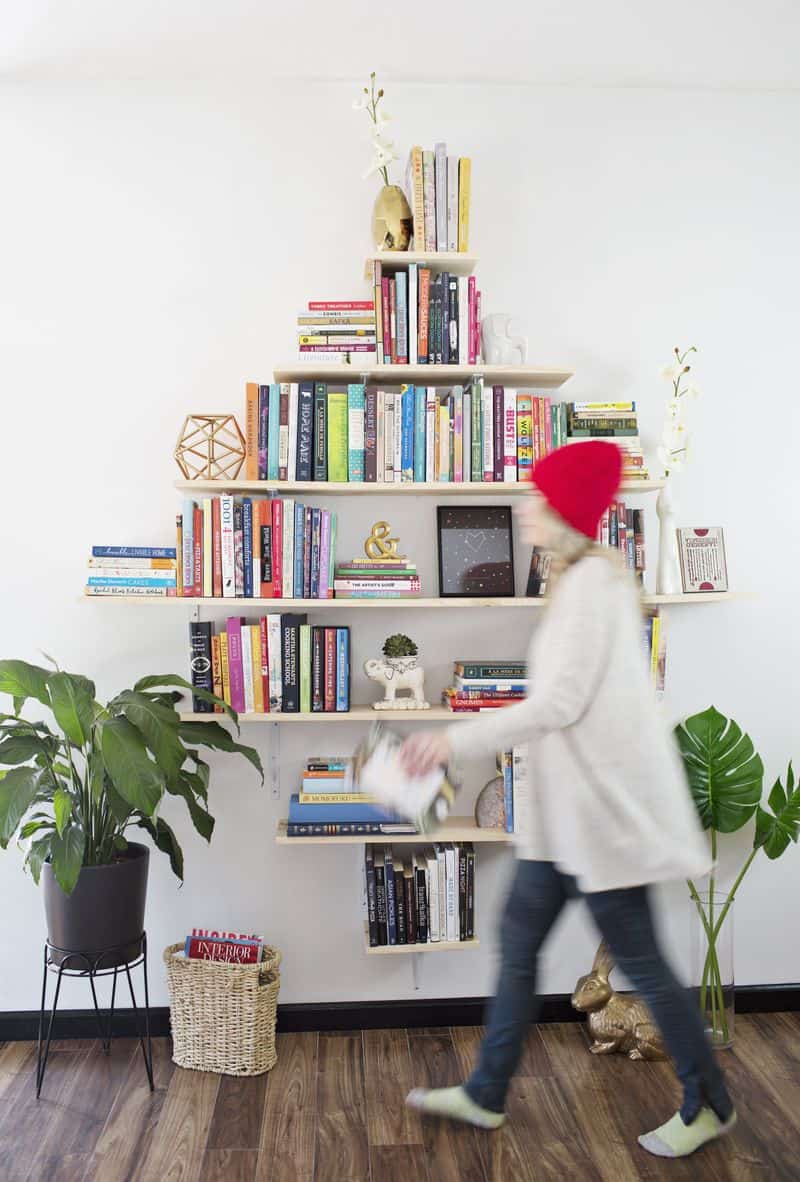
") We wanted something that would fill up most of the wall (in our living room).
We wanted something that would fill up most of the wall (in our living room).
First I started shopping online, but everything I found either felt a little too generic or was a little more pricey than I wanted to spend. Trey suggested we just build something that we liked, and so then we started sketching out a few ideas.
We both ended up liking this kind of open-shelving meets a diamond shape idea. So, we went for it.
 Here’s all the books after I moved them off those shelves so we could measure and plan. At this point I was worried that maybe our idea wouldn’t end up holding all the books. I figured I could always distribute them to other areas around the house, but I kept my fingers crossed that we’d be able to fit them all in this one spot.
 If you are going to create a similar project, you will likely want to change up the measurements some. We built this to fit well on our wall, which is about 9ft tall and 8ft wide (to the steps). If your wall is smaller or larger, you’ll likely want to adjust so it visually fits your space. One thing that helped us was using tape to mark where the shelves would go. This let us look to make sure we were happy with the size before we ever bought any supplies.
Supplies:
-one 1×10⁻⁶ft board
-two 1×10⁻⁴ft and 3.5 inch boards
-two 1×10⁻²ft and 7.5 inch boards
-two 1×10⁻¹ft boards
-12 (or 13*) 8″ x 10″ shelf brackets
-4 3″ x 3″ angle framing anchors
-drywall screws with wall anchors
-white spray paint
-power saw (if cutting the boards yourself)
-powder drill
-level
*We bought 13 brackets. You can see where we planned to place them from the small pieces of tape in the photo above. We ended up only using two brackets on the center shelf, but we’re going to wait a few months to see if it bows any. If it does, we may add that last bracket.
Altogether this project cost about $120 and took us two days to install. We could have easily done the entire project in one day, but we split it up into a Saturday and Sunday project because we had other stuff to do that weekend. 🙂
Step One: Cut your shelves to the size you need. In the supply list I’ve indicated the final sizes of the all the shelves we installed. We actually bought two long boards and cut the shelves to the sizes we needed as this made the project more economical for us. But you could also have your hardware store cut the boards for you.
 Step Two: If any of the brackets or framing anchors aren’t the color of your wall, spray paint them. Our wall is white and the framing anchors only came in steel (the brackets could be purchased white). So I spray painted those before we installed.
Step Three: Install your shelves. Be sure to use a level to make sure you get them perfectly straight. Since the brackets are in a specific design, mimicking the diamond shape, we knew we likely would not get to install them all on studs. So we used wall anchors when needed. Well, really Trey did. He did most of this part. Which is for the best because I am notorious for “eye-balling” things. So when levels are needed, I am not always the best person for the job. Ha!
") We left our boards raw as we already have some other raw wood looking pieces in the room, but you could easily stain or paint them if you wanted a different look. After that, just add your books and knick knacks and enjoy. I found that all our books DO fit on our new shelves, so that’s awesome. It does make the shelves fairly full, but I like that look, so I’m fine with it. 🙂 Thanks for letting me share! xo. Emma
We left our boards raw as we already have some other raw wood looking pieces in the room, but you could easily stain or paint them if you wanted a different look. After that, just add your books and knick knacks and enjoy. I found that all our books DO fit on our new shelves, so that’s awesome. It does make the shelves fairly full, but I like that look, so I’m fine with it. 🙂 Thanks for letting me share! xo. Emma
Credits // Authors: Emma Chapman and Trey George. Photography: Emma Chapman. Photos edited with A Beautiful Mess actions.
terrific job! i wish ! were savy with using tools. I love DIY and have good easy ideas but the tools are my downfall. everything would probably fall off the walls. maybe some time you would have a video on the proper way to use nuts and bolts etc. thanks
So cute and simple!
www.throughmyowneyes.com
These shelves are gorgeous!!!!!! I love them!
The two plants on the right and left of the book shelves add so much to this. Lovely!
x // http://eliseandthomas.com
omg i freaking love this idea! so wish i had a wall big enough for this!
What a transformation! The shelves are incredibly cool – love the diamond shape.
Erin | beingerin.com
Love this idea! I want to try this when I redo my bedroom! 🙂
-Lauren
http://www.musingsofaflowerchild.com/
You are always so creative & helpful!
http://www.llindatt.blogspot.com
Looking good x
http://jessicawoods.fr
Was going to say the same thing!
I have a big statement wall I’ve been wondering what to do with. This is an amazing idea! I may do another design than a diamond (my wall is horizontally large so I’ll need something that fills the space more). If those are all the books you have between you and your Husband…..I must be a hoarder because my collection is much bigger…..and I’m on my own!!! I have this solid wood bookshelf in my living room that my mother ordered from this local wood working shop when I was fifteen. I meant to order an other identical one (or two) for years…..but they went bankrupt 2-3 years ago so my dream of a beauty and the beast inspired “library room” is on the back burner for now. The one bookeshelf does not even fit all my books and it’s already jam packed (with two rows on each shelf and no nick nacks except my sound system). Anyway, I digress, this is a beautiful ingenious idea!
I love it, I really do! 😀
Do you mind sharing where you got your brackets? Those are perfect for the shelves I’m building!
This is amazing. Please do a CD/DVD storage idea next. We are using apple crates to store CDs and don’t get me started on the DVDs ?
I love the symmetry of this project and it beats the hell outta the ‘before’ bookcases!
Aw this looks awesome! Big bookshelves give such a homey feeling, I don’t think I could live without them. The majority of my book collection is crammed into some plain Billy bookshelves. Does the job but def. does not look as cool!
Such a cool idea to form a shape with book shelves, this makes it a wonderful center piece of the room I think!
https://www.makeandmess.com/
dang girl! I love it!! super cute and functional!! I don’t have a ‘kid friendly’ wall in my house to try this but I love it!! The only place i can keep books safely is in my office 🙁 not really displayable 🙁 yours looks awesome though!!!
I love that this project is so cute and affordable! It really livens up the wall and makes great use of the space. I’m hoping that I have space for a shelf like this in my next apartment so that I can try out this tutorial!
-Helen
http://www.sweethelengrace.com
I love these bookshelves! They add such a great dimension to the room!
Paige
http://thehappyflammily.com