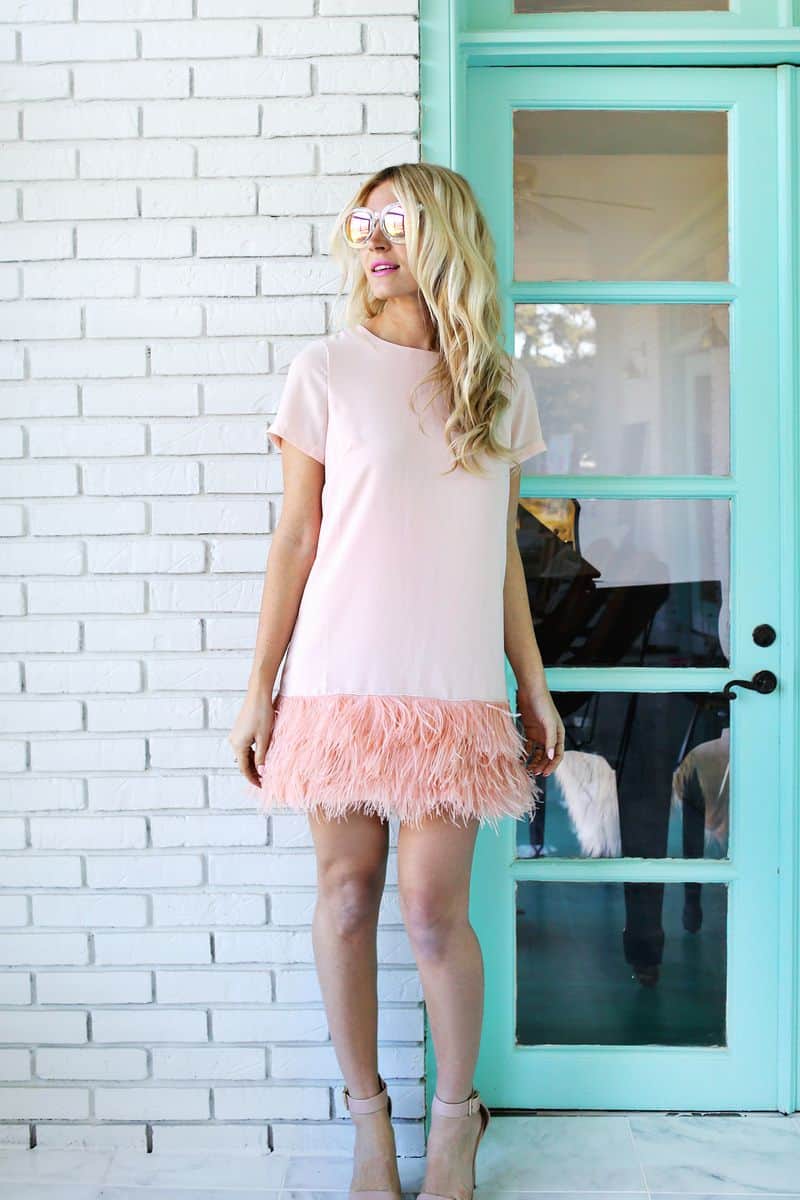
") I feel that most great DIYs stem from not being able to get what you want. You know how it is, you are on the hunt for that perfect coffee table, or pillow, or outfit, and you finally find just what you’ve been dreaming of and…you can’t afford it. I was searching for blush dresses to wear as a bridesmaids dress in my brother’s upcoming wedding (the bride, Sarah, is letting us pick our own dresses because she’s cool like that and not the control freak bride that I was. Sorry again to all my friends…), and I found the most amazing blush dress with feathers at the bottom. O. M. G. As amazing as it it, I really wasn’t willing (or able!) to spend over $300 on it. So I sulked about it for almost two weeks before the lightbulb came on of, “Hey Dummy! DIY that dress!” Oh yeah! Good idea!
I feel that most great DIYs stem from not being able to get what you want. You know how it is, you are on the hunt for that perfect coffee table, or pillow, or outfit, and you finally find just what you’ve been dreaming of and…you can’t afford it. I was searching for blush dresses to wear as a bridesmaids dress in my brother’s upcoming wedding (the bride, Sarah, is letting us pick our own dresses because she’s cool like that and not the control freak bride that I was. Sorry again to all my friends…), and I found the most amazing blush dress with feathers at the bottom. O. M. G. As amazing as it it, I really wasn’t willing (or able!) to spend over $300 on it. So I sulked about it for almost two weeks before the lightbulb came on of, “Hey Dummy! DIY that dress!” Oh yeah! Good idea!
") Supplies:
Supplies:
-shift dress in a solid color (I bought this one)
-feather trim in the same color as your dress
-sewing machine
-straight pins
Once you get your dress, measure how wide the bottom of the dress is and think about how many layers of feather you want on the bottom. Those choices will let you know how much feather trim you’ll need to buy (like if your dress is 20″ across and you want two layers you’ll need 80″ of trim). Usually they sell feather trim that is either attached to a ribbon or to a very thin cord like the one I linked. I think the ribbon finished trim is probably easier to sew onto the dress, but how it’s attached looks a little more obvious. So I opted for the thin cord instead.
")
") Determine where you want your lowest feather layer to hang in relation to the bottom of the dress (I suggest the feathers covering about 1″ below the hem) and make a line of straight pins just above where you want your feathers to be attached. I used a ruler to make sure all my pins were an equal distance from the hem.
Determine where you want your lowest feather layer to hang in relation to the bottom of the dress (I suggest the feathers covering about 1″ below the hem) and make a line of straight pins just above where you want your feathers to be attached. I used a ruler to make sure all my pins were an equal distance from the hem.
") Once you have a pinned line, start on the back side of your dress and begin attaching the feather trim to the material just below the pinned line. For any layers that are not the top layer, use a zigzag stitch to secure the top edge of the trim in place (the stitching will be covered by the next layer of feathers). Go all the way around the dress until it meets back on the other side. I used a little bit of fray check glue to keep the trim cord from unraveling when I cut the trim.
Once you have a pinned line, start on the back side of your dress and begin attaching the feather trim to the material just below the pinned line. For any layers that are not the top layer, use a zigzag stitch to secure the top edge of the trim in place (the stitching will be covered by the next layer of feathers). Go all the way around the dress until it meets back on the other side. I used a little bit of fray check glue to keep the trim cord from unraveling when I cut the trim.
") Repeat the process by measuring up from the hem for the next row and making a line of pins just above where the trim should be placed. The best placement will depend on how long your feathers are and how thick your trim is. So just overlap the two layers until you find the placement you like. Repeat the process of sewing the next layer of trim onto the dress.
Repeat the process by measuring up from the hem for the next row and making a line of pins just above where the trim should be placed. The best placement will depend on how long your feathers are and how thick your trim is. So just overlap the two layers until you find the placement you like. Repeat the process of sewing the next layer of trim onto the dress.
") For your last layer of feathers, do everything just like you did for the other layers, but do a straight stitch alongside the trim cord (on the side that has the feathers) instead of a zigzag over the cord for a less obvious stitch. I noticed that with just the straight stitch, the feathers tended to slip upwards in spots and create a wavy line. So I also hand-sewed the trim cord in place with a hidden stitch. If you are fine with how the zigzag stitch looks on the lower layer, you can save a little time and do that on the top layer as well. I just wanted the minimal amount of stitching visible.
For your last layer of feathers, do everything just like you did for the other layers, but do a straight stitch alongside the trim cord (on the side that has the feathers) instead of a zigzag over the cord for a less obvious stitch. I noticed that with just the straight stitch, the feathers tended to slip upwards in spots and create a wavy line. So I also hand-sewed the trim cord in place with a hidden stitch. If you are fine with how the zigzag stitch looks on the lower layer, you can save a little time and do that on the top layer as well. I just wanted the minimal amount of stitching visible.
")
")
") How great are those feathers!! Of course you can do this idea in any color scheme you want or choose contrasting colors for a more dramatic effect (like black feathers on a white dress). I would definitely dry clean this puppy since the feathers are so delicate, but in a pinch you could hand wash just the top of the dress in a sink. Instead of costing over $300, this dress ended up being around $100 instead! Not bad for a special occasion dress if you ask me (and a special dress it is!). Maybe with all that savings I could get some new shoes to go with it?? xo. Laura
How great are those feathers!! Of course you can do this idea in any color scheme you want or choose contrasting colors for a more dramatic effect (like black feathers on a white dress). I would definitely dry clean this puppy since the feathers are so delicate, but in a pinch you could hand wash just the top of the dress in a sink. Instead of costing over $300, this dress ended up being around $100 instead! Not bad for a special occasion dress if you ask me (and a special dress it is!). Maybe with all that savings I could get some new shoes to go with it?? xo. Laura
Credits // Author: Laura Gummerman. Photography: Laura Gummerman and Elsie Larson. Photos edited with A Beautiful Mess actions.
I want to attach feather trim to a body con dress. Do I need to pull the fabric as I attach so it will stretch over my thighs/hips?
You make it look so easy! Very cute dress!!
Leather chaps for sale
Nice outfit…
Exclusive bridal lehengas at https://www.varunajithesh.com/
Laura NOO!!! So sad 🙁
Please, don’t you realize that wearing feathers is like wearing fur?!? Please noo 🙁
such an amazing idea =D
I love how it looks and how easy it actually is to make – a simple dress into an amazing one so quick and easy
This is so adorable! I love feathers!!
xo dré
www.flightoffeather.com
I love this! you make it look so easy!!! the color is perfect 🙂 http://sunnycoastlines.com
You made this dress fabulous
Xoxo
http://fashionbackyard.blogspot.co.uk
I absolutely love this DIY, so pretty! <3
xx
Very cute! Perfect colour, too!
So cute 🙂 The dress looks gorgeous, better than any ready to wear version!
AGNESE from www.theblogness.com
How cute and smart of you! I’ve copied many things I couldn’t afford, being raised middle class my mom sewed all of my important dresses for me and I never worried about someone else having on the same thing. I still thank her for teaching me how to sew as I’ve recovered furniture,made window treatments and still sew some of my own clothes. !
So easy to do and so pretty! x
http://jessicawoods.fr
Great idea! Love the result, the dress looks fantastic <3
http://simonaroxanahuidiu.blogspot.ro
This turned out really great! It’s so so so pretty!
http://annescribblesanddoodles.blogspot.com
Love this!!!
Will be making one too!
Thanks a lot for the fantastic tutorial! xx
This is such an amazing idea! And you make it look so easy!
This DIY feather hem dress looks amazing on you! I have no clue how to use the sewing machine or I will have make a similar dress too!
Prudence
www.prudencepetitestyle.com
https://www.lulus.com/products/fun-loving-ivory-skater-dress/280362.html
How about diy this skater dress to resemble the one Amal Clooney wore to Hail Caesar premiere? 😉
Love!!!! Such a fun way update a simple dress. And the color is gorgeous!!!