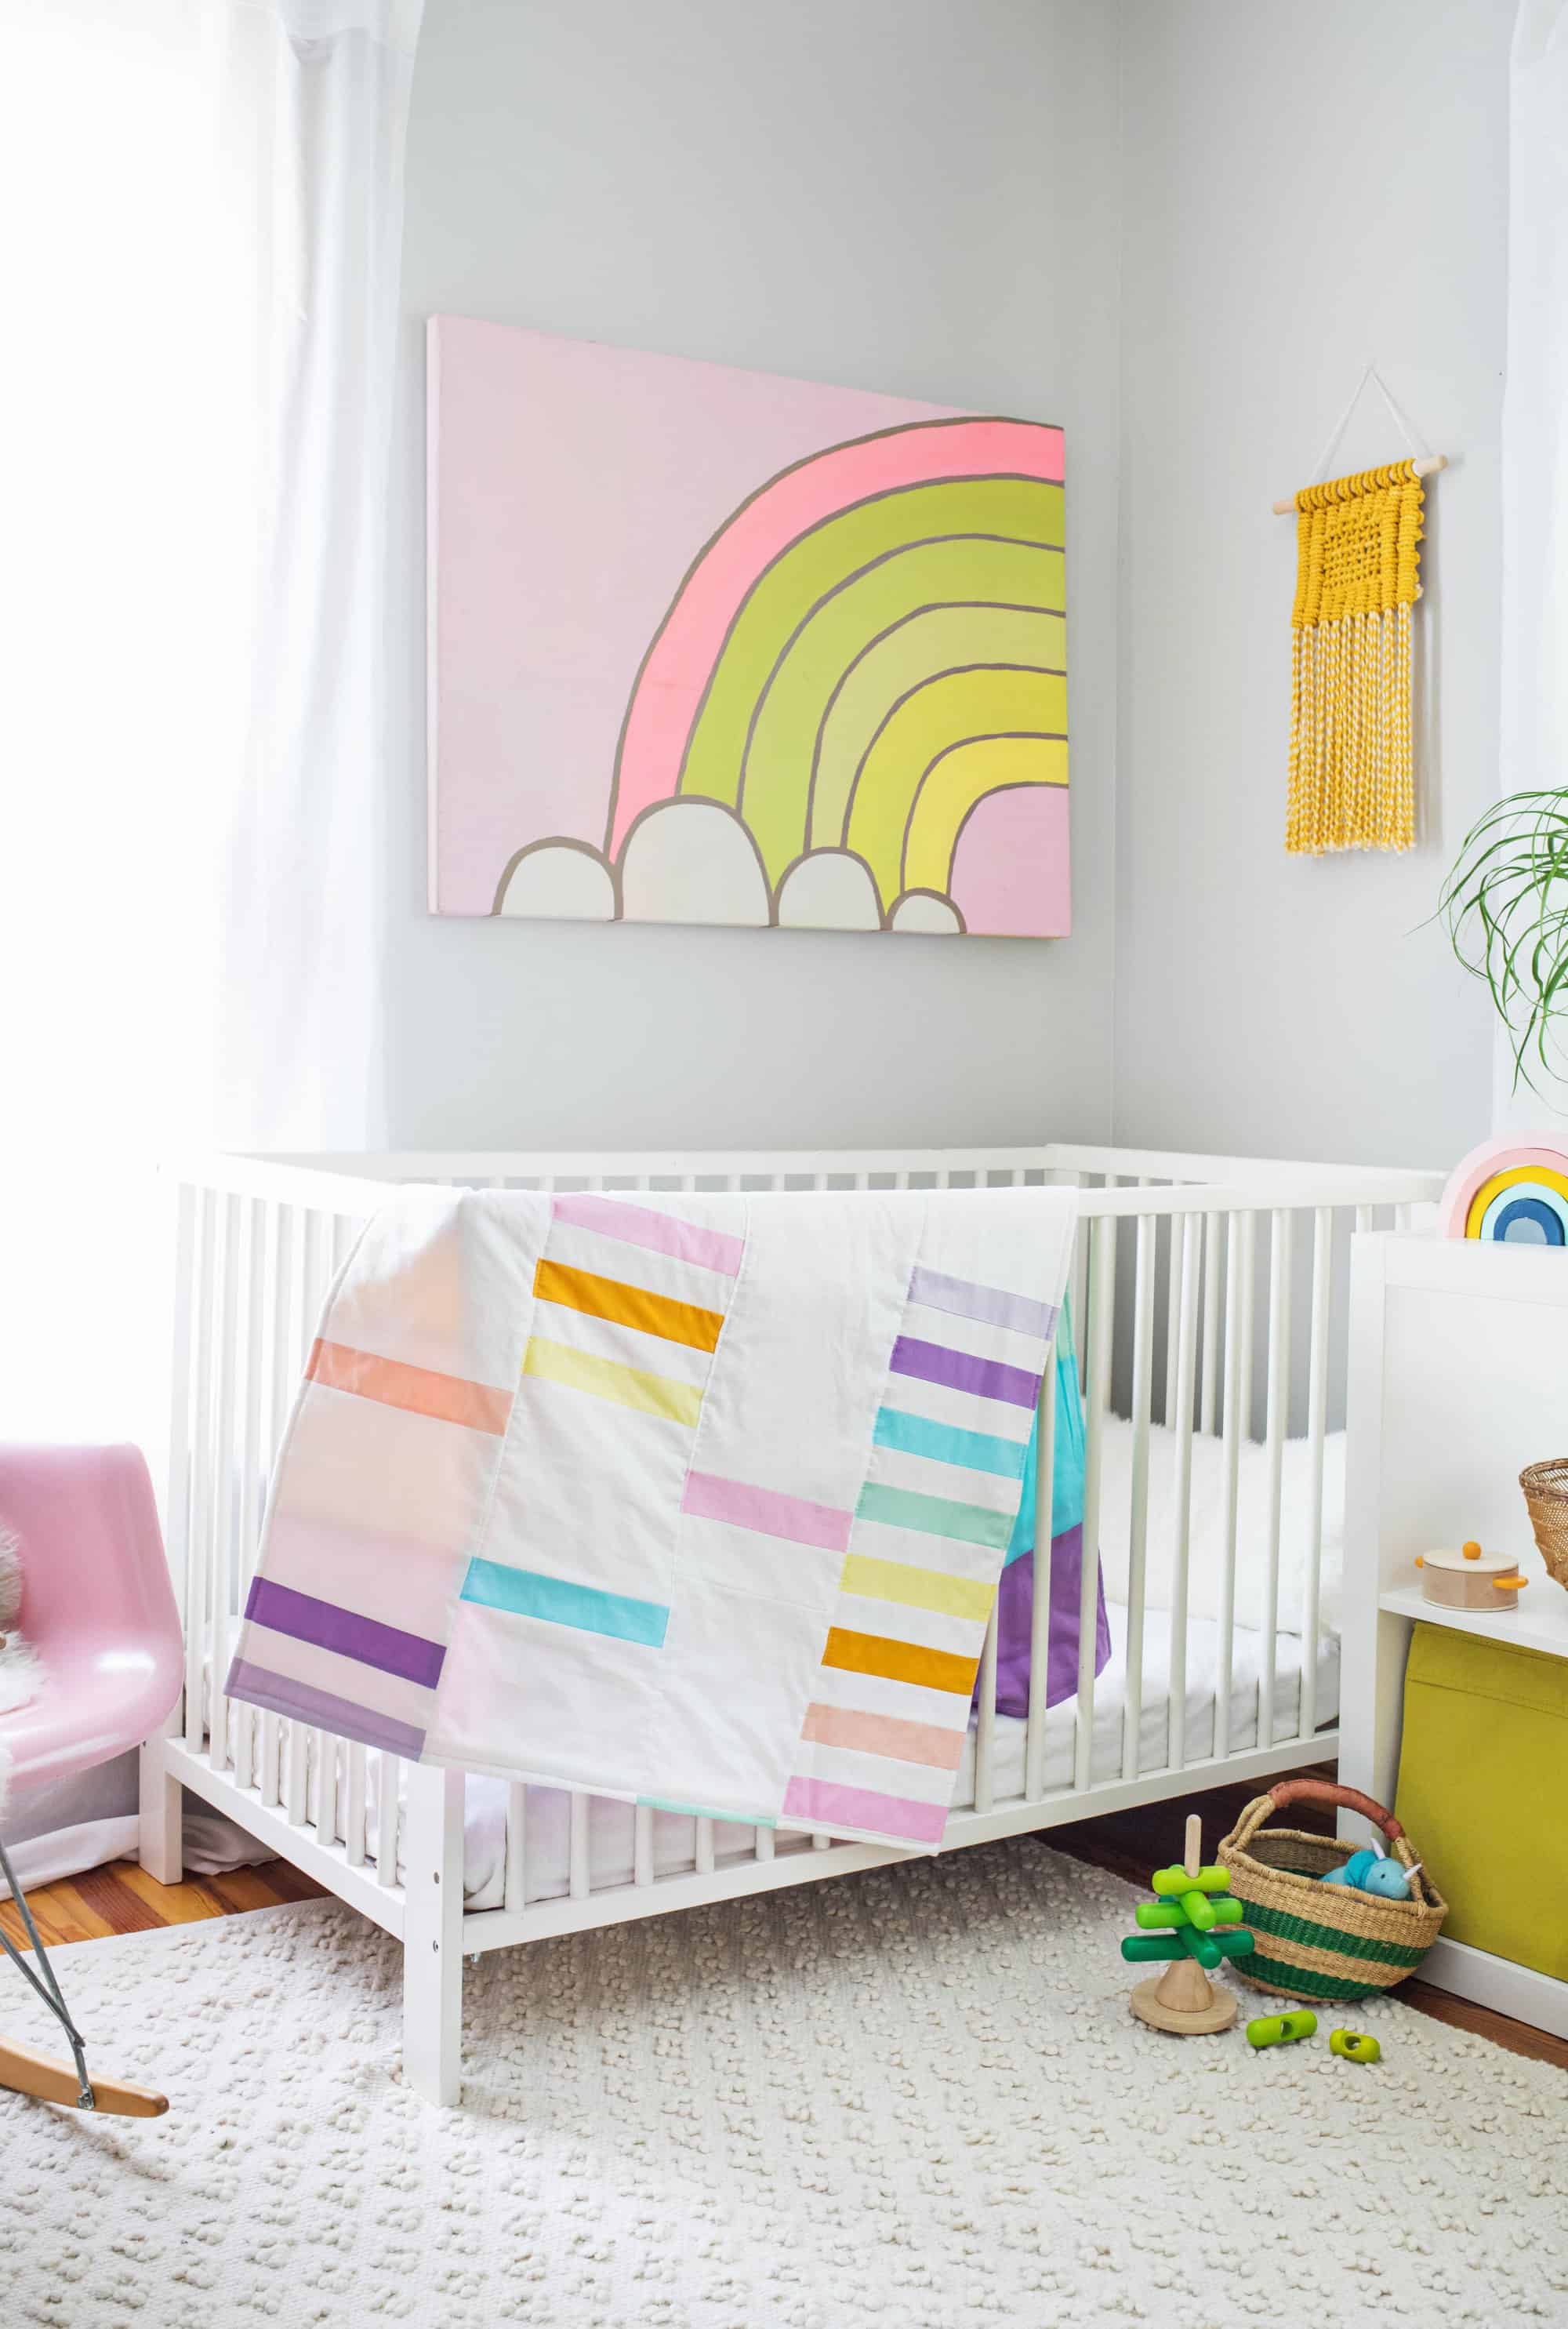
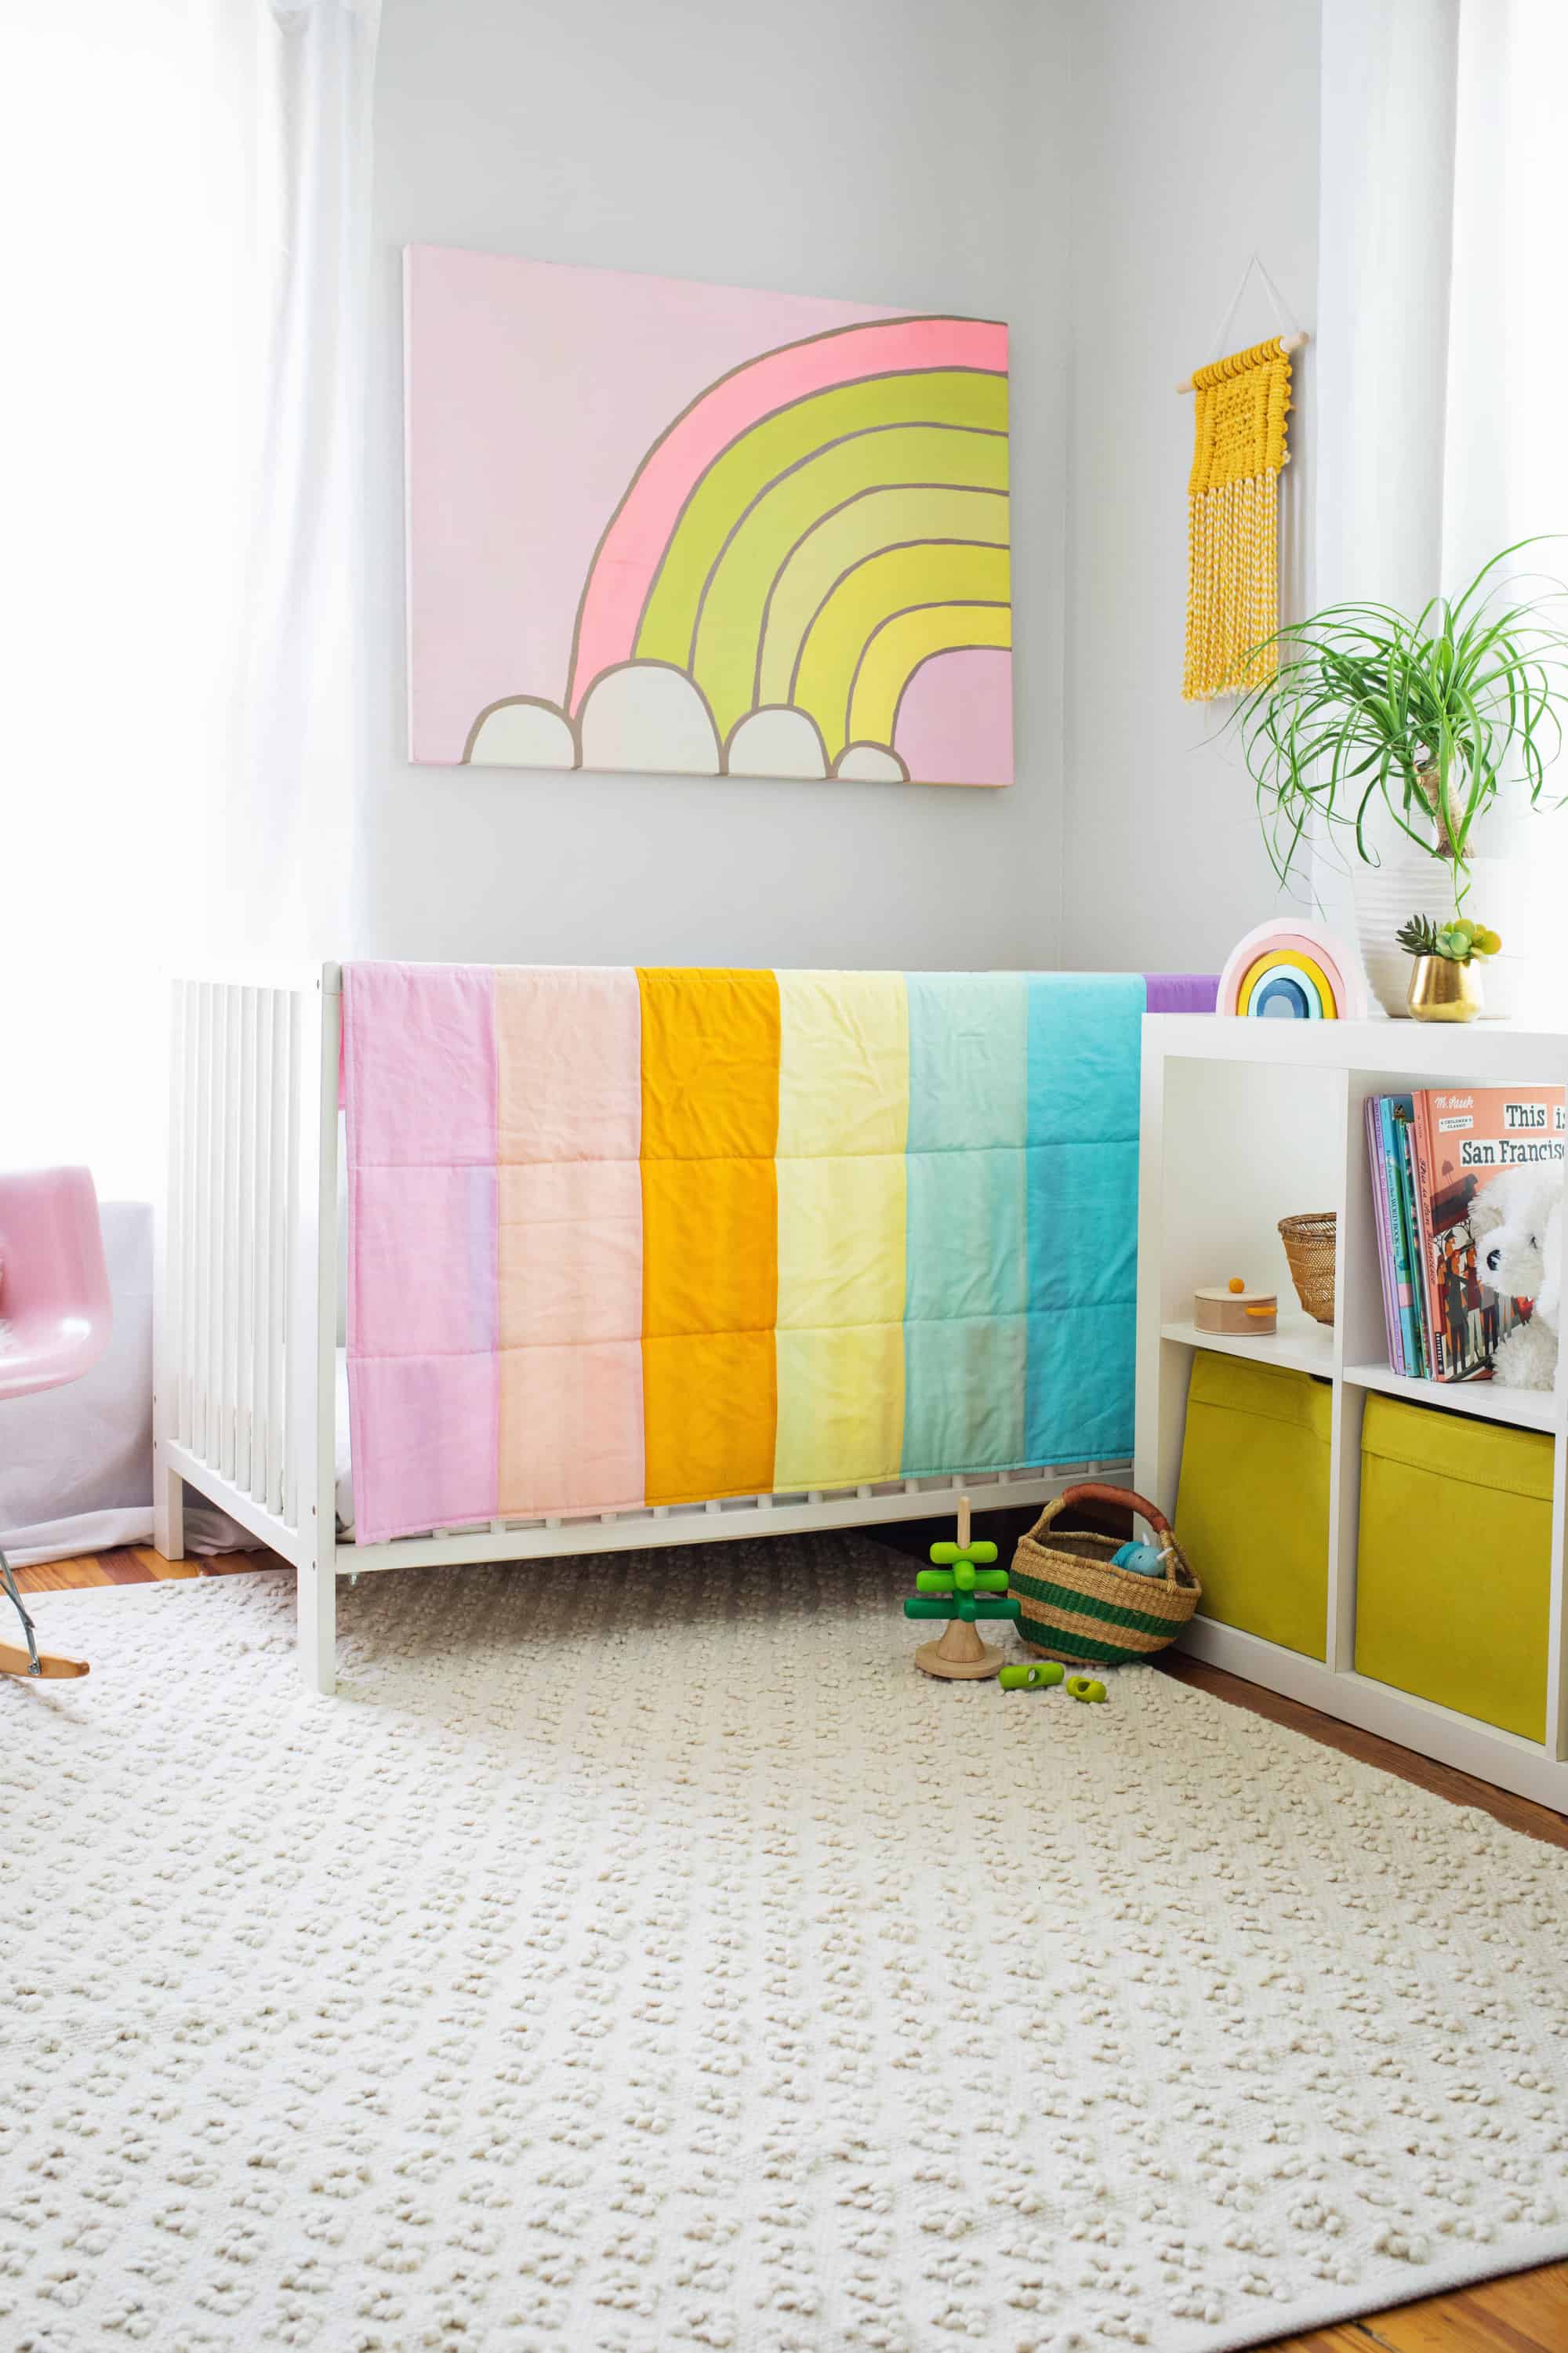
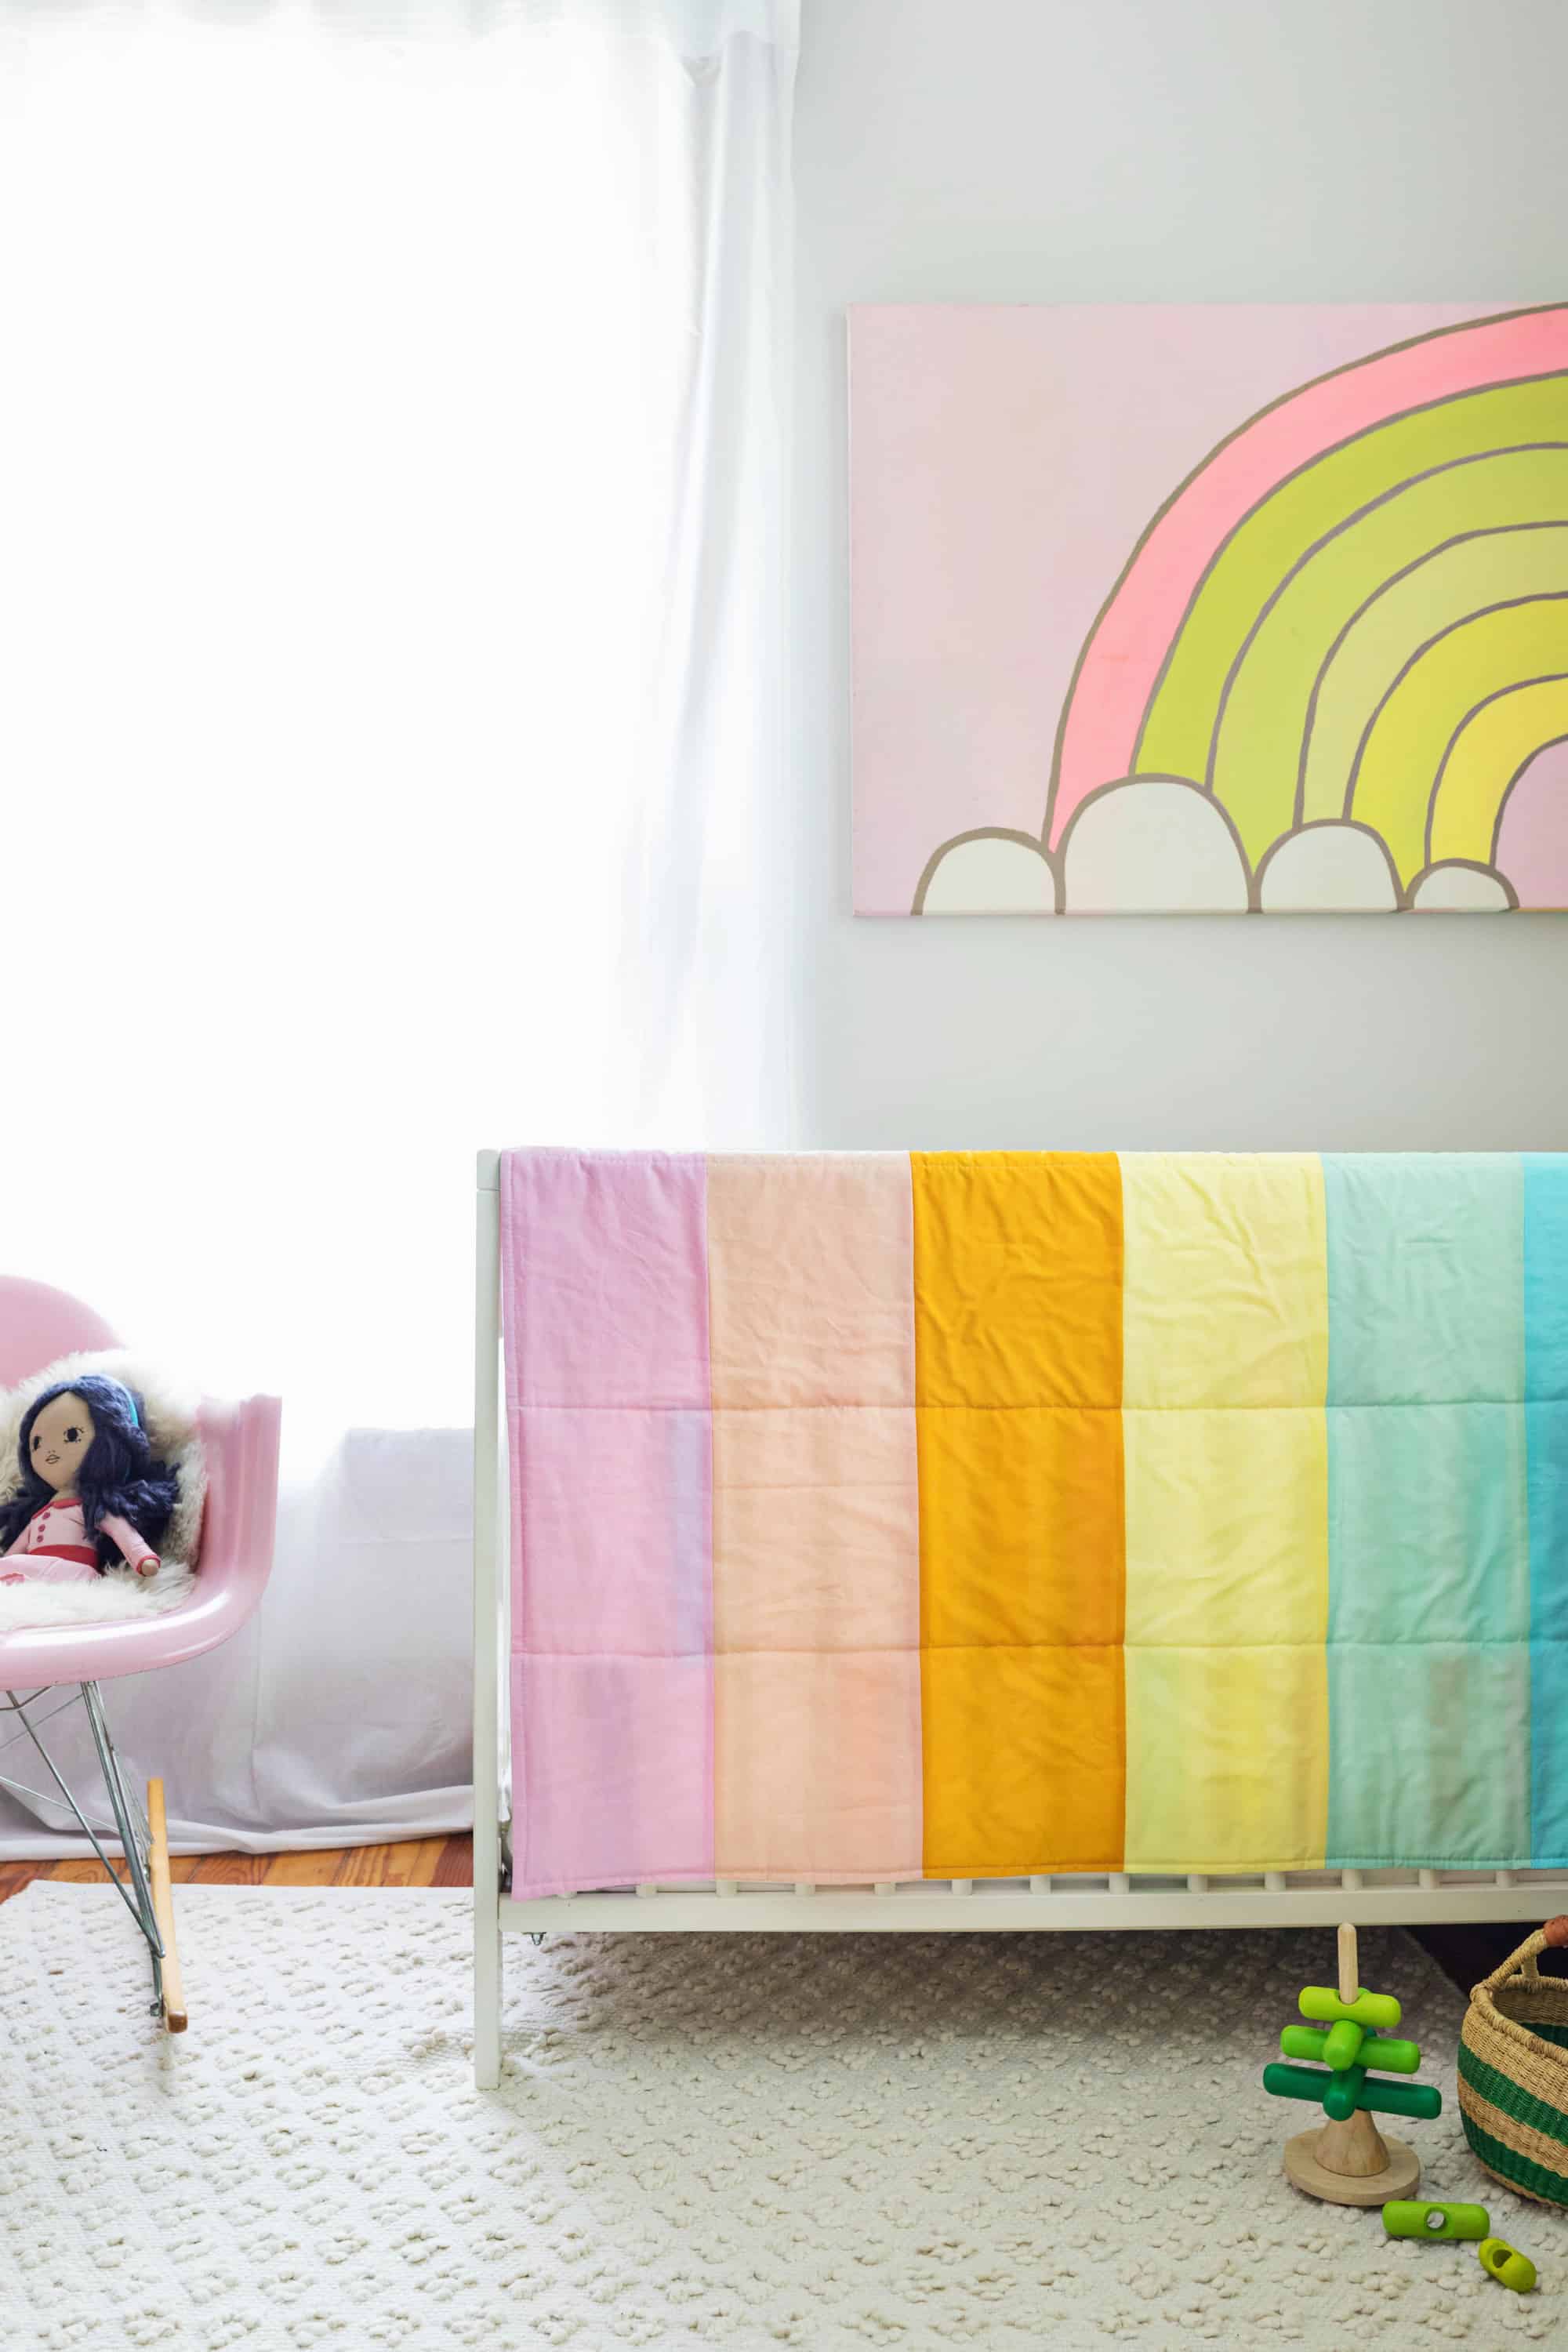
 Whether you’re preparing for a sweet baby or have a few friends that are, sewing a crib quilt is a special way to celebrate a new life and add a handmade keepsake to a little one’s space! This modern blanket is an easy quilting project for any beginner since it only involves rectangular patches, features a lot of larger blocks, and isn’t heavily quilted together. It also features a simple stripe pattern on the reverse side that makes a big statement.
You can easily customize this to fit your room’s color scheme or make it gender neutral if that part is still a surprise! If you’re savvy with your machine, you can add even more extensive quilting to sandwich it all together, add a hand-stitched binding, or replace the larger quilt blocks with even more small patchwork pieces. Looking to simplify it even further? Add a solid cut of fabric for the back side. Either way, this modern stripe pattern will add a soft graphic touch to a special little one’s space.
 Supplies:
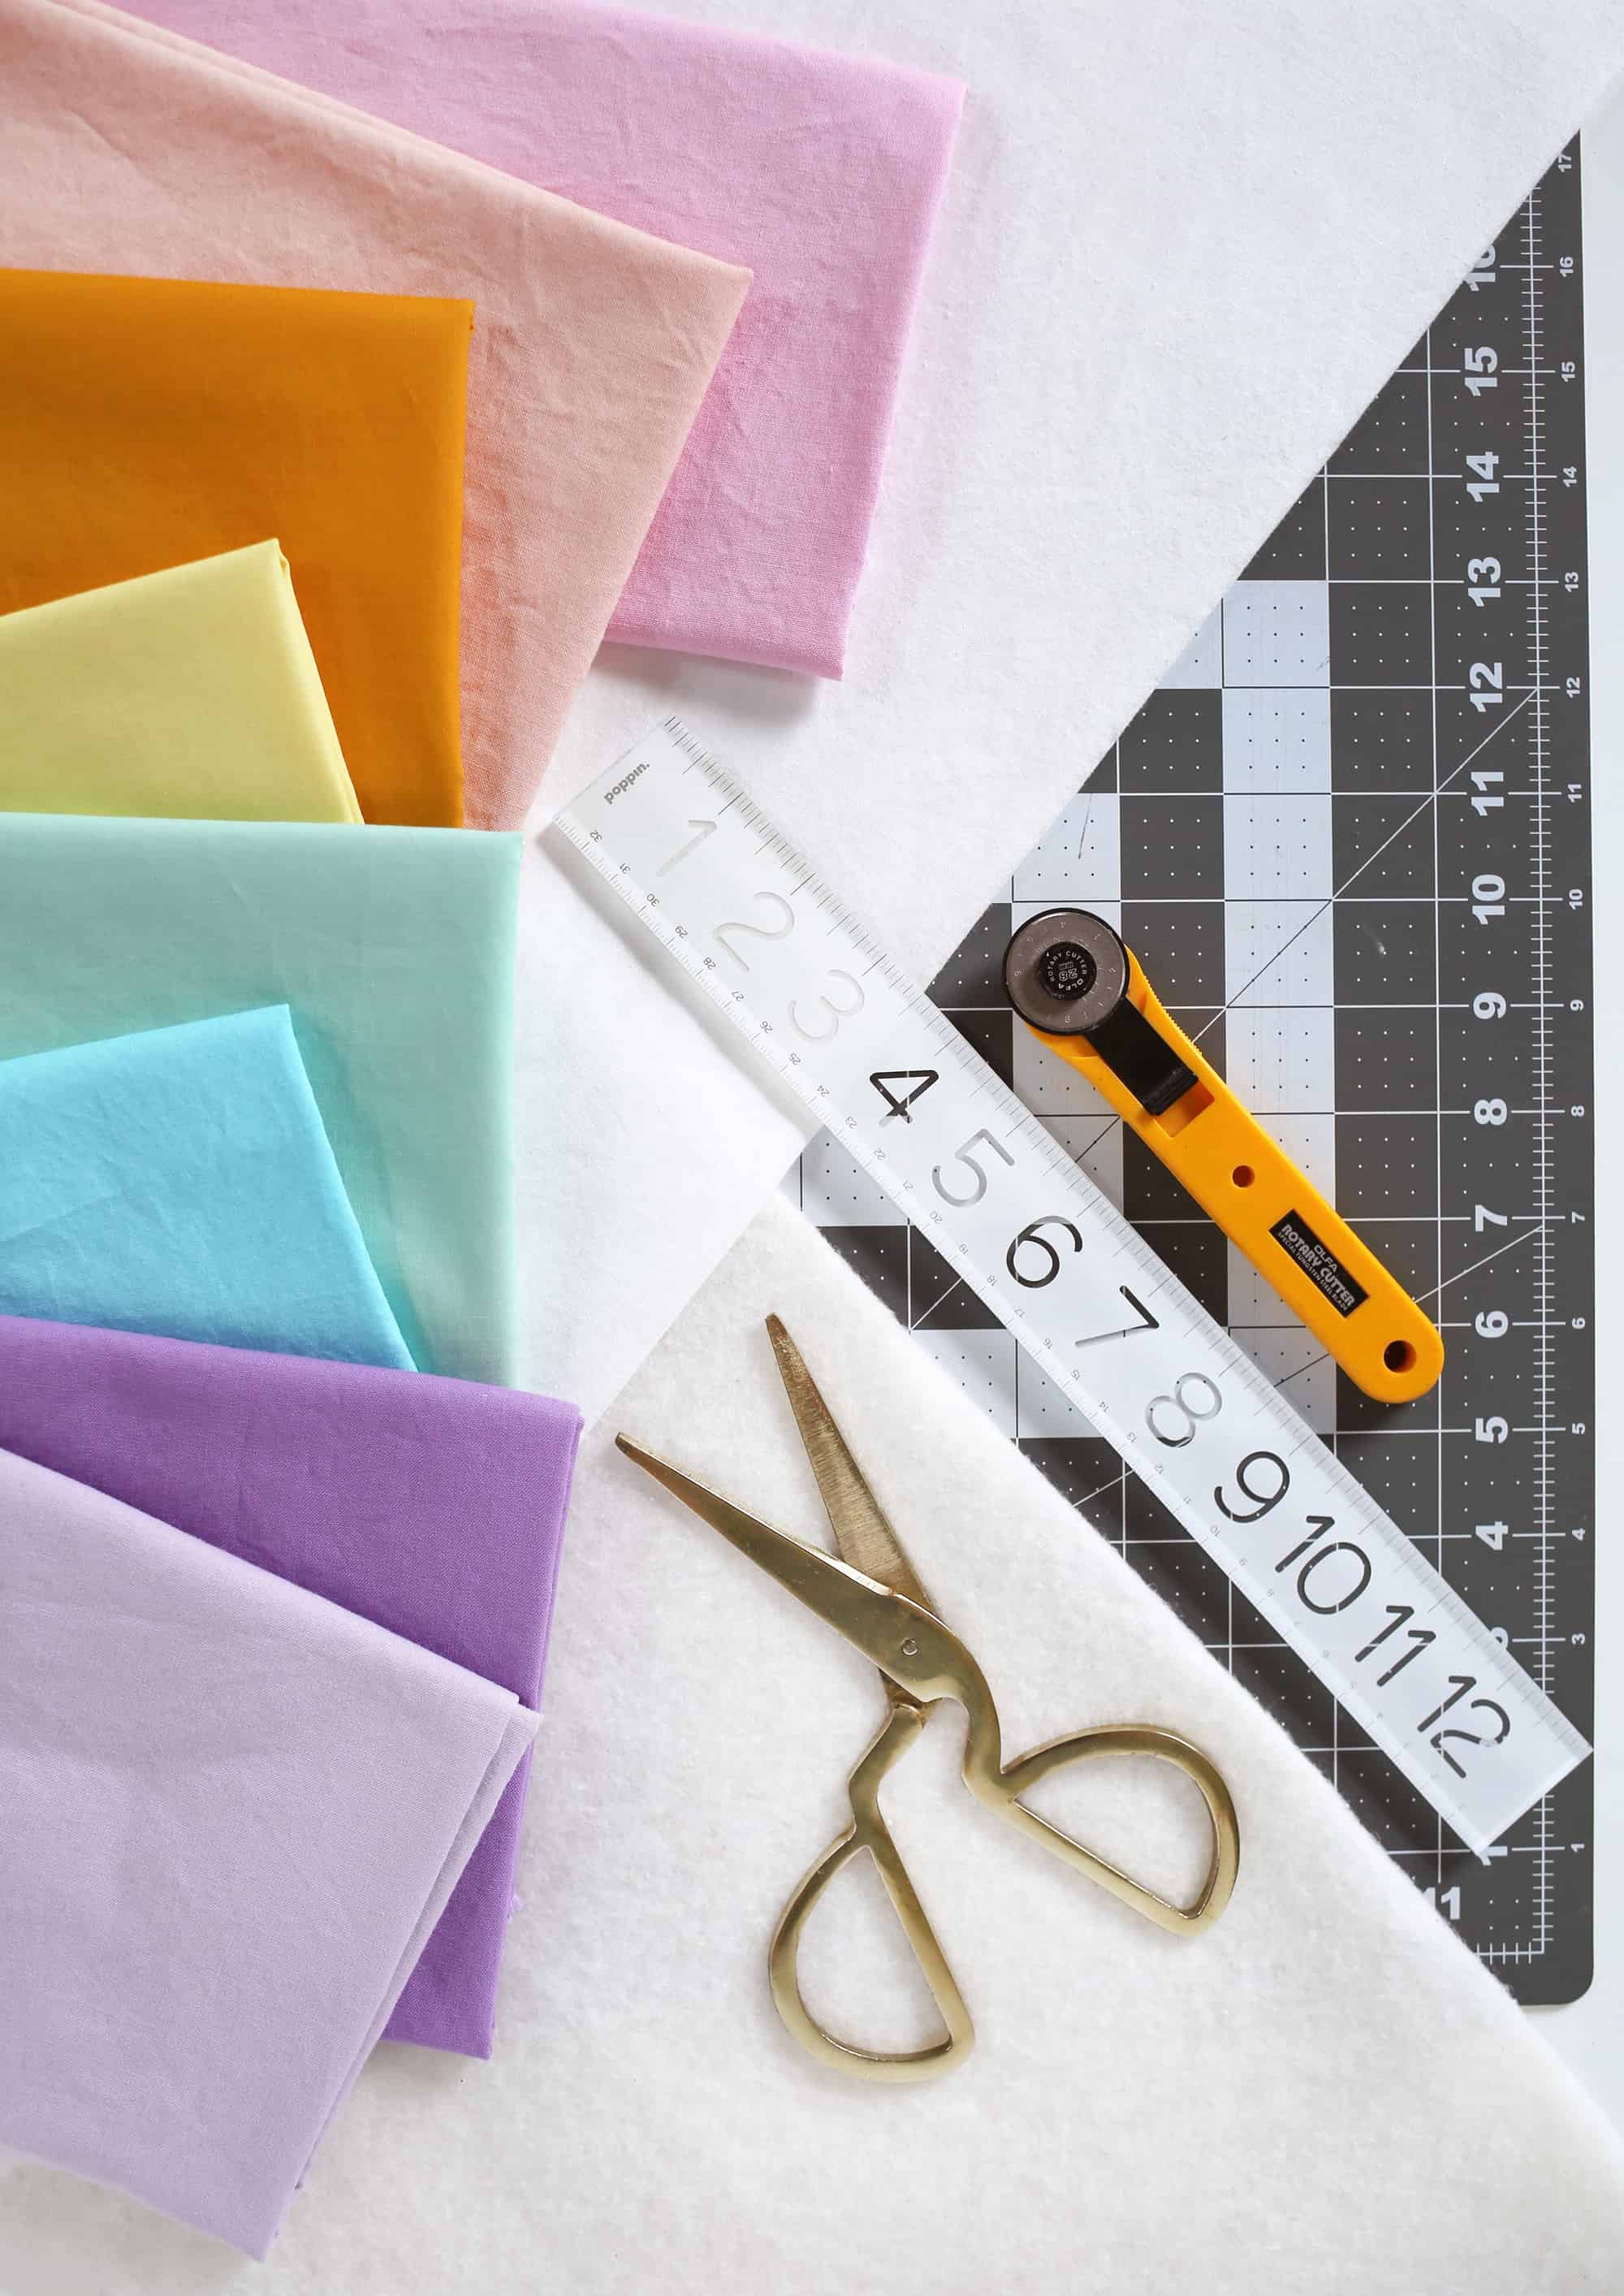
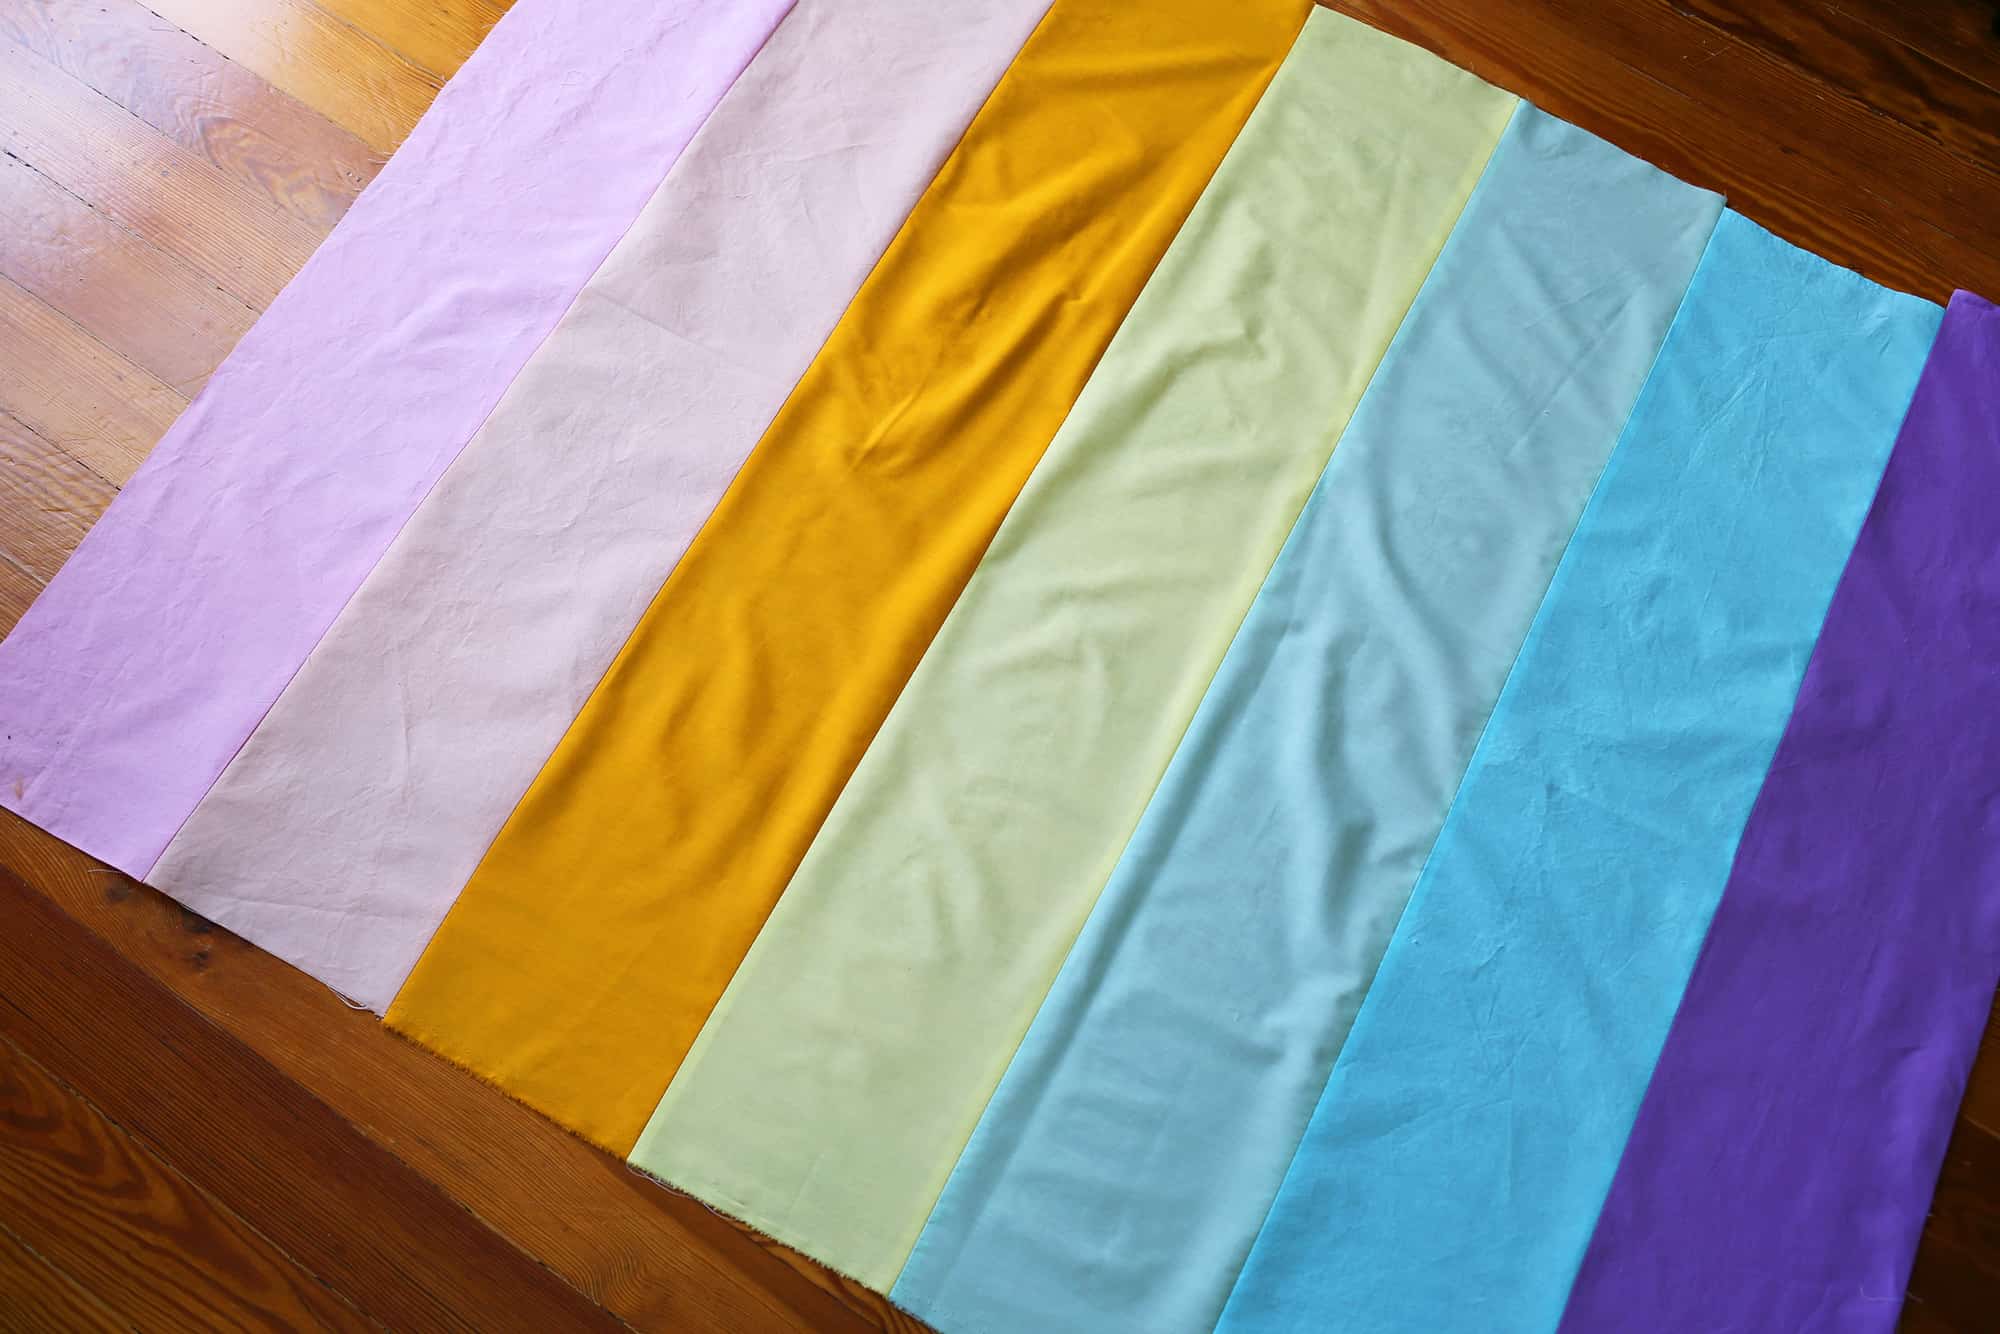
-1/3 yard 100% cotton fabric in 8 different rainbow shades for the smaller rectangles on front and stripes on back
-1 yard 100% cotton fabric in warm white or preferred shade for the larger blocks
–crib quilt batting
–sewing machine
-100% cotton thread
–straight pins
–cutting mat
–rotary cutter (optional but recommended)
–acrylic or metal ruler
–scissors
-iron and ironing board
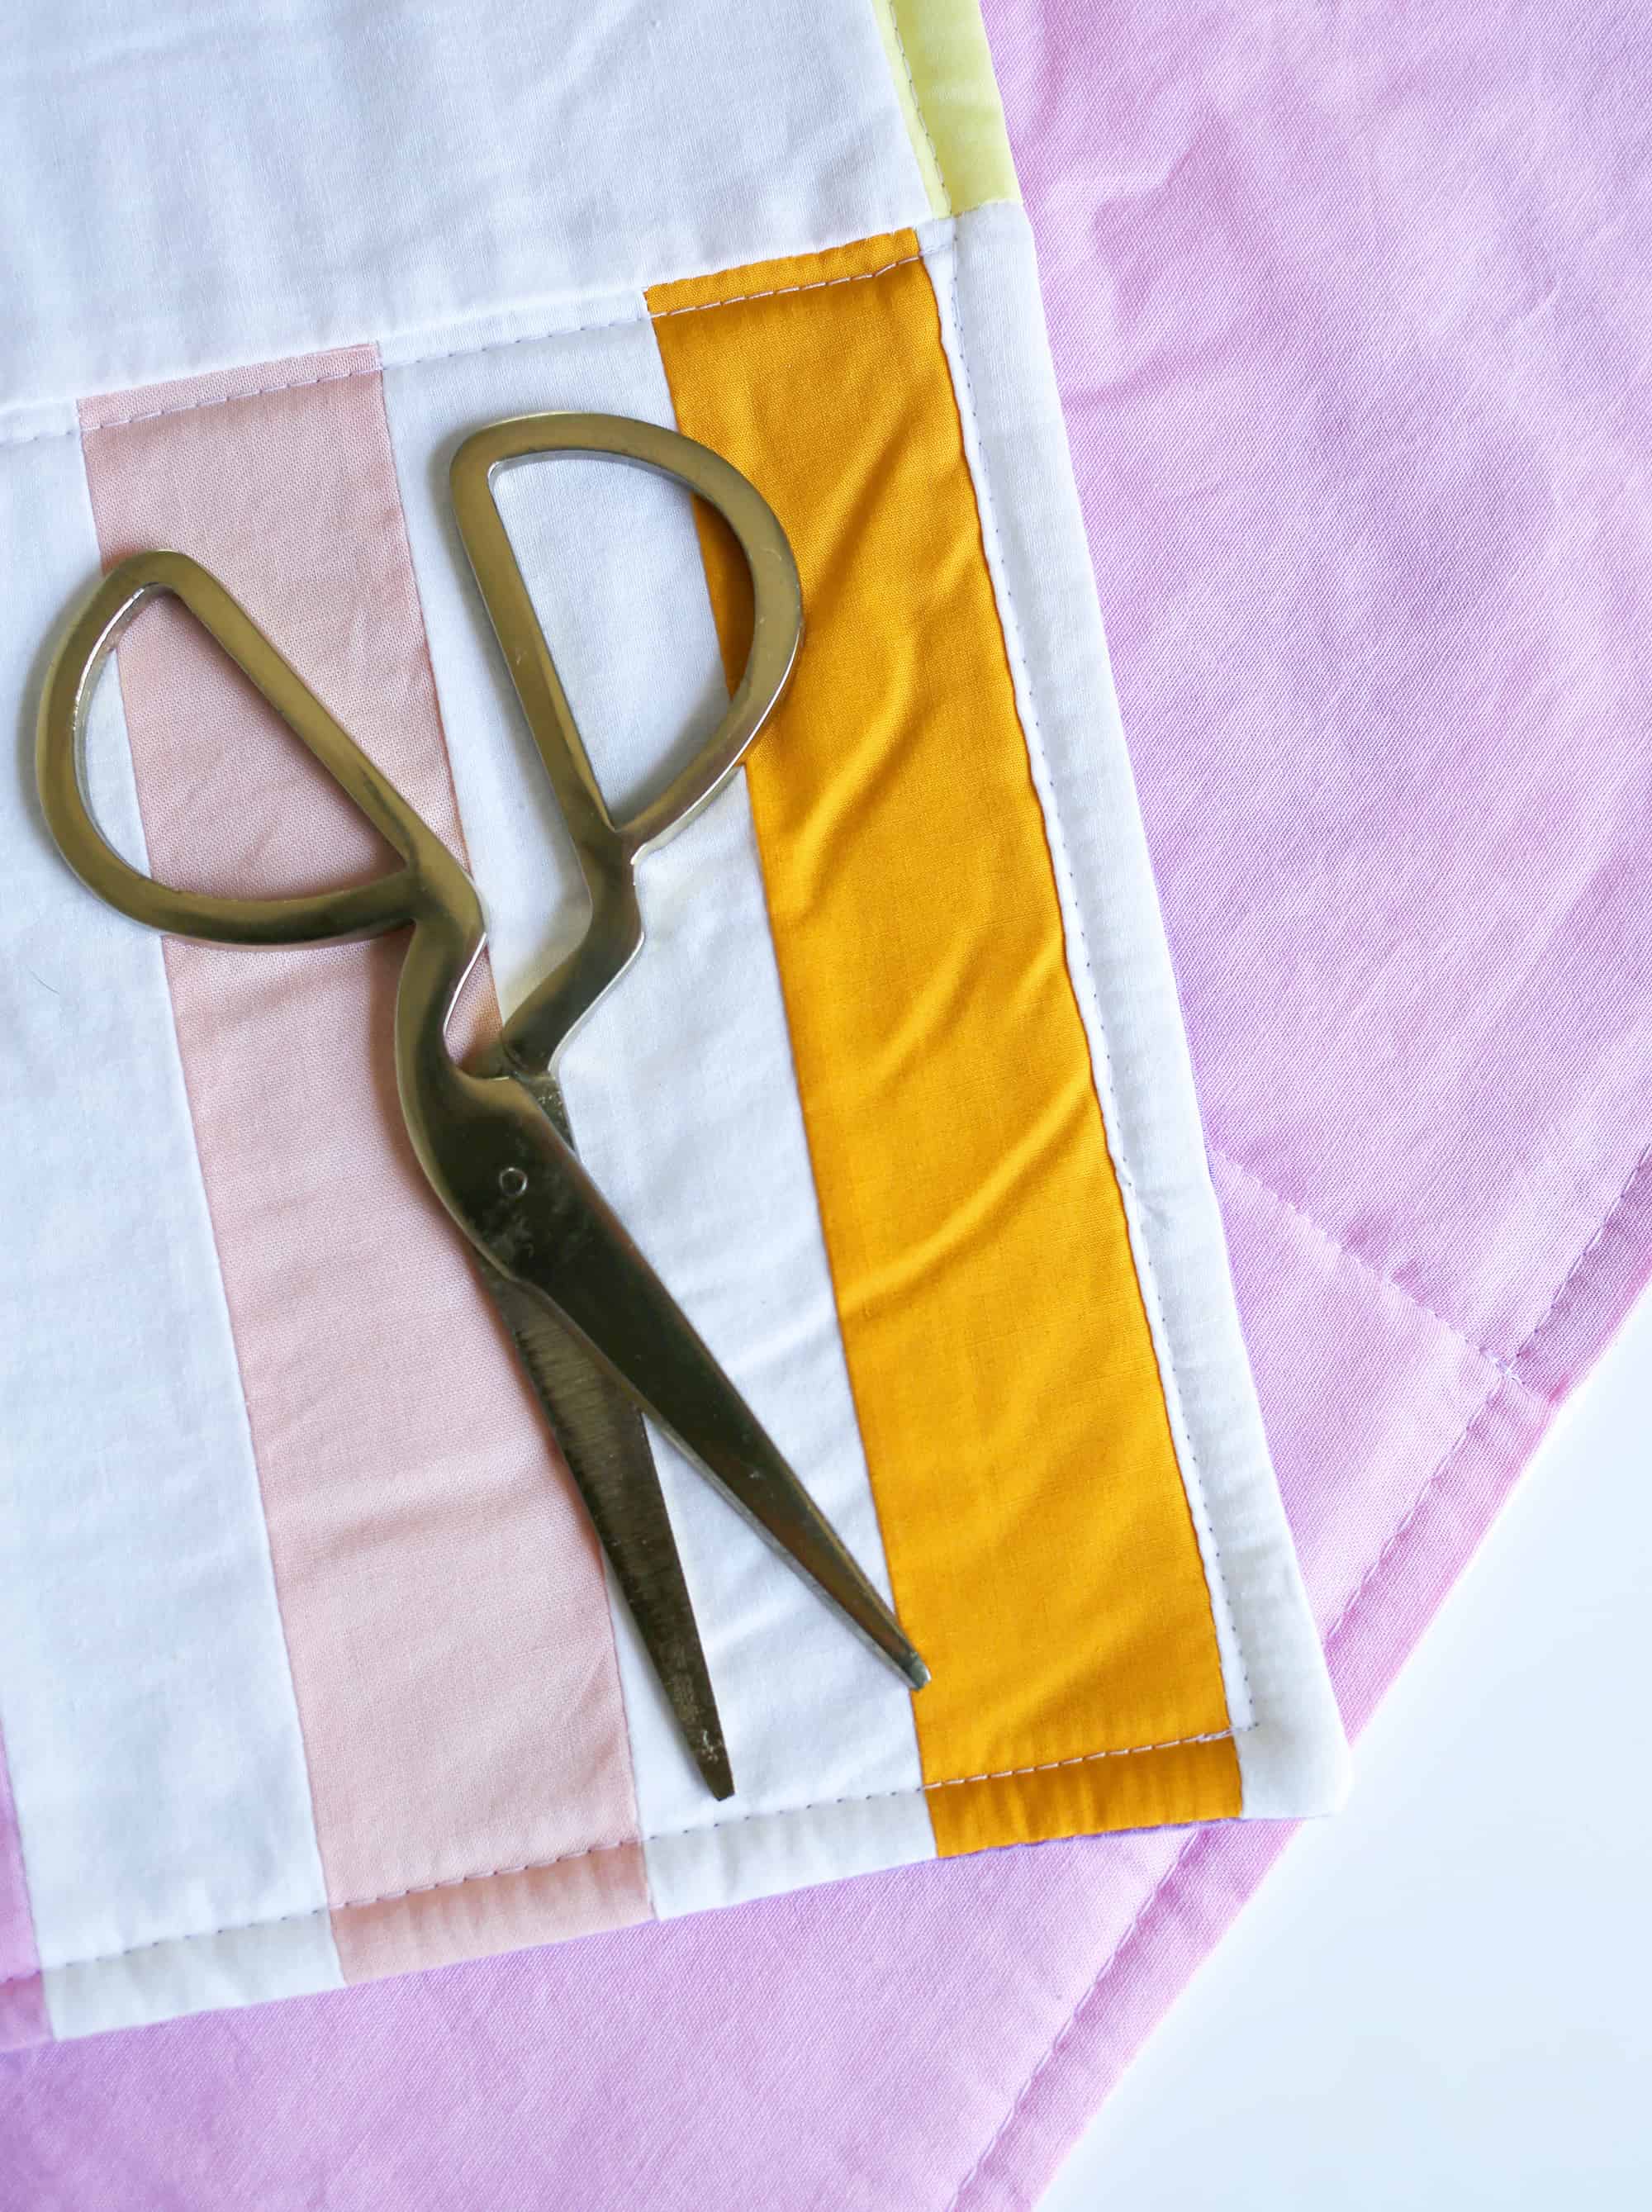
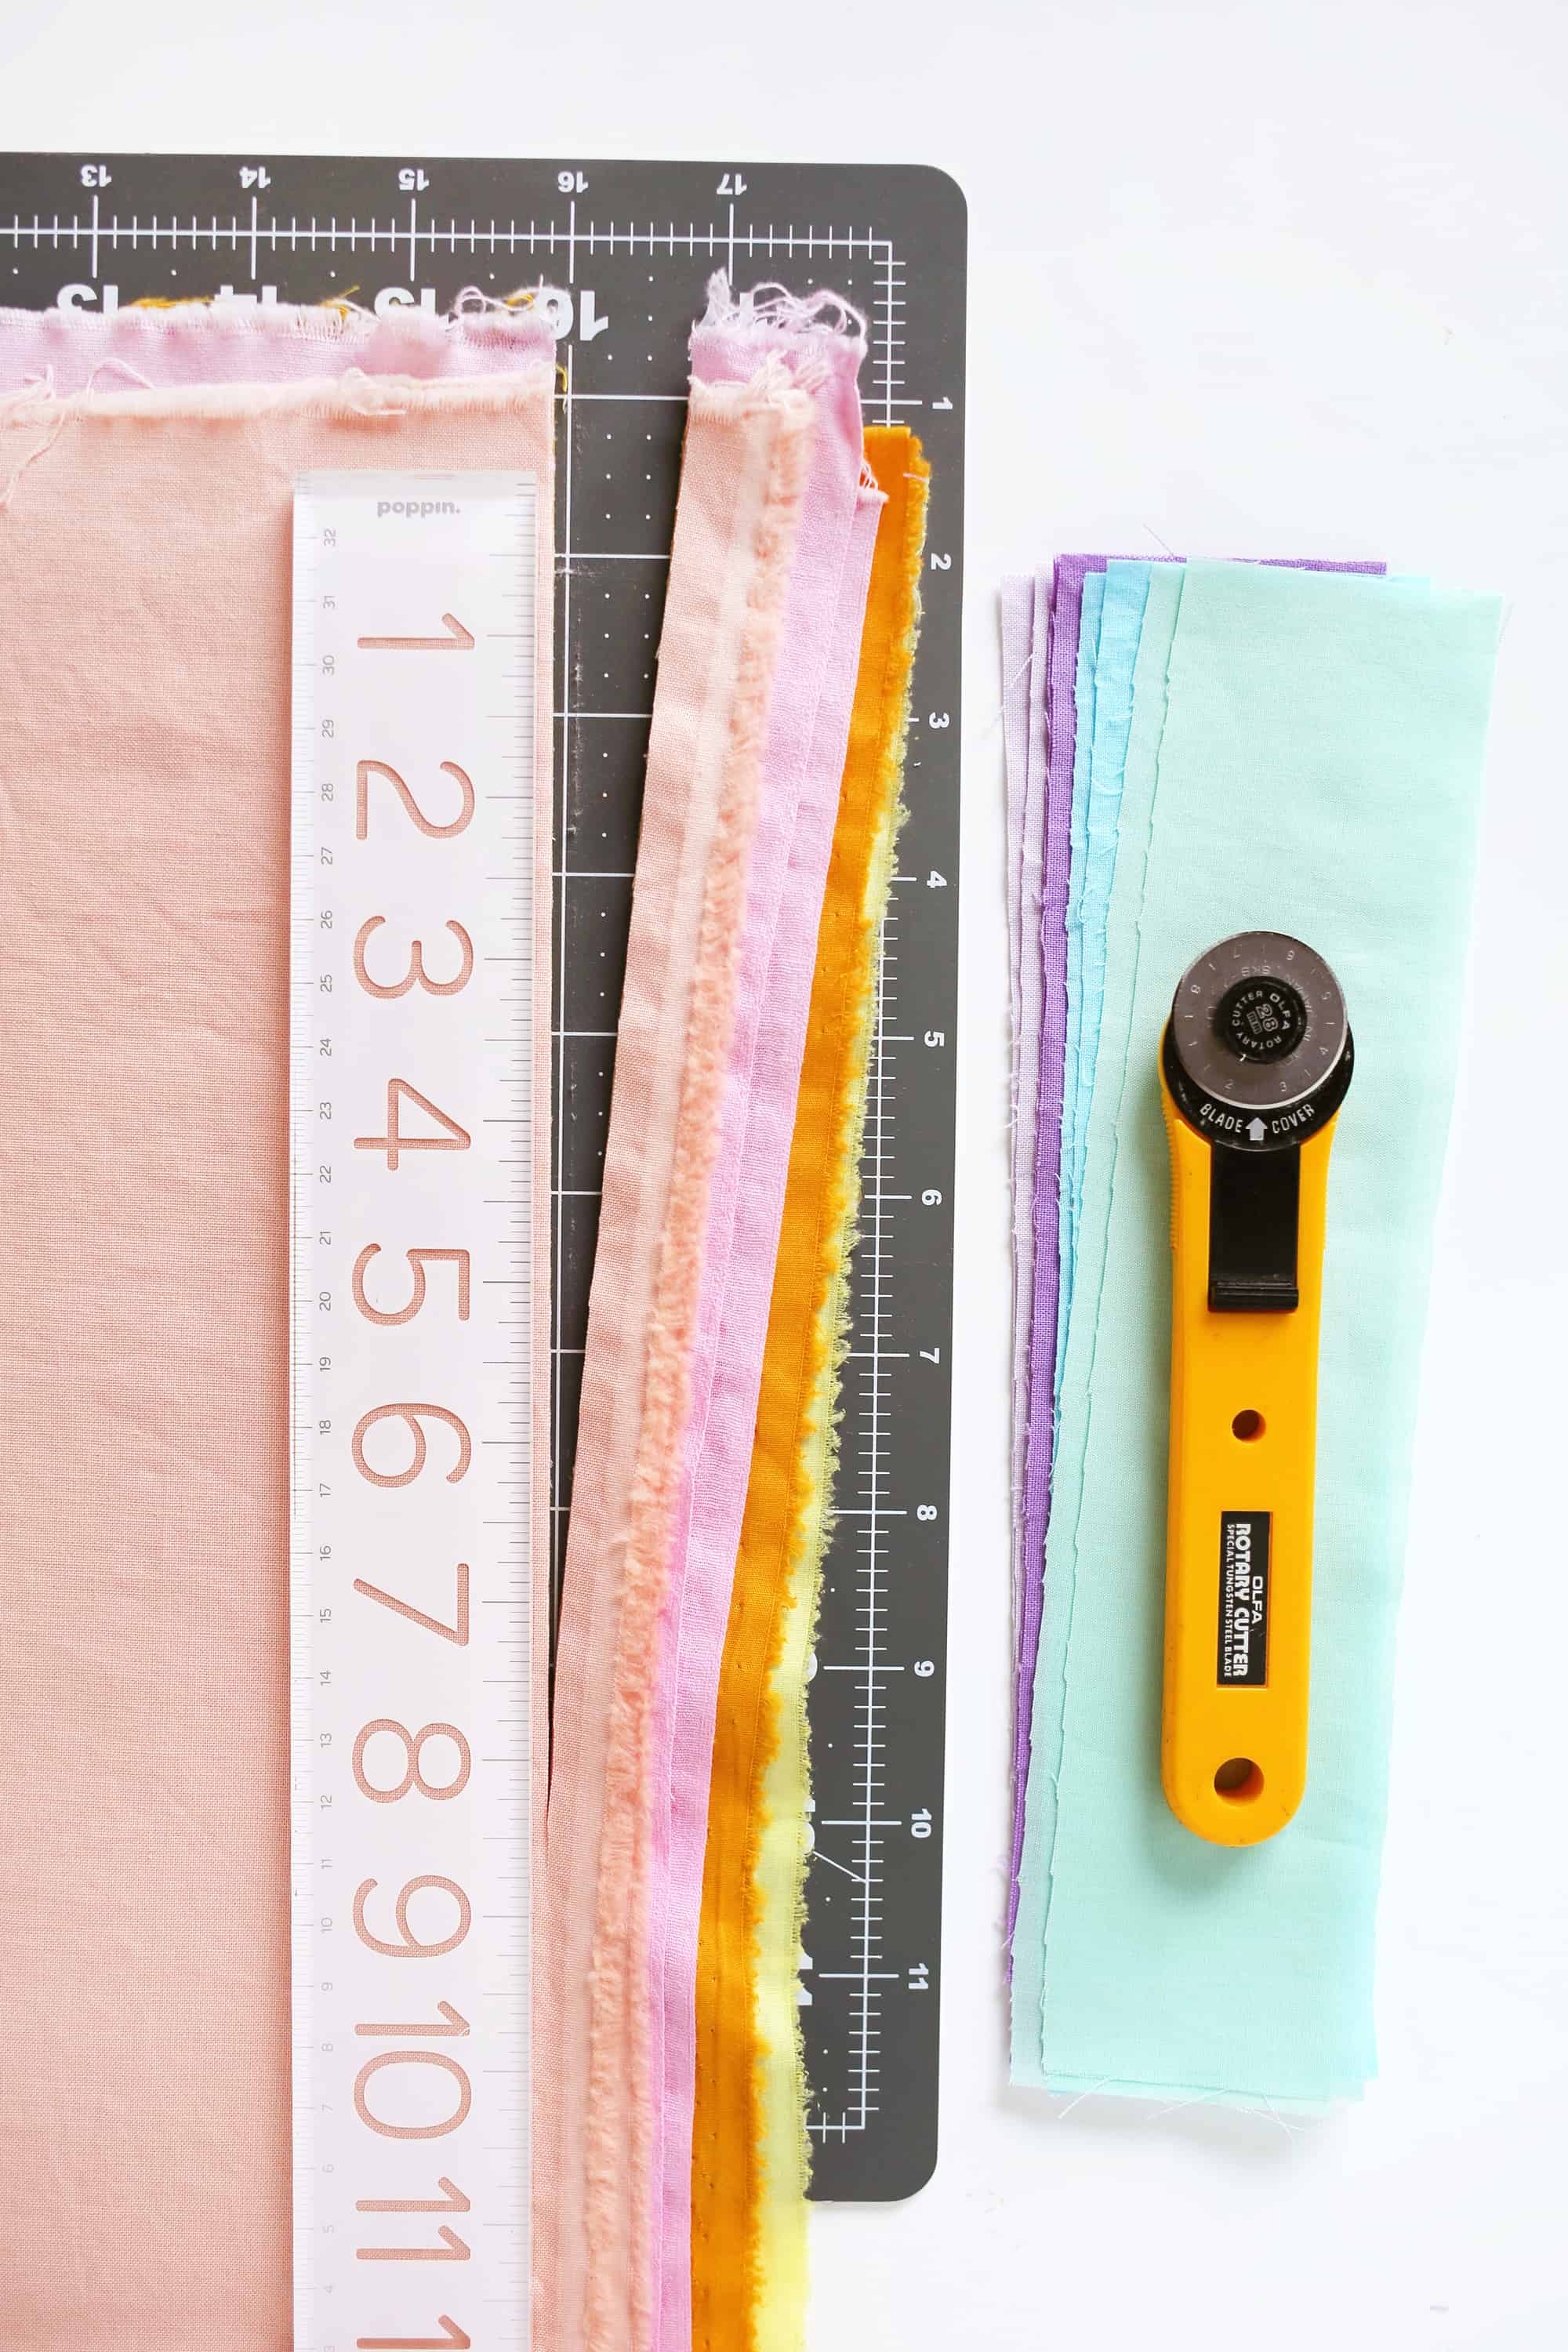 After laundering all of your fabric to preshrink it, use your iron to work out the wrinkles so you can cut the straightest edges possible. Cut off an 8″ x 35″ piece of fabric in each of the solid colors except for your white and set aside. That will be the fabric you’ll use for the back of the quilt. Then cut the rest of your fabric into 2.25″ x 9″ rectangle pieces. You may end up with more than you need, so you can do this a little at a time or all at once depending on your color selection.
To get an idea of your design, I suggest laying your solid color rectangles in four columns on your work surface and playing with the arrangement of colors and groupings of striped areas. You’ll want a few solid white blocks scattered to break up the space in each of the four columns. Cut as many 2.25″ x 9″ white rectangles as you need to go in between your solid color rectangles. Then measure the lengths between your big gaps where you want your larger white blocks to go and add .5″ to that measurement. These will all be 9″ wide. So, if you measure a gap that is 6″ long, you’ll want to add .5″ to that for a measurement that will be 6.5″ x 9″. Once you’ve cut your various white rectangles, you’re ready to start pinning your columns together.
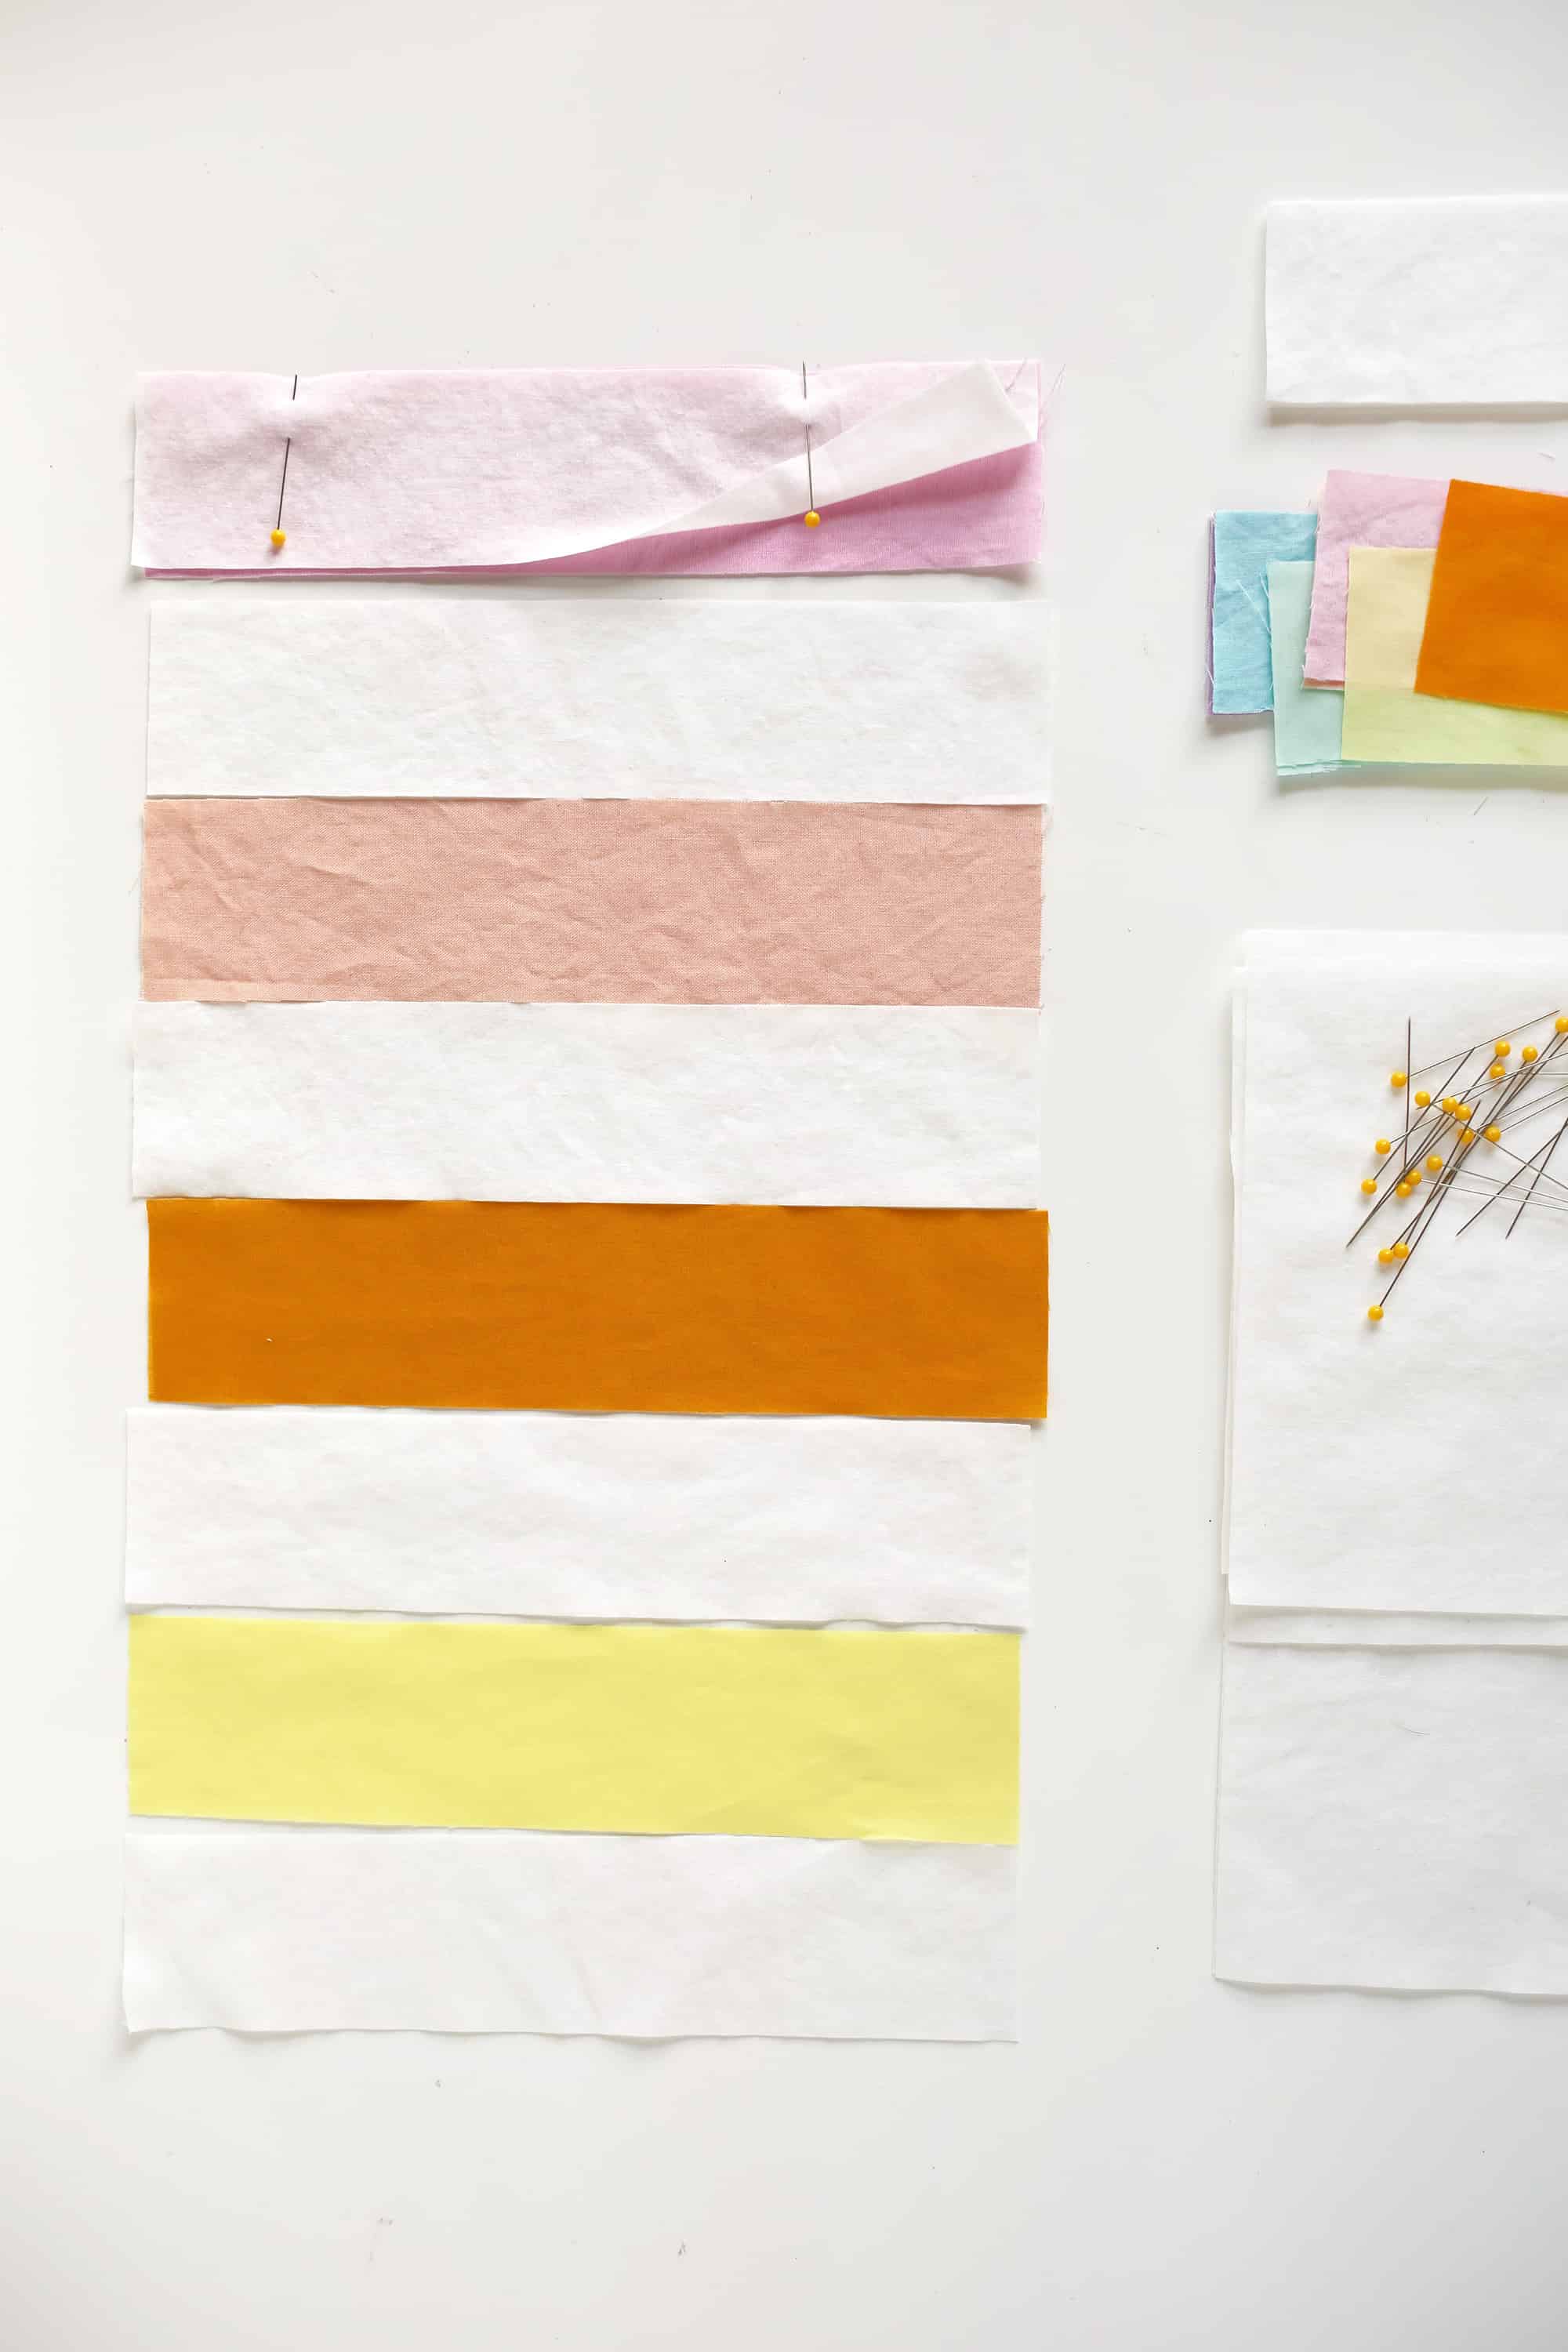 When working with solids, there’s not always an obvious right side and a wrong side to the fabric. If you were working with prints, you’d place the top rectangle onto the rectangle below it with the right sides facing each other and pin them together on the long side where they were touching. It’s the same idea for solids.
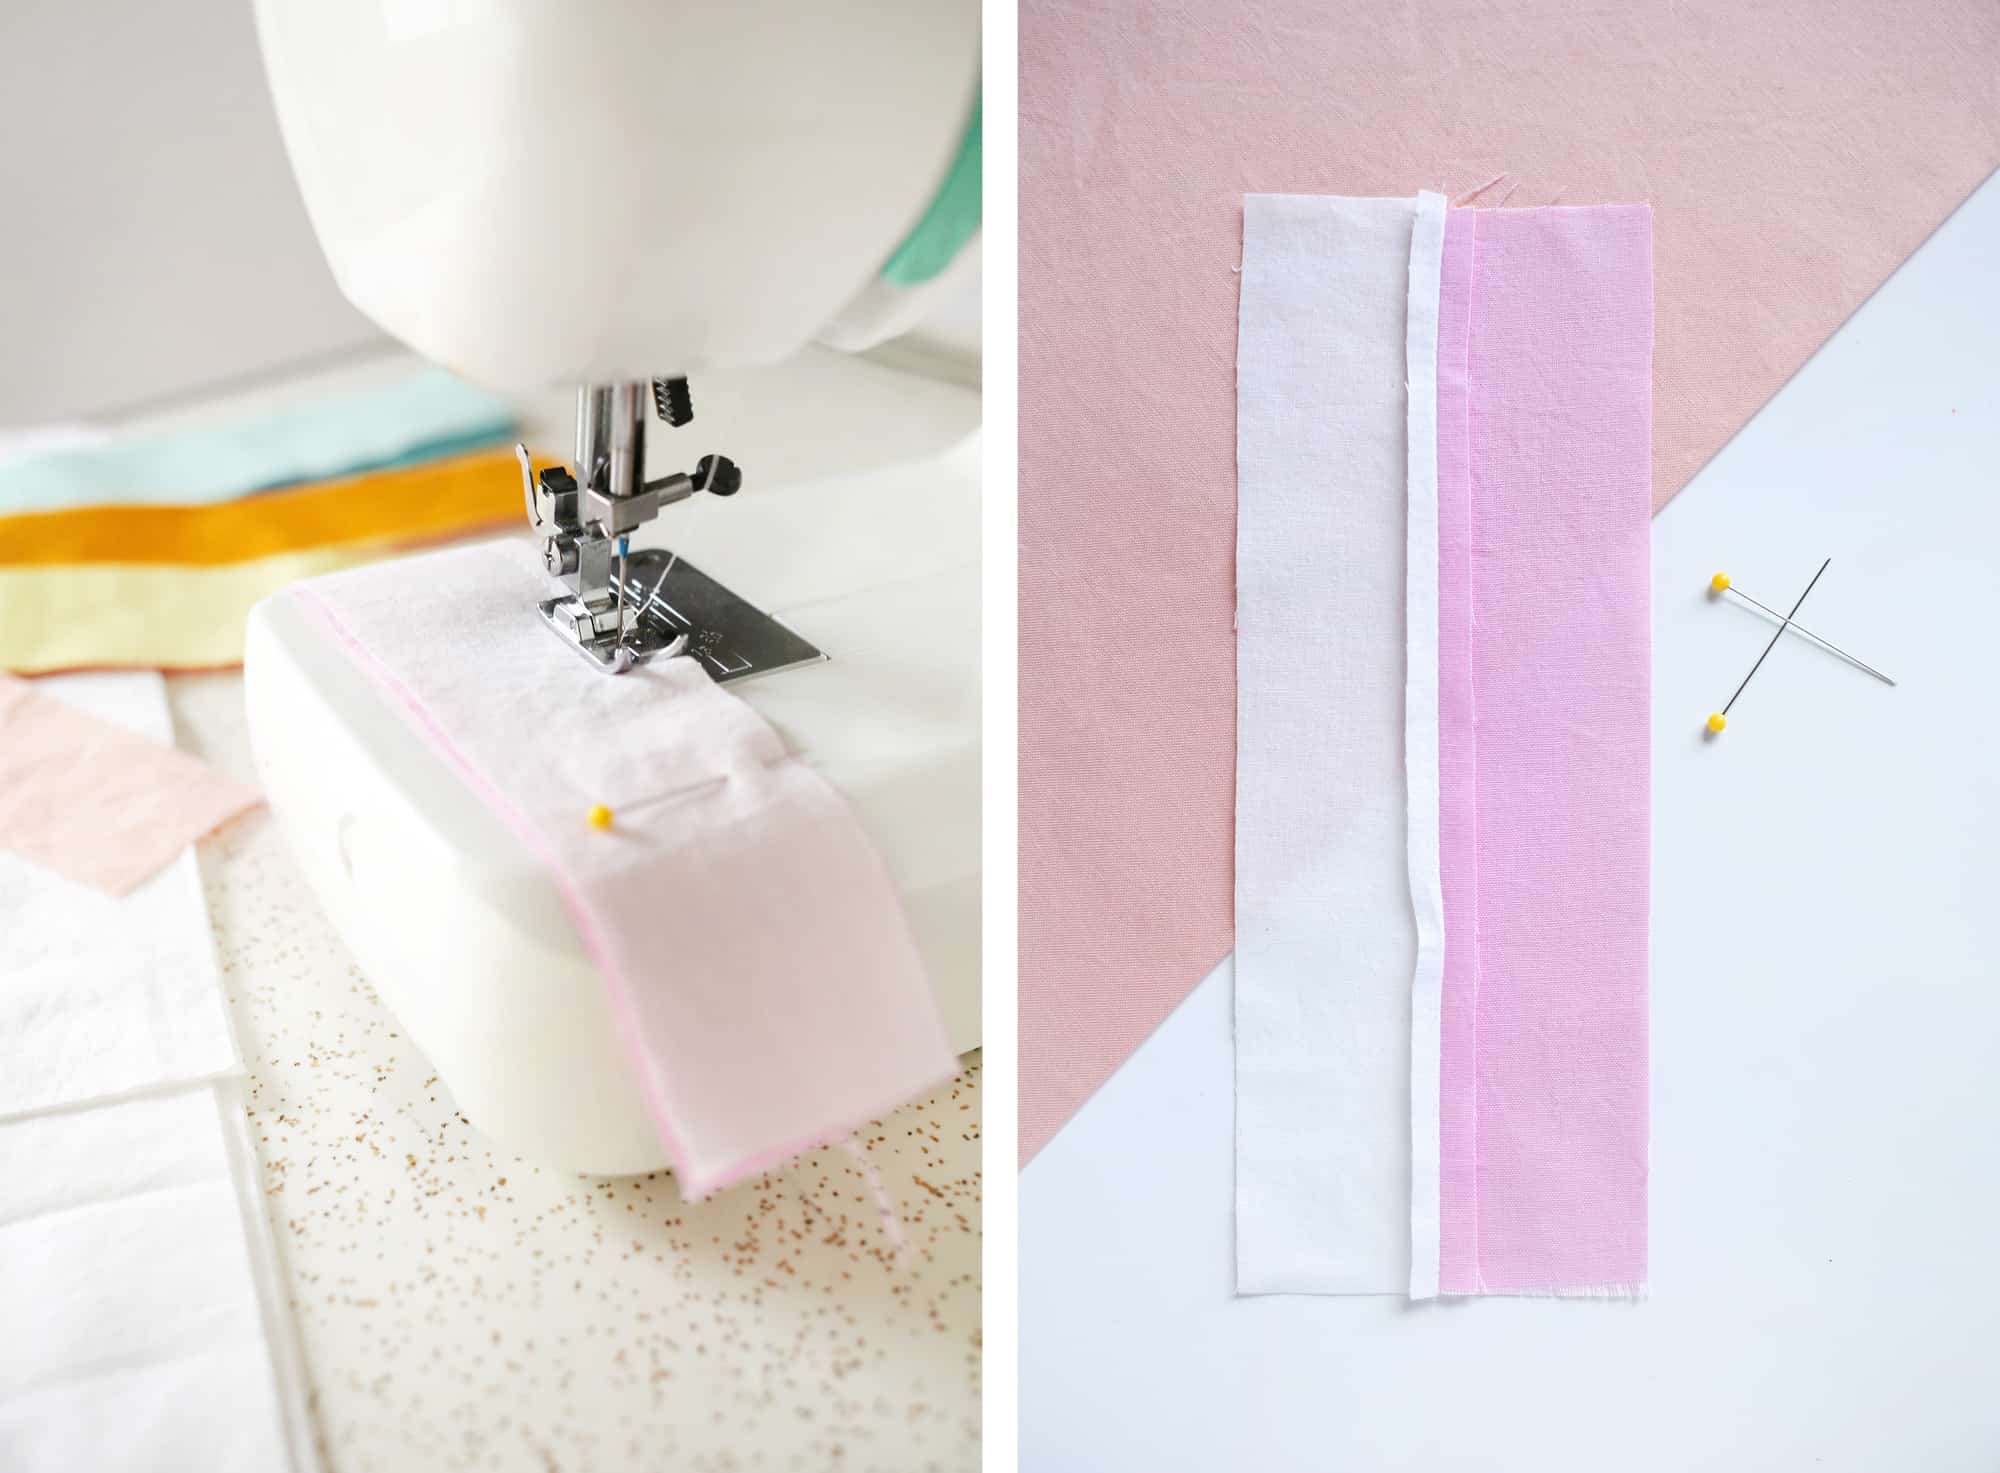 Stitch along the pinned edge so that you are stitching in 1/4″ from the edge. Backstitch at the beginning and end of your seam to secure things, and then trim your thread. Unpin. Fold your fabric open so that the extra edge is facing you and iron it down flat for a cleaner finish when you are quilting things together down the road.
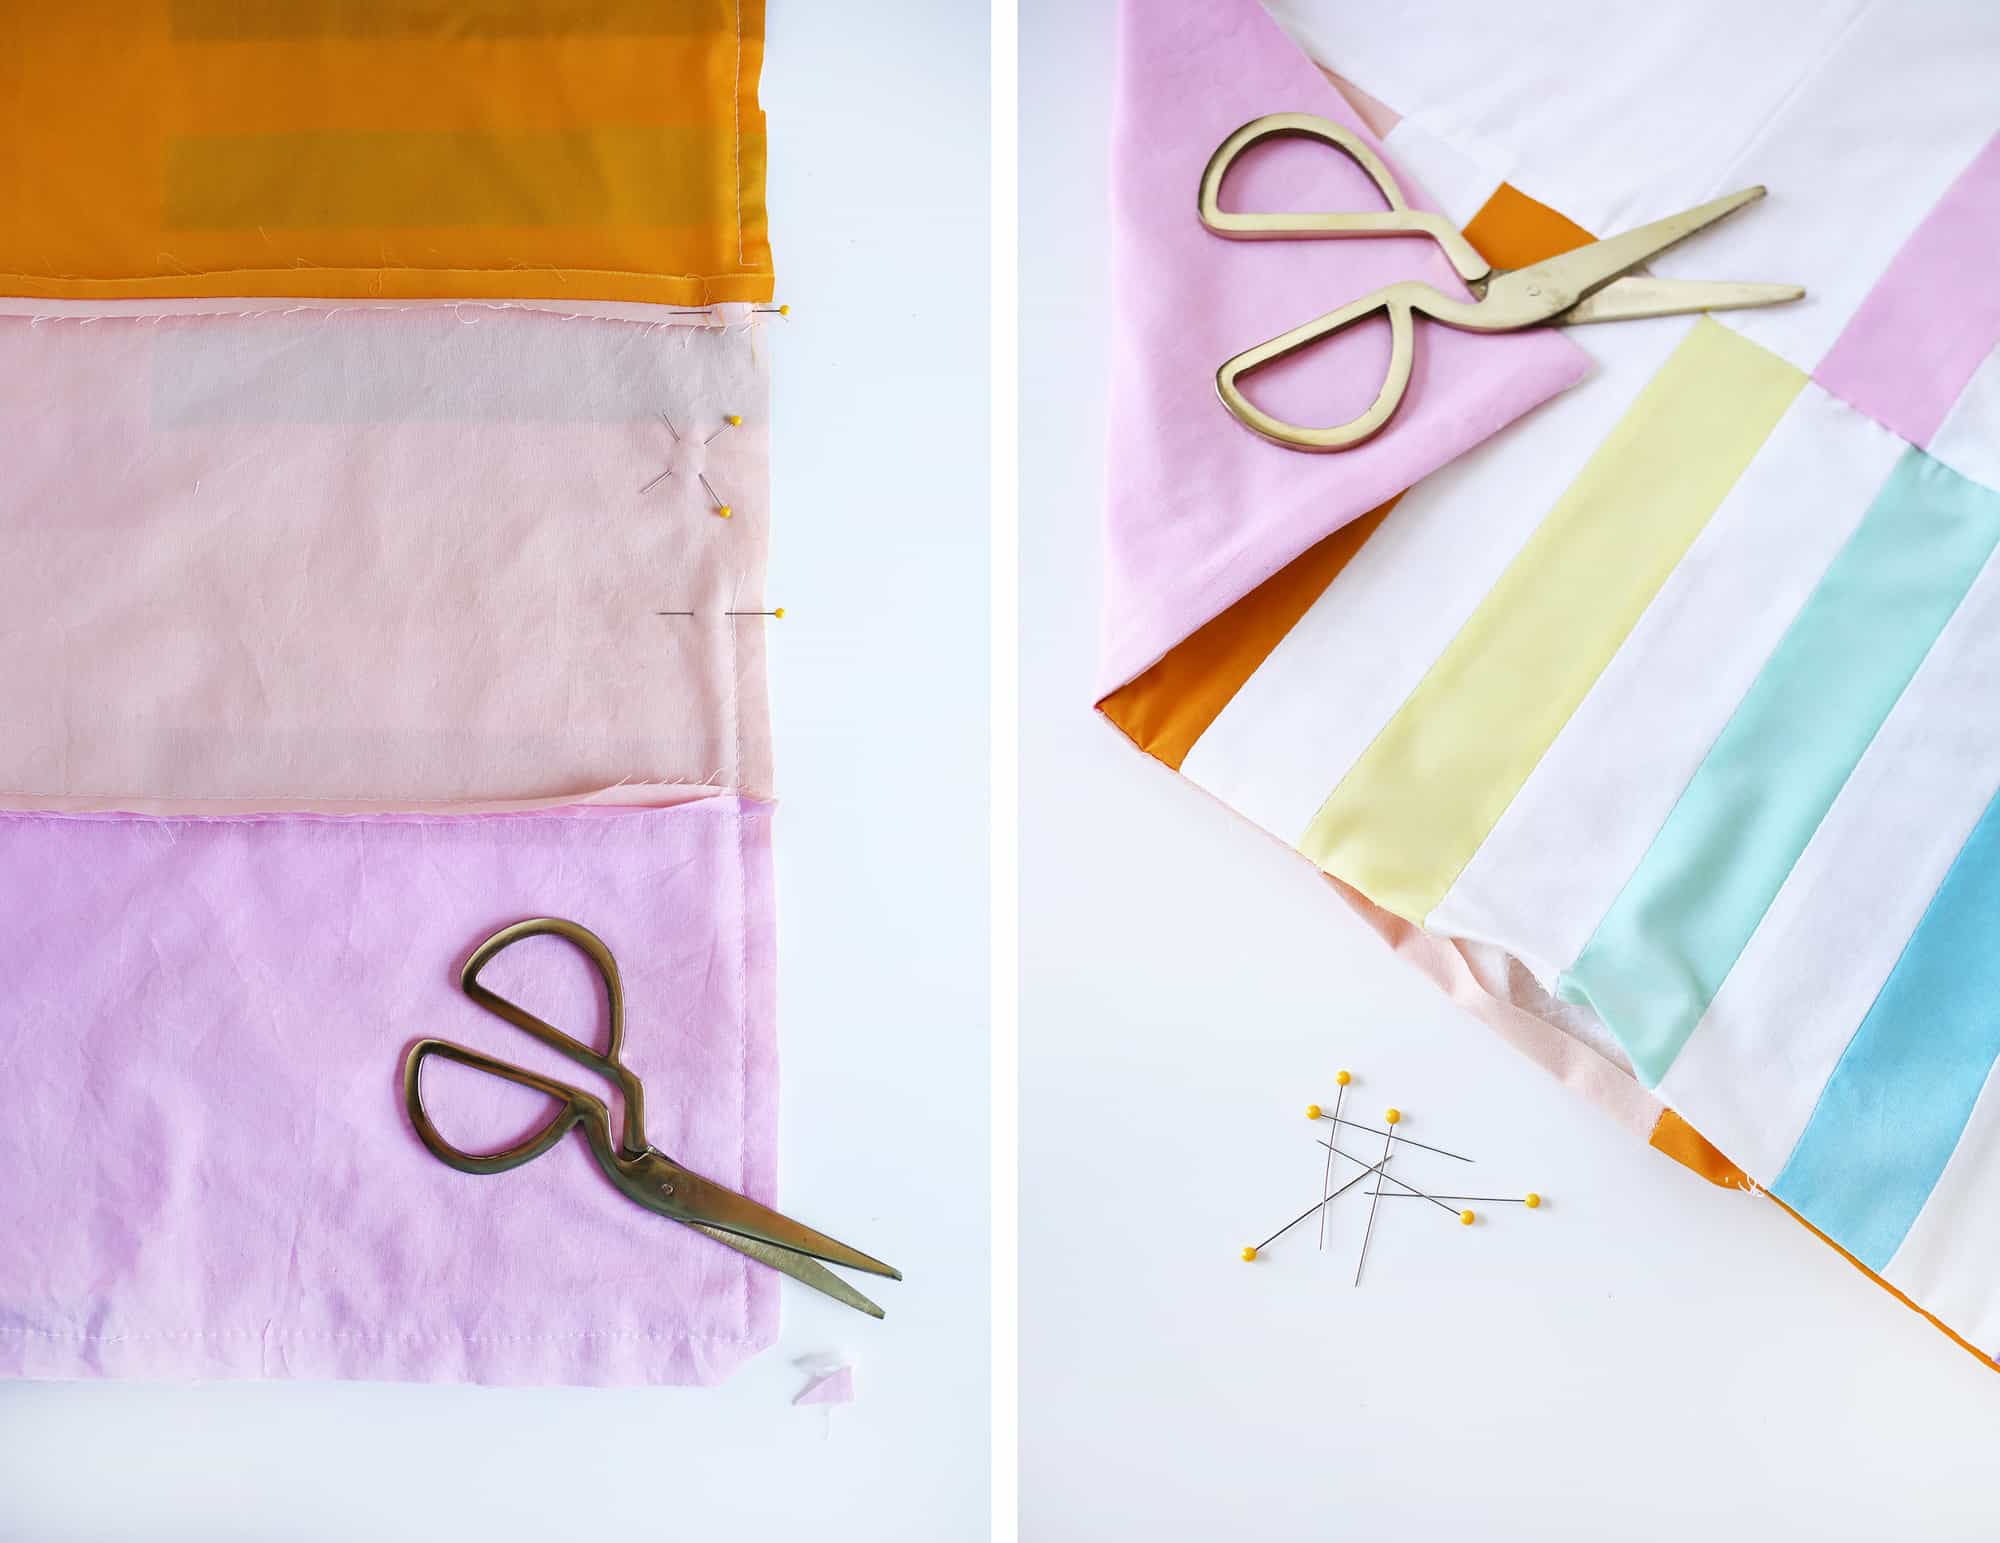
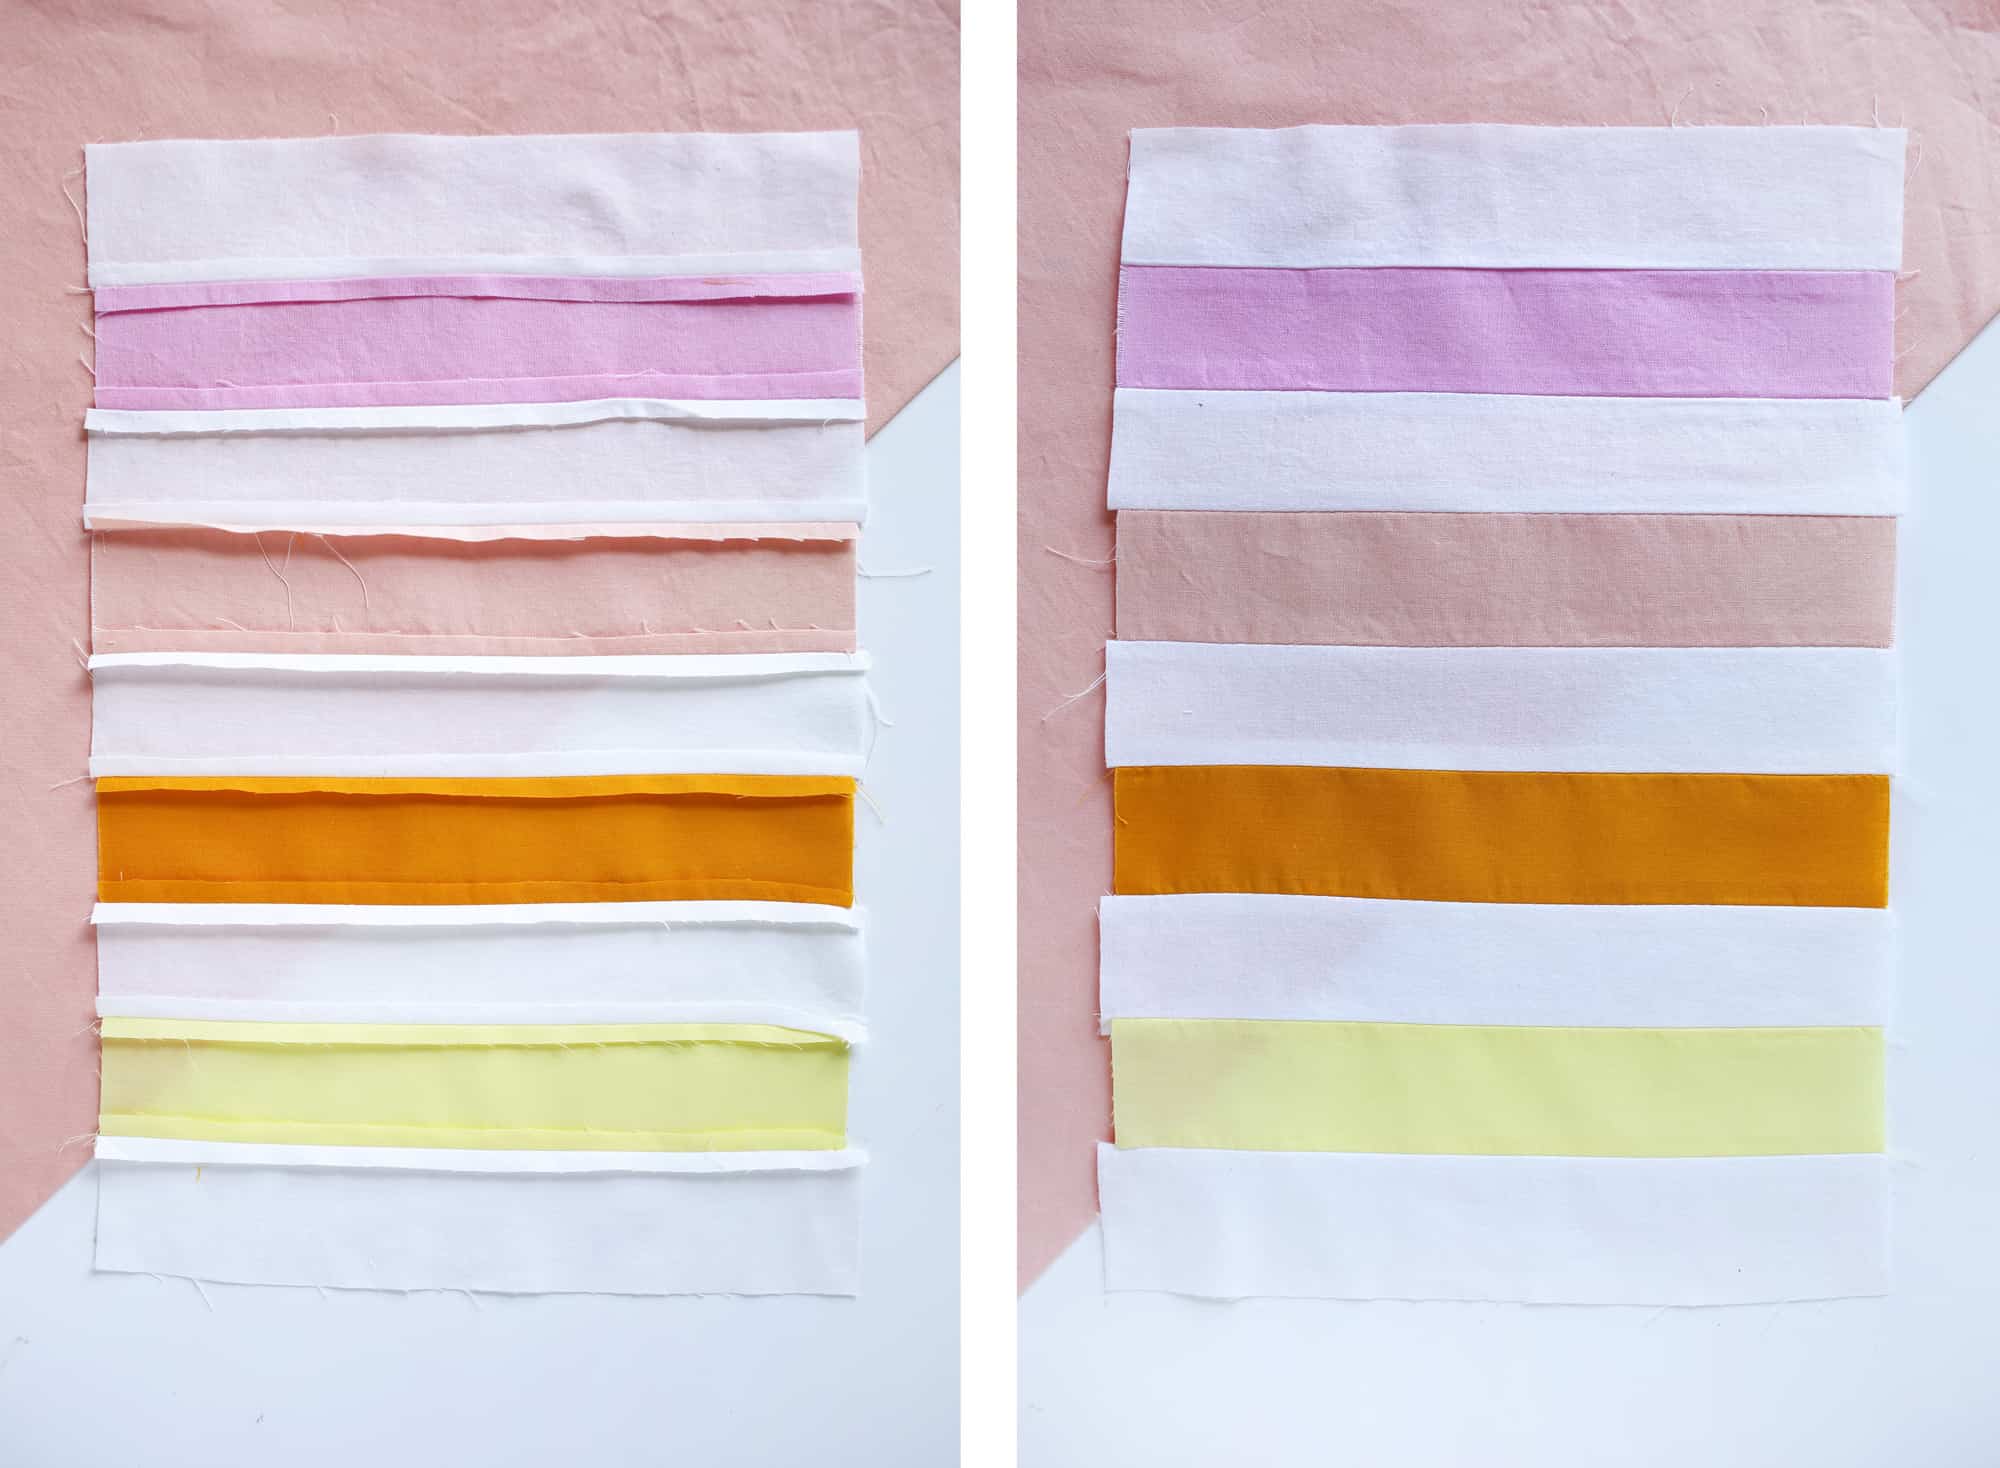 Continue stitching your long edges together in the same order you had them arranged. Iron the seams open and flat on the wrong side. Then flip your column over and iron it flat on the right side. Do this until you’ve finished sewing each column.
 You shouldn’t have too much overhang on your edges, but this is a good time to trim things up so you have straight edges. Use your acrylic ruler and rotary cutter or a pair of sharp scissors.
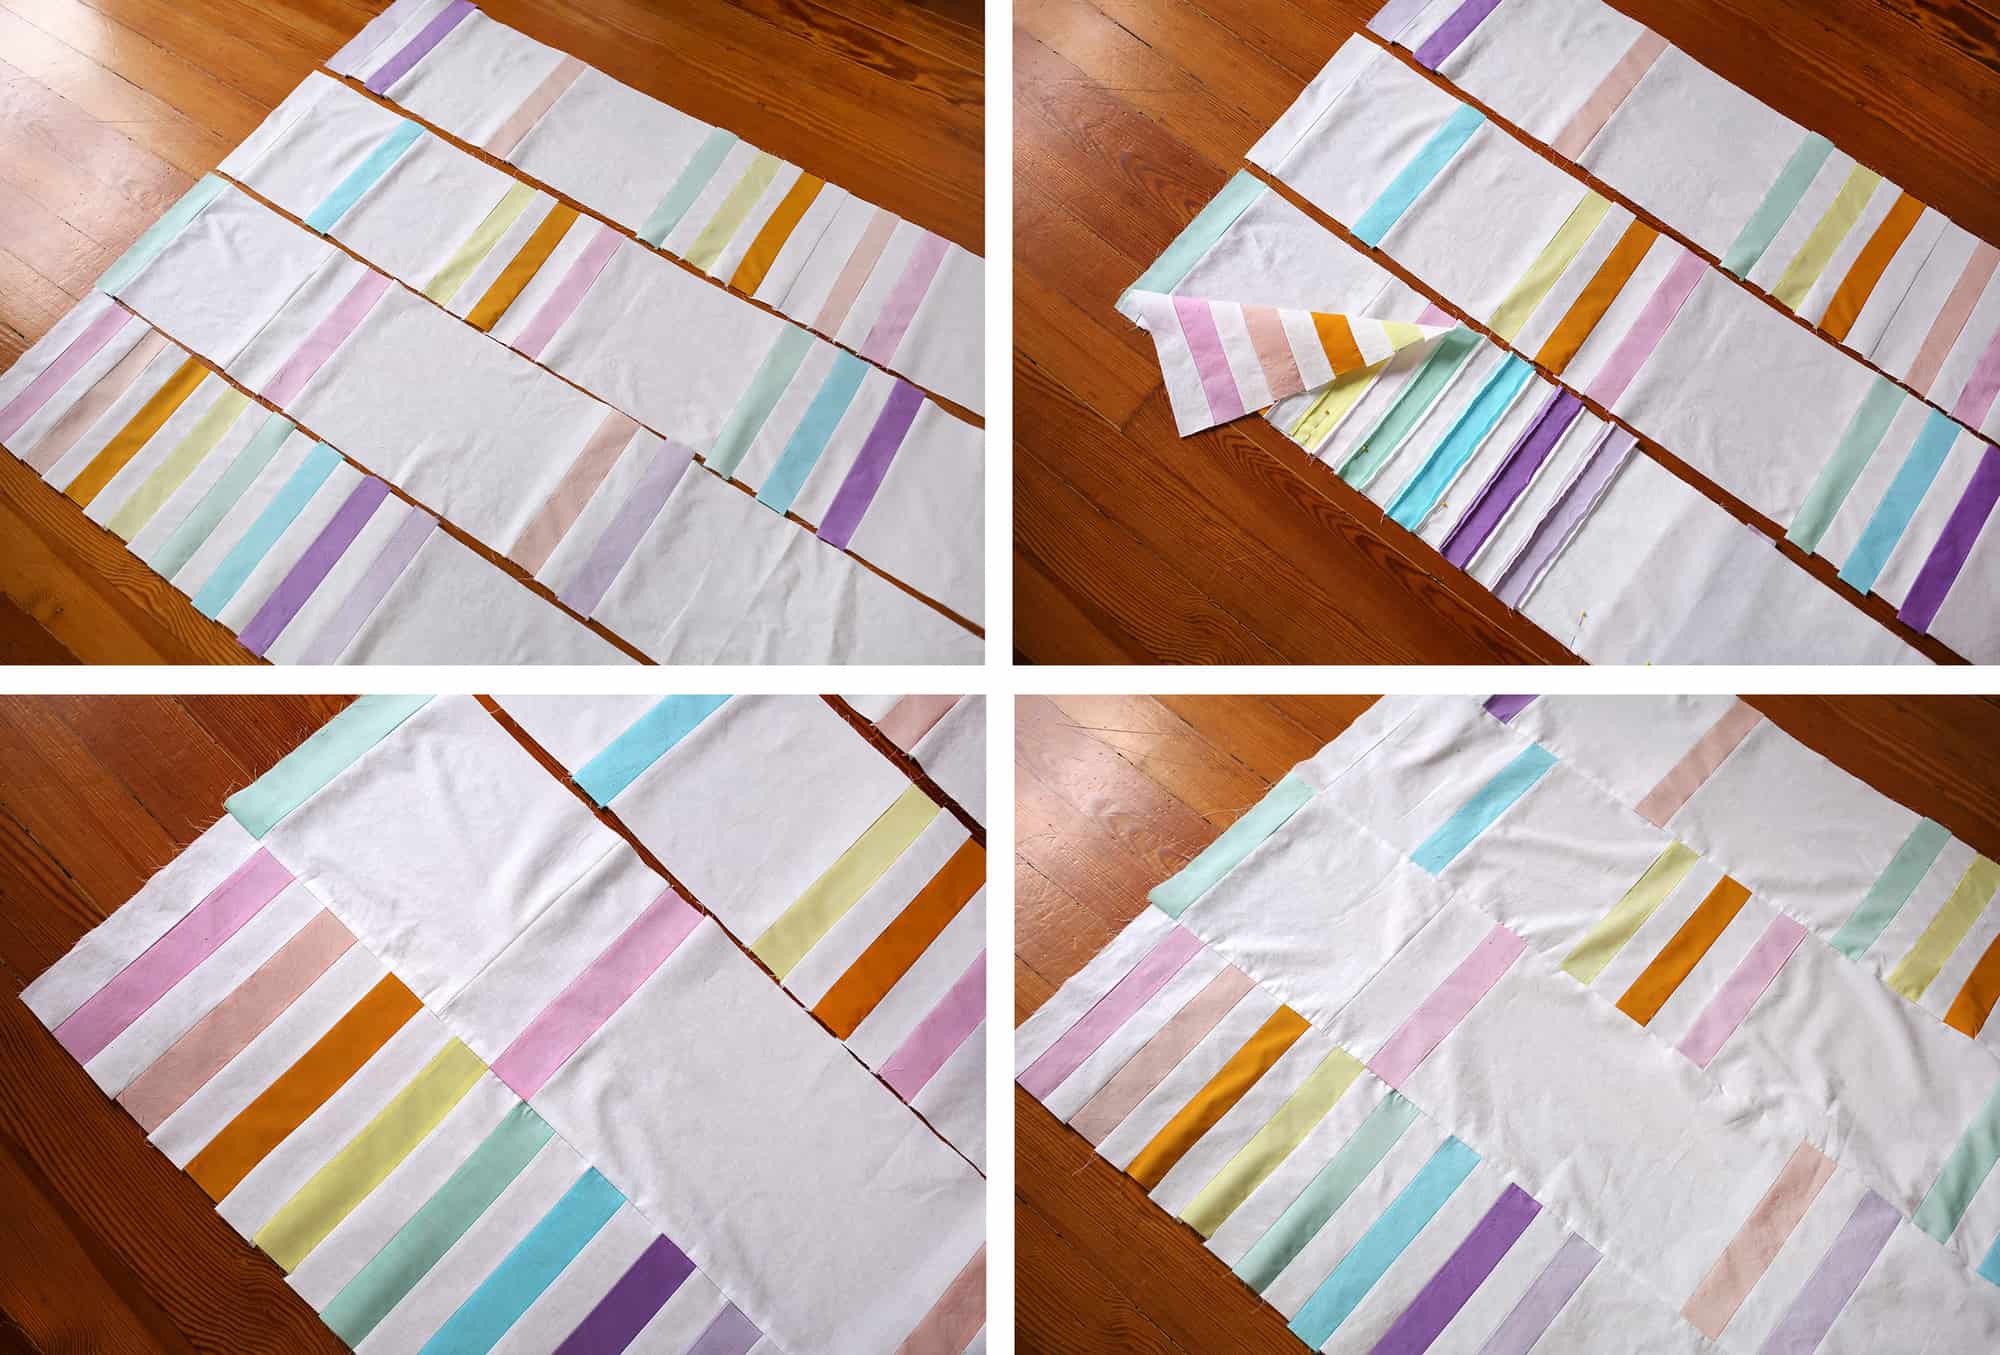 Lay your columns out side-by-side to make sure everything is lining up as you’d like it. Then fold the first column onto the second column so that the right sides are facing each other and the long edges where they were touching are flush and even with each other. Pin along that long edge where they were touching (when they were side-by-side) every 5″ inches with straight pins. Feel familiar?
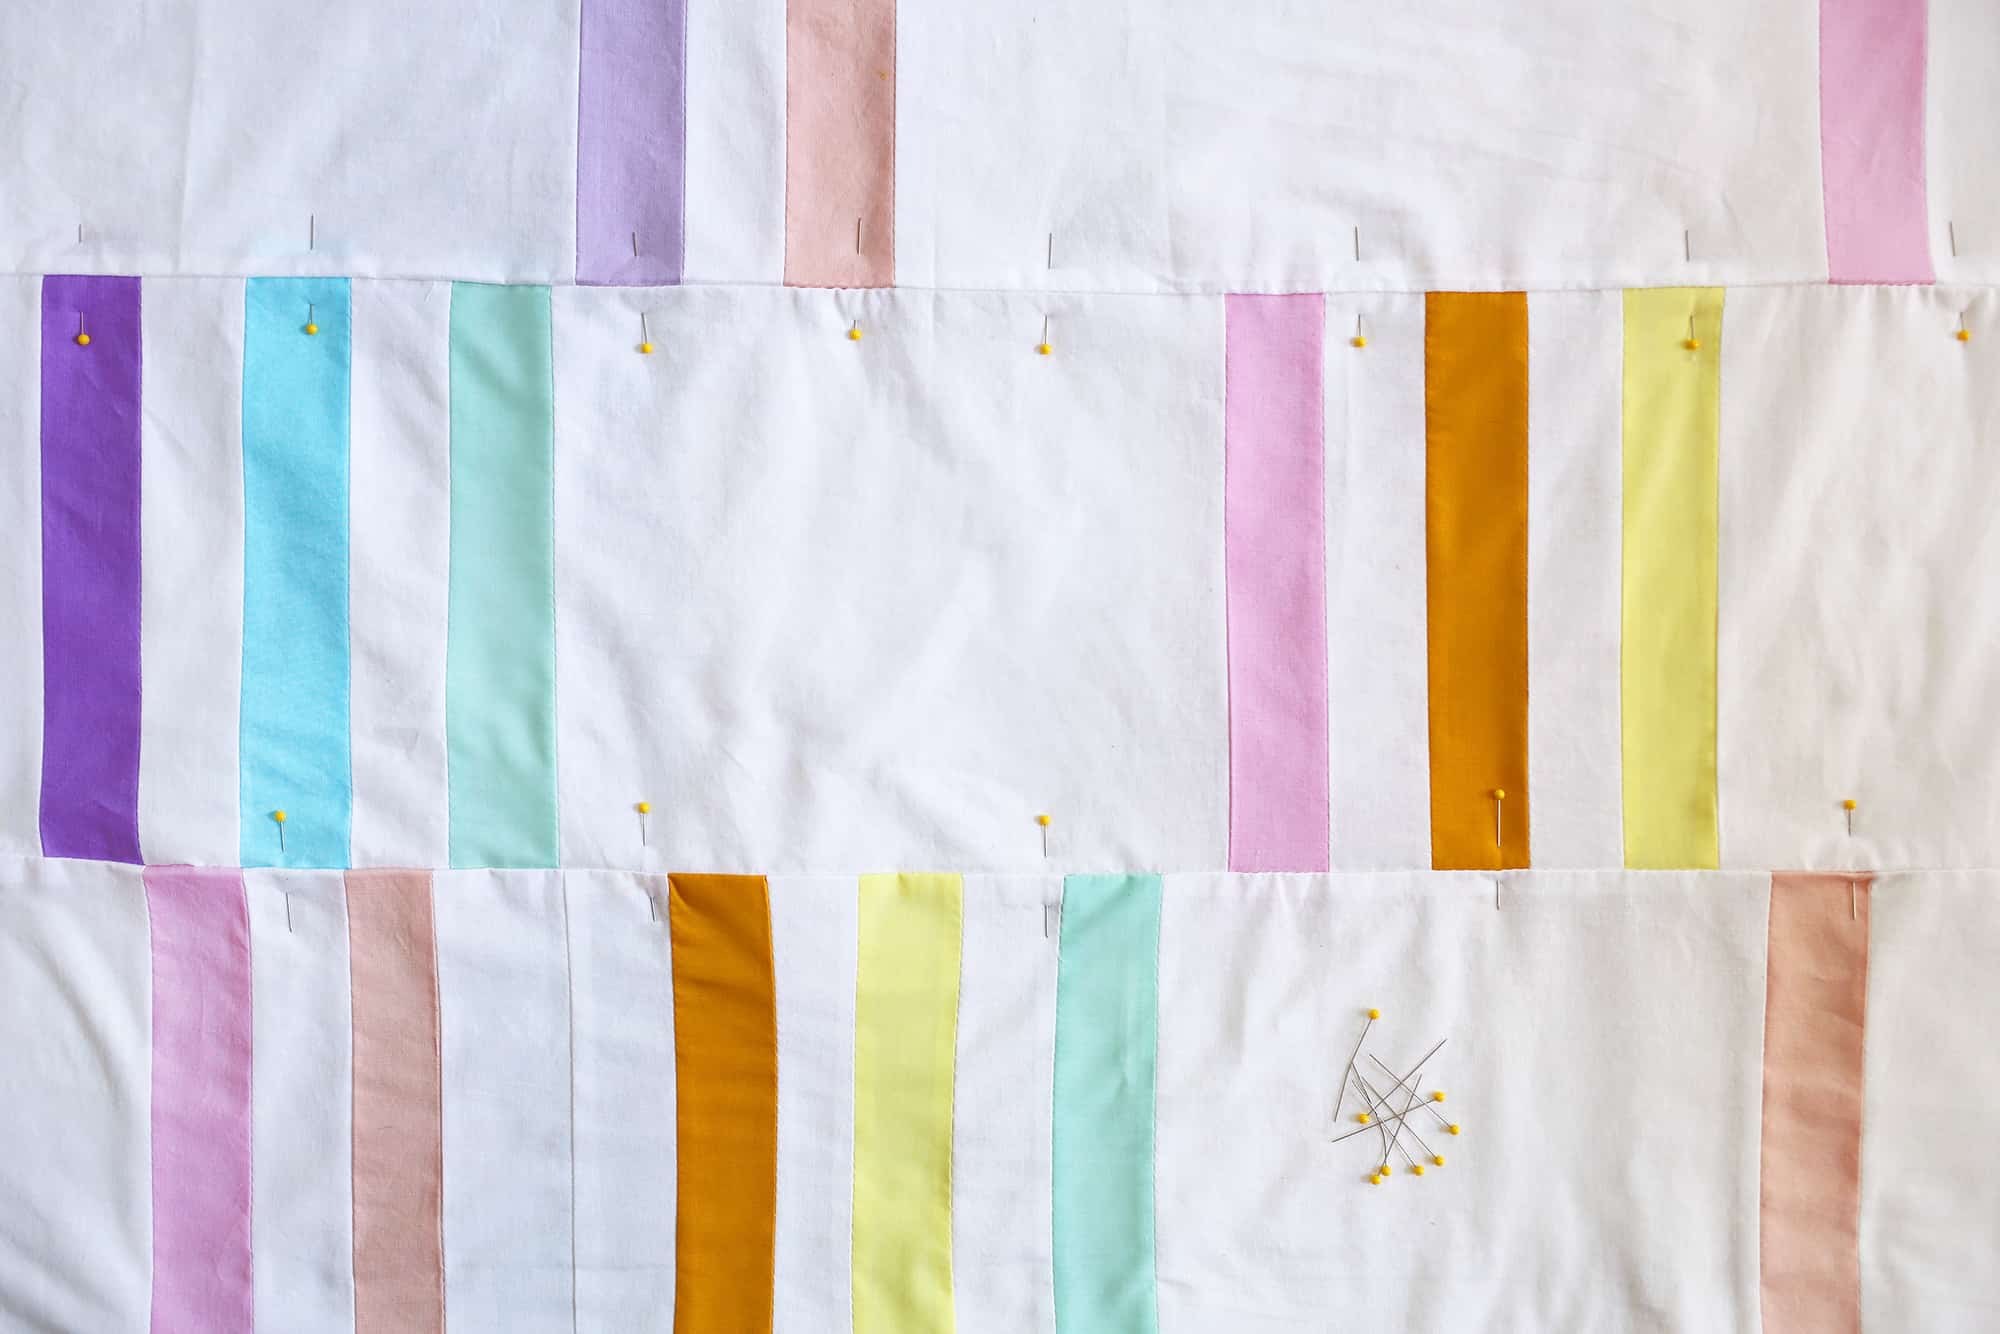
Stitch along that long edge so that you’re about 1/4″ in from the edge. Backstitch at the beginning and end. Trim thread. Open your columns, iron your seam flat. Iron the right side flat. Then repeat that process with your third column and then your fourth. Congrats! You’ve got a quilt top!
 To create the back side, lay your 8″ x 35″ strips in the order you’d like and repeat that same process of pinning the panels together along the long edges, stitching across with a 1/4″ edge, back stitching, trimming, and ironing flat. Trim up your edges here, too. You’ll end up with a lovely backing to your quilt in no time! If you prefer a single solid or printed piece of fabric for the backing instead, you can skip to the next step.
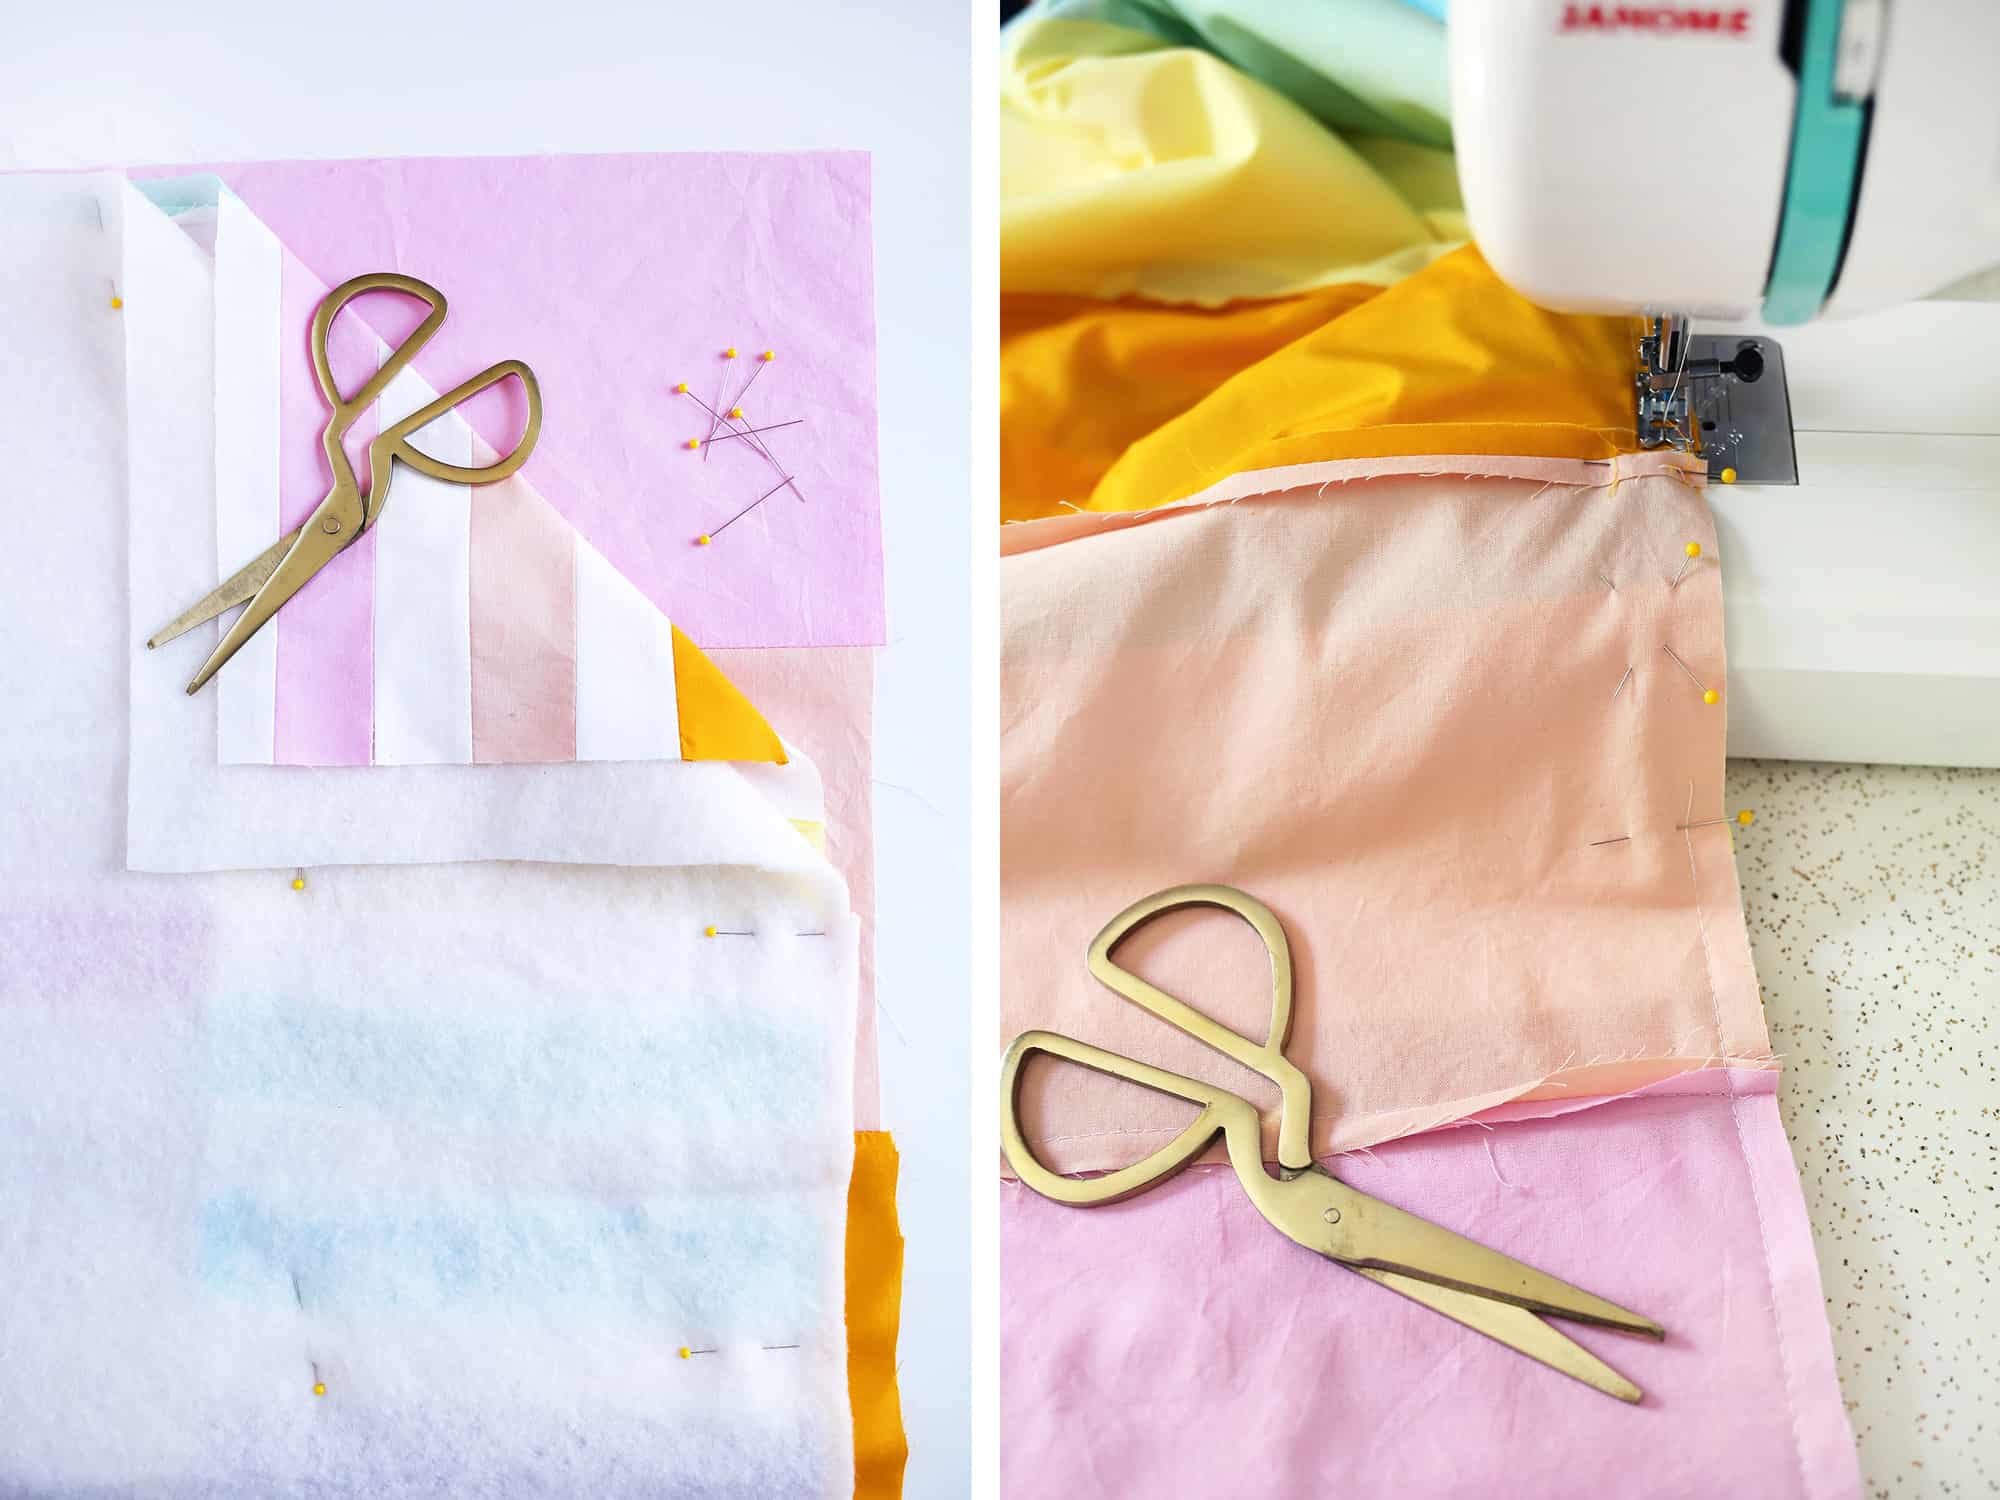 This part can feel tricky, but it’s just a matter of lining things up. Place your quilt back on your work surface with the right side facing up. Then place the quilt top on top of it with the right side facing down. Line up your edges so they are flush in one corner along one long edge and one short edge. Then place your batting on top of your quilt top so that it is also lined up with the same corner along one long edge and one short edge. Pin these three pieces together starting from the center and working your way to the edges so that your pins are about 6″ apart. Between two of your pins along the edges, pin an X. This will be the blank space that you do not stitch over in order to turn your quilt right side out.
Trim off the excess fabric or batting. Starting on one side of your X, backstitch, and then stitch along the perimeter of your quilt sandwich so that you are stitching through all three layers and are stitching 1/4″ from the edge of your fabric. Stitch all the way around the edges until you get back to the pin on the other side of your X and backstitch.
 Remove your pins. Trim off the corners of your quilt but don’t cut past the stitch line. This helps you have more pointy corners when you flip them right side out.
Flip your quilt right side out and iron this down so that you have neat edges. Fold the edges of your opening in as shown. This will get stitched together in a bit.
 Starting from the center and with the quilt top facing you, add your straight pins through all three layers of your quilt so that they are running along the long seams. Space them 5″-6″ apart. Pin along the edges of your quilt as well.
  You want to start stitching down the center seam first, so gently roll one side of your quilt towards the center in order to fit it under your sewing machine. Start from the top of your seam about 1/4″ from the neatly pressed edge and stitch all the way down so that you follow the seam with the edge of your foot. This will act as a guideline to help you stitch straight lines.
 Gently unfold your quilt and stitch down another long seam and then another, always stopping about 1/4″ from the edges of your quilt. Trim your thread ends. Remove your pins. Then start at the beginning of the open seam along your edge and stitch all along the perimeter of your quilt until you get back to where you started. You will continue stitching 1/4″ from the edge. Backstitch over where you started and trim your thread. You’re done!
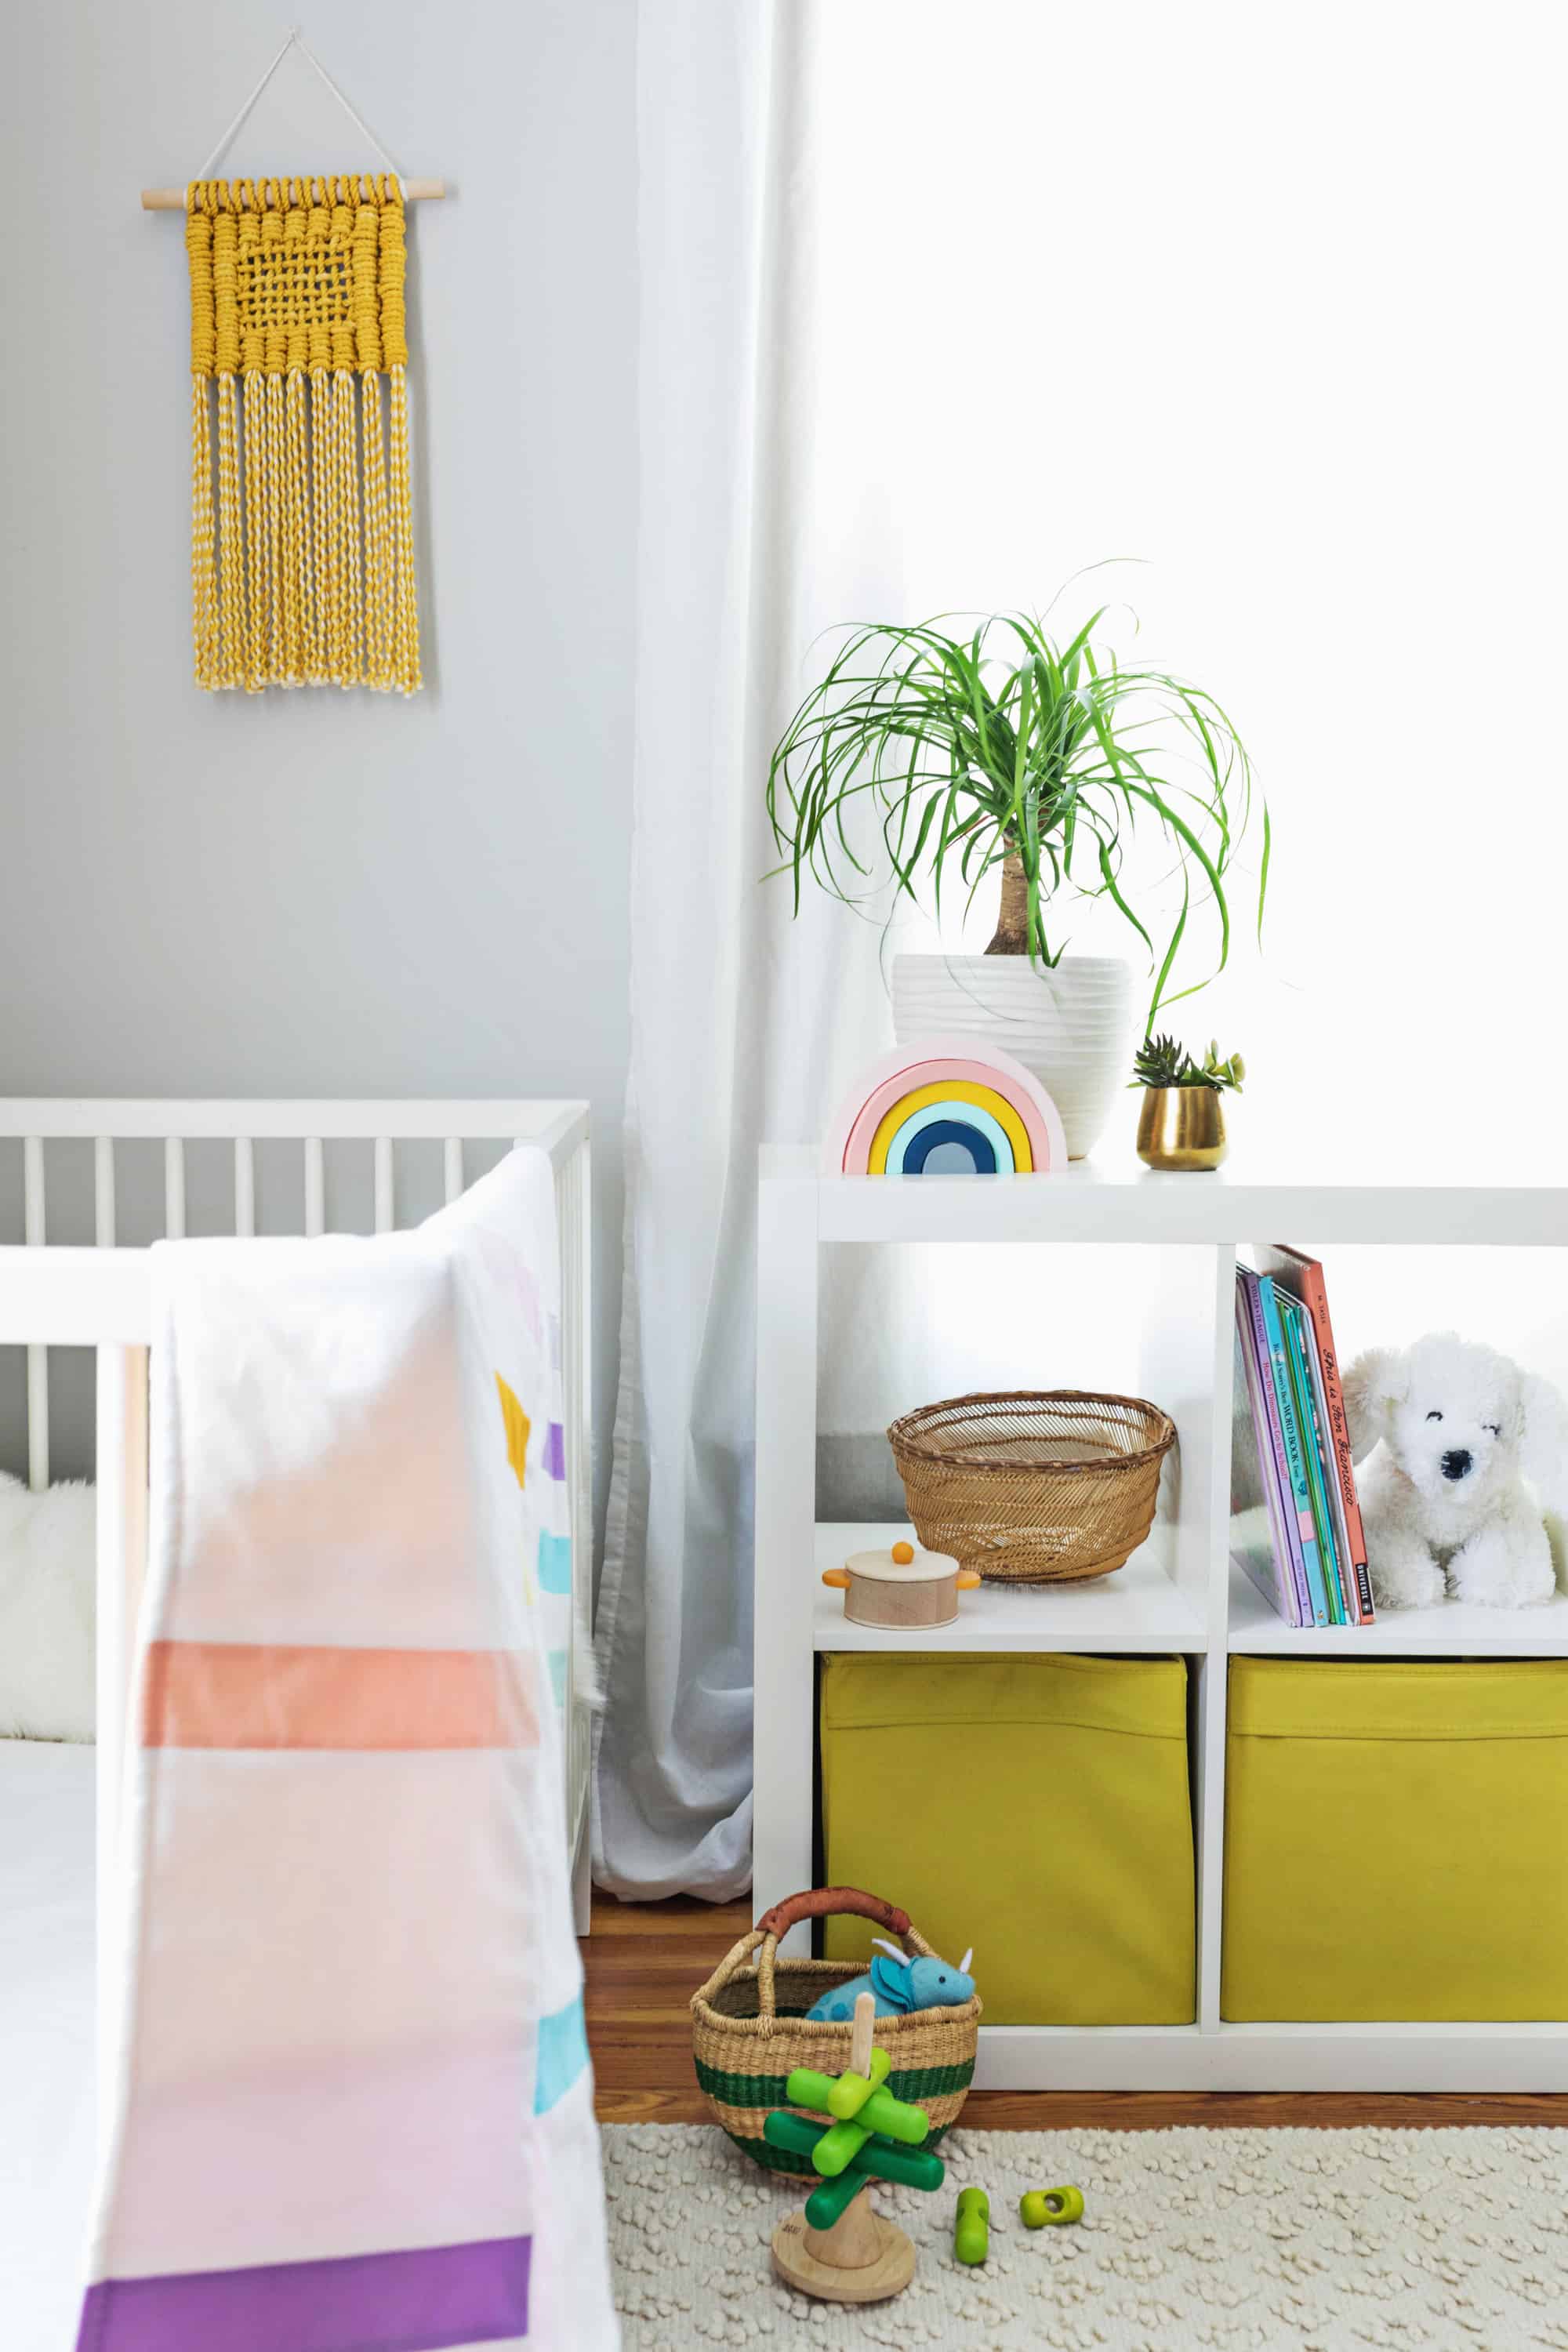 Machine wash in warm water and line dry or tumble dry low.
 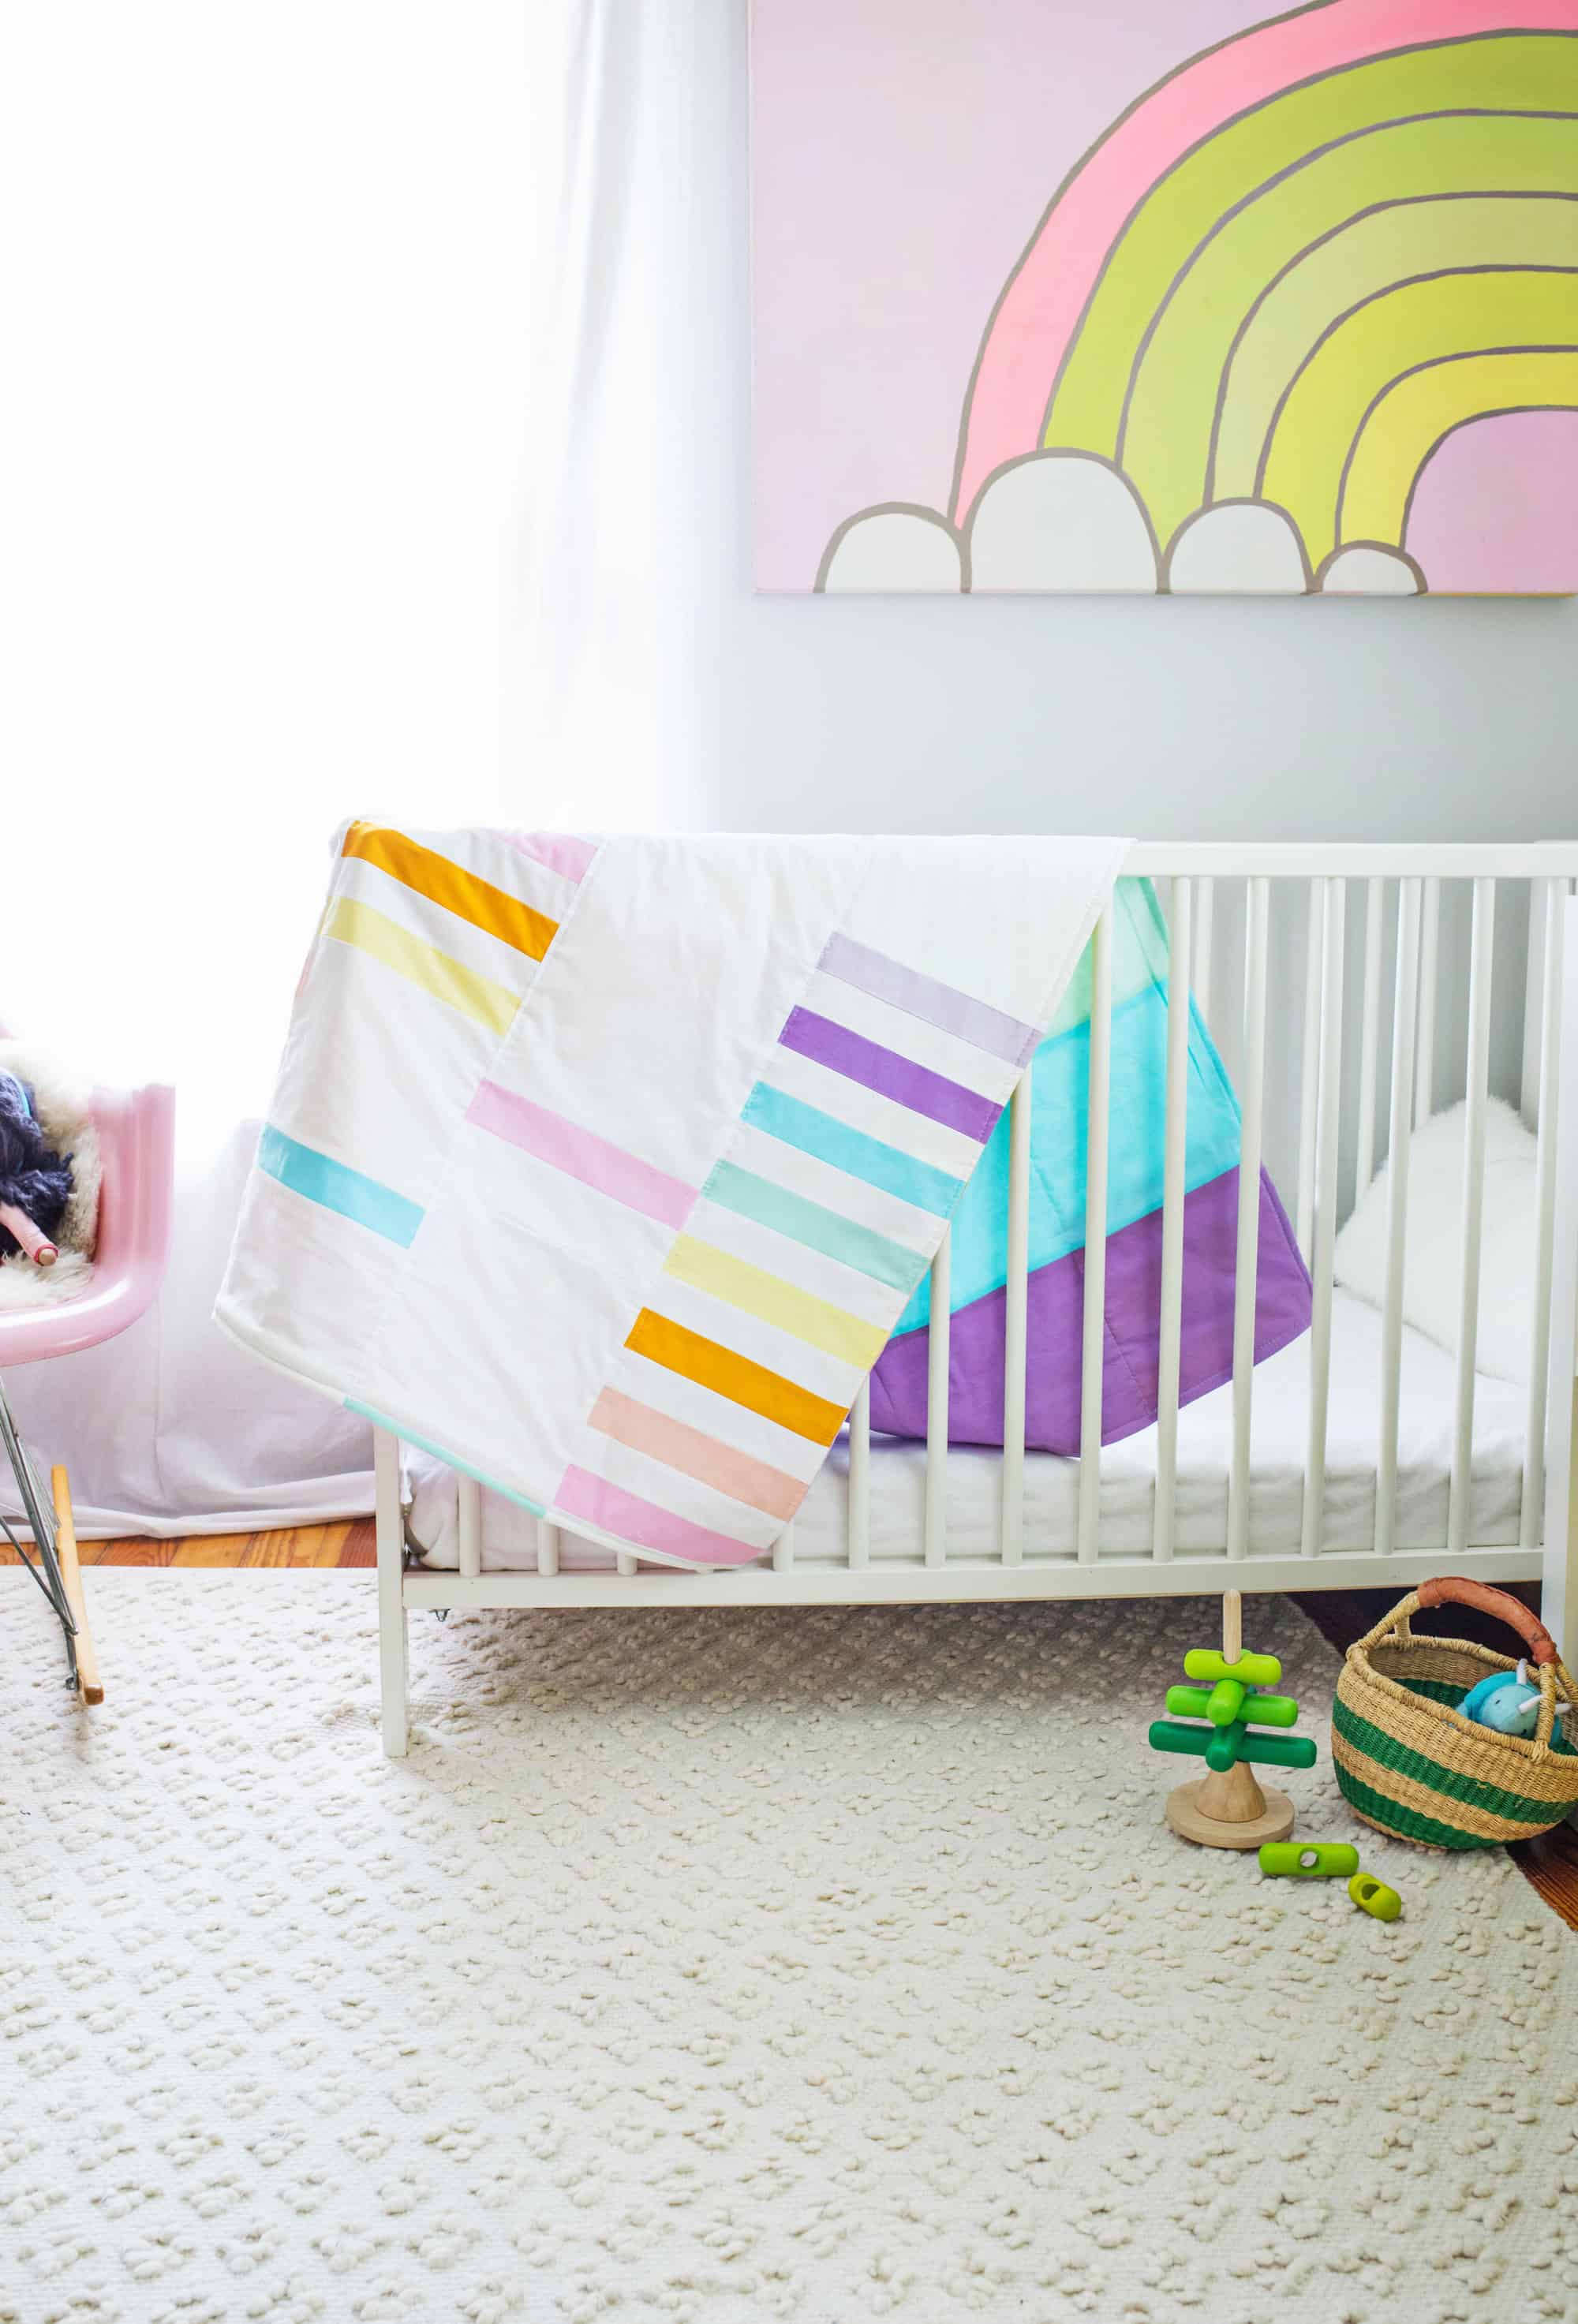 This kind of quilt is great to have in your nursery for letting those new babies work on their tummy time or an impromptu cuddle session with a toddler and will easily become a favorite thing to drag with them to grandma’s house when they’re big enough to stay overnight without you.
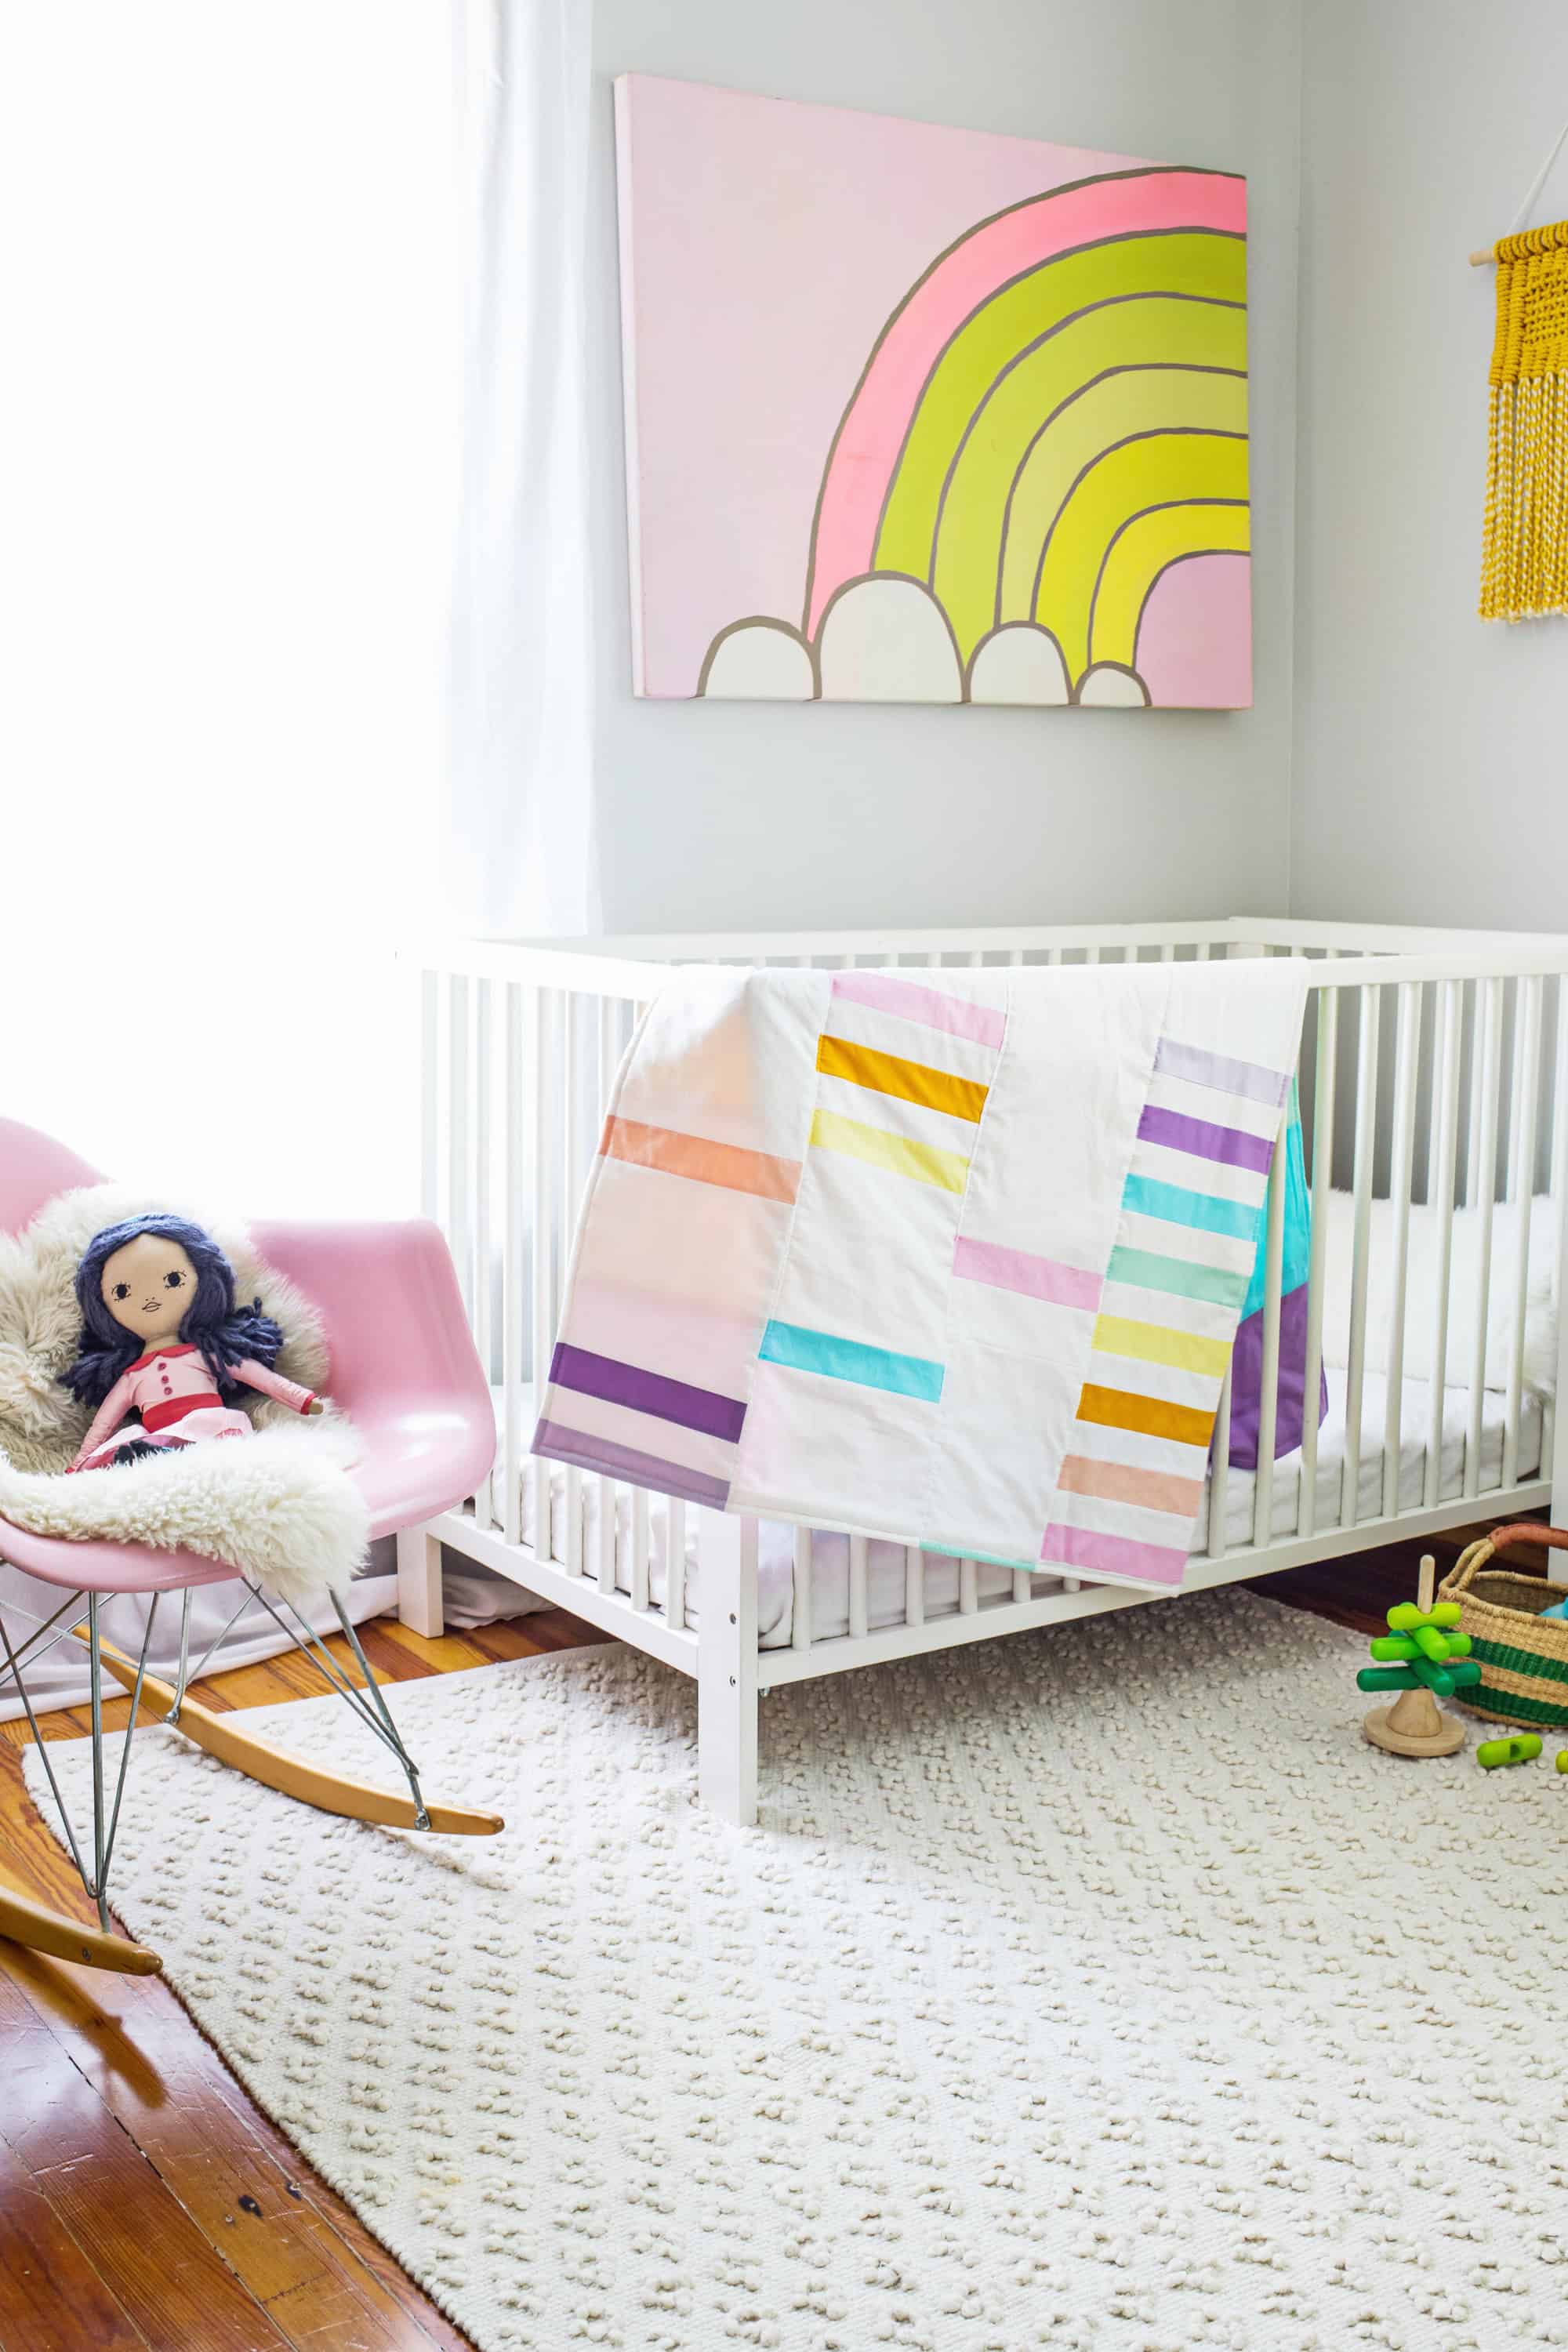
 Feeling ambitious? Use this same pattern to make a larger lap quilt or go even bigger and tackle a queen! Just increase the amount of columns and the length of each column according to the quilt dimensions you’d like and figure out how much more fabric you’ll need to get there.
Love you guys. You don’t need to be PERFECT at everything. Let the 100’s of quilt blogs teach bow to make a quilt. Seriously. Use your name to direct some attention to other blogs.
Rachel has actually been quilting since we were in college. I love that our team has a variety of skills they want to share with you guys! 🙂
Absolutely love this post,you have the most stunning photos. Dotted with hearts by Jvnnc
Love everything in that room!
PS is there a diy for the wall hanging?
This is absolutely stunning, and I’ll bet that even I could handle it as my first ever quilting experience! Pinning! 🙂 Lisa
Love it!
Rachel, the quilt is colorfully cute; however… that mustard weaving is awesome!
Love the colours of the baby quilt!
This is SO fun!! I love the colors.
It’s so colourful, beautiful!
https://www.makeandmess.com/
OMG this is so cute, Rachel! And I love that rainbow painting too.
Carrie
www.wearwherewell.com
Carrie, Thanks so much! Yes, I’ve been holding on to that rainbow for a few years and I’m so glad I didn’t donate it during one of our last few moves!
Those colors are amazing! Love that rug too! Where is it from?
Kristie, The rug is from Target but may not be available any longer.
I’m not the greatest sewer, but sending this on to a friend who is for a “hint hint…make me this please?” Also in love with that neon bright rainbow canvas. That I can do!
I love the colors on this quilt…such a gorgeous labor of love.
– Greta
www.mintyfrosting.com
Was wondering if you made the rainbow painting? Can’t wait to make this quilt for my sisters baby!
Amy,
Yes, I painted this for my daughter, Ruby, when she was a newborn (seven years ago!!!). It was inspired by Gemma Correll’s work back then but these colors are still my fav!!!
Thank you for such an easy to follow tutorial! I can’t wait to make one of these for my God-daughter ?
Oh, I’m so glad you love it!
I’m not much of a quilt person because there’s usually too much busyness going on but this is a beautiful modern take on one and I absolutely adore it! I’d totally make one for my bed if I had the time and talent!
It was a team effort! Laura Gummerman and I put our heads together to come up with something to fit her style and I love how this turned out!
The quilt is super cute, but what especially catches my eye in this set of photos is the rainbow painting in the background! Adorable!
Charmaine Ng | Architecture & Lifestyle Blog
http://charmainenyw.com