") Hi, friends! As you know I am in full on nesting mode. I’ve become quite good at inventing new projects that are absolutely essential to complete as we are in the waiting period for our adoption. Keeping busy and inspired has been key my key to happiness these past few months!
Hi, friends! As you know I am in full on nesting mode. I’ve become quite good at inventing new projects that are absolutely essential to complete as we are in the waiting period for our adoption. Keeping busy and inspired has been key my key to happiness these past few months!
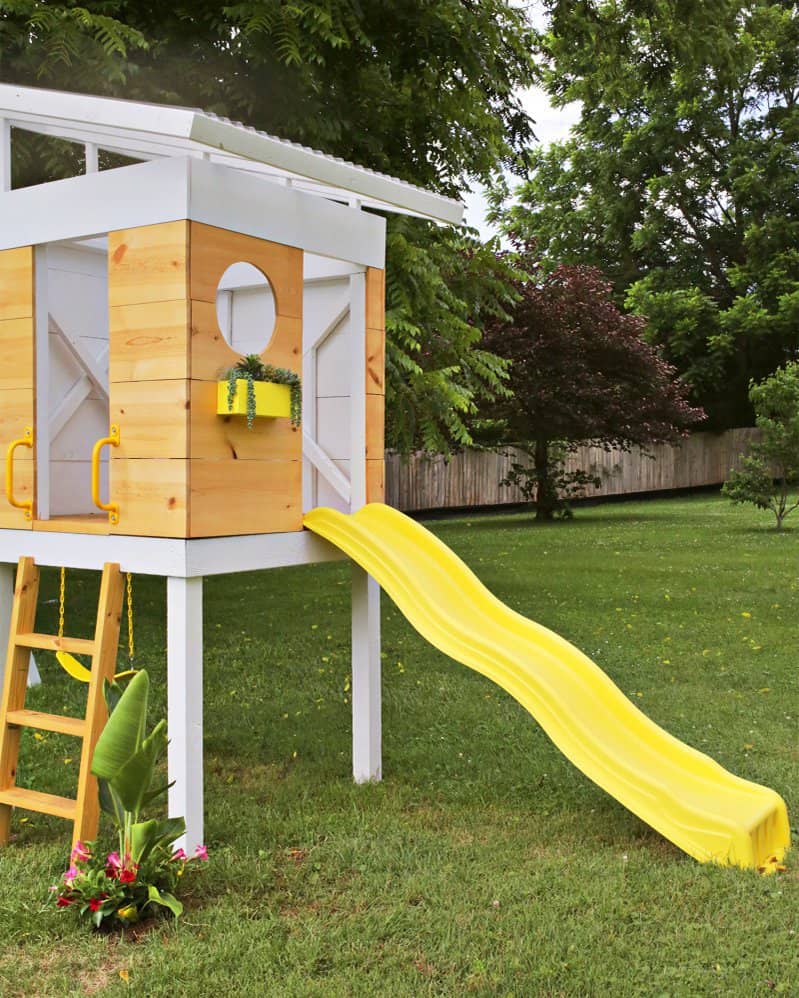
Today I am excited to share our mid-century modern play set that I designed and Collin built! I wanted to add something to our yard with swings and a slide, but I wanted to do it in a customized way that matched the style of our home.
With this project we were able to create a custom play set for the same price (ballpark) as other pre-made sets with a similar size and features. I am SO EXCITED about this project, and I know you are as well because I have NEVER received so many DMs about a project (ever!) as I have this past week after I posted some stories with the playhouse.
Related: For more kids activities check out Childhood Magic!
")
") For this post we partnered with Ace Hardware. Once we were ready to paint we went to our local Ace and were sure to ask what paint and stains were the best for outdoors, and the team at Ace was really knowledgeable and great to work with! We knew we wanted a bright, sunny yellow and a crisp white that would pop against the natural wood.
For this post we partnered with Ace Hardware. Once we were ready to paint we went to our local Ace and were sure to ask what paint and stains were the best for outdoors, and the team at Ace was really knowledgeable and great to work with! We knew we wanted a bright, sunny yellow and a crisp white that would pop against the natural wood.
Based on their recommendation we used their Clark+Kensington Paint and Primer in One collection and the Cabot Clear Wood Protector on this playhouse. It’s so important to make sure each wood piece is painted or stained properly so that the wood will be OK through all the seasons.
In this post we will outline every detail of the cost, tools needed and DIY steps, but if there is anything you are confused about, don’t hesitate to ask us in the comments! But before we get into all the DIY details, I’ll share more about the design!
") I had the vision to make an A-frame playhouse (which we are still doing right “next door” to this one), but midway through the design, I realized that I would love to add something that had more of an active play set (slide, swings, etc…). So I started brainstorming ideas to incorporate more play set features into a mid-century design.
I had the vision to make an A-frame playhouse (which we are still doing right “next door” to this one), but midway through the design, I realized that I would love to add something that had more of an active play set (slide, swings, etc…). So I started brainstorming ideas to incorporate more play set features into a mid-century design.
Some of my favorite memories from growing up are playing with my cousins in a pretty similar playhouse at my grandma’s house. It kept us busy for hours upon hours, and my niece is still enjoying it to this day. So with my crazy nesting hormones going off, the idea of creating some outdoor spaces for kiddo memories is just about the most magical thing I can imagine!
") Here’s a view from the slide side! When I was shopping for a slide, the color options were a little slim, so I ended up going with yellow, matching the swings and handles to it, and then keeping the rest of the design really natural and neutral! The stain was perfect because it didn’t change the color of the wood and we wanted to keep it light. I also used Clark+Kensington’s Designer White as a clean, crisp accent color to pair with the wood.
Here’s a view from the slide side! When I was shopping for a slide, the color options were a little slim, so I ended up going with yellow, matching the swings and handles to it, and then keeping the rest of the design really natural and neutral! The stain was perfect because it didn’t change the color of the wood and we wanted to keep it light. I also used Clark+Kensington’s Designer White as a clean, crisp accent color to pair with the wood.
") Here’s a view from behind the swing set. I picked this side of the yard for a lot of reasons, but most of all because I didn’t want to obstruct the view from our sunroom. As it is, you can see the play set, but barely. It’s also located right next to the deck that we are planning to build in the next year or two.
Here’s a view from behind the swing set. I picked this side of the yard for a lot of reasons, but most of all because I didn’t want to obstruct the view from our sunroom. As it is, you can see the play set, but barely. It’s also located right next to the deck that we are planning to build in the next year or two.
") The little flower box under the circle window is my favorite detail! I love how painting it with the Clark&Kensington (we used the color The Bright Side) helped tie together the colors from the slide and swings, and I LOVE how it mimics this project from the front of our home. This play set is like a tiny version of my own dream home!
The little flower box under the circle window is my favorite detail! I love how painting it with the Clark&Kensington (we used the color The Bright Side) helped tie together the colors from the slide and swings, and I LOVE how it mimics this project from the front of our home. This play set is like a tiny version of my own dream home!
")
") Here are some more detail photos.
Here are some more detail photos.
") We have been having a lot of guests this month, and we have already gotten a LOT of use out of this play set. So don’t think it’s going to be sad and empty while we wait for our adoption- it’s BUSY over here! Our nieces and friends’ children (and adults!) are having so much fun playing with it.
We have been having a lot of guests this month, and we have already gotten a LOT of use out of this play set. So don’t think it’s going to be sad and empty while we wait for our adoption- it’s BUSY over here! Our nieces and friends’ children (and adults!) are having so much fun playing with it.
OK… on to the DIY!
Supplies:
-four 4″ x 4″ x 6′ pressure treated posts ($26.48)
-two 4″ x 4″ x 10′ pressure treated posts ($24.84)
-two 4″ x 4″ x 8′ posts ($23.96)
-one 4″ x 6″ x 12′ pressure treated board ($23.27)
-six 50-lb bags of fast setting concrete ($32.76)
-one piece of 3/4″ x 4′ x 8′ pressure treated plywood ($33.79)
-two 3/4″ x 6″ x 8′ pressure treated boards ($12.16)
-ten 2″ x 3″ x 8′ boards aka “stud” boards ($21.05)
-ten 2″ x 4″ x 8′ boards ($33.04)
-three 2″ x 2″ x 3′ boards ($18.66)
-eight 1″ x 12″ x 8′ boards ($117.72)
-three clear 26″ x 8′ corrugated polycarbonate roof panels ($62.91)
-four 5/8″ x 8″ lag bolts and washers ($13.96)
-4 10″ eye bolts ($27.88)
-eight 3″ L braces ($31.84)
-one 2-lb box of 2 1/5″ self drilling star head screws ($9.37)
-2 swings ($75.16)
-1 slide ($102.16)
-one gallon of Cabot Clear Wood Protector ($31.99)
-one gallon of Clark & Kensington semi gloss exterior paint (in Designer White)($36.99)
-one quart of Clark &Kensington semi gloss exterior paint (in The Bright Side)($17.99)
-two yellow handles ($14.95)
-yard flags (optional)
total: $791.84
Tools:
-post hole diggers
-drill
-compound miter saw
-4′ level
-ratchet with 1/2″ socket (for 5/8″ lag bolts)
-1/2″ x 16″ drill bit
-tape measure
-two 8′ ladders (1 optional)
-nail gun
– jigsaw
-sandpaper (optional)
-two paint brushes
") First, measure out a 4′ x 4′ square in the space where you want your play set to be and mark all 4 corners. With your post hole diggers, dig your first hole in one of the corners of your 4′ square about 2′ deep. Take one of your 4″ x 4″ x 6′ pressure treated posts and place it in the hole. With a measuring tape, make sure that from the top of the post to the top of the hole is 4′.
First, measure out a 4′ x 4′ square in the space where you want your play set to be and mark all 4 corners. With your post hole diggers, dig your first hole in one of the corners of your 4′ square about 2′ deep. Take one of your 4″ x 4″ x 6′ pressure treated posts and place it in the hole. With a measuring tape, make sure that from the top of the post to the top of the hole is 4′.
Once you have it at the right height, take a bag of your fast setting concrete and pour about half of the bag in around the base of your post. Grab a nearby water hose or a simple bucket of water and pour some water in your hole, saturating all of your concrete using a small stick or old screwdriver, and mix your concrete in the hole (it’s really that easy!).
Take your 4′ level and make sure your post is perfectly straight up and down. Once you get it into place, check the post every few minutes (for about 15 min) to make sure it hasn’t moved at all. Repeat this step with the other 3 corners of your 4′ square, making sure all 4 posts are exactly 4′ apart and all perfectly level with one another.
") Have the store you buy your lumber from cut your 3/4″ x 4′ x 8′ pressure treated plywood into two 4′ x 4′ pieces. Take the two pieces and lay them both on top of your 4 posts. Line them up perfectly and screw them into the posts, ideally 4 screws per post for extra security!
Have the store you buy your lumber from cut your 3/4″ x 4′ x 8′ pressure treated plywood into two 4′ x 4′ pieces. Take the two pieces and lay them both on top of your 4 posts. Line them up perfectly and screw them into the posts, ideally 4 screws per post for extra security!
Then take your 3/4″ x 6″ x 8′ boards and cut them into 4′ pieces using your compound miter saw, making sure to cut the ends at 45° angles so they line up really nice, as shown above! These boards are for extra stability but are mainly aesthetic. Next, take your two 4″ x 4″ x 8′ posts and cut one in half to make two 4′ pieces and the other one into two 3’6″ pieces.
Attach the two 4′ pieces to the front side of your play set using L braces and the 3′ 6″ pieces to the back side the same way.
 Use extreme caution while doing this next step because you will be working with very heavy pieces of wood! With the help of a friend (or 2), very carefully take your 4″ x 6″ x 12′ pressure treated board and place one end on the back two posts of your play set (the 3′ 6″ side) and prop the other side up on a ladder as shown above.
Temporarily take some small pieces of wood and screw them to the two posts holding the 12′ board to secure it to keep it from falling in the meantime until you can properly secure it. I would recommend having another person on a different ladder on the end now hanging off the play set to hold it from going anywhere while the next step is completed.
Set your level on top of the board now propped up on the ladder and put some shims (thin pieces of wood, or just scrap wood lying around) underneath it on top of the ladder until it is level. Once it is perfectly level and you have someone holding the board propped up on the ladder in place, take your two 4″ x 4″ x 10′ posts and assemble them into a simple A-frame with two supports on either side right under it for support.
You can assemble it laying down on the ground. You’ll have to cut the tops of the posts with your compound miter saw at whatever angles necessary to make this work for your space. I used some temporary wood screws to hold the pieces together until I was ready to bolt them together with the heavy duty lag bolts.
") Stand your A-frame up and line it up perfectly with the suspended board and mark the ground where the bottom of each post of your A-frame touches the ground. Lay the A-frame down out of the way for now.
Stand your A-frame up and line it up perfectly with the suspended board and mark the ground where the bottom of each post of your A-frame touches the ground. Lay the A-frame down out of the way for now.
Now since your A-frame is 10′ and your suspended board will probably only be around 8′, you will have to adjust where you dig your post holes appropriately because the holes will need to be closer together than where you marked them originally. To be honest, there isn’t an exact way to explain this step because your space will not be perfectly level.
So you will have to adjust everything to work for you. It will probably be trial and error until you get it perfect, but don’t be discouraged! You can do it! Once you have figured out where your post holes need to be so that your A-frame is the right height to support your suspended board, set the A-frame in the two holes and repeat the concrete pouring process you did earlier, making sure everything is perfectly level! Now that your A-frame is in place, use your 1/2″ drill bit and pre-drill where your lag bolts will go.
Once pre-drilled, ratchet your lag bolts in very tightly as shown above. Now you can take off those temporary pieces of wood holding your 4″ x 4″ x 12′ board in place on your 3’6″ posts.
Make sure your 3’6″ support posts are level straight up and down and pre drill for your lag bolts with your 1/2″ drill bit, one in each post. Ratchet your bolts down super tight, as tight as you possibly can! Now you have the swing set portion done! Next take two 2″ x 4″ x 8′ boards and cut them into 4′ pieces and cut the ends at 45° angles and attach them to the top of all 4 posts on your play set, as shown below.
") Next, attach your slide to whichever side you want (we chose the opposite side of the swings) and frame out your front entrance and your slide side exit to whichever height and width you want.
Next, attach your slide to whichever side you want (we chose the opposite side of the swings) and frame out your front entrance and your slide side exit to whichever height and width you want.
Brace the other two blank walls into x braces as shown above. You can do all of this with your 2″x 3″ boards. This doesn’t need to be precise or perfect, just enough to brace everything and keep it secure.
") Next, the roof! Take 4 of your 2″ x 4″ x 8′ boards and on the ground make a 6′ x 6′ square, using your compound miter saw to make 45° cuts at all ends, and then screw it all together.
Next, the roof! Take 4 of your 2″ x 4″ x 8′ boards and on the ground make a 6′ x 6′ square, using your compound miter saw to make 45° cuts at all ends, and then screw it all together.
Now take 3 more boards and cut them the appropriate length and place them equal distances apart inside the 6′ square and screw them in. This is the base for your roof. Now take your 2″ x 2″ x 3′ boards and cut 3 of them at 2′ (or your desired height) and a 15° angle on one side of each. Do the same but with 3 smaller 6″ pieces, these will all be the support posts for your roof.
Fasten your 6 posts on the top of your play set, 4 at each corner and two in the middle on opposite sides. Now take your 6′ x 6′ roof and place it on top of all 6 posts and level everything up perfectly. Screw it all down. Now take your three 26″ x 8′ corrugated polycarbonate roof panels and lay them on top of your roof.
Once you’ve got them all lined up and spaced evenly, use some screws to fasten all of the roof panels. You can take a razor knife or some scissors and cut off the extra. You can also wait to add the roof panels until after you paint, if you are painting your roof base!
I made the mistake of adding them before and ended up having to climb back up a ladder and temporarily remove them to paint the roof base. Avoid that headache if you can!
") Now, you can take a measuring tape and space out your swings however far apart you want. Mark where your holes will be and pre drill your holes for your eye bolts. Once those are all screwed in, you can clip on your swings! For the ladder, just take some 2″ x 4″ boards and cut them to the desired length and height and screw them all together. Pretty easy!
Now, you can take a measuring tape and space out your swings however far apart you want. Mark where your holes will be and pre drill your holes for your eye bolts. Once those are all screwed in, you can clip on your swings! For the ladder, just take some 2″ x 4″ boards and cut them to the desired length and height and screw them all together. Pretty easy!
Next, grab your 1″ x 12″ x 8′ boards and start cutting them to the correct size. Two sides should be an even 4′ across and the other sides will be smaller cuts based on how you framed out your openings. Now take your nail gun and start fastening them to the sides of your play set, starting from the bottom and moving up.
Once you have them all nailed on, grab a piece of cardboard or piece of paper and draw out your desired size circle for your window. Trace the circle wherever you want your window to be. Then grab a drill bit and drill a pilot hole along the line of the circle. Take your jigsaw and cut out your circle window!
Now, before you paint, I would recommend grabbing some sandpaper and smoothing out all of your outside edges just a tad including your window. It’s entirely optional, but I think it adds that little extra finishing touch to really make it look nice!
Next, for the final and fun part! Take your Cabot Clear Wood Protector and simply paint it on whatever wood will be left natural. I recommend 2-3 coats for extra protection.
This also gives it a really nice finished look! Once dry, tape off the edges of all of the natural wood and paint all of the trim and posts and the inside walls with your Clark+Kensington exterior paint in your desired color. (The Ace Paint Studio has a ton of color options that you can pick from!)
Take your handles and screw them on with the supplied bolts and washers. If you want to add a planter under the window, follow these steps from this project. That’s it, you’re done! Time to get swinging!
 Here’s a snapshot of my nieces from last week! Thanks so much for reading!!! I love and appreciate you all. If you have any questions, don’t hesitate to hit me up in the comments. xx -Elsie
P.S. Don’t want to build a play set from scratch? Check out Laura’s mid-century makeover of an inexpensive existing play set or her Hexagon Sandbox DIY (With Built-In Benches!

I absolutely love this! I’m going to try and build this for my little ones. I can only find a 4” x 6” x 10’ at my local stores. Do you think I could use this and mount it only to one of the 4” x 4” instead of across to both posts?
This is amazing !! I would love to have this beautiful playhouse in my backyard. Love the lovely yellow slider and the swings <3 Thank you for the cutest idea for the playhouse.
Oh, I think I found the L braces at Home Depot. Haha. Thanks again for this great layout/tutorial. Very helpful!!
First off, this is amazing! We are using this as a guide for our playground but not doing the mid-century modern look (even though that’s what makes yours so great!). Do you remember where you got the eight 3″ L brackets/braces that secure the 4×4 posts on the platform? I’m having trouble finding something on Lowe’s website that is similar. Looks like there are 4 black hex bolts in each one? Thank you!
Hi, I love this, such a cool idea. Would you be able to tell me what the overall footprint is? I’m trying to figure out if we have the space to make this work!
Thanks!!!!
This is absolutely gorgeous! We were planning on a tree house for the back yard this summer but now I want to do this! Will probably have to make it a bit more Pacific NorthWest rain proof with some little overhangs, but I love that I can give hubby this project and all the supplies and say go!
Hello!! I don’t think I saw this linked in the post, but is there any way to tell me where the swings and slide are from? Or even just what length the slide is? LOVE this idea. I hope we can make it one day for our mid century home! Thanks
I think the side is from either Lowes or Home Depot and the swings are from Amazon. xx
Looks like this tutorial is gone! Can you bring it back??
Hi! The steps and supply list are toward the bottom of the post– did it not show up for you?
This looks really great and If I’ll have kids in the future, I’ll surely consider doing this myself. The little flower box under the circle window made a beautiful accent to the playhouse plus the color — yellow! Awesome choice!
Also, I noticed all the materials were carefully listed and the directions seemed clear. I love everything about this!
This is so nice! Honestly, I’ve never, ever seen a backyard swing set + house as pretty as this one… I absolutely love the colors… the yellow is amazing, the white, well, perfect because it’s white… and the wood color is just fantastic. I’m crazy about this, wow.
I wanna have children just so I can build this for them, that’s how much I love this project 🙂
Your future little child will someday play in it 🙂
Thank you!!!
I agree! This is a unique and cool idea to combine backyard swing set + house.
This is exactly what we were looking for to build for our granddaughter! Can’t wait to get started on it this summer!!
Perfect for the kids
The pink pineapple
http://thepinkpineappleblog.blogspot.com/
Any chance you coukd break down what I wouldn’t need for the swing part. We have a great little swingset but would love to build the house/ slide. Love love love this!
This is absolutely so cute. Your daughter will love it!
I absolutely love this, especially the colours! How can you make a play area so you, I love how you personalise everything. Really inspiring post!
Holly
The Art of Being Holly
great information.
Great job Elsie and Collin. The directions seemed clear from a sitting at my desk not actually building it stand point 😉 I might suggest doing some gravel/wood chips around the outside because the grass is likely to die from all the little feet that will be running around this place!
WHAT?! This is amazing! So cool!
Ok last comment -promise!
I know it’ll be a little bit before your daughter could actively do it, but making a small white picket fence garden off the A-frame would be super cute! I love kid sized play 🙂
Love this! And the clear roof is super fun! Can’t wait to see the A frame house too!