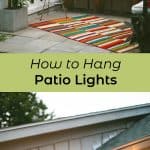
") Party lights, Christmas lights, string lights—so many different names, but we can all agree on one thing: lights make an outdoor space at least 96% more inviting. I’m going to tell you a couple of hints/tips about hanging lights in your outdoor space. These lights were really the icing on the cake for the party alcove. Icing can be the best part, ‘specially on a carrot cake… Now I want cake.
Party lights, Christmas lights, string lights—so many different names, but we can all agree on one thing: lights make an outdoor space at least 96% more inviting. I’m going to tell you a couple of hints/tips about hanging lights in your outdoor space. These lights were really the icing on the cake for the party alcove. Icing can be the best part, ‘specially on a carrot cake… Now I want cake.
") Supplies:
Supplies:
-party lights (we used these interior/exterior lights)
-exterior extension cord (optional)
Tools:
-measuring tape
-staple gun
-step ladder
Step One: The best place to start is to measure your space. Grab a buddy to hold the end of the tape, measure, and go to town. You might want to just hang the lights around the perimeter of your space. We chose to go the crisscross method; maybe there’s even a third option you could try 😉
Here are some things to take into consideration when hanging party lights:
- Do you have an outlet available?
- Could you run an extension cord from inside?
- Is there material to attach your lights to (e.g., awnings, fencing, tree, etc.)?
- How many people are you going to invite to your party when you’re done?
")
") Step Two: I chose to use a staple gun to hang these lights. The entire time I was thinking about that scene from the movie Christmas Vacation. You know what scene I’m talking about. I started at the opposite end of where I wanted to end (I feel pretty ridiculous writing that). But it’s true; I had to take account for where the plug was going to end up. When I was stapling, I made sure not to staple through the wire, using about two staples per end. Since I ended up using three strands of lights for the space, I had to plug them into each other. I tied the connecting ends into sort of a knot so they wouldn’t come apart.
Step Two: I chose to use a staple gun to hang these lights. The entire time I was thinking about that scene from the movie Christmas Vacation. You know what scene I’m talking about. I started at the opposite end of where I wanted to end (I feel pretty ridiculous writing that). But it’s true; I had to take account for where the plug was going to end up. When I was stapling, I made sure not to staple through the wire, using about two staples per end. Since I ended up using three strands of lights for the space, I had to plug them into each other. I tied the connecting ends into sort of a knot so they wouldn’t come apart.
Be careful not to drop the strands and break bulbs; they are super fragile, as glass tends to be. The instructions that came with the product actually recommend that you remove all bulbs before putting up the strands.
I tried to keep the strands somewhat taut, but not so much that I was straining the staples. If you do decide to do the crisscross method, make sure to keep the strands far enough from each other that if a nice wind picks up, the bulbs won’t swing into each other. Since we didn’t have an outdoor outlet available, I had an exterior extension cord plugged in nearby that I could snake through a window at a moment’s notice and plug into.
") Nothing real groundbreaking here, but maybe if you see how easy it is to hang some outdoor lights, you’ll give it a try! Let me know if you have any questions. Now, about that cake… -Josh
Nothing real groundbreaking here, but maybe if you see how easy it is to hang some outdoor lights, you’ll give it a try! Let me know if you have any questions. Now, about that cake… -Josh
Credits // Authors: Josh Rhodes. Photography: Sarah Rhodes. Photos edited with Hazel from the Signature Collection.
I love this idea. I’m currently working on decorating my balcony and I think this would work perfectly!
I wish these lights were more affordable so I could have a ton! 😉 Great tips!
– Christina www.cityloveee.blogspot.com
Dying! I want cake. And a party. And outside fairy lights! You did a beautiful job, ladies and gents; I’ll be expecting the party invite in the mail 🙂
xo
K
It does make a backyard more inviting. Love what you did. Thanks for sharing from 3girls1apple.com
Are these outdoor lights meant to be hung year round?? If I am to staple them, I assume so…but are they durable??
Amazing idea! My garden party will be 1000x better now haha 🙂
I love your patio bench! It would be perfect in our small backyard patio. Do you have a tutorial one how you made it or would you mind sharing some details? Thank you!
Nothing ground breaking, but having someone walk through the little tips you might not think about, or save you from “learning as you go” is always so great – thanks!
Awesome as always!!!!! Now….could you please post a tutorial on how to do those simple but magnificent benches?! I am soooooo doing this in my backyard!!! ha XO ~Ivonne
Oh that little nook looks so lovely! I LOVE fairy lights! I actually decided our wedding venue (10yrs ago) on the fact that they had a fairy light tree that we could use!!
Nicole
www.houseofnicnax.blogspot.com
Love this! I’m going to have to try this out once I get a new place in San Francisco!
xoxo Sara
http://www.restlessnomads.com
Yep. Party lights make any outdoor space better!
Jordyn
Pretty Lovely
I’m a little scared of what happenns when it rains…It’s a really good idea tho!
I love outdoor lighting!
But make sure to check the ones you look at!! Some styles (similar to the ones you hung) actually state on the back of the packaging that they’re only good for about 90 days (so you won’t be able to use them next year)!
– Ashley
Wow, I’m really going to be doing this. I’ve been waiting for a good use for my home depot gift card and this is it! Awesome post bro! Great, helpful tips! Much appreciated.
You can get the exact set at Target 🙂 – Jacki
Do you have a link to where you bought the lights from? 🙂 My mister just saw them and said they are EXACTLY what he wants for our porch!
Target has globe lights like these. They ALSO have replacement glass globes for a couple bucks – both clear and frosted. I broke two immediately when I hung mine up so I’m glad I was able to easily replace them.
I really like these tips! I have a little balcony off my apartment that doesn’t get used quite enough (so many spider webs…) but maybe with some lights out there we’d use it more often! they sure are adorable!
xoxo
Taylor
Something I did when I hung my Christmas lights was to buy an adapter that plugged into my porch light. Essentially it screwed into where the light bulb goes, then the end of the string lights plugged into that! It totally rocked my world and made it easy to turn them on and off in the evening from the comfort of my living room! Using something like this would be awesome in the backyard as well– and only cost a couple of dollars!