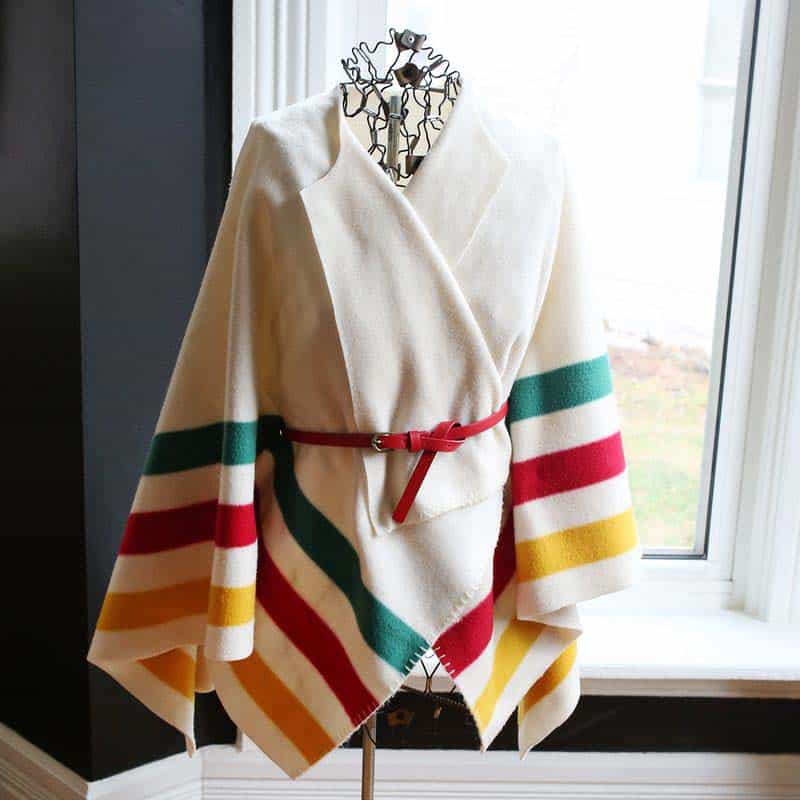
 Guys, I made a sweater from a favorite blanket. Well, it’s not really a sweater, per se. It’s not a poncho or capelet either. Maybe tunic? I’m not sure what to call it, but it feels similar to wearing a poncho (if you’ve ever owned one of those or a similar garment), and it’s SUPER cozy. I’d like to think this is a more fashionable version of a Snuggie.
So, if anyone has ever wished they could find a way to wear a Snuggie in public, man, we are kindred spirits. And also, this post is for you.

 This blanket was a present from my dear friend Holly. You know Holly, she’s been teaching us to crochet lately. She’s the sweetest. And last year she gifted me this beautiful blanket, and it’s been used as a throw blanket at our home since. Until one day I found the dogs had dragged it out the dog door while we were at work. It got quite dirty, and I was afraid it was ruined. I had it dry cleaned, and they were able to get most of the stains out. I just love the colors of this blanket, so I decided to turn it into something wearable instead.
 Now, I actually have been working on my sewing skills. But since this fabric is a synthetic fleece and doesn’t fray, I knew I could easily turn it into something wearable without any sewing skills at all. So, I went for it. Here’s what I did.
 I have this vintage body form. But, if I didn’t, I could have just as easily used myself and a full length mirror. This project was all about draping. Whatever you use, it needs to be something along these lines.
First, I figured out where I wanted the front opening and head area to be. In case you’re curious, my blanket was originally about 65″ in length.
 I measured to center my cut and created a space for my neck. I cut 14 1/2″ in (found from draping), and I decided how big to cut the neck hole by measuring my neck and adding an inch.
After every cut, I draped the blanket back onto the form (or sometimes myself) to make sure I was on the right track and things were laying properly.
 After draping again, I found that the arms were too long. I had to essentially “roll” the sleeves, which doesn’t really work with this kind of garment. So I cut off both edges. This meant I lost the navy blue stripe, but I still had three of the four original colors, so I was OK with that.
 The last thing I did was cut two small holes for a belt to loop through. I had grabbed this red belt from my donation pile, and I planned to swap it out with a better one later. But it ended up working so well with the colors that I just kept it—repurpose win!
I like to wear this with the belt looped around the front of the tunic but not the back. The belt goes on the inside around the back. You could easily wear it either way. I just like the flowy look of the back, so this is what I prefer.

 As you can see, you just wrap it around, belt it, and you’re good to go. One day I wore it with a long sleeve cotton shirt underneath, and another day I wore it with a sleeveless, sheer collared shirt. I preferred the second as the fleece won’t move as much against the long sleeve cotton, making it a little more tricky to move in throughout the day. Also, this gets seriously warm, so the sleeveless shirt felt better underneath in addition to allowing for more movement with the fabric. This would also be cute with a fabric belt as well!
And there you have it. About thirty minutes of “work” and no sewing skills, and I love it! Thanks for letting my share my “new” blanket sweater with you. xo. Emma
P.S. That exact blanket just happens to be on sale right now!
http://www.thebay.com/webapp/wcs/stores/servlet/en/thebay/hbc-/blankets/fleece-multi-coloured-throw-0007-jet984–24
ha ha! An updated way to wear the Hudson’s Bay blanket the same way the First Nations did (as outer wear). Now I can’t wait to see what you’ll do with the remaining navy stripes! hmmm… I wonder if a navy tie belt could look as good as the red…?
Emma, this is so rad!! I love that it’s been well-loved, and turned into something amazing! Love ya!
This tunic looks amazing! Great idea xo
http://anovamelody.blogspot.com
Oh, I do love this idea but I was sad to see that you cut the blue stripe from a very iconic and historic pattern! Those stripes have been around since the late 18th century in that combination and are recognizable to many — The Hudson Bay Co.
Amazing idea! And it looks amazing 🙂
Sofie x
http://sealoffashionsofie.weebly.com/my-blog
I am from Canada and this looks just like the vintage The Bay blankets so cutting them up is incredibly blasphemous. But otherwise, very adorable.
xoxo, Laura
www.theaccidentalmama.com
I LOVE this! So chic and simple, definitely a unique gift for christmas
xoxo
misswednesdaysgirl.blogspot.co.uk
that is so cute!
xx nikki
www.dream-in-neon.com
I LOVE this so simple and chic and very easy to do. Such a cool and individual gift idea for Christmas!
xoxo
misswednesdaysgirl.blogspot.co.uk/
Oh, this is beautiful! You did a great job and it looks so cozy and warm. The colours remind me of a Hudson Bay blanket, which you see everywhere in Canada.
That’s very cool!
emma girl, you tiny genius. consider this a virtual fist bump. 🙂
This is a great idea! I love the look of it 🙂 Keeping this in mind!
WritingMonique
And all of us Canadians say “That’s a Hudson’s Bay blanket!” 🙂 Creative!
So super cute … and just maaaaaybe a sewing project I can do!!!!!!
So creative! I bet nobody could tell you were wearing a blanket if you wore that out.
http://itsjpei.wordpress.com/
I’m definitely going to have to make this!
This is my kind of DIY! Super easy, no effort involved, wearing a blanket in public… yep. I am definitely filing this away in my “to do with a fleece blanket” if I ever find a good piece to turn into a poncho!
xo
Kristina
Eccentric Owl
Awesome timing! My sister just asked me if I could sew her something as comfy and warm as a poncho but a bit more stylish – she sent me about 14 pictures as examples – and this is a perfect fit for what she described 🙂