 Hey, folks. It’s Josh. I’ve been super busy these past couple of months working on our HFHS project house. As we mentioned in our last update, the house is coming along, and we can’t wait to share more with you soon. We’ve learned a LOT while working on this project! One task we recently completed was painting all of the interior. A lot more goes into painting than you might guess, so I thought it would be fun to share a thorough breakdown of everything we encountered and learned as we painted this house. If you have any big painting projects in your future, I highly recommend you check out some of these tips and lessons we learned so hopefully your project goes smoothly.
Please note: there are tons of references online on the subject of painting (from pros who have been doing it for years). This post is going to be an overview of the steps, mistakes, and successes we used/had.
The house we’re working on is about 900 square feet. All in all it cost about $1300 to paint the entire place. The quote from our contractor was $2500 and that number didn’t include skim coating the dining room, which we ran into unexpectedly. So we saved over $1000 doing it ourselves, and our cost included a paint sprayer we purchased! Actually, let me break down all of the costs for you. (This is a rough breakdown, all numbers are rounded.)
Supplies & Tools:
(3) 5 gallon buckets of KILZ primer – $225
chalkboard paint (custom color) -$25
lead tester $10
wallpaper stripper – $5
dust masks and respirator – $50
drop cloths – $55
painter (we used this one) – $240
drywall/tape/mud- $35
elastopatch – $10
masking tape -$35
grinder/cutter wheel – $60
wall patches – $10
caulk gun – $2
spray sock – $2
coveralls – $15
paint/brushes/rollers – $350
pizza (it just makes painting better, although optional) – $60
We are pretty much set up to run a small painting company now. Keep a lookout for ABM Paint Co™. Not really. But when you work on an old house, projects just keep stacking up, which means more tools and supplies. But even after buying all the tools, supplies, and paint, it still cost less than hiring a pro! One thing that isn’t on the list, and to most people is the most expensive thing, is time. A lot of time is needed for prepping, painting, and cleanup. You don’t want to be in a rush when you’re painting. Precision is key to a job well done, and you can’t be both precise and in a hurry. It just doesn’t work! So keep that in mind when you’re planning a paint project. Try not to rush through it. Take your time prepping and painting, and when you’re done and see how good of a job you’ve done, you’ll see that it was worth it!
Prepping
There were a couple things that needed to be done before I even started thinking about painting. Since the house was built in 1921, I wanted to check for lead. You can find lead testers in any home improvement store. I followed the directions on the label, did some tests, and found that the house was lead free! That was a relief because removing lead is a huge hassle, requiring professionals, special suits, and more tests. No thank you. If you do happen to test for lead and it shows positive, you can contact the national lead hotline, which should get you on the right track for proper removal. Fortunately we were able to bypass that entire process.
 The second thing that we needed to do was prep the walls for paint. That required several things:
Wallpaper
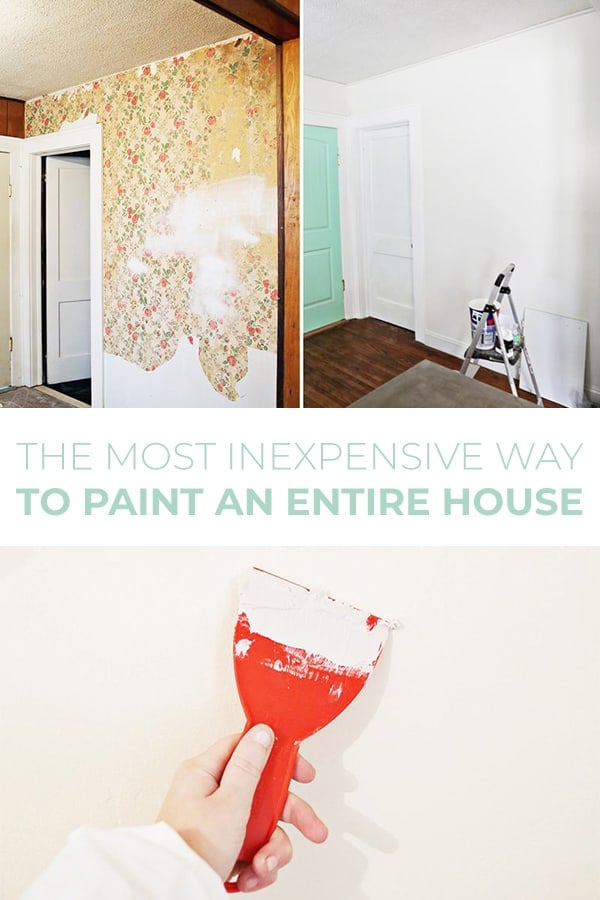
First, we worked to remove all wallpaper throughout the house. There was a wallpaper border in a couple rooms, so it wasn’t too big of a deal taking it off. I basically scored the paper, wet it, then scraped it off. We did a more in-depth post last year. The main thing to keep in mind when removing wallpaper is to score well, then soak soak soak. The longer you let the paper soak up the removal spray or water, the easier it will peel off! Don’t paint over the wallpaper. Like most short cuts in home repair, it will lead to more problems down the road. Which I ran into in this house. In the dining room, I was removing the wallpaper when I realized somebody had previously painted over wallpaper. In the entire room! Which leads me to the second thing we did.
 I ended up scraping off paint and wallpaper down to the plaster. It took a couple days to finish. I’m so glad they only did that in the one room! Again, moisture really helped in the process. The more I soaked the walls, the easier it was to scrape and remove the wallpaper and paint. After I had the entire room scraped down to the bare plaster walls, I realized I would have to repair some cracks and skim coat the entire room if there were going to be halfway decent looking walls.
 Skim Coating Plaster
We used a product called Elastoplastic to fill in the cracks, so that it would expand and contract with the walls. That was no problem. Skim coating was a whole other story. It was something I’d never done before, so it took a bit of experimentation to get it looking somewhat good. I watched a bunch of YouTube videos to get an idea of how it was done. Of course every person had different methods, tips and advice. Eventually I just had to go for it. I used a premixed all-purpose sheet rock joint compound. Describing how I did it won’t be very helpful. It takes doing it to even understand how to start. I would do what I did, which was watch a bunch of videos and get a big picture on how it’s done. Then buy the mud, the mudding knives, the mudding hawk and go for it. What you’re basically trying to do is create either a good flat or textured surface to paint over. I tried to get the surface as flat as possible. It took several coats, retouching, wet sanding (using sanding sponges) and patience to get the walls looking halfway decent. I was happy with the results, thankfully. Especially compared to what it looked like before!
Stains
The ceilings are all covered in popcorn finish. We really didn’t want to keep the texture at all, but decided to forgo removing it to save money since it’s mainly an aesthetic preference anyway. But we wanted to at least get the ceiling back to looking white. Previous residents must have been smokers, as the ceiling in the living and dining room had taken on a gross yellow patina. Although popcorn with butter is delicious, you don’t want your ceiling to look like buttered popcorn. There were some unsightly water stains as well. We initially just tried painting over the stains with KILZ primer (we actually just tested one spot to experiment.) The water based primer didn’t have a chance against the stain, and within minutes it was seeping through the (several) coats of primer.
 The next option was using oil based primer. That stuff is not fun to work with. The fumes are not fun to work around (be sure to open windows!), and you can’t wash it off without using more chemicals. Fortunately somebody suggested we try bleaching the stains, which sounded a bit more feasible and manageable. So we tried it. Dawning coveralls and face masks, and armed with a pump garden sprayer filled with diluted bleach (mostly water with a couple capfuls of bleach), we attacked the stains. After a couple spray downs, the yellow started to disappear! For a couple of days, we misted the ceiling, waited a couple hours and repeated. Most stains were taken care of, the rest were dissolved enough to prime over.
 After we had the dining room ready for paint, there was a kitchen wall that needed some help. There were cracks, and a big ol’ bulge from where a chimney had been plastered over. It was also covered with greasy old wallpaper. We decided to grind out the crack and drywall over the entire wall. I would suggest hiring somebody to do this for you. It would take a pro about an hour to take care of it for a reasonably small price. I know just enough about drywall that I was able to do it myself. First, I used a grinder with a cutter wheel to cut out the plaster and lathe that was bulging out. I’m pretty sure the majority of people don’t have to deal with plaster walls and lathe. It’s mostly found in older homes. So the chances of you running into this problem are slim. Fingers crossed, knock on wood (pun!).
Repairing Minor Holes
In both bedrooms there were holes knocked in the walls by the door handles (easily avoided with a $1 doorstop.) The holes were too big to patch with just spackle, so I got a couple of hole patches. They are sold near the spackles in your home improvement store. The directions are easy to follow, and they work! After paint, you wouldn’t know there once were big ol’ ugly holes. We used spackle to cover nail holes, minor cracks, and imperfections throughout the house. I tried a lot of different spackles in this house. My favorite one for minor repairs is Fast N Final. It applies easily, dries in a few minutes, and doesn’t require a whole lot of sanding.
 Once all the walls were patched, repaired, dry, and sanded it was time to spray on the primer. Using the sprayer took some getting used to. If you do have a big project ahead of you and decide to buy or rent a sprayer, here are a few tips I (as an amateur) would pass on to you when it comes to using a sprayer:
Using Paint Sprayer
1. Read the directions! When I use a new machine or tool, I usually just go for it and learn along the way. For a sprayer, there are so many variables that can make or break the outcome: clogging, pressure, priming, cleaning, etc. all play a role. Read the directions and you’ll know how to deal with all of those issues as they come along.
 2. I’ll probably say this a lot in my posts, and it really is a no brainer, but I think it’s easy to forget that there are tons of resources available not only online, but in things called books, and from real people! Watch videos, use Google, go to your library, or ask people questions. There are people that are old pros out there that have great info. They know hints and tips and methods that can only be picked up by doing something full time, for years. Maybe you have an uncle or neighbor that paints. Ask them to give you advice they wished they had when first starting out. Even the people at the paint department in the home improvement store can give some good advice. Why I like to get my resources from different places, is that some people like to pretend to know what they are talking about. By cross-referencing resources and digging a bit deeper, solid advice can be found.
3. Have a plan. How are you going to clean the machine? Do you have a mental route of the space mapped out that takes into account the hose, machine placement, the paint bucket, etc? Do you need to protect the floor or windows from overspray? Having an idea of all the steps you need to take to get things done will save time.
As for actually using the sprayer, the main thing to remember is to not overcoat with paint. Two or three quick passes will minimize drippage as opposed to trying to get a full coat on all at once. (Which I learned the hard way. The first room I painted was so drippy droppy, we had to do some extra sanding once it dried. I felt so bad!) Only by actually using the sprayer will you get a method down. By the time I was done with the sprayer, I felt like a pro and actually had fun painting!
4. Wear coveralls! Wear shoe protectors. Wear a head sock! Wear goggles! Especially when first starting out, and/or are spraying a ceiling, you will get paint everywhere. My glasses will never be the same.
 It took a couple days to get the house primed. When that was done, it was time for our paint party! We had some people over and painted colors, whites, trims, and doors. You can see the color choices here. The walls were painted a semi-gloss paramount white and the trim was gloss ultra white. Choosing two different sheens gives contrast and a bit more depth. The semi-gloss and gloss painted walls are also easier to clean compared to flat paint.
Tips
I’m going to leave you with a few hints and tips that I’ve picked up in this project and will use on all the next paint projects I tackle:
- Spend the extra money getting better tools. Buy the $6 dollar bendy handle trim brush ( I won’t do trim without it) as compared to the $2 chip brush. Get the more expensive paint tape with edge lock tech. You’ll get crisper lines, less paint seeps. Cheap brushes and tape don’t help and usually cause double work. You’ll still save money by doing the painting yourself.
- Take the extra time and tape off your windows, sills, countertops, floors—basically anything not getting painted. The same thing with door hardware, take off the knobs, tape hinges. It takes a lot of time to do. It’s a hassle. But after you’re done painting, and you’re peeling off the paint and plastic and putting back on the knobs, it’ll look so good! You’ll feel so good!
- Clean your brushes thoroughly right after use. Especially if you’re buying the more expensive ones! That extra care will go a long way. You can reuse the brushes for future projects.
- Paint trim first, then walls.
- After painting, if need be, install door stoppers right away. Save the walls from abuse!
So there you go. An amateur’s guide to painting a house. Really the best way to learn how to do something is by doing it. Don’t be afraid to tackle that big paint project. – Josh
Credits // Author: Josh Rhodes, Photography: Emma Chapman. Photos edited with A Beautiful Mess actions.
Josh, thank you for the painstaking detail you use to describe what we painters go through. Especially on a renovation project. Most are not this big but laying out what DIY’ers would be looking at before they start is quite eye opening…we have a painting business and find it helpful when homeowners have outside resources to gather information on… keep up the good work!
Aurora House Painters
So I read a lot of painting blogs to make sure I understand what my clients want. I gotta say, this post is amazing! You applied what you learned far faster than the majority of my employees ever do. I totally respect what you did because it what I do everyday. I’ll end with this, YES buy higher quality gear people. It makes a huge difference and why would you want all of your time and money to go to waste?
I’ll be reading more for sure! Thanks.
Wow, you really got down and dirty, I am seriously impressed when I hear people like yourself really learning and trying it yourself. Makes me feel like a slacker. I thought that was really interesting how you used a hose with bleach to get rid of the wall stains instead of the oil based primer. Now that I know it works I may try that myself and pass on the tip to friends. I am lucky to have a brother in the painting business hence the website . It really is tedious work and you need time which I never seem to have enough of. Great article, thanks for all of the great tips, I am happy I found your blog:-)
I’ve been painting homes for over 15 years and I think you’ve nailed it: PREPPING. Most DIY’ers and home owners have little to no knowledge about the amount of time and cost it takes to prepare a project prior to painting. Your Article did a Great job in explaining some of the procedures that are necessary for a truly professional paint job. All to often the prepping is weak or non existing. As you pointed out, covering badly stained walls or ceilings with a coat of Kiln is probably not enough. Just wondering how many hours were spent in the prepping of your project? Great details and information.
Wow this is so detailed and well documented. Perfect for when I want to paint my own home. (I am tempted to keep records like you to Josh)
Yes i completely agree with getting quality tools! I have had so many frustrations from buying garbage tools. It ends up costing more in the long run. Thank you so much for sharing this was very helpful!
I agree heavily with your decision to buy the higher end brushes. Choosing the quality tools over the cheap ones, even despite the price, is definitely the right way to go when undergoing a DIY painting project. The difference it provides is day and night! In my opinion, the money used to buy the top tier equipment saves you from any extra stress or headaches that poor quality brushes or tape can cause, so in the end it really is a win! All in all, this is a very well written and informative article, thank you for sharing your experience!
Josh, some great work on the renovation, it’s come up really nicely! It’s good to see you stressing the importance of not taking short cuts when it comes to prepping and removing wallpaper. It definitely does lead to more problems down the road when done incorrectly. However there is a caveat on that. If the wallpaper is in good condition and you have primed it properly, you can get away with painting over wallpaper. On a few jobs where the client has been on a tight budget, we have used an oil based primer to really seal the adhesive and keep then moisture from the paint away. Has worked well and we haven’t got any call backs. But I’d still agree with you and always push for stripping back wallpaper where possible. An ounce of prevention is worth a pound of cure as the saying goes.
Also, would love to see how your painted popcorn ceilings came up. We call it ‘vermiculite’. Its quite old school and we come across it in school jobs and old buildings occasionally.
Anyway, great work, Josh!
After starting a painting project and needing some help I came to this article. Thanks for the advice.
I bought a house in Amaia Laguna, and its really small. I wanted to decorate it to make it look bigger, thanks for the advice!
I’m always on the hunt for new and helpful ways to keep my painting business up to date. Thanks for sharing your step by step process. : )
The best interior ever! We are going to change some rooms in our house, therefore, such tips are really useful. I agree, better get the more expensive paint tape with edge lock tech. It is really important at work.
These are some great tips for painting the outside of a home. Our home is old, and the color on its exterior shows it. I like how you talked about hiring a painter. I can see why asking for multiple references would be a good idea to see if the painter knows his stuff! CJ Holmskovec
Thanks for sharing..
This has given me some great ideas for my kitchen and living room. I’m a little nervous about how to décor my whole room but I think this guide will help me a lot once I start with the work.
Looks like it was quite a large job and it looks great!
Thanks again. These painting lessons demonstrate how to paint using several different techniques to create art in many different styles, from photorealism to abstraction.
Thank you for sharing these tips, Josh! My boyfriend and I are about to embark on a major re-design of our condo and I am not looking forward to all the painting prep work. It does make a huge difference if you do it right though!
I live next door to this house and I just wanted to say a big “Thank you!” The pictures do not do justice to how terrible the house looked before ABM purchased it. You all have done so much to add value to the house and also our neighborhood. Thank you so much! I can’t wait to meet the family that eventually moves in!
Whoa! You must be a fan speaking of lessons learned..:) I appreciate your insight and if nothing else well, we played in the dirt and here we are now…Best..:)-annie