 I spend a lot of time on the floor at my house! If I’m not crafting on the floor, I’m crawling after a child or reading a story. This can make for sore knees or a numb rear end. So we’ve recently added a few floor pillows to make things a little cozier. As much as I appreciate a soft place to perch, I also love an excuse to sew something that makes our space even prettier and thought you might want to know just how easy it is to create a few oversized pillows, too.
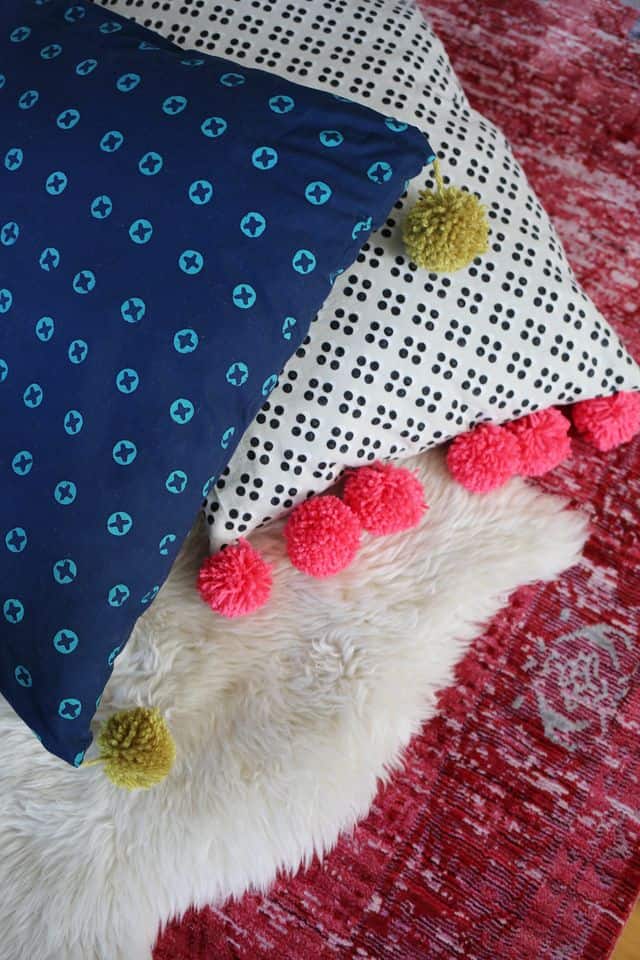
When picking out fabric for your floor pillows, you want to think about color and durability. I used quilting weight cotton because I loved the patterns and colors they came in, and I knew the cotton was pretty durable. The navy print is from one of Alison Glass‘ collections and the black and white is by Melody Miller for Cotton + Steel. These were purchased online from Indeed Fabric if you’re interested in some great print options.
If you know your pillows will get put through the ringer, you might want to check out the print options available in canvas or upholstery weight fabrics. You can also make these from canvas drop cloths and print or paint your own designs if you’re not finding something you love on the market.
Supplies for a Rectangular Floor Pillow:
-1 yard of printed cotton fabric
-1 skein of yarn (130 yards)
-2 lbs of polyester fiber fill
-sewing machine
-straight pins
-scissors
-needle and thread
-pom pom maker (optional)
Supplies for a Square Floor Pillow:
-1 1/2 yards of printed cotton fabric
-1/3 skein of yarn (40 yards)
-2 lbs of polyester fiber fill
-sewing machine
-straight pins
-scissors
-needle and thread
-pom pom maker (optional)
If you’re making a rectangular pillow with pom poms on the short ends, make twelve pom poms using a designated pom pom maker or another method. Make sure you leave at least three inches of tail length to stitch to your fabric later. If you’re making a square pillow, you’ll only need four pom poms.
Rectangular Pillow
Find the shorter end of your yard of fabric and fold it in half with wrong sides together to create a rectangular shape. Pin your pom poms just to the top layer of fabric with the tails sticking out to the edge and pom poms sticking in about 1″ from the edge. Repeat for the opposite end. Again, be sure to only pin them to the top layer of fabric.
Square Pillow
Cut your fabric to get two pieces that measure 27″ x 27″. Place one of the cuts of fabric on the floor with the right side facing you and pin a pom pom in each corner with the tail facing out and the pom pom facing in.
For the rectangular pillow, unfold your fabric and stitch a line down the pom pom edge so that you’re stitching about 1/2″ from the edge. I suggest backstitching (stitching in reverse) over the yarn tails to add extra security. Remove your pins. Repeat for the opposite end.
For the square pillow, stitch over the pom pom tails in each corner a few times using the backstitch button (or reverse), but you don’t have to stitch all the way around the perimeter.
For the rectangular pillow, fold your fabric in half with the right sides facing each other and carefully match up your two sides. Pin them together. Be sure your pom poms are tucked in and out of the way. Repeat with opposite end.
For the square pillow, place the second cut of fabric on top of the first with the right sides (printed sides) facing together. Match up your corners and edges and pin together.
For the rectangular pillow, stitch a second line down the length of your edge but stitch it between the first line and the pom pom so that your first line of stitching doesn’t show when you turn it right side out. Trim your tail ends, remove pins, and repeat on the opposite end.
For the rectangular pillow, line up your two long sides to match and pin them together. Stitch down from the top corner about 1/3 of the way and backstitch. Then stitch from the bottom corner up about 1/3 of the way and backstitch. This will leave you about 7″ of space open near the center to add stuffing.
For the square pillow, start in the center of one edge and stitch all the way around about 1/2″ from the edge. Stop stitching when you get about 6″ away from where you started so you have space to stuff your pillow.
For both pillows, remove your pins and turn right side out. Be extra careful with your pom poms as you move them through and then push out the corners with your thumb. Fill with polyester fiber fill and stitch closed using a blind stitch with a needle and thread.
Fluff your pillows a bit for an even shape and then find a good book or a craft project to keep you busy and test them out! The rectangular pillow does double duty as an oversized bolster pillow for a queen or king-sized bed but is also really fun on a twin. Not only are these great for extra company or impromptu lounging, they instantly add that extra layer of something special to help a room feel even more inviting. –Rachel
Credits//Author and Photography: Rachel Denbow. Photos edited with A Beautiful Mess actions.
LOVE this! Definitely going to make these before my next movie night for floor snuggles!!
xoxo
VGB
www.VerbalGoldBlog.com
Adorable!!
-Samantha- www.floraunderground.wordpress.com
HannahF,
Thanks! I actually have a tutorial for the cat pillow on my personal blog!
http://smileandwave.typepad.com/blog/2014/04/here-kitty-kitty-pillow-tutorial.html
Looks so comfortable and pretty at the same time 🙂 good job!
xx
http://paintmeyellowmag.wordpress.com/
These look fab! can’t wait to try with my Potato print cushions. x
http://wildandgrizzly.com
This is so cute! http://www.hannamarielei.com
Just purchased some woven ikat throws this weekend and was trying to dream up a project. Great inspiration!
Love this project, but I also love the cat pillow in the pic. Can you do a tutorial on that one? Thanks
This is a beautiful diy – thanks Rachel!
I love the pom pom embellishment! I just did a round up of 21 clever DIY home decor ideas using fabric–wish I would have seen these cute floor pillows in time! You did a great job!!
Although I’m late to the pom-pom trend, I did just make my first batch this weekend. It was faster than I expected. I love idea of adding it to a pillow. Thanks for sharing!
This is actually so cute I love it!
I just needed cushions and wanted to buy new ones but maybe i’ll make them! x
http://jessicawoods.fr
That’s such a cute project, I especially like the black and white one because it forms such a nice contrast with the pink pom poms!
http://www.makeandmess.com/
Love these!! Thanks for the idea!! I’m just in the process of decorating the babies nursery, shared with our 10 year old. Floor cushions are a fab idea!
You can see some pics here: http://homemadebyhail.blogspot.co.uk/
Aawww so much cuteness!!I love pom pom in general and those colors that you use….I’m in love and now i want them everywhere and not just on pillows haha
Does anyone know where that gorgeous rug is from?
i love that so so much! definitely need to that 🙂
mfashionfreak♥blog
Love it!
xx
http://www.cherry-mag.com
thank you for your post.