So many of my projects are inspired by my kids and born out of a need to facilitate some kind of activity that will either teach them independence or nurture their creativity. This hammock chair DIY is one of those.

I made this hammock chair specifically for my older son who loves to read and often needs a little bit of quiet space away from his talkative sister. Our front porch has often served as a little retreat from the chaos of a family of five and was the perfect place to hang out (literally) and enjoy a book.
While I made this hammock chair for my kids, it could be used by adults as well. I used supplies strong enough to hold up to 200 lbs. so that it might withstand a sturdy plop from either of the older kids, but supplies are available at most hardware stores that will ensure this hammock chair tutorial can hold even more weight.


 Supplies:
–1 1/4″ x 3′ oak dowel (oak is a hard wood and considered safer than poplar for supporting weight. Also, I had mine cut to 3′)
–3/8″ x 16′ braided polypropylene (get this by the foot)
-2 yards of plain canvas
–80mm stainless steel spring snap link (holds up to 220 lbs)
–3/16″ stainless steel quick link (holds up to 660 lbs)
–black fabric paint (my acrylic paint is fabric-friendly)
-paint brush
Tools:
–drill and 3/8″ drill bit
-sewing machine
–iron and ironing board
-shears
-ruler
-lighter
 Step One: Fold your two yards of canvas in half and lay flat with the fold on the left as shown. Measure in about 7″ from the top right edge and mark.
I cut mine about 12″ in, and it was a bit too much, so I’m suggesting 7″. Using a yard stick or ruler, draw a line from that top mark to the bottom right corner, and cut through both pieces. Open your canvas.
Step Two: Fold your top edge down 1/2″ and iron flat. Then fold it in again 1/2″ and iron flat. Pin and stitch the bottom of the fold as shown above. Repeat with the long bottom edge.
 Step Three: Flip your canvas 90 degrees to the left so that the longest edge is on the right. You’re going to create pockets for the rope to slide through on each side.
Fold each corner in about 1 1/2″ and iron flat. Then, fold the unhemmed top edge in 1/2″ and iron flat.
Step Four: Fold again 1 1/2″ and iron flat.
Step Five: Stitch two lines along the bottom folded edge as shown. Reinforce your beginning and ending with back stitches. Repeat with other side.
Step Six: Make a mark 2″ and 4″ in from both ends of your dowel, and drill through. Sand your rough edges and stain if you’d like. I chose to leave mine natural.
 Step Seven: Place your canvas on a large sheet of cardboard, and paint your design on one side. Let it dry, and then paint a design on the other side (optional). If you’re using printed fabric, be sure it’s upholstery weight or outdoor fabric to ensure its strength.
Step Eight: Tie a knot at one end of your 16′ rope so that there is about 3″ of a tail. Melt the end so it won’t fray. Thread it down through the outer hole of your oak dowel and up from the widest corner of one side of your canvas seat to the narrow corner of the top.
Then, tie a knot about 3′ from your first knot, and thread it up into the oak dowel. Continue to thread it down into the hole 4″ from the other edge, and measure 3′ from the loose end, and tie a loose knot.
Thread it down through the other canvas pocket and back up through the last hole before tying a knot with a 3″ tail. If your two sides aren’t even, adjust your knots before pulling them tight.
 Step Nine: Find the center of the rope above your dowel, and tie a knot with about 8″-10″ of room above it. Attach your spring link, and then your quick link, and finally hang it on a hook screwed safely into a ceiling beam or large tree branch.
Be sure to adjust all of your knots to make sure the seat sits evenly. Test it out by hanging on it before sitting in it to make sure everything is secure.


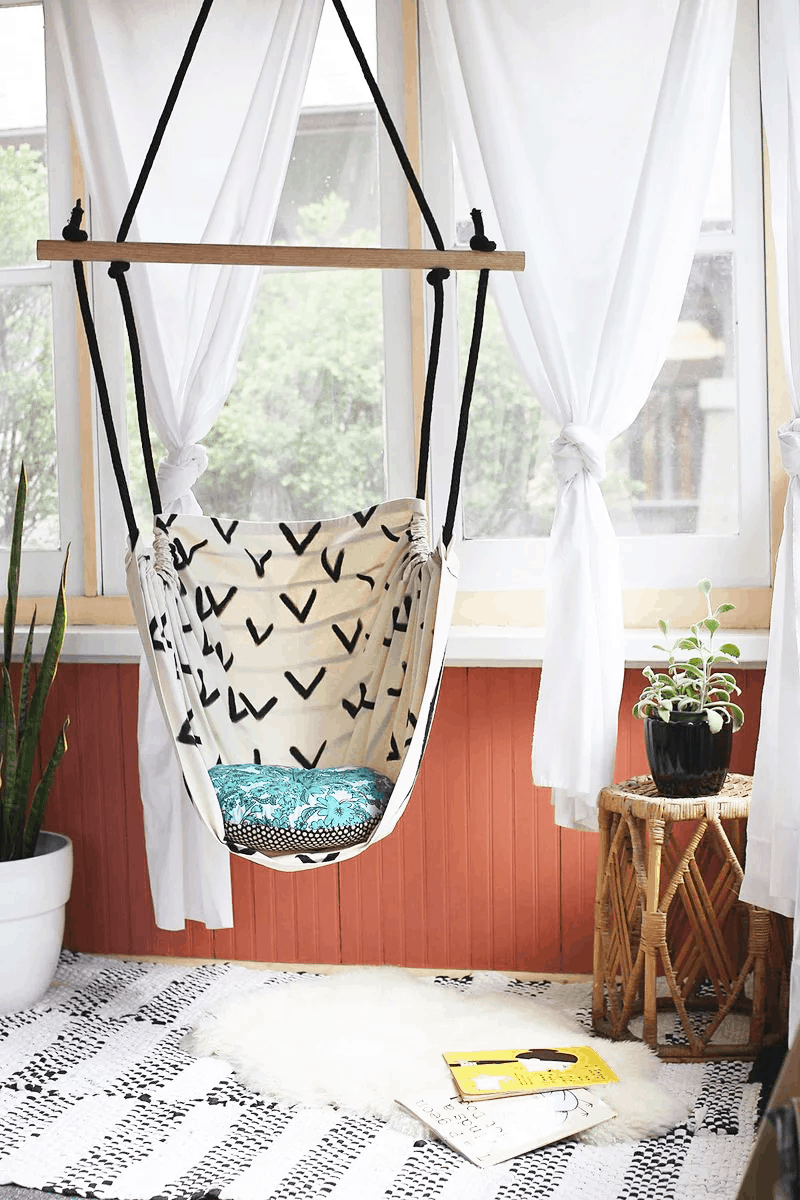
 A soft, round pillow in the bottom of the seat can be added for extra cushioning for smaller sitters. Height can be adjusted depending on the height of your ceiling.
Our porch ceiling is lower than the inside of our house, so you can add another loop of knotted rope, or just cut your rope to be about 2′-4′ longer depending on the height of your ceiling.
I added a cozy rug (similar here) and some plants in woven planters to make the area feels more cozy as well. I hope your hammock chair gets as much use as ours! –Rachel
P.S. If you love this idea but aren’t sure of your DIY skills, I would suggest getting one of these—so cute!
Looking for more of Rachel’s DIY projects?
Credits // Author and Photography: Rachel Denbow. Note: As always, use this tutorial at your own risk. This chair is made for gentle swaying and not actual swinging. Please use with caution. A Beautiful Mess and its writers are not responsible for any injury or loss from execution of this tutorial. Safety first, y’all!
Love this post? Sign up for our newsletter for more ideas!

Get creative ideas for recipes, crafts, decor, and more in your inbox!
 Get the How-To

Supplies
Equipment
- power drill
- sewing machine
Instructions
- Fold your two yards of canvas in half and lay flat with the fold on the left as shown. Measure in about 7″ from the top right edge and mark. I cut mine about 12″ in, and it was a bit too much, so I’m suggesting 7″. Using a yard stick or ruler, draw a line from that top mark to the bottom right corner, and cut through both pieces. Open your canvas.
- Fold your top edge down 1/2″ and iron flat. Then fold it in again 1/2″ and iron flat. Pin and stitch the bottom of the fold as shown above. Repeat with the long bottom edge.
- Flip your canvas 90 degrees to the left so that the longest edge is on the right. You’re going to create pockets for the rope to slide through on each side. Fold each corner in about 1 1/2″ and iron flat. Then, fold the unhemmed top edge in 1/2″ and iron flat.
- Fold again 1 1/2″ and iron flat.
- Stitch two lines along the bottom folded edge as shown. Reinforce your beginning and ending with back stitches. Repeat with other side.
- Make a mark 2″ and 4″ in from both ends of your dowel, and drill through. Sand your rough edges and stain if you’d like. I chose to leave mine natural.
- Place your canvas on a large sheet of cardboard, and paint your design on one side. Let it dry, and then paint a design on the other side (optional). If you’re using printed fabric, be sure it’s upholstery weight or outdoor fabric to ensure its strength.
- Tie a knot at one end of your 16′ rope so that there is about 3″ of a tail. Melt the end so it won’t fray. Thread it down through the outer hole of your oak dowel and up from the widest corner of one side of your canvas seat to the narrow corner of the top. Then, tie a knot about 3′ from your first knot, and thread it up into the oak dowel. Continue to thread it down into the hole 4″ from the other edge, and measure 3′ from the loose end, and tie a loose knot. Thread it down through the other canvas pocket and back up through the last hole before tying a knot with a 3″ tail. If your two sides aren’t even, adjust your knots before pulling them tight.
- Find the center of the rope above your dowel, and tie a knot with about 8″-10″ of room above it. Attach your spring link, and then your quick link, and finally hang it on a hook screwed safely into a ceiling beam or large tree branch. Be sure to adjust all of your knots to make sure the seat sits evenly. Test it out by hanging on it before sitting in it to make sure everything is secure.


Simply the best way to take a rest in a camping hammock chair and it is so blissful
Question:
2 yards = 72 inches long and 60 inches wide. So, when you say fold in half, do you mean lengthwise or widthwise? And is that for the head portion where it seems to be narrower?
This is so cute! I’m making it right now. Two things that would be really helpful to know: fabric width (as mentioned by others in comments above) and where the selvedges are when you fold the fabric initially. There are two ways you could fold the fabric in half. Would be great if there were a few measurements on the photos 🙂 Excited to see my chair complete!
How much did this cost to make?
I’d definitely suggest using a bigger eye-hole than that little thing. And I’d recommend using two of them, even if it ruins your ability to swing in a rotating fashion. I love the idea of a unique hammock chair, and yours looks wonderful! The pillow, the fabric used, these all make for a very personalized look that I really enjoyed! Thanks for the inspiration!
So, I made this piece and warned by all the comments, I first pinned the cloth together and hang it to see how it would turn out. Turns out, the description is not very useful when you use different measures to make an adult version as the proportion change. So here some hints…
Based on the comments that the measures were for children and that adult versions needed to be bigger I used a thick cotton fabric of 230*155cm. I think 180*130cm is probably the minimum you should aim for. Mine is a bit big for a normal sized person but with some cushions it’s actually quite comfortable. Now…
The bar is about 1m wide and the strings on which the chair hangs are about 80cm apart. This should also be about the width of the top end of your finished piece, 75-90 cm. Let’s say 80cm in this example, meaning that the folded cloth needs to be cut at 40 cm from the crease PLUS about 10 cm on each side for the rope pockets. So in total you need to measure 50cm on the folded cloth’s top margin. You can be more generous with the rope pockets, the fabric falls nicer if the rope has more space in the pocket.
Now you fold the fabric but not to the bottom corner but to a point 50 cm from the bottom. These 50cm will be your seating space. If you cut to the bottom corner you are more likely to get an inclined seat from which you slip to the floor.
Good luck.
This was a fun project. I followed what TASS said and my hammock turned out great! For the next chair I am going to add maybe an inch or two to the width of the top of the chair so I can recline a little. Thanks for the suggestions on measuring!
I did a similar chair in my dorm room few years ago. It was a real struggle, I wish I had found your guide earlier.
As you said in the article, this is the best place to relax and enjoy a book)
What a great idea! But I will probably need to double the dimensions to fit in it.
Thanks for sharing!
Hey everyone that is having issues with the size!!
After struggling and feeling as something was wrong with me, my husband and I figure it out today!!
If your fabric is wide, 54”, then you NEED TO CUT AT LEAST 12”!!!!!!
If not IT WILL SAG!! ( trust me, been there done it)
Actually for the head area you could even
go in 2 more inches
I used outdoor canvas,, 2 yards at 54 “ wide.
Now, if you use plain regular canvas,, it’s going to be about 45” wide. This is important because it’s going to determine how much you cut. So with 45 “ you can safely cut 7”.
But 54” wide, cut 12-14 off.
I hope this helps you .
Just remember, outdoor fabric is going to be 54” wide, so cut more..
Regular fab or canvas is around 45”,,so you can cut 7.
If you have any questions, on what I did, you may contact me here theobachan2@icloud.com
Can u please help, I’m in Australia and these instructions make no sense cause of the different use of measurements
Hi,
I have made this now twice.
I read the directions step by step very carefully.
I used 2 yards of outdoor fabric, 54”wide.
Mine looks like a bunch of fabric hanging on a pole.
Did you leave something out in the instructions?
Mine was going to be a birthday present for a little girl..
I still want to do this, but I don’t want to buy more fabric.
Please help.
Tina, I loved this comment, was shaking with laughter, a bunch of fabric hanging on a pole, hilarious! I can so feel the disappointment in it after the initial excitement, it’s like a comedy.
However, as I was about to make one myself, I am very glad you shared a solution and I don’t have to look at a similarly misshapen result.
Thanks for that.
I just made two of these to hang in the trees for my kiddos.
I followed your directions exactly and they look like huge bizarre insect pods. Enormous, uncomfortable and rather ridiculous.
????????????????????
Anyone else have this challenge?
Mine doesn’t look right either. I followed it step by step. It doesn’t look anything like the photo. I also have to take about half the rope off.
Yes! Me! Definitely not right. Not sure what the dimensions are supposed to be, but mine aren’t even close.
Love this chair!
Wow! This hammock chair is awesome. I think I’ll be making some floral designs or birdies on the canvas for my baby girl.
Hi, I loved your idea and decided to make one for my boys room. When I finally got it hung up and sat in it I kept sliding out. Did I do something wrong or is there a simple solution to prevent one from sliding out. I also tried my 3 year old son in it and it was a little better but he also had trouble not sliding out.
First, try adjusting how much of the seat fabric is pulled forward vs behind. This you can easily adjust with this design. Another thing is it may have to do with the type of fabric you used? If it’s something that just has less friction than the canvas type material Rachel used here that may make a difference? But I’m not sure what you used, so maybe not. Hope that helps!
I’m 13, and was wondering if you could use some sort of wire like material in the edge of the fabric to make it a certain shape, and use word to create a stand, so that you don’t have to hang it on the ceiling, and if you were to make a stand like this, what material, wood most likely would work best, but I don’t really know, I just want to make one if those cool egg hanging chairs, and they’re super expensive, and was hoping I’d be able to make my own, and this already seems to have the base of what I’m looking for, I just need more details to make it more egg shaped and such
Thank you for this awesome diy how to! I am in the middle of making this and am having a difficult time threading the rope through the oak dowel holes. ???? did you find it to be difficult? Or am I doing something incorrectly? Thank you!
Do you have a video showing how to make this?
I was looking on ideas to write a good comments and ended up here through google. I could not get what i wanted but read you article though. Nice One. Best of Luck!
Please tell us the proper size to use. I have done it twice now and still don’t have the measurements right.
Hi Dannielle– We try to respond to every question, however, we don’t always get to the ones from older blog posts (this one is from 2014, and was written by one of our contributors). Do you have a specific question for Rachel?
Yes! Lol. Thank you. I have the same question that everyone else has been asking. What is the width of the fabric?
Please tell us the exact measurement of the fabric you used to make this chair
Hi Pam! Rachel (the author of the post) should be able to help you with this. racheldenbow AT gmail DOT com