")
") For me, pie is usually a two day event, which I think makes it all the more special. On day one I make the dough. I’m one of those bakers who likes to use my (clean) hands to incorporate the cold butter into the flour. It’s kind of a forearm workout.
For me, pie is usually a two day event, which I think makes it all the more special. On day one I make the dough. I’m one of those bakers who likes to use my (clean) hands to incorporate the cold butter into the flour. It’s kind of a forearm workout.
I try to remember to take my wedding ring off before I begin so it doesn’t get filled with crusty butter. I’d say I remember to do this about 75% of the time.
Related: 15+ Easy No-Bake Desserts and 40+ Easy Picnic Food Ideas and Apple Pie
") On day two, I make the filling and bake the pie. This is clearly the most fun of the two days because after the baking comes the eating. But, even though the eating is arguably the whole point of baking the pie at all, I can’t help but admit that day one holds a little bit of joy for me. Is it the anticipation?
On day two, I make the filling and bake the pie. This is clearly the most fun of the two days because after the baking comes the eating. But, even though the eating is arguably the whole point of baking the pie at all, I can’t help but admit that day one holds a little bit of joy for me. Is it the anticipation?
Or maybe just the simple victory of turning a handful of ingredients into something else? I’m not exactly sure.
Maybe you’re like me and you’ve got a little bit of baker in you. I mean, I am the girl who got an electric mixer tattooed on her forearm. There’s just something so comforting to me about playing around with, and ultimately, making good food.
I guess I feel a little bit of a connection to my mom and my great-grandmother because they are (or were, in the case of my late great-grandmother) enthusiastic about both making and eating food. And I joined that legacy many years ago. 🙂
Actually, this pie very much reminds me of my great-grandmother. She will always be known to me as grandma Lula. She was a Texan by way of Oklahoma, and she was a classic, which never goes out of style. I guess that’s kind of what this peach pie recipe is—no frills, but anything but plain.
 My Favorite Peach Pie, makes one pie
For the crust:
3 cups flour
1 tablespoon sugar
1 1/4 cups cold butter, cubed
1/4 cup + 1-2 tablespoons cold water
For the filling:
24 oz. frozen peaches, thawed*
1/2 teaspoon vanilla extract
1/2 cup flour
2 teaspoons corn starch
1 cup sugar
1/4 cup brown sugar
1/2 teaspoon salt
2 tablespoons butter
*You can use fresh peaches instead—especially if they are in season! You will want to add the juice from one lemon or a tablespoon of water if you do though because fresh peaches will likely be less liquid-y than frozen.
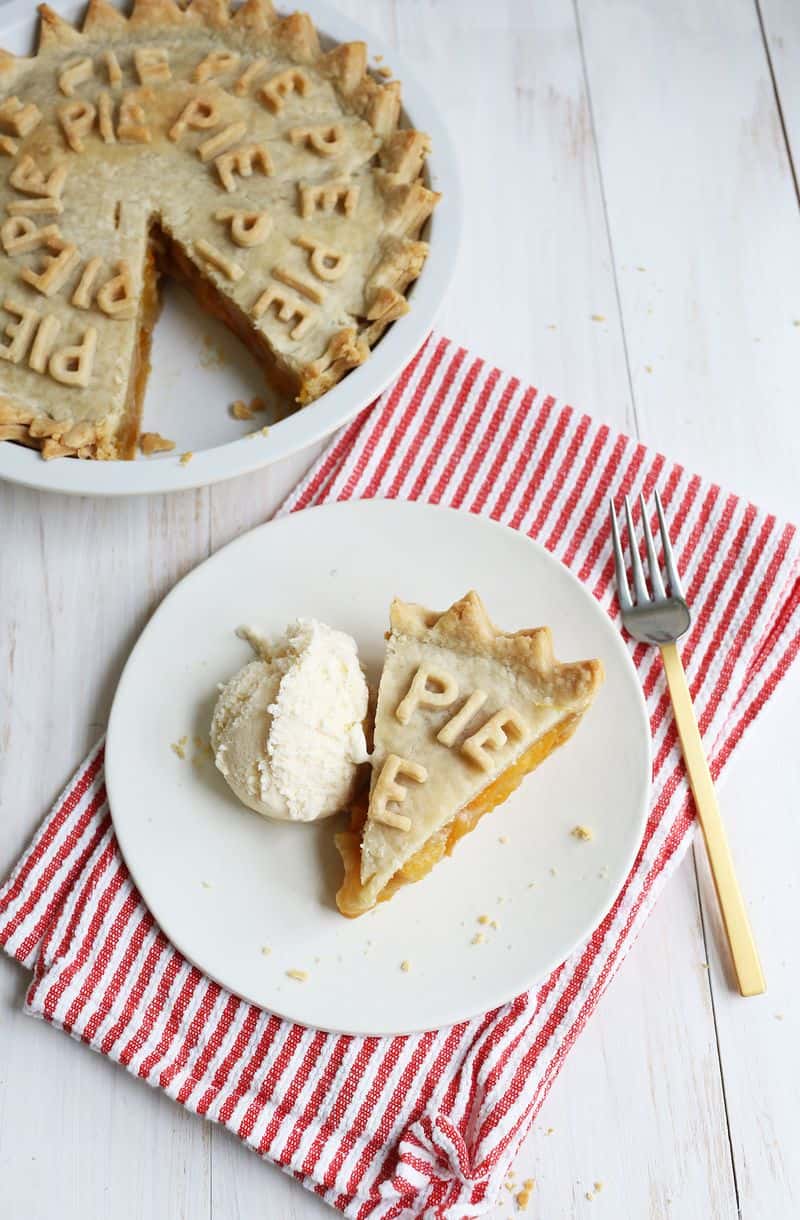
First, we make the crust. This is going to make a little more than two (for the top and bottom) because I like to encourage decorating the top. Add some words, fall leaves, smilie faces, really whatever cookie cutters you can find. It’s silly and oh so fun. 🙂 In a large bowl stir together the flour and sugar.
Add the cubes of cold butter and mix together until the mixture resembles tiny pebbles or large grains of sand. Like I said, I like to use my hands, but a pastry blender works well too. Then add 1/4 cup cold water. Mix together and try to form a dough ball.
If the mixture is too crumbly, add another tablespoon or two of cold water. Just enough so the dough comes together. Then wrap in plastic wrap and refrigerate for at least a couple hours or overnight.
 Now let’s make our filling. If you are using frozen peaches, thaw them and try to remove any excess liquid. You don’t have to pat the peaches completely dry as some liquid is good, but you don’t want them sitting in a big puddle of water after they thaw either. Just give them a good drain and you’re good.
Toss them with the flour, sugars, salt, and vanilla extract. Once you’ve rolled out about 1/3 of the dough for your bottom crust, place in a buttered pie pan. Then add your filling. Top with the 2 tablespoons of butter cut into four pieces (for even distribution).
Roll out the remaining dough and cover the top of the pie. You should have about 1/4 or 1/5 of the dough left over, you can use this to decorate the top. Once you have your design cut out, dip your fingers in a little water to wet the top crust. Press the design onto the moistened top crust.
This will help to make sure your design doesn’t move around while baking. Always a bummer to spend time spelling out a word only to have all your letters move around in the oven. Tastes the same though.
 Bake at 350°F for 50-60 minutes. I like to check on the pie after the first 30 minutes to make sure the edges of the crust aren’t browning too fast. If they do, remove the pie from the oven and carefully wrap the edges in foil. Then continue to bake.
Allow to cool for 10-15 minutes before slicing into it.
") You have to serve this along with vanilla ice cream. It’s part of the recipe, I swear. Happy pie baking! xo. Emma
You have to serve this along with vanilla ice cream. It’s part of the recipe, I swear. Happy pie baking! xo. Emma
Get our FREE recipe guide with our most popular recipes of all time!
Free Popular Recipe Guide
Our top 25 recipes of all time!
 Get the Recipe

Ingredients
For the crust:
- 3 cups flour
- 1 tablespoon sugar
- 1 ¼ cups cold butter (cubed)
- ¼ cup + 1-2 tablespoons cold water
For the filling:
- 24 oz. frozen peaches (thawed*)
- ½ teaspoon vanilla extract
- ½ cup flour
- 2 teaspoons corn starch
- 1 cup sugar
- ¼ cup brown sugar
- ½ teaspoon salt
- 2 tablespoons butter
Instructions
- First, we make the crust. This is going to make a little more than two (for the top and bottom) because I like to encourage decorating the top. Add some words, fall leaves, smilie faces, really whatever cookie cutters you can find. It's silly and oh so fun. In a large bowl stir together the flour and sugar. Add the cubes of cold butter and mix together until the mixture resembles tiny pebbles or large grains of sand. Like I said, I like to use my hands, but a pastry blender works well too. Then add 1/4 cup cold water. Mix together and try to form a dough ball. If the mixture is too crumbly, add another tablespoon or two of cold water. Just enough so the dough comes together. Then wrap in plastic wrap and refrigerate for at least a couple hours or overnight.
- Now, let's make our filling. If you are using frozen peaches, thaw them and try to remove any excess liquid. You don't have to pat the peaches completely dry as some liquid is good, but you don't want them sitting in a big puddle of water after they thaw either. Just give them a good drain and you're good.
- Toss them with the flour, sugars, salt, and vanilla extract. Once you’ve rolled out about 1/3 of the dough for your bottom crust, place in a buttered pie pan. Then add your filling. Top with the 2 tablespoons of butter cut into four pieces (for even distribution).
- Roll out the remaining dough and cover the top of the pie. You should have about 1/4 or 1/5 of the dough left over, you can use this to decorate the top. Once you have your design cut out, dip your fingers in a little water to wet the top crust. Press the design onto the moistened top crust. This will help to make sure your design doesn't move around while baking. Always a bummer to spend time spelling out a word only to have all your letters move around in the oven. Tastes the same though.
- Bake at 350°F for 50-60 minutes. I like to check on the pie after the first 30 minutes to make sure the edges of the crust aren’t browning too fast. If they do, remove the pie from the oven and carefully wrap the edges in foil. Then continue to bake.
- Allow to cool for 10-15 minutes before slicing into it.
looking forward to making my pie
Did you use salted or unsalted butter in the pie and crust? I love this recipe! My second pie is in the oven right now.
This pie doesn’t look fully baked at all. I bake at 400 degrees for 50-60 minutes wrapping the edges so they won’t burn.
The peaches did not soften at 350F, I was so disappointed. I knew I should have baked it at 400F!
Best peach pie I’ve ever had. My husband said we could eat it every week. Peaches were from our tree, had been in the freezer for six months. Again, this is delicious, thanks for posting it.
I’ve used (and loved!) this recipe for a couple years and shared it with friends. It worked incredibly well in Colorado where I was living, but recently moved to Seattle and am not sure how the moisture in the air is affecting it. Any thoughts? Also: Have you (or anyone else) experimented with any lactose-free butters or alternatives? I am navigating a new (and depressing) lactose intolerance and am trying to still make pies.
Thank you!
-Ab
I make a pie a week in the summer as we have a peach tree, which produces more peaches than we know what to do with. This recipe is on my list to make this summer. Thanks for sharing!
I make a peach pie a week in the summer, since we have a peach tree. We have more peaches than we know what to do with. This recipe is on my list to make. Thanks for sharing.
I found this link on makezine.com
Love the crust design 🙂
bothkitchens.com
I love the way you did the pie top! It looks delicious!
This pie looks delicious and that crust is amazing!
Paige
http://thehappyflammily.com
thanks for the recipe. we tried it this weekend and it was gone in less than 24 hours! 🙂 my daughters had a blast decorating it.
It looks so tasty!the decoration of the pie looks nice also.I got some ideas from your post of smoothie also.have a nice day!
Looks absolutely delicious! And love the way you decorated with the pastry! 🙂 x
nicole-emily-heath.blogspot.com
Those letters are so cute! I love the way they look going round the pie like that, so pretty!
My pie filling is 1 T instant tapioca, 1/2 c white sugar, 1/4 almond extract and a dash of cinnamon, dotted with butter.
PIE PIE PIE PIE PIE! <3
I love the detail on the crust. Recipe looks yummy!
Love the lettering! Where can I find these letter cutters? Your pie looks perfect.
Oh my goodness! I love the lettering.
www.cloclocreative.wordpress.com