
One of the things I really missed from our last house was the backyard setup that we had with a wooden deck area and a pergola covered patio area as well. Our new house only has a small cement patio off the back porch and not much else to speak of. So I really wanted to give the area a bit of help to make it feel like a cozy space.
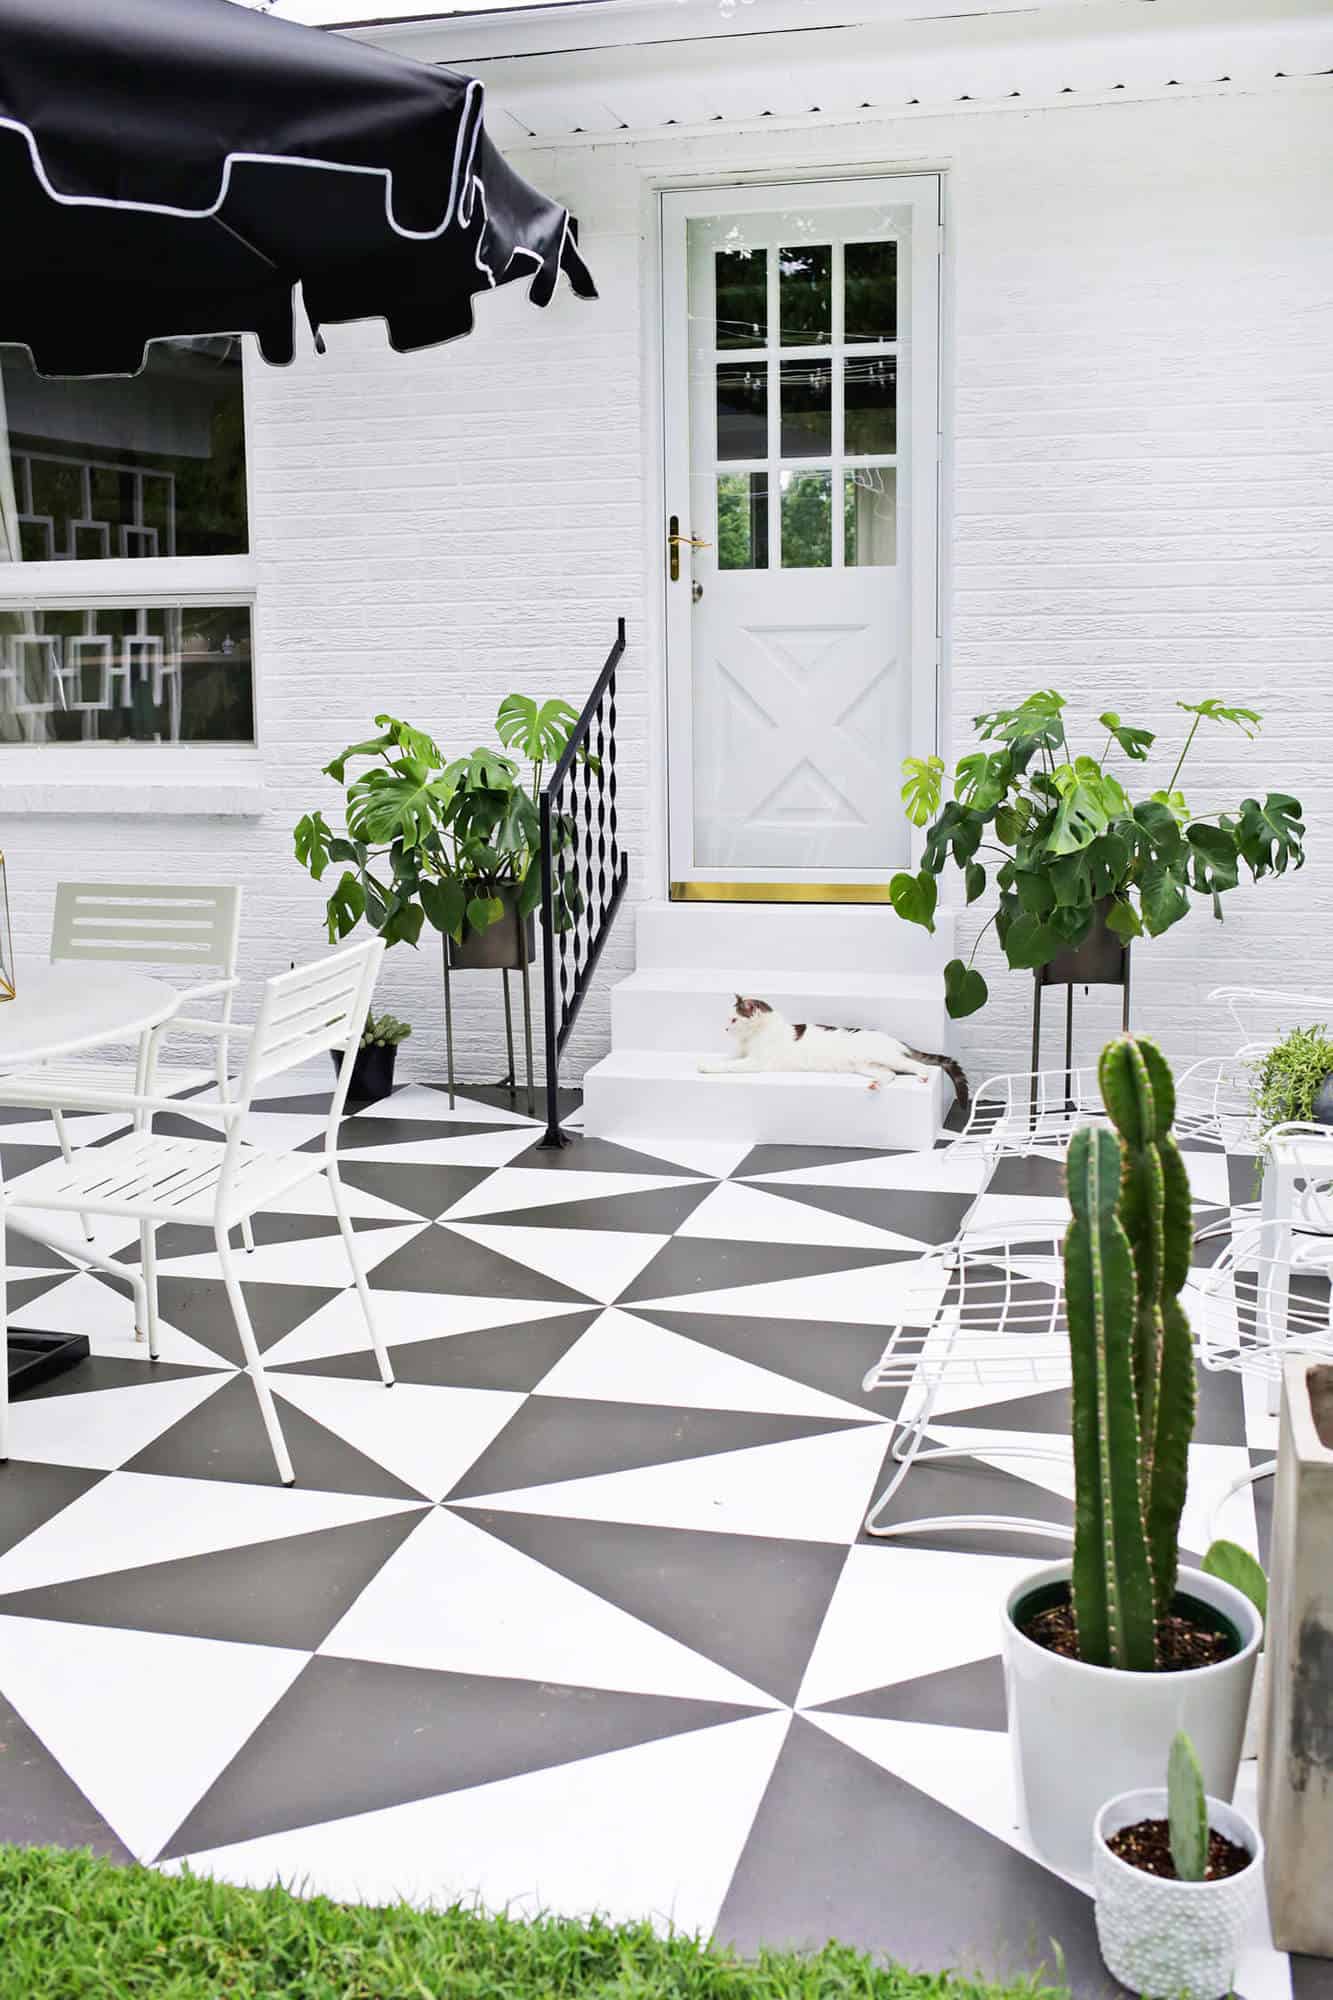
One of my favorite things I did at our last house was paint a rather elaborate painted rug on our patio, and since I was so happy with that result, I thought another painted floor might be just the solution at this house as well.
Rather than a rug, I wanted to try a black and white tile pattern instead, and after a few hours of inspiration scouring, I decided that a slightly amended version of this beautiful tiled patio would be just right for the space. Once I had the pattern picked out, it was time to roll up my sleeves and get to work!


Since my concrete wasn’t a perfect square, my tiles are rectangles and not squares, but I didn’t want to have any “half tiles” somewhere. So I adjusted them to fit the space, and it still keeps the same overall vibe.
With the sections marked off around the edge, I was able to tape off whole rows at a time by connecting the marks to the corresponding ones on the other side of the concrete. Once I had a row, I could tape off the smaller sections within the row as well.


I also decided to rig up a patio lighting system that didn’t require a pergola. I’ll show you how I did that soon, but I can’t wait to spend a few end-of-summer evenings outside on this baby! xo. Laura
i love it!
I tried this it looked awesome it was a great idea , but after some months it got some water stains on it Because of rain can you help me with getting something as top coat so that next time I re-paint those stains does not show up or let me know which paint you used .
I love it! I’m hoping you’re willing to measure one of the sections (ie one of the squares that you then divided into 8 parts.) If you get a minute PLEASE let me know. I’m not a great DIY person, but I have concrete walls in my basement that could use some geometry. Thank you!
I’m sorry! Laura is no longer living at this house ?
I’m going to do the same during this quarantine
Wow! That was a really game changer! I love the way you work!
I need to paint or place new tiles on my backyard about 1500 sqft.
love this. I am going to do a basement floor the same. Can you give me a measurement of the four tile, so I can get an idea of size to do mine?
Would really like the help.
Thank You
How to you make the two triangles to be equal do you minus the width of the tape? Is there a video for this?
Amazing post man.
This is just beautiful!! Amazing work. Well done…
OK I think it’s safe to say I am *obsessed* with this faux tile project & am planning to DIY my own on my (currently rather sad) back concrete patio! But I’ve been looking online at porch & floor paints (both Behr and Valspar) and some of the reviews are pretty scary – did you have any issues like peeling, bubbling, or the painted surface getting slimy or slippery when it rains? (I’m in Portland, so this is a big concern!) Thank you! 🙂
These truly changed the game. If you have the artist in you plus much patience, this could be your new project but if not, don’t worry you could still have the same beauty but paying with more bills.
What an amazing job! Well done. I want to try something like this on my awful concrete
Thank you! I’ve been trying to decide what to do with our back patio and this is a great idea! Love it!
I might have missed this response above, but I’m just curious. How long do you think this took you? The taping and the pattern work seems a bit daunting and I’m a painter! Maybe, the scale makes it easier!? You could could be a muralist with this DIY!
Hey LF!
I live in PNW, too (Portland to be exact) and I painted our outdoor tile patio three years ago when we moved into your apts. The paint held up quite well, but the taller, rougher gritty spots wore with time, and in some low spots moss has started to grow. The bonus, since we live in the grey, the sun doesn’t face our paint so fast and easy little touch ups have proven just that, easy peasy. Good Luck! If you’re interested in seeing it, hit me up. I plan to do something like this patio DIY in our new house next spring too!
That looks amazing! I wonder if I can do something like that with our driveway? We have a neighbor that painted her driveway to look like bricks.
Bridget | http://nuttyhiker.com
This looks so awesome!
Oh man, good question! Wish I could remember! They are some sort of palm, that’s all I know!
Laura
I think it’s just a Lowes outdoor light!
Laura