 If you’ve been around a toddler for more than 10 minutes you’ve probably seen them either try and grab someone’s phone or use another object (a banana, a toy car, their hand) to talk on the phone to someone. In our house, we get a lot of calls to Lola’s grandparents on inanimate objects, or, if she’s sneaky enough, our actual phones.
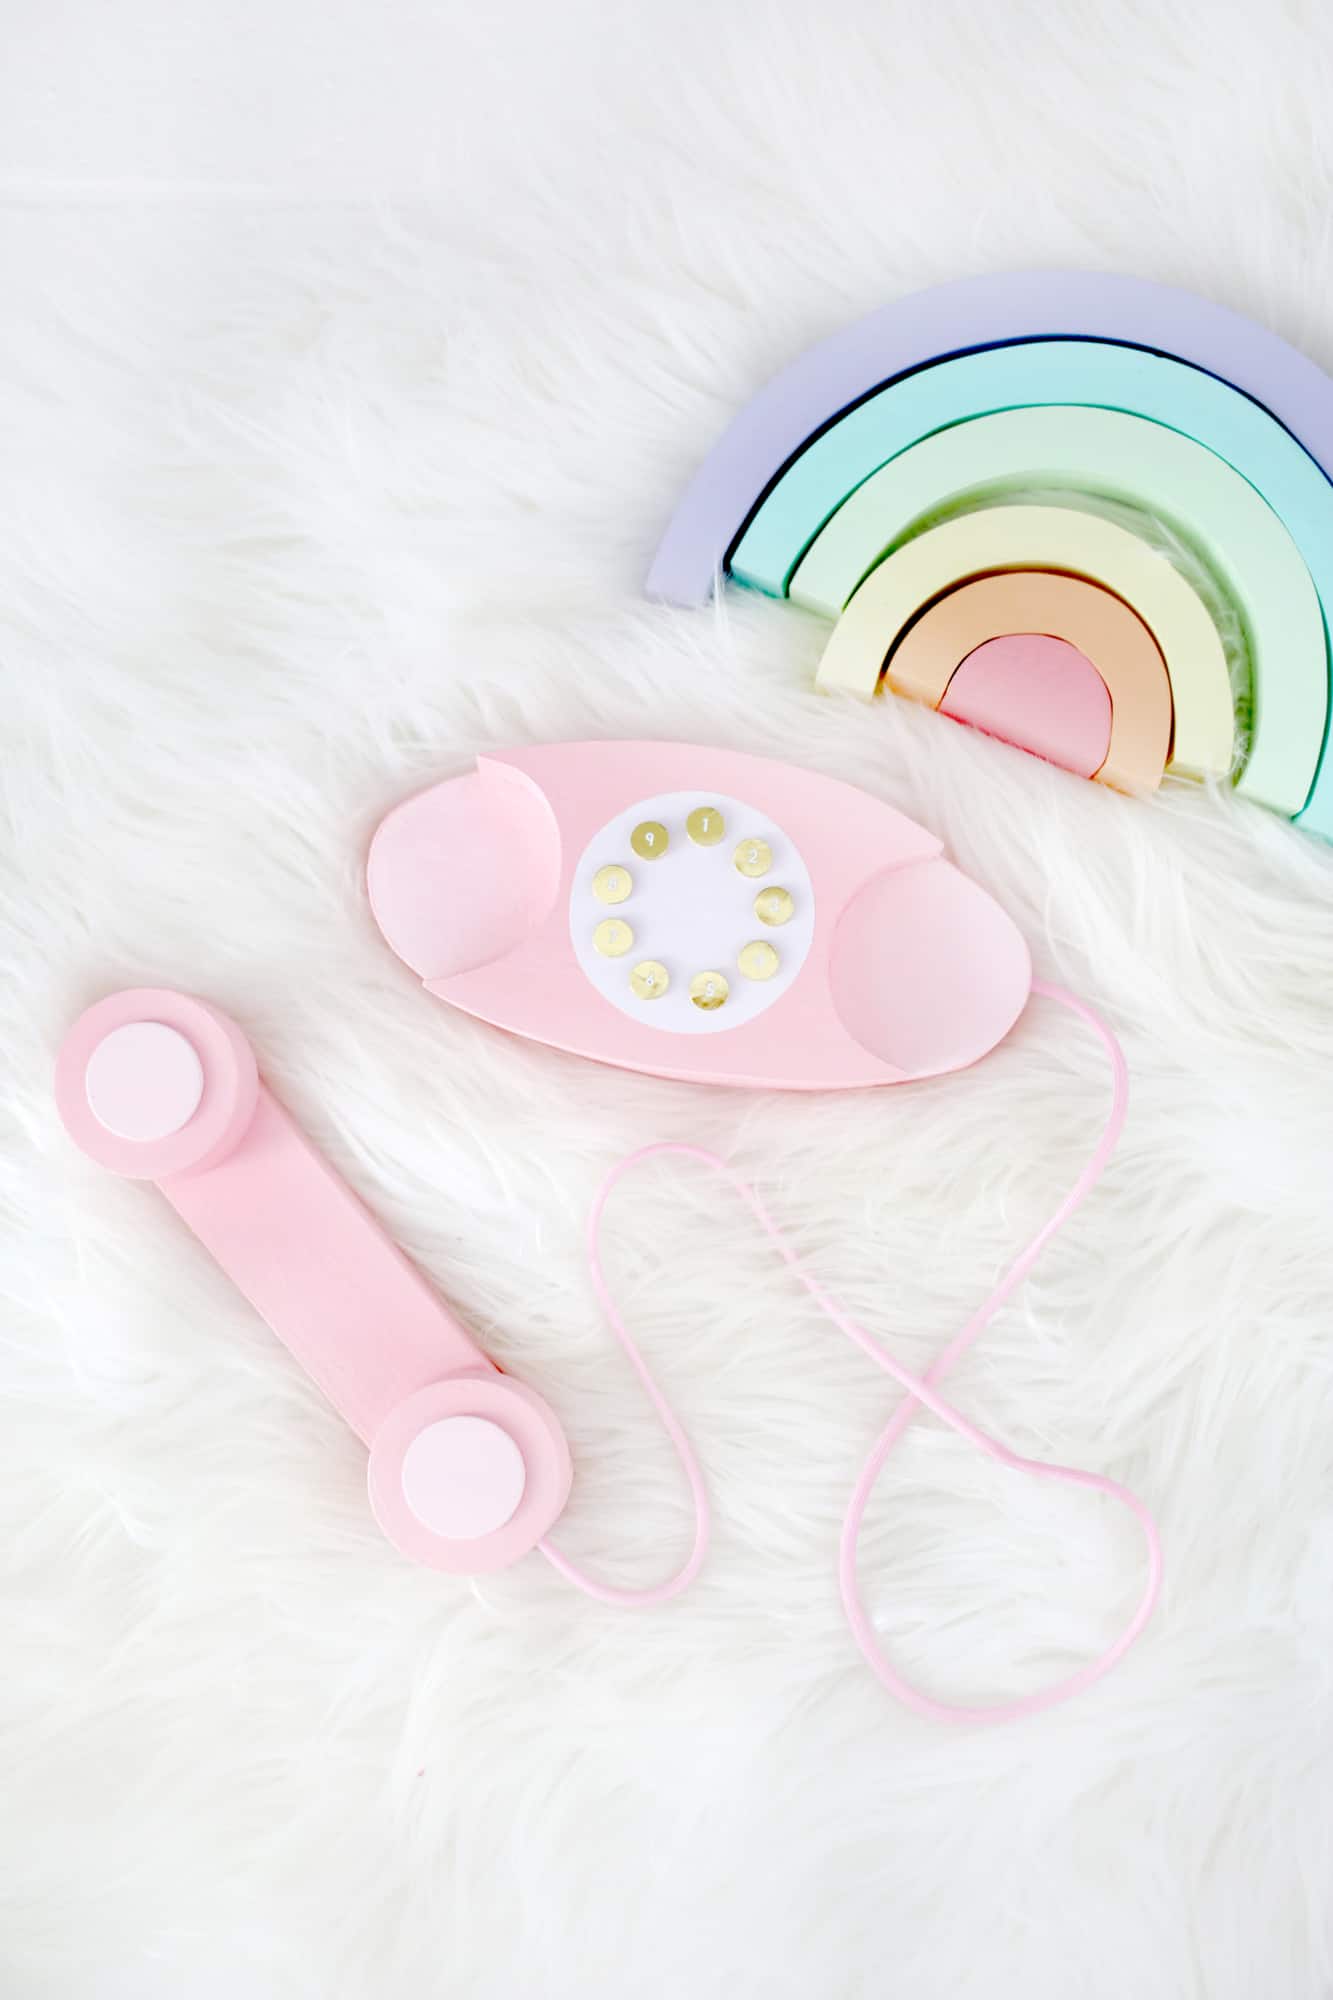
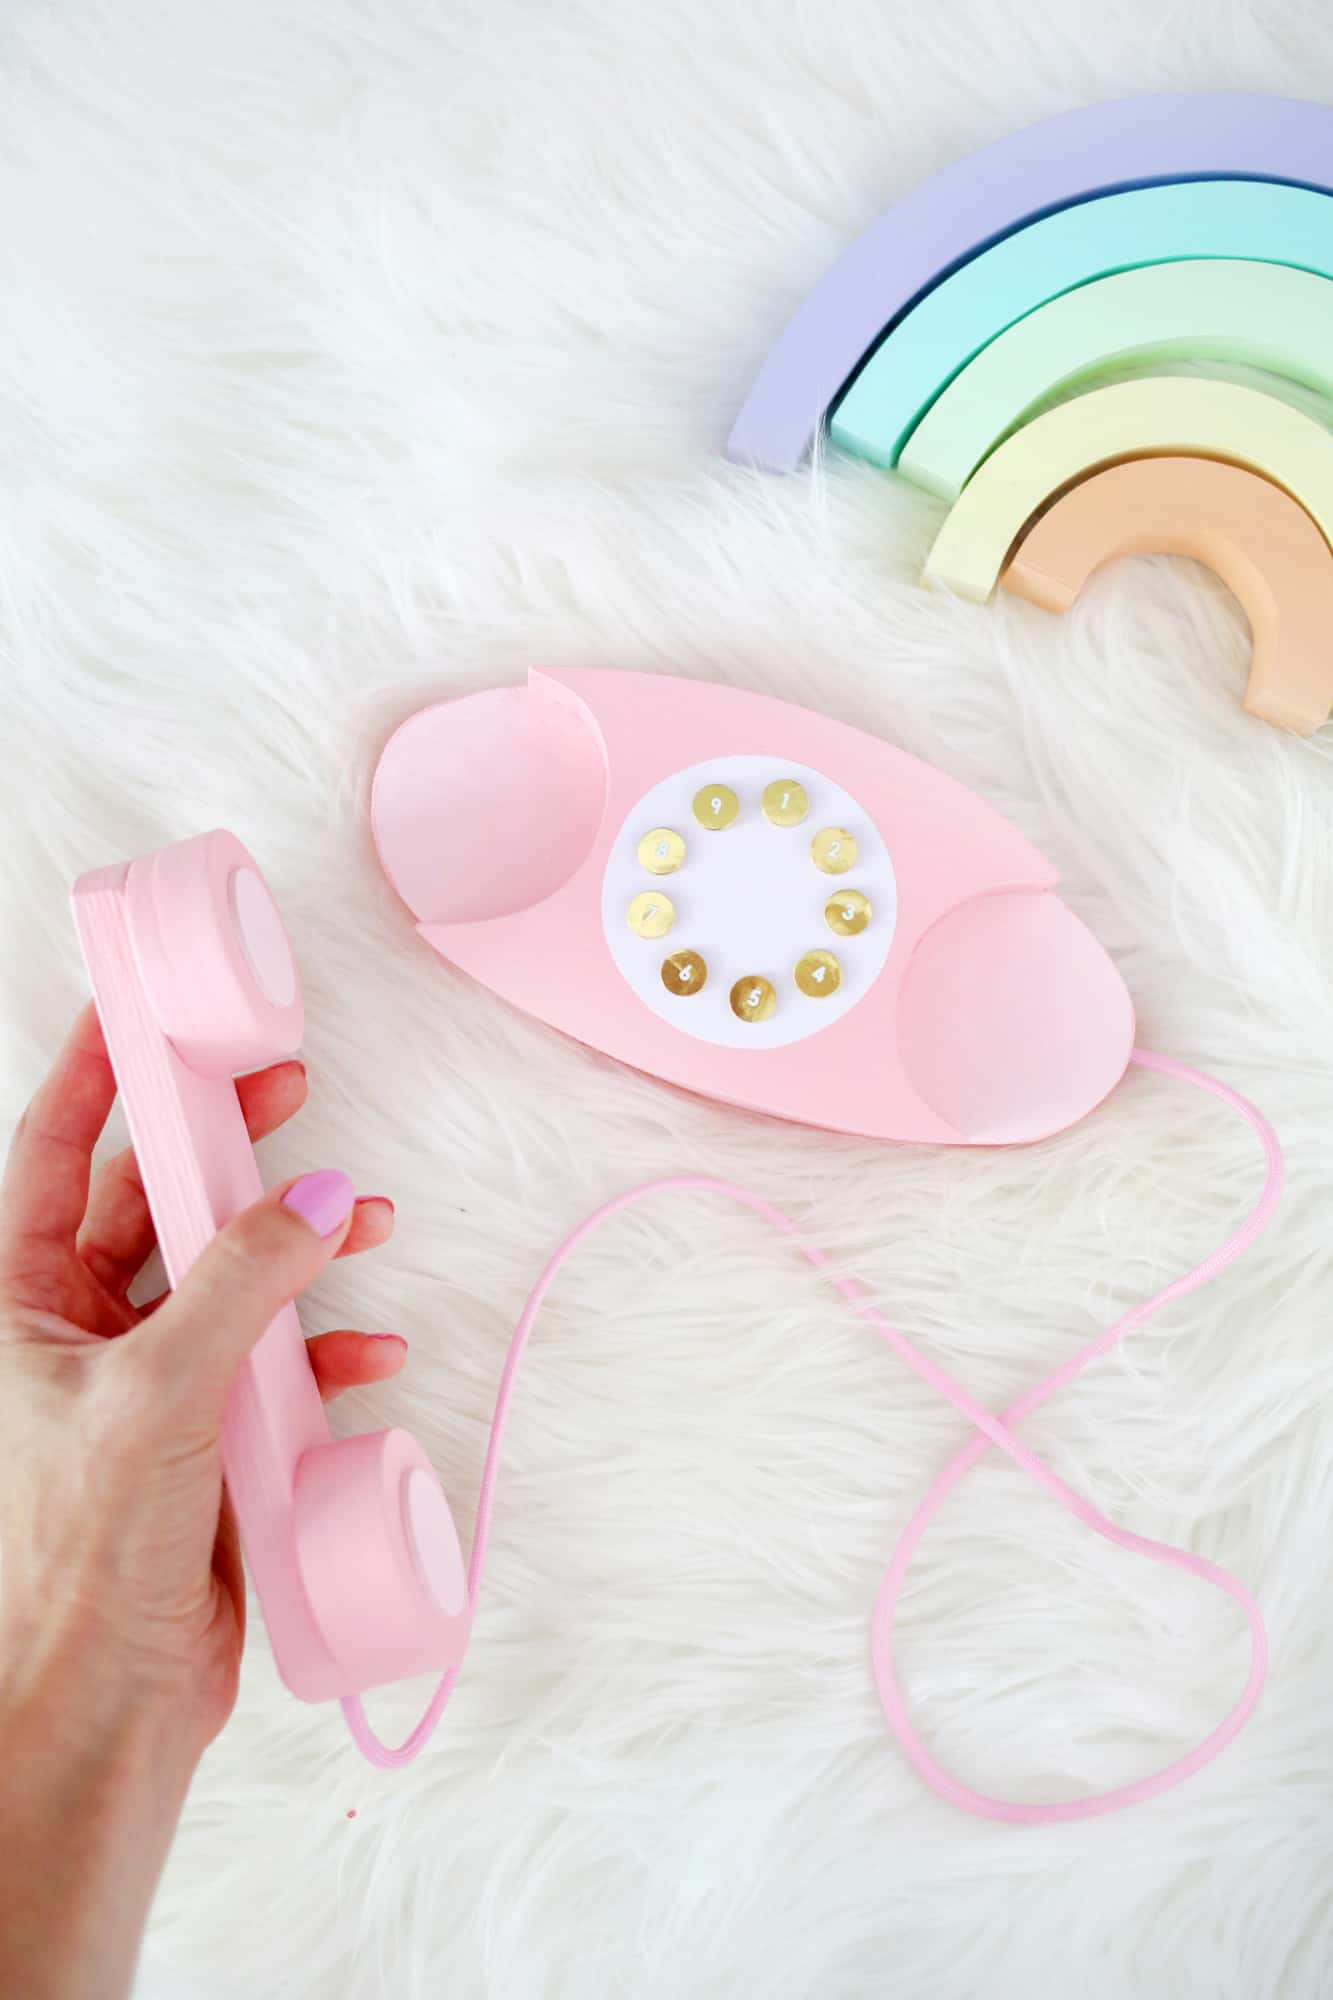
So I thought it would be fun to make her her own play phone that she can make calls on all day long! Since I have a princess phone in our bedroom (just for fun, it’s not actually connected), I thought Lola should have her own version as well, so I modeled this play phone on that vintage look. This phone toy is intended to be for at least an older toddler (past putting anything in their mouth) and you can see the cord options for safety concerns listed in the post steps. OK, let’s get started!
Related: For more kids activites and printables check out Childhood Magic!

Supplies:
–nylon cord (4mm) See safety note in post
-3/4″ wood board big enough to get your phone pieces traced onto
-1/2″ x 1 1/2″ board for phone handle (at least 8″ long)
-non-toxic paint (I like to use this non-toxic paint for kid toys and just order a sample size)
-sandpaper
-wood glue
–jig saw and jig saw blades
-drill with drill bit the size of your nylon cord
-2″ wooden circles (you’ll need 3 of these for each earpiece)
–white vinyl for circle (you could also paint a white circle if you don’t want to buy vinyl)
-bag of assorted wood circles for buttons and earpieces
-gold date stickers
-wood filler (this is my favorite kind)
–phone template
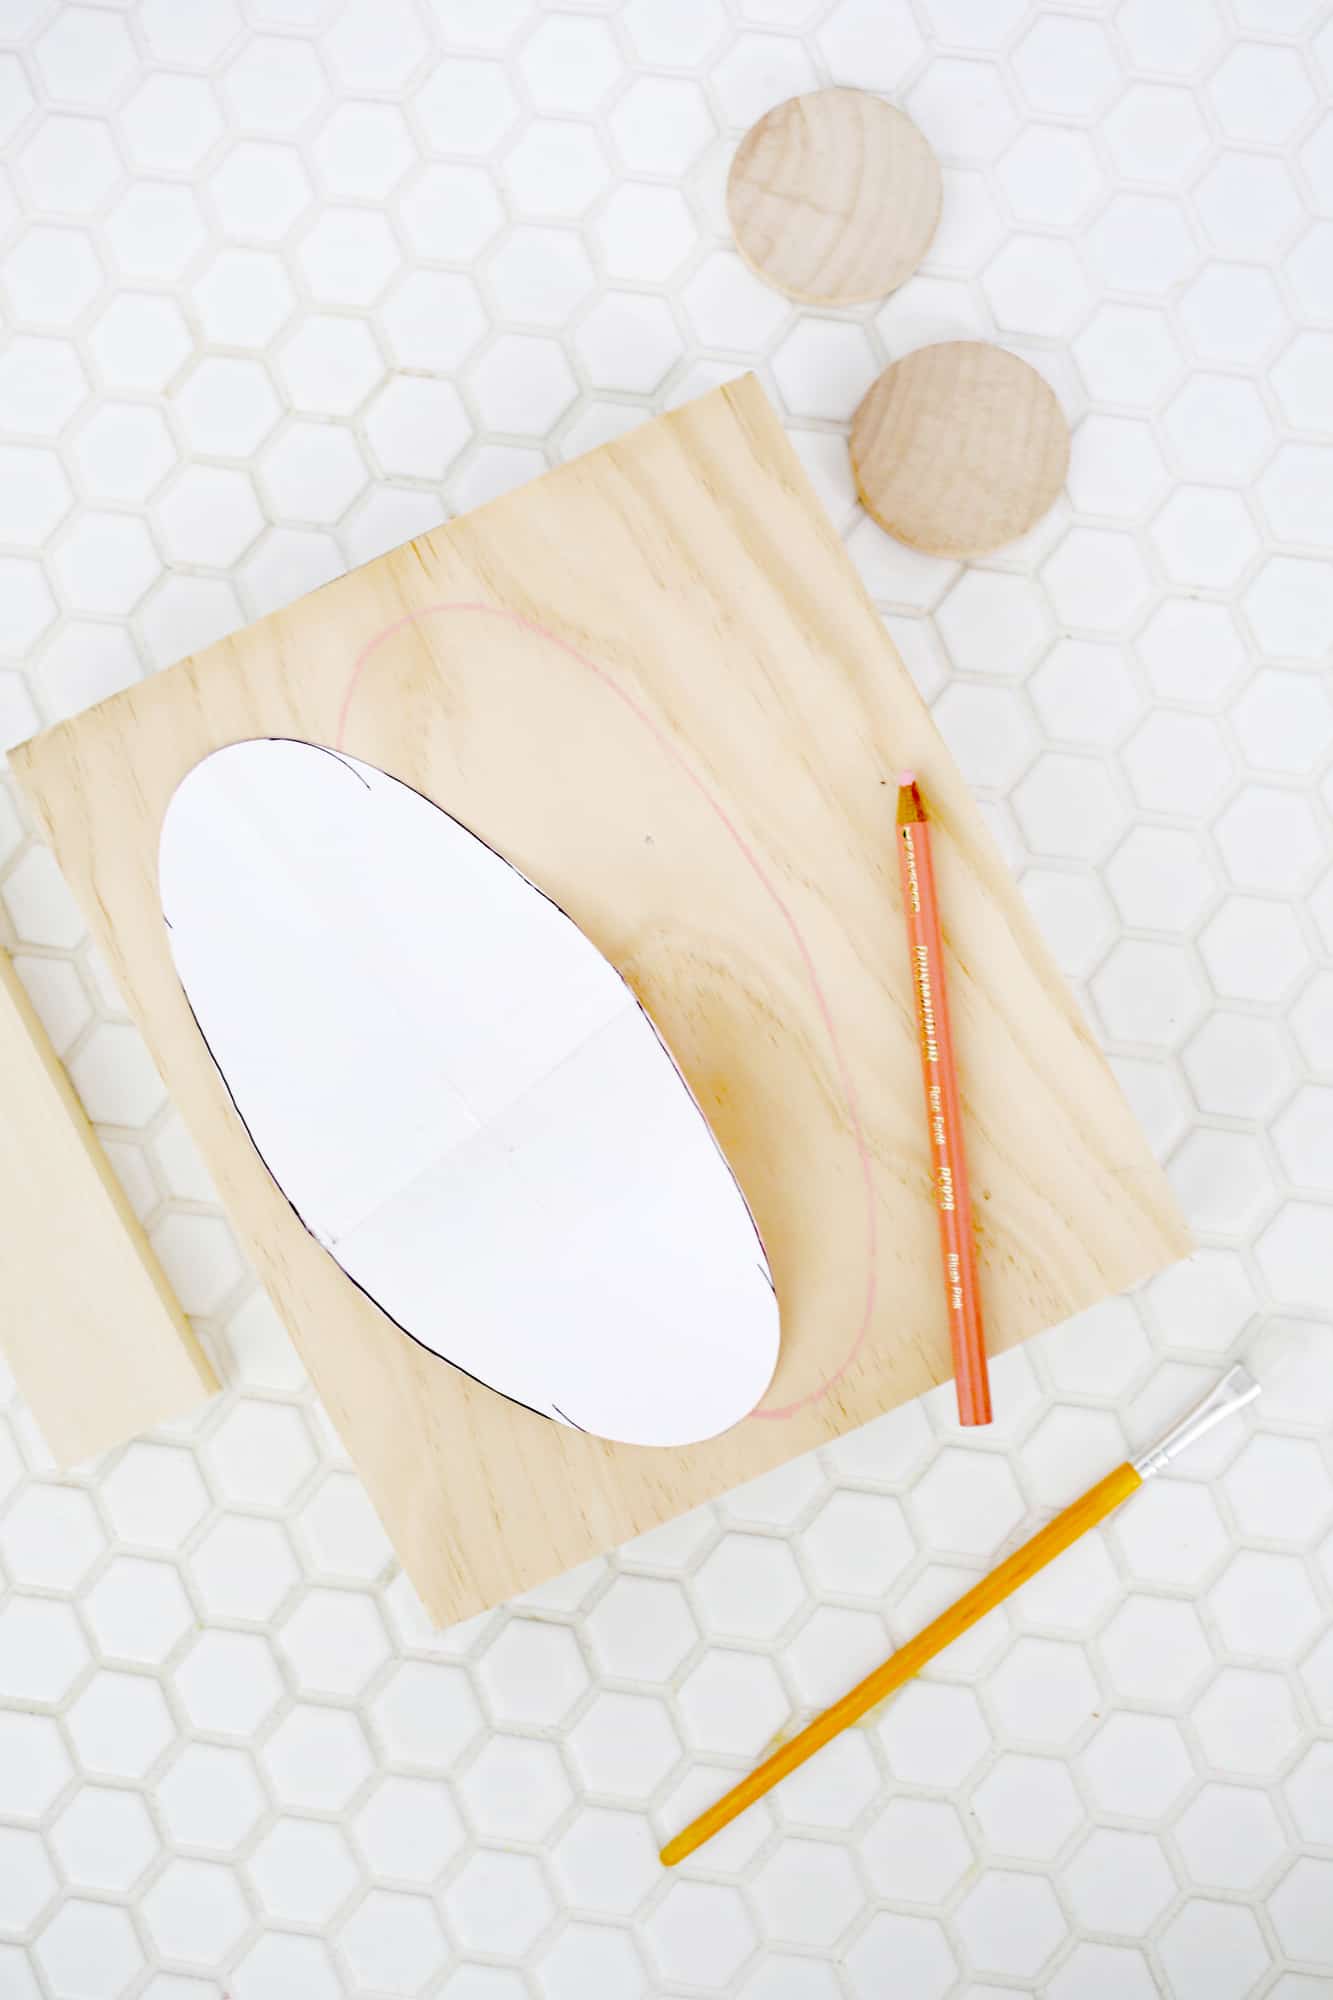 OK! So, first you are going to take your two templates and trace them onto a piece of 3/4″ thick wood.
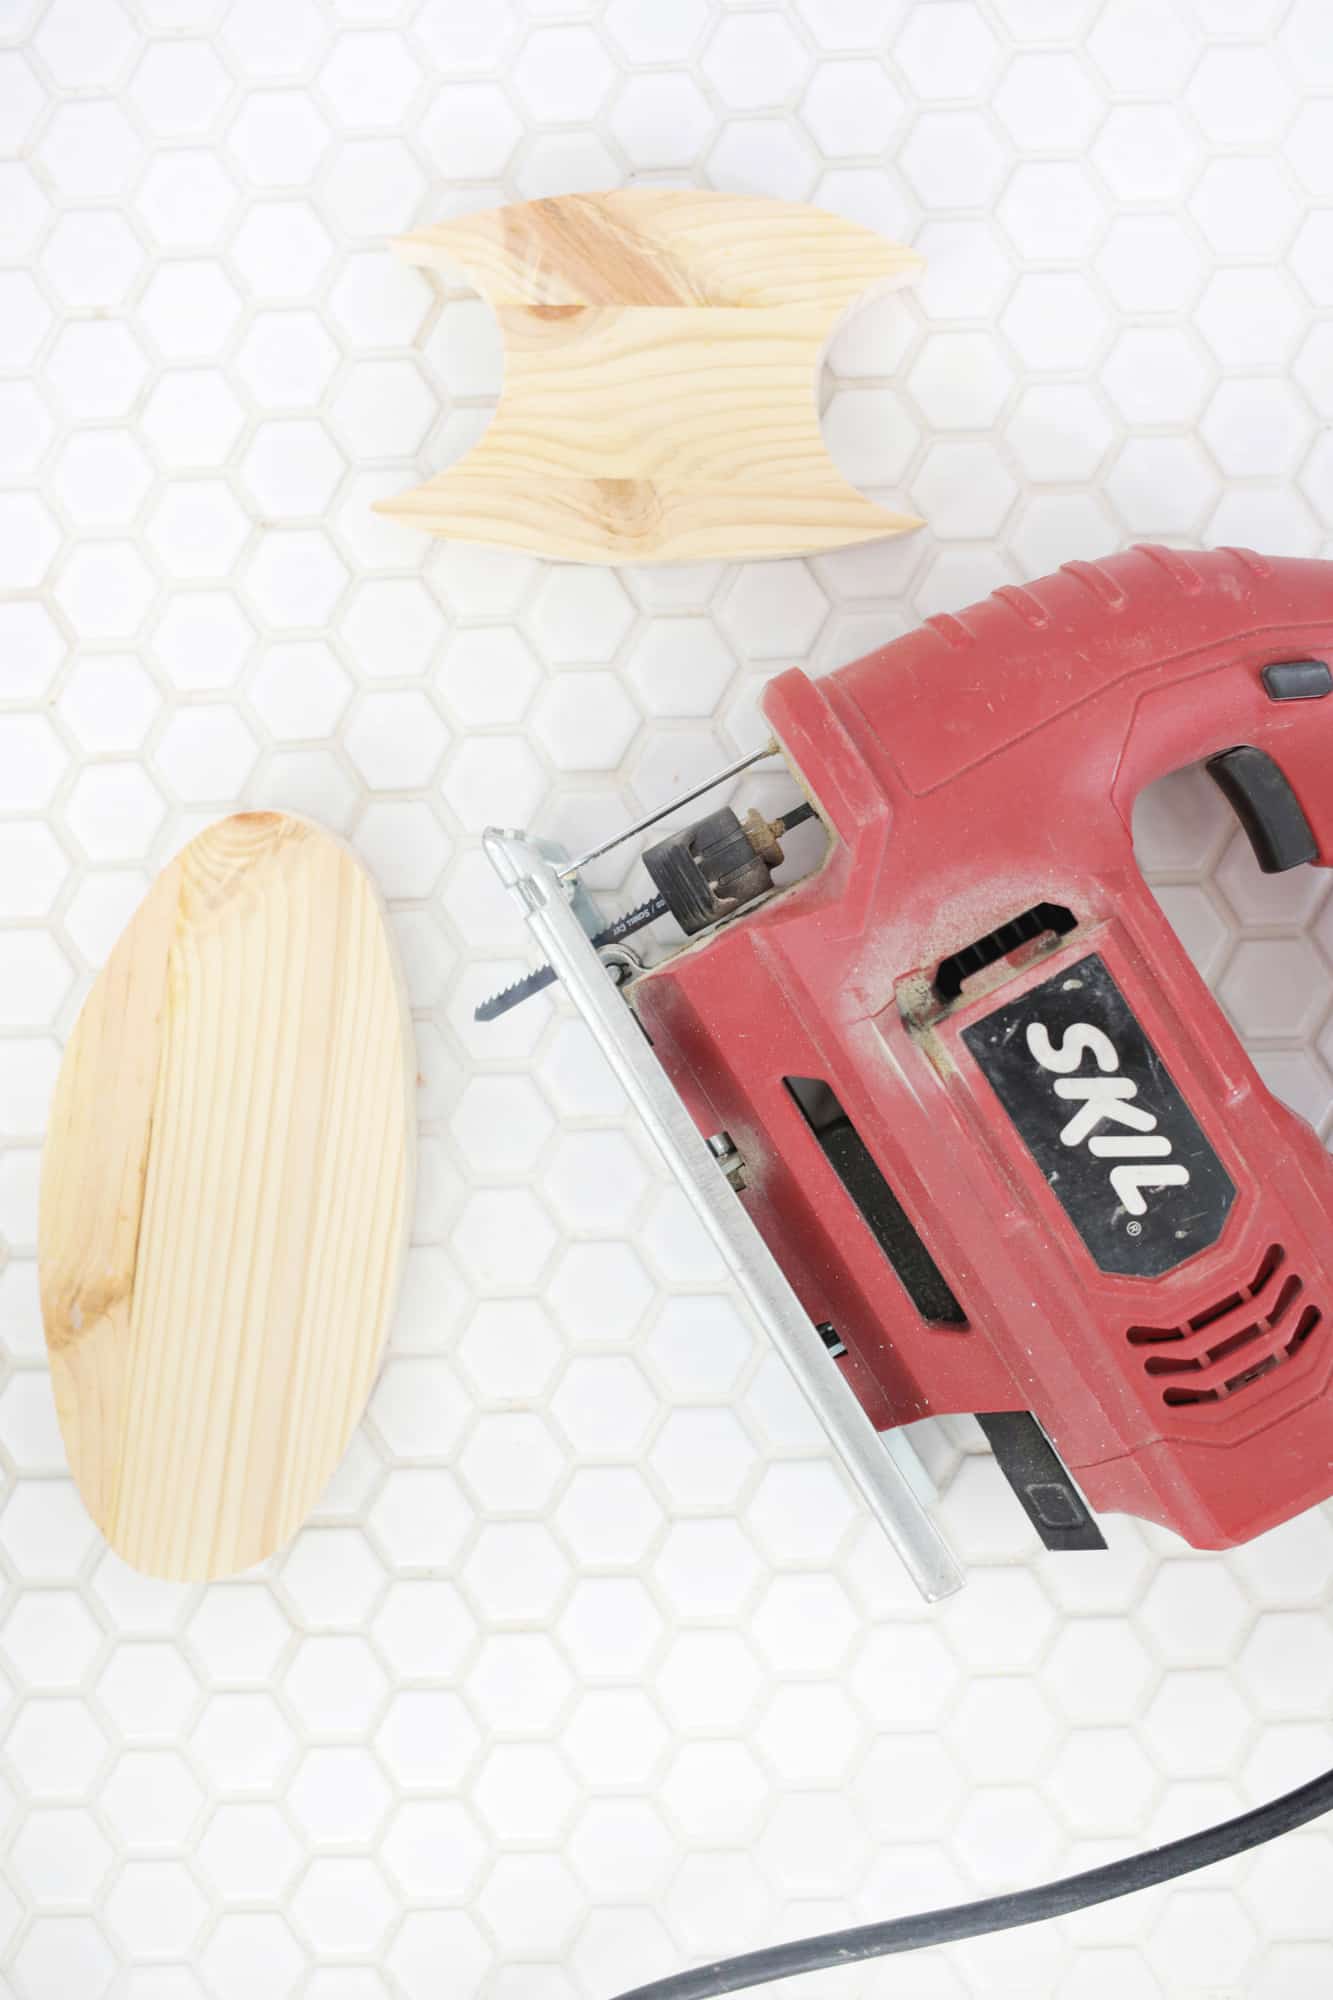
Use your jig saw to cut out your two wooden phone pieces. I would use a blade that’s marked for fine cuts or a scroll saw blade rather than a rough cut blade so you get a smoother edge (they usually come in variety packs like this). If you don’t have a jig saw, they are like $30 and super easy to use even though it may look scary (I promise!) and you can do a million more DIYs if you have one. So it’s totally worth the investment and small amount of effort to learn how to use one!
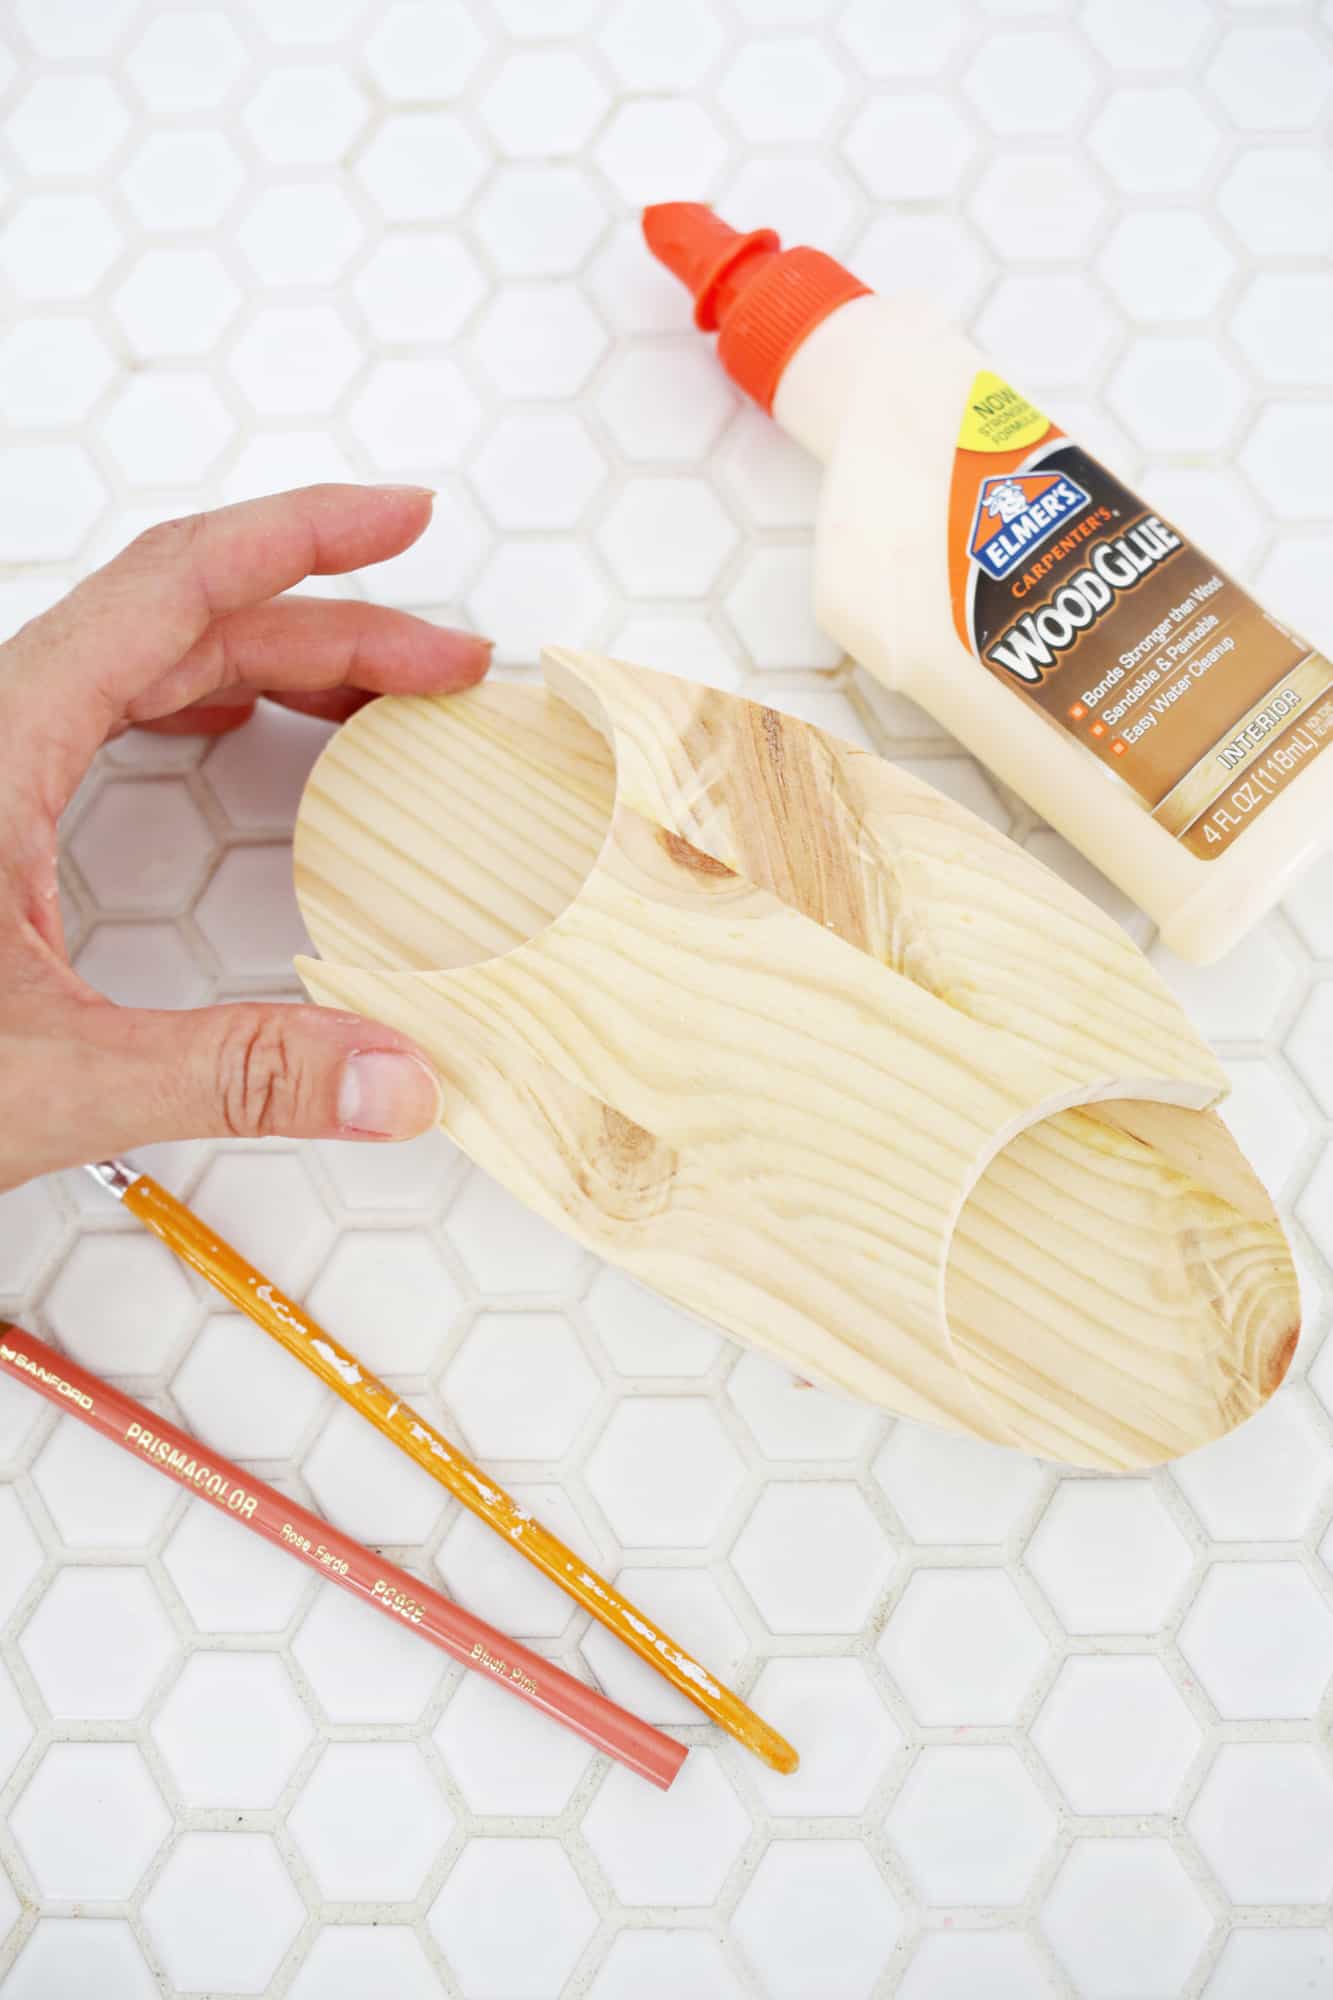
Use some wood glue to glue your pieces together. Allow the glue to set and then use a medium grit sandpaper to round any sharp edges and sand along the sides where the two pieces meet so your phone base looks more like one piece than two different pieces.
 Take 6 of your wooden circles and stack 3 together to make each earpiece and glue them together. You can use clamps if you have them, but it’s not necessary if you don’t have any. You’ll want your handle to be the perfect length so your earpieces fit inside the receiver holes. So place your earpieces into the receiver holes on the base, line them up with the outside edges and measure how long your handle should be from the outside edge of one circle earpiece to the other. Mark that length on your handle and trace the round edge of one of your extra circles at each end to get the right curve and use your jig saw to cut the curves (I clamped my handle piece to another larger board and let the area I was cutting dangle over the side to cut the angles).
Once your handle is cut, glue the earpieces to the handle and let the glue set. Use your sandpaper to smooth any rough edges. You can also use some wood filler to fill in any gaps in the wooden base or receiver to make them look like one solid piece. Just use your finger to smush some filler into the gaps, wait until it’s fully dry and then sand away any excess.
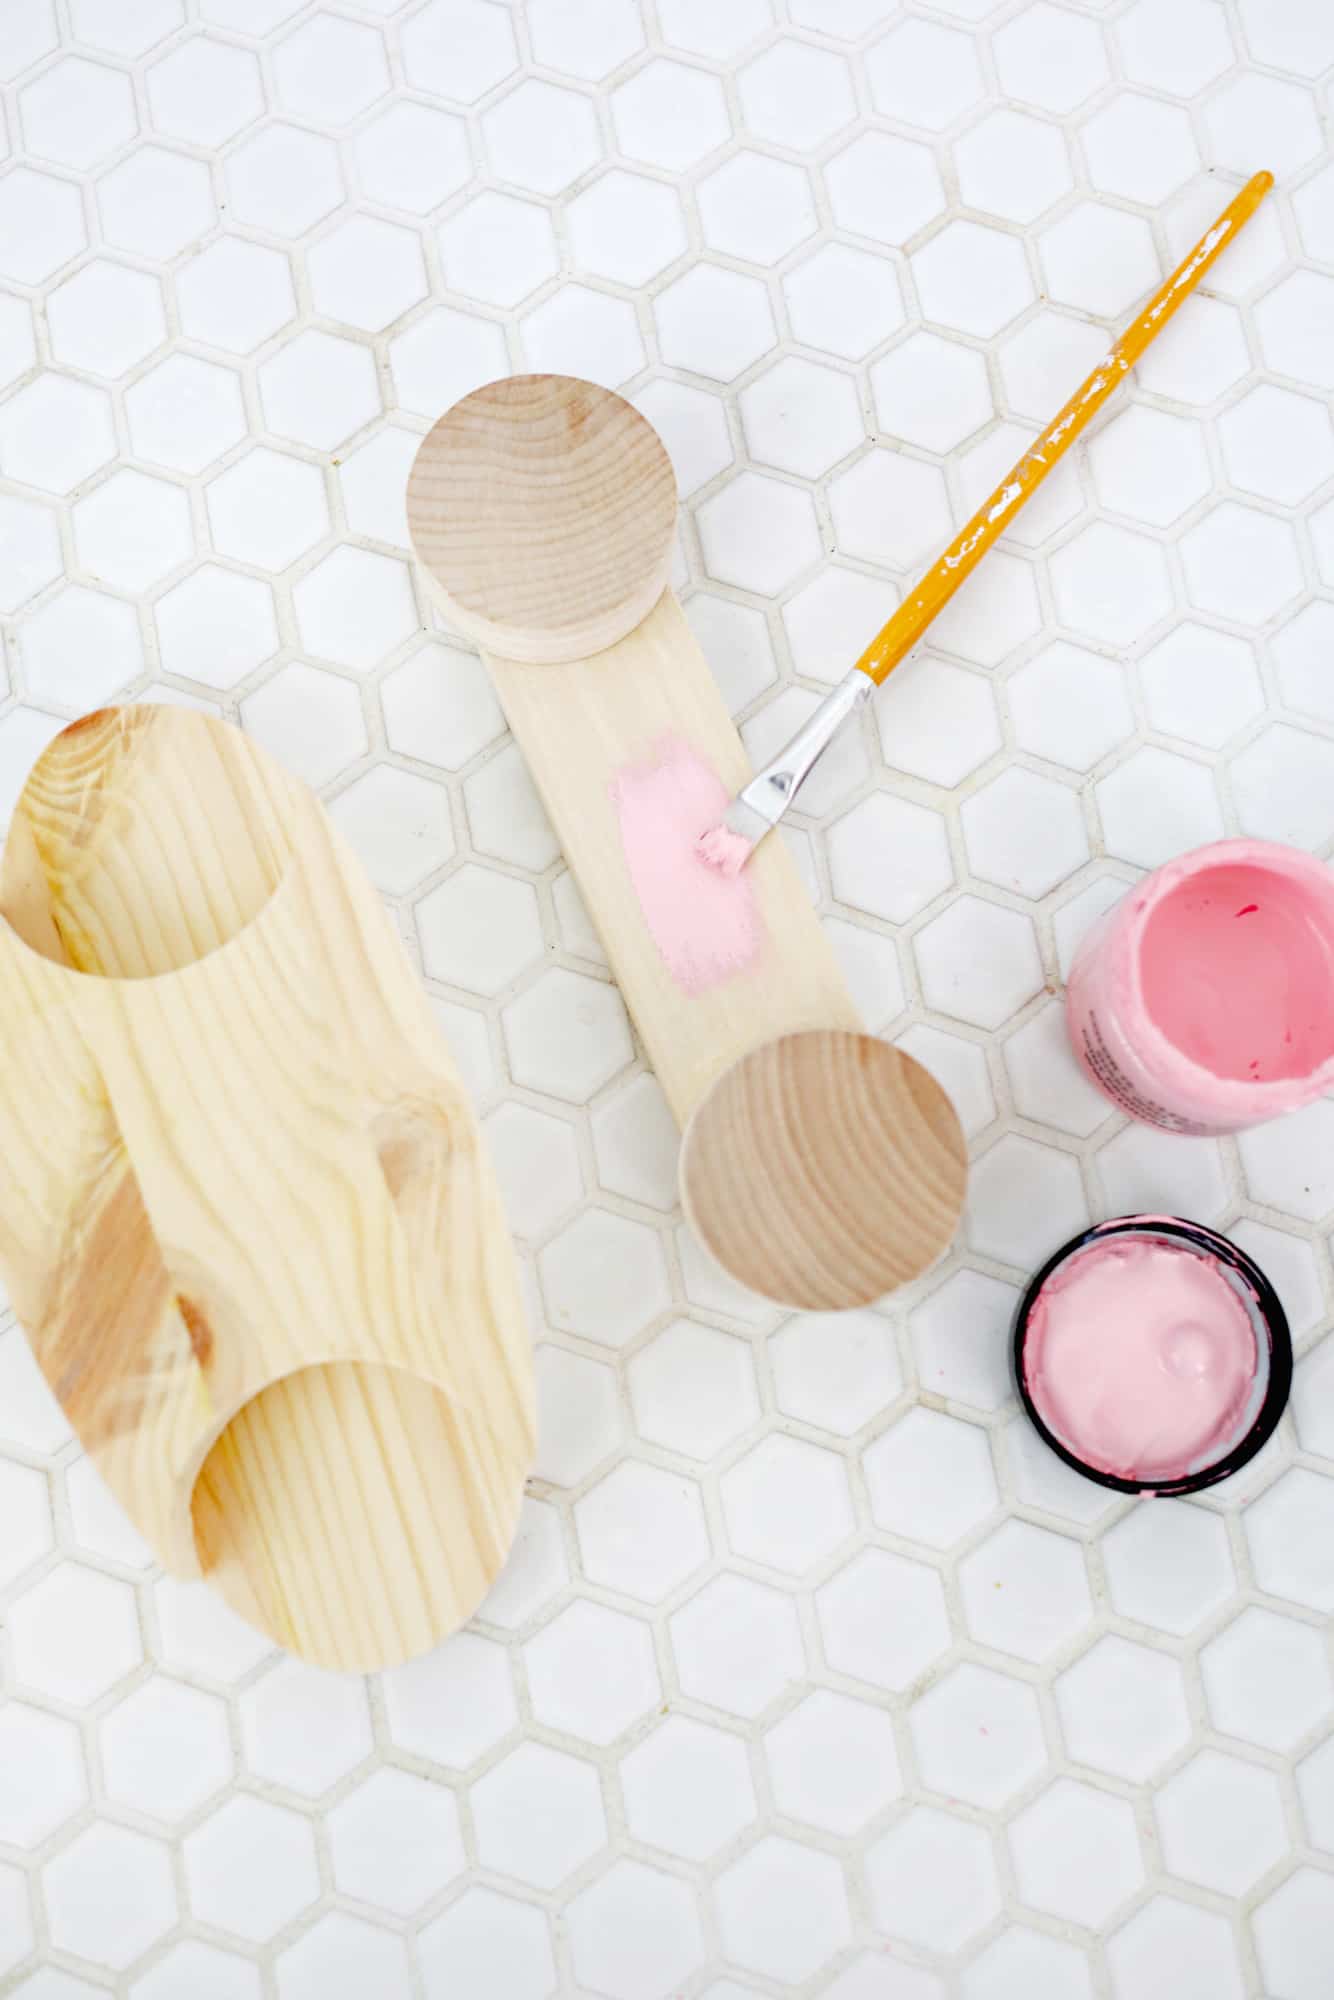 Now it’s time to paint! Give your phone a few coats of whatever paint you like and let it fully dry. I painted some smaller wooden circles I glued on the earpieces a little bit of a lighter pink and used the same color on the recessed receiver holes on the base just to give it a little more dimension.
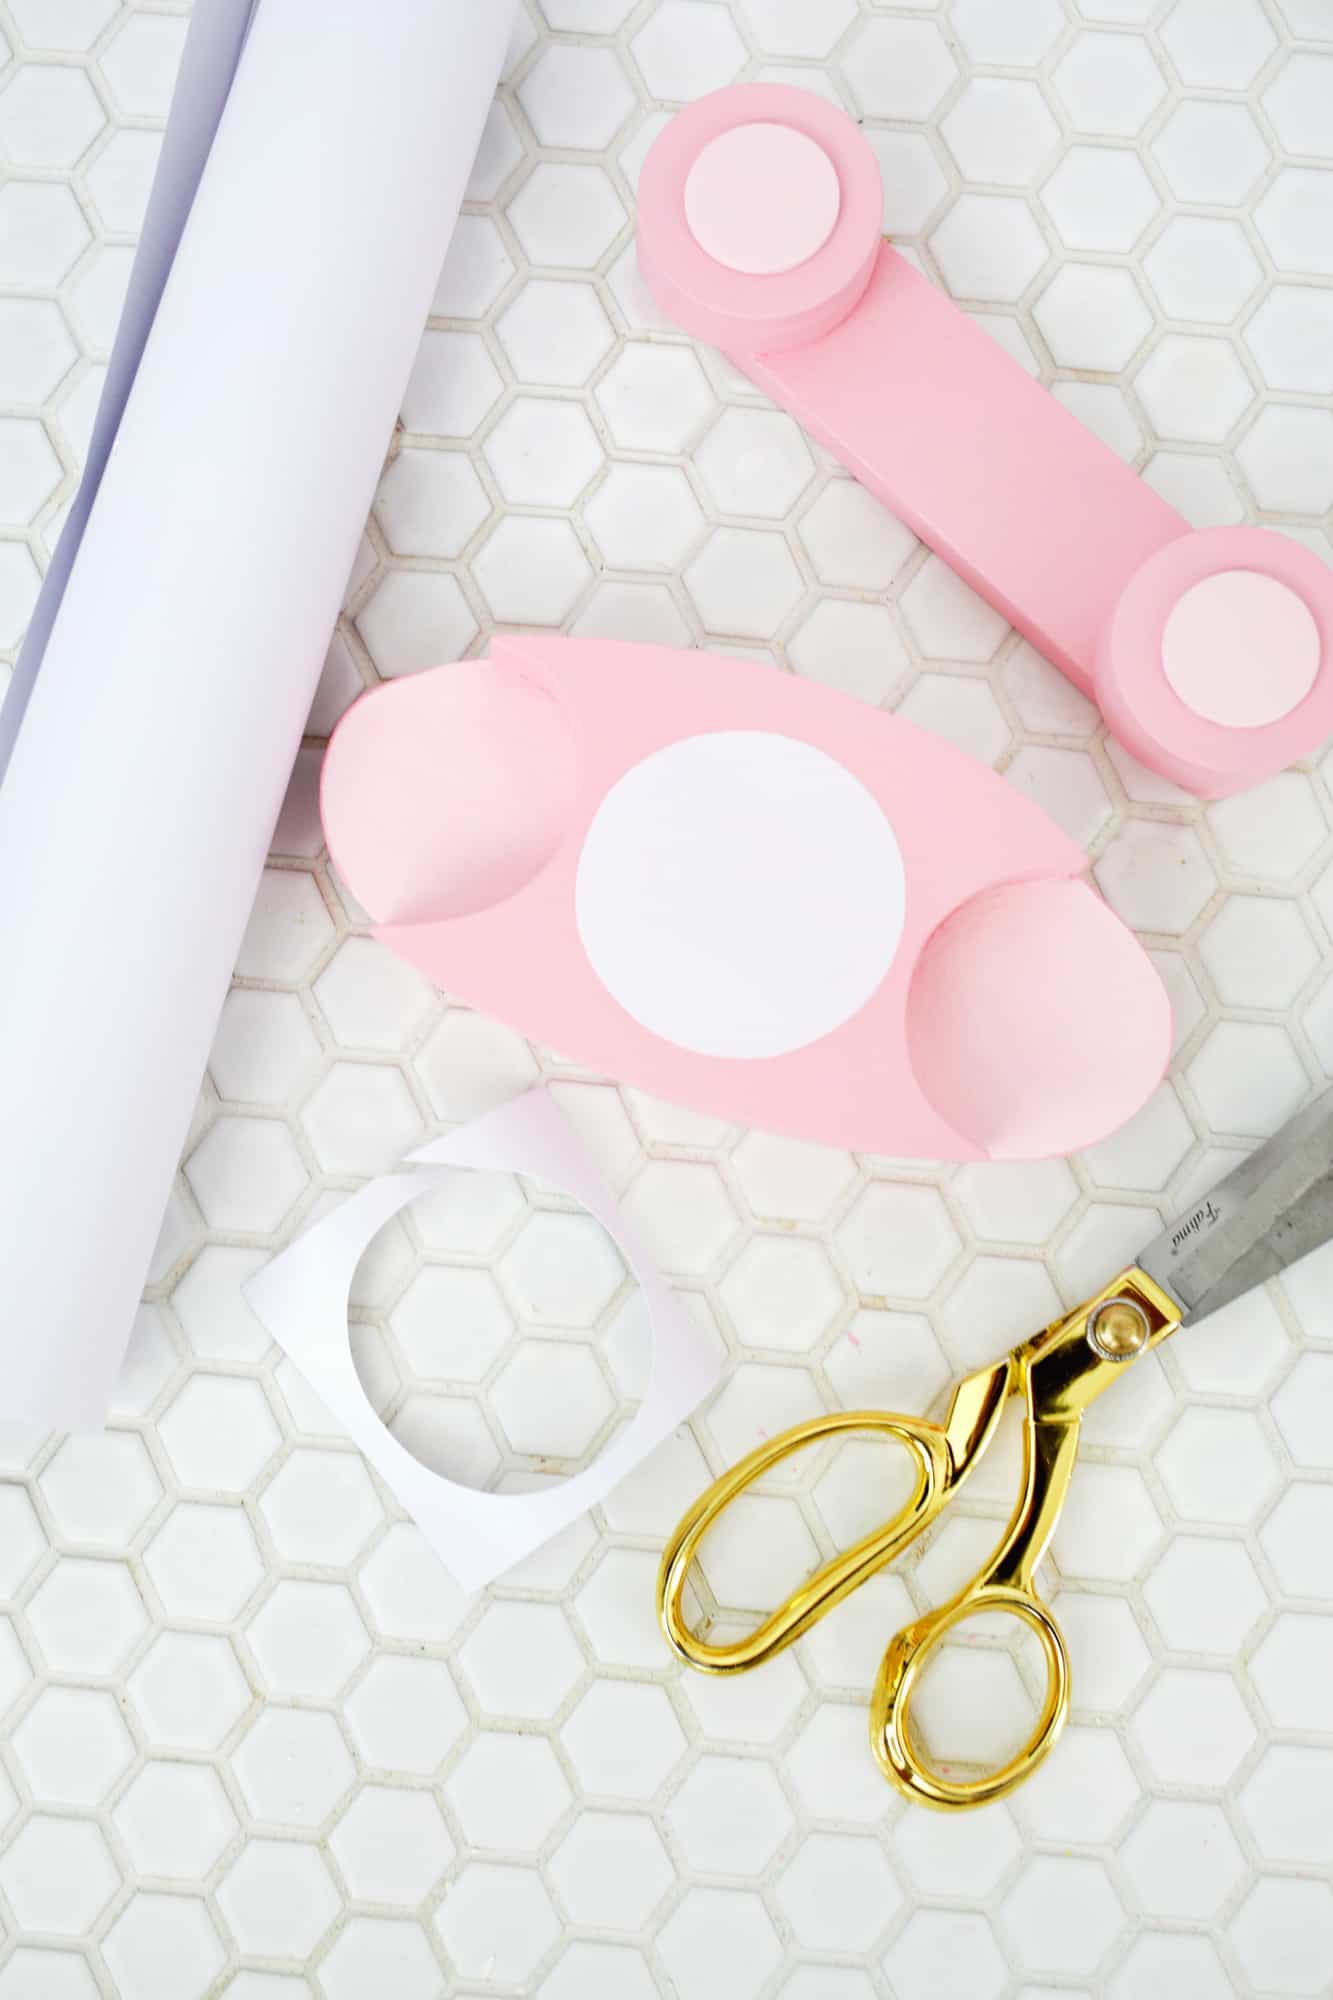
Now, for the button area I cut a circle out of the white vinyl that was a little smaller than 2 1/2″ wide and placed it in the middle of the phone base.
 Then I got some super small wooden circles (I think they are 7/16″ wide) and placed some gold date stickers on them to be the buttons. I just used some gel super glue to glue them all into place around the sticker. I thought the placement of numbers 1-9 looked best, but if you want to crowd them in a bit you could get a “0” or a “*” on there as well …
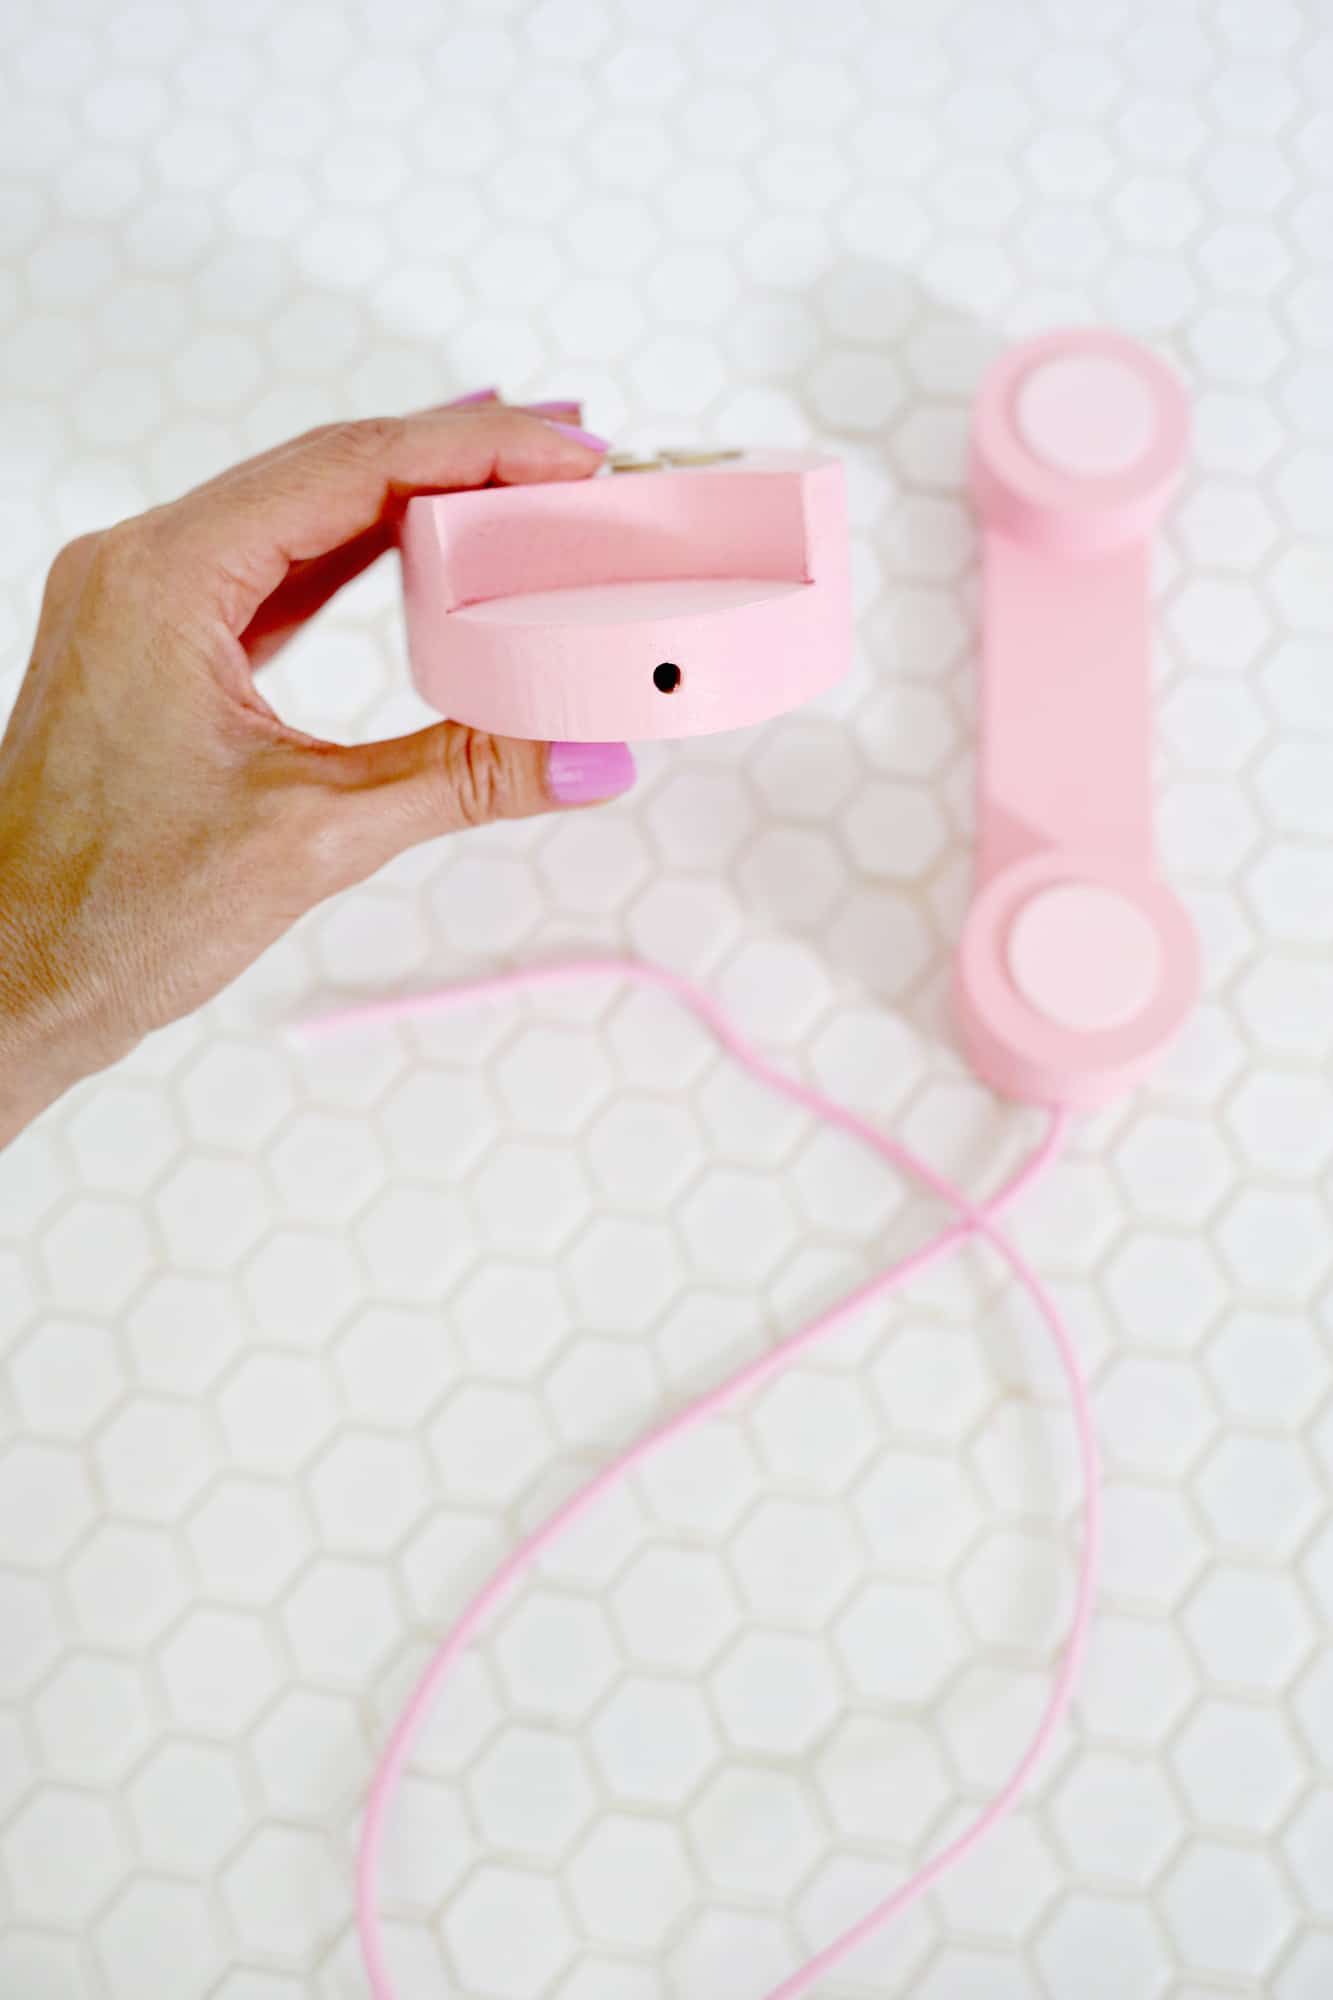 Next, I used a drill bit the same size as my nylon cord and drilled a 1/2″ deep hole into one side of the base and one end of the receiver. I cut a piece of cord about 27″ long, placed some super glue in each hole, and then stuck the cord ends into each hole as well. If your cut cord end puffs up or frays and it’s hard to get it into the hole, you can cut off the fraying end and hold it over a lighter about 1″ away from the flame and the heat will melt the end a little and keep it from fraying.
SAFETY NOTE: I made the cord as long as indicated above but she plays with the phone under my supervision so if you are worried about your kiddo playing with the phone on their own I would make the cord much shorter so it could not be a strangulation hazard. If you don’t feel comfortable with any toys with cords (pull toys, lacing games, etc) then you could just make this a cordless option as well!
 Once your phone cord is attached, your phone is ready to make some calls!! You can also add some rubber feet onto the bottom of the phone if you want, like I did so the phone base will stay in place on a table while they pick up the receiver and press the buttons …
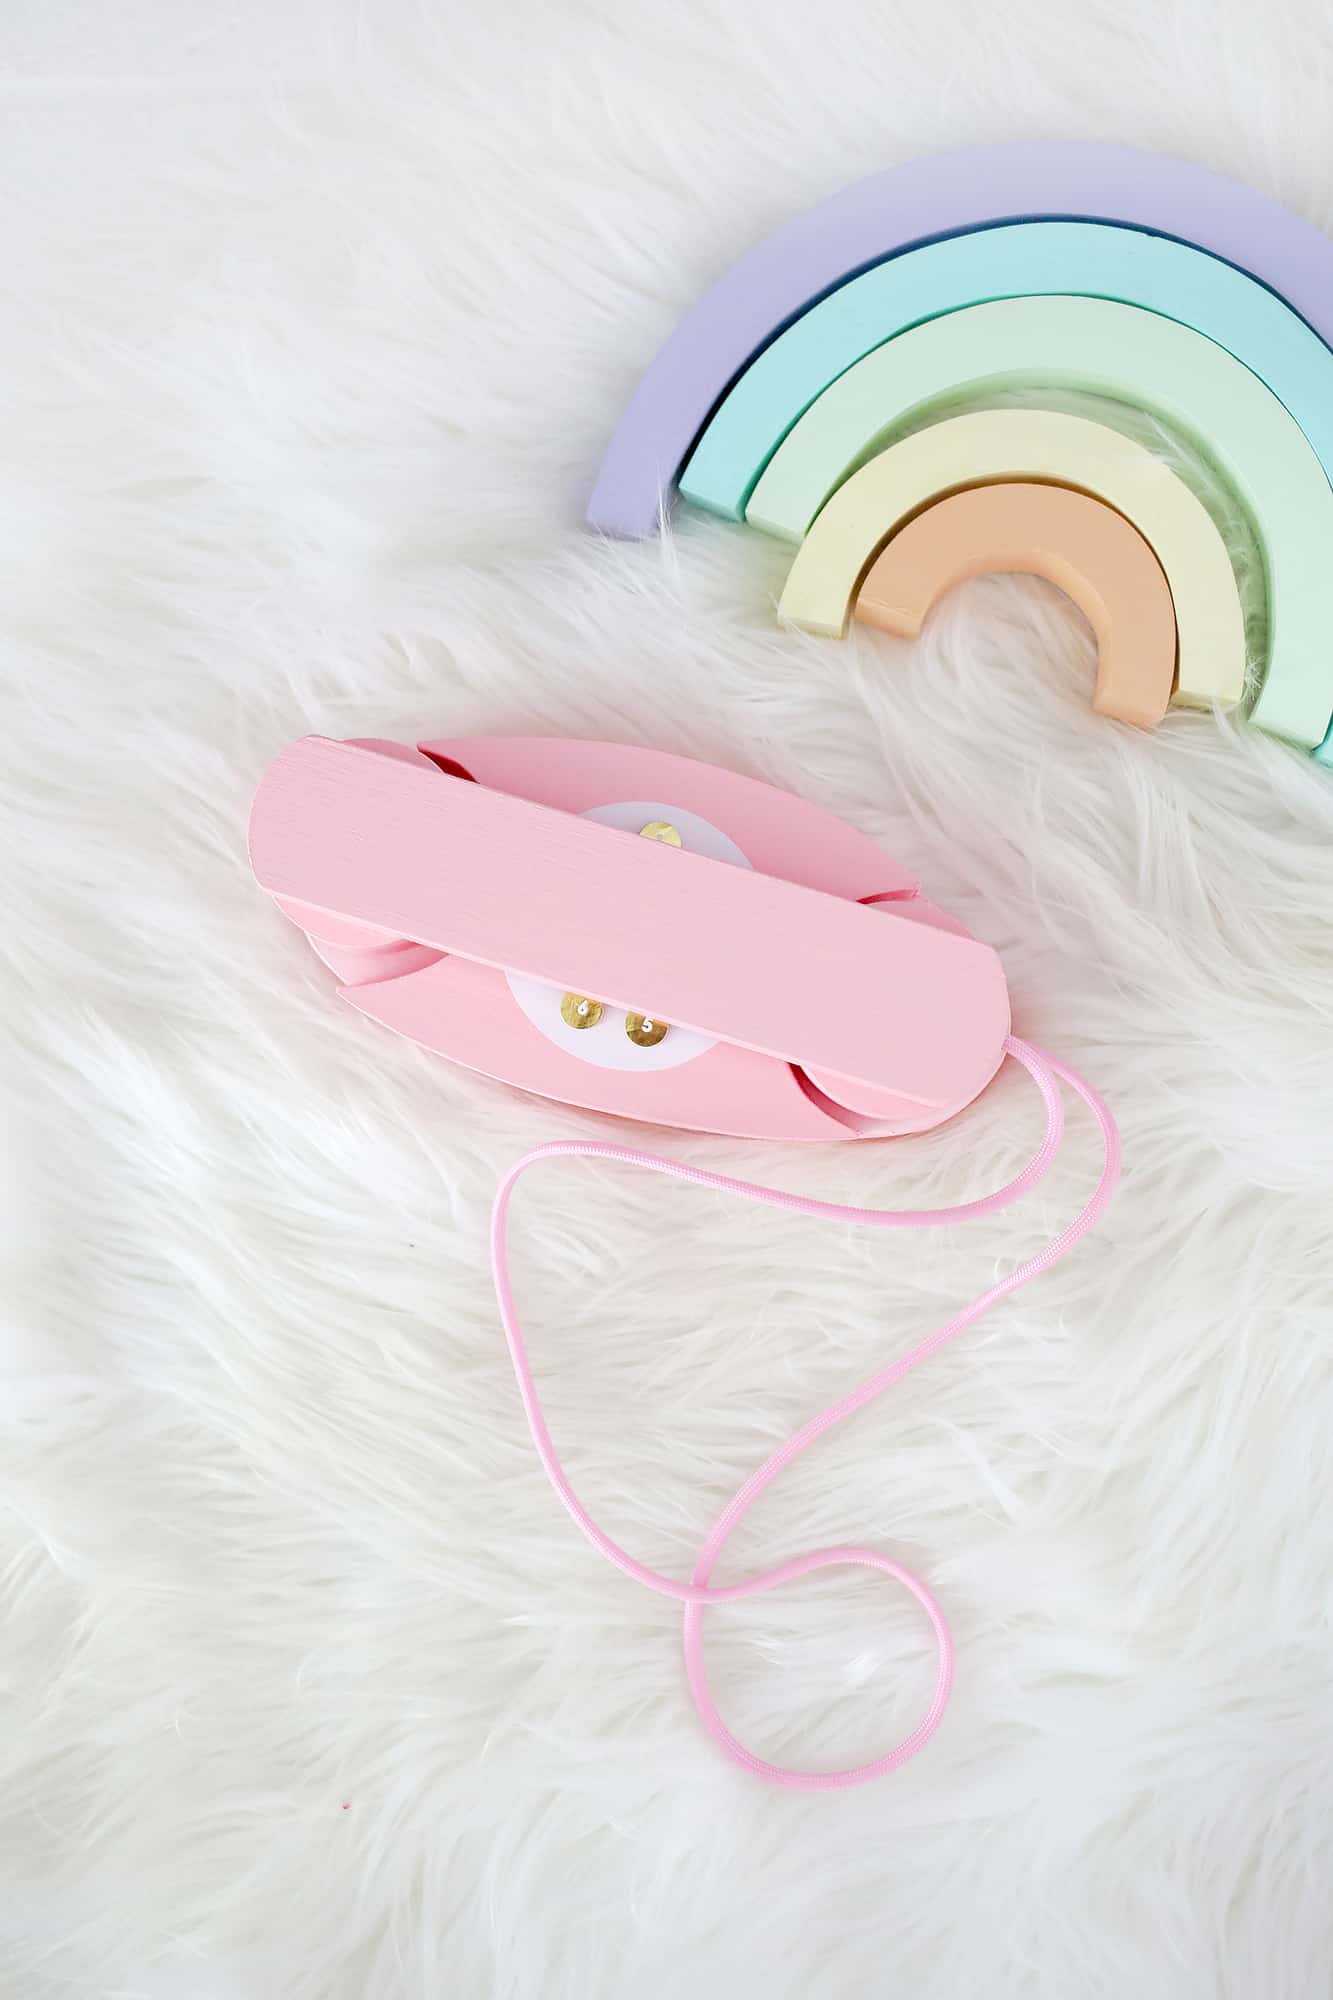
 Wow. You guys, I have to say I think this phone is absolutely adorable and it makes me so happy to see it sitting around the house! Lola’s already racked up quite a long-distance phone bill, but I think it’s totally worth it—haha!! Of course, your phone can be any color you want, so just switch the cord and paint color or use a stain you like on some nicer wood if you want a natural finish. As always Happy calling! xo. Laura
This is so cute! Would look so perfect in my classroom!!
-Kate
https://daysofkate.com/
Oh my gosh this is too adorable! I absolutely love this idea ♥
Laura, of all your amazing DIYs, this is my very favorite!! Pink princess phone to match Mommy’s? How very sweet is that??
You’d love to hear that I have a baby blue rotary phone with the pearl-like decorative top around the numbers, gold star accents of course. It sits on my end table and is hooked up to nothing since I ditched my cable and landline. I love it so much I can’t bear to get rid of it!
What a great idea, a great project – love it!! I particularly like it because it is made of wood and not plastic – wood is a natural sustainable resource and is more durable for toys than plastic. The cord length mentioned by Rita – maybe an elastic based cord so that it stretches?
~ Lisa
This is so cute and girly! However, you may have noticed that toys with cords, pull strings, etc. are now made much shorter in length as this is a dangerous hazard. Babies and kids often are inclined to wrap things around their necks (I have seen it with my son, scary!) so this is important. Perhaps you can add a note about this in the post, so readers are aware? Safety > Aesthetics.
Yes, I’ll add a note about that, thanks for the thought!
Laura 🙂
I think this is a super cute project, but want to point out the strangulation hazard for toddlers with the cord so maybe consider adding a disclaimer that it should be used only under 100% adult supervision or consider making it without the cord.
Yep, that’s a good note to point out so I’ll make a note of that as well 🙂
Laura
I love seeing the kiddo projects! What a fun phone for toddlers!
This is the cutest thing ever! I’m obsessed!
Paige
http://thehappyflammily.com
How cute.
You guys are so creative. I love the pink colour of the phone! ❤️✨
Charmaine Ng | Architecture & Lifestyle Blog
http://charmainenyw.com