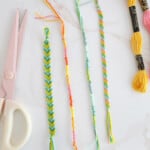
How to Make Friendship Bracelets
Video and photo instructions to make 3 easy beginner friendship bracelets
Servings 1 bracelet
Cost .50¢
Equipment
- -scissors
- tape (or clipboard)
- embroidery thread
- ruler
Instructions
Candy Stripe Friendship Bracelet
- Cut 5 strands of embroidery thread that are about 36″ long. Tie them together at the top with a simple knot. You can either tape them to a table or use a clipboard if you want to be able to move around as you work on it.
- Take the first string (A) all the way on the left and make a forward knot on the second strand (B).
- Repeat by using that first color string (A) and making a forward knot on each string (C, D, E) working your way across the strands.
- What was your second strand originally (B) is now your first strand so you’ll use that to make forward knots on each thread all the way through to the end again (C, D, E, A).
- Repeat with each strand as they become the first strand in line and you’ll start to see your candy stripe pattern appear!
- Once you’ve reached your desired length, you can tie your bracelet with a simple knot and your bracelet is complete.
Spiral Staircase Friendship Bracelet
- Cut 4 strands of embroidery thread that are about 36″ long. Tie them together at the top with a simple knot. You can either tape them to a table or use a clipboard if you want to be able to move around as you work on it.
- Chose one color (can be any color) and use that thread to tie a forward knot around the other 3 threads bundled together.
- Repeat and tie a total of 10 forward knots with that color.
- Choose another color and tie 10 forward knots around the bundle of the threads with that color and repeat with each color creating your staircase.
- Once you’ve reached your desired length, you can tie your bracelet with a simple knot and your bracelet is complete.
Chevron Friendship Bracelet
- Cut 4 colors of embroidery thread about 72″ long. Holding all your threads together, fold in half and make a knot close to the fold so you have a small loop as the top of your bracelet.
- Order your thread colors so that they mirror each other (ABCDdcba).
- Take your first thread on the left side (A) and tie a forward knot around the second thread (B).
- Continue to use your first thread (A) to tie forward knots around your third (C) and fourth (D) thread as well.
- Now you are going to repeat the process but backwards on the other side. Take the first thread on your right side (a) and do a backwards knot around the second thread in (b).
- Continue to use your first thread (a) to tie backwards knots around your third (c) and fourth (d) thread as well.
- Now that both of your first threads are in the middle (A and a), take your left-hand thread (A) and do a forward knot on the right-hand thread (a) to finish off the “V” shape.
- Repeat this process with each outermost string (which is now B and b) and your chevron pattern will start to emerge.
- Once you’ve reached your desired length, you can tie your bracelet with a simple knot and your bracelet is complete.
Notes
Tips for Making Friendship Bracelets:
- When tying your knots, you want to pull the knot firmly tight but not too tight. It should feel like a gentle but firm tug to tighten it rather than pulling really hard.
- Try and keep all your knots tied at the same tightness to keep the bracelet looking even.
- It’s easiest to work on a table or a large clipboard so you can tape the bracelet about a foot away from you and have the strings hang down over the table or clipboard edge.
- Try making different color combinations for holidays or special occasions!