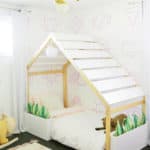
Palm Springs House Makeover
Turn a kid's house bed into a Palm Springs dream home!
Ingredients
- house bed frame
- 12 8″ wide wooden boards
- white paint
- white wood screws
- twin size roll slat
- 3 2" x 2" boards
- 1″ thick dowel rod
- 5.5″ round wood disc
- mini puck light
- 8″ plastic globe
- epoxy glue
- 2 planter beds (see separate DIY post)
Instructions
- For the roof, we bought 8″ wide boards, cut them the width of the house, painted them, and then spaced them about 2″ apart to create a roof! It was easiest to paint them before attaching them to the house (I like to use this paint for kid projects as it’s extra safe) and then we clamped them in place on the roof, pre-drilled our two holes about 1″ away from the top and bottom of the board edges and then used white screws to attach the boards on each side. The boards that meet in the middle had to be cut lengthwise at an angle with a circular saw to meet nice and pretty (the roofline is almost an 80° angle, so we cut each board at almost a 40° to fit). If you didn’t want to take the time to do that, you can also not have them meet in the middle (and plan one of your roof gaps over that spot) or just have them touch as-is instead of cutting the angle. Since the bed we bought has an asymmetrical frame, it wasn’t the same length on both sides, so I cut a board a little thinner at the end near the wall so it wouldn’t be as noticeable.
- I just got a twin-size roll slat and set it on top of 3 2″x2″ boards that I cut to fit inside the length of the bed. I placed one board all the way on the right side, one all the way on the left side, and one down the middle and screwed the roll slat onto the boards with wood screws.
- For the light, I got a 1″ thick dowel rod and cut it to 5 1/4″ long and cut two 40° angles into one end so it would fit into the “V” of the roof arch. I then pre-drilled a hole into the flat end of the dowel and also through this 5.5″ round wood disc so I could use a wood screw to attach them together. I used some epoxy glue to glue the two pieces into the “V” of the roof (and had some large clamps keep it there while the glue dried). Once the glue was dry, I could stick on my mini puck light onto the center underside of the wooden disc and then I used more epoxy to add an 8″ plastic globe onto the disc (I taped the globe to the disc with painter’s tape to keep it in place while the glue dried).
- See the linked post to see planter bed instructions