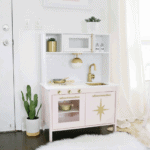
MID-CENTURY MODERN IKEA PLAY KITCHEN HACK!
Update an Ikea kitchen for your kiddo
Ingredients
General Supplies
- IKEA play kitchen
- peel and stick subway tile
- gold spray paint and clear gloss spray
- flat white primer spray paint
- paint for kitchen (I would suggest a lacquer paint if you can!)
- painter’s tape
- piece of foam core board
- wood glue and epoxy glue
- drill and drill bits
- wooden star decal
- 5″ center to center brass pulls (I used 3 of these)
- round gold cabinet knobs (I used 3)
Supplies for stove
- 12″ rounded rectangle board for stove
- 4″ circles (2 of them that are 1/8″ thick)
- gold and white vinyl
- small brass knobs
Light Fixture
- wooden ball (4.5″ size)
- 1/2″ wooden dowel rod
- 4″ wooden circle (1/2″ thick)
Instructions
- First, I started by painting the sections of the kitchen the colors that I wanted.
- Once the main sections were painted, I spray painted the kitchen faucet and sink with the gold paint and then with the clear gloss once the gold paint was totally dry.
- I decided to do an undermount on the sink to give it a more luxe feel, so we just centered in on the bottom side and used 4 small wood screws to screw it in place—looks so much cooler!
- I wanted to add some realistic looking subway tile to the backsplash, so I used peel and stick tile to make it happen! Since the bottom and top have a backboard but the middle section doesn’t, I just cut a piece of foam core board a tiny bit larger than the opening, and tiled the board to each edge with the tile. Once the tile was on, we loosened the top section of the kitchen enough to wiggle in the board so it was flush with the back and then tightened the screws back in again and it’s wedged in there pretty well. You could always put a brace of some sort on the back if you felt your toddler would push it through, but it feels pretty solid to me so I left in in there. We also did some white acrylic caulk around the edges to hide any of the seams and that made it look a lot nicer as well. I also tiled the top section so it looks like it goes all the way up the wall, so you’ll want the 10 square pack if you want both tiled, but the 5 square pack is enough to tile just the bottom backsplash.
- I made my own little stovetop by gluing a thin wood board over the hole and adding two painted circles and small brass knobs to act as the stove controls. To make the burners, I cut different sized gold and white circles out of vinyl and then layered them on top of each other so it made a bullseye effect when layered.
- Switching out the hardware was pretty easy (although you could paint the handles as well for a budget version) and I also painted a gold star wooden decal to add a bit more midcentury style to one of the cabinet doors.
- To make the globe light, I drilled a 1/2″ hole through my 4″ wooden disc and then drilled about 2″ into the top of a wooden ball. I used a piece of a 1/2″ wooden dowel rod as the connecter (which you can cut with any kind of electric or good old-fashioned hand saw) and glued them together. Then I painted it all white, divided the ball in half with painter’s tape, and painted the top half, rod, and disc gold, and glued it under the top cabinets. For extra stability, I also drilled a screw into it from the top in the microwave area.