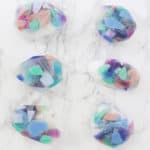
GEMSTONE SOAP DIY (TWO WAYS!)
How To Make Gemstone Soap
Ingredients
- melt and pour soap base in clear and opaque
- soap colorants
- favorite essential oils
- silicone mold, I used this rectangle one and this diamond one
- knife
- glass pyrex pitchers
- silicone spatula
- disposable plastic cups
Instructions
- To create the different colors that you’ll need for your soaps, first create 6-9 solid colored soaps. I used a combination of clear and opaque soap base and mixed in various soap colorants to create the colors I liked. This part is really the creative part. Have fun mixing up colors and using different soap bases for a beautiful variety. I found that using the same color and pairing it with the opaque or the clear gave me a totally different look. To melt down your soap base, simply (and carefully) cut away small cubes of your melt and pour soap and pop a handful in the microwave in a pyrex pitcher. Use your spatula to mix the base until it’s completely melted. At this point you’ll add in your desired essential oils (I used a citrus scent) and colorants.
- Mix together and pour your color into a plastic cup. You’ll repeat this for each color you want to create. I ended up doing 9 but probably could have done more since I enjoyed this step so much. ? Let your soaps cure before moving on to the next steps. I left mine overnight, but if you’re impatient, you could store them in the fridge for a few hours, I won’t tell.
- Once your colorful soaps are done setting, take them out of their plastic cups. I ended up having to break the plastic cups to get them out, which was totally fine since they were disposable. Next, slice up your soaps into various shapes and sizes. Set aside.
- To create the hand-cut gemstone soaps, I started by adding a sprinkle of cosmetic grade micro glitter to the bottom of the silicone mold. Please note that you definitely want this to be cosmetic grade and not craft glitter! After having a little too much fun with the glitter, I started adding the slices of colors into each mold. I liked adding a lot more to the bottom of the mold and making the pieces more sparse at the top. I also made sure to use colors randomly in order to get really unique looks.
- Melt a block of opaque and clear base in two separate glass pitchers. I found that having them hot and melted at the same time created a more organic look to the soaps in the end since one or the other didn’t get time to set too long before pouring in the other base. I started with the clear base and slowly poured it over each mold and finished it off with the opaque base filling it to the top. Let your soaps sit overnight or in the fridge for a few hours.
- Peel your soaps out of their molds. I loved this part! It was so neat to see how each one turned out and the variations. Using a knife, I slowly cut facets into each soap bar to create a gemstone. There really wasn’t any method to the slicing, I was just cutting away to see how each soap formed. Again, each one ended up looking totally different and so beautiful!
- To use the diamond silicone mold instead of the rectangle, I did the exact same steps except that for the second batch, I used only clear soap base and one color for each soap to see how they would turn out. I love the semi-clear gem look with the single color a lot, especially with that deep indigo color!