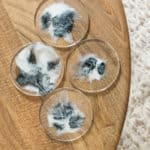
DIY Alcohol Ink Resin Coasters
Ingredients
- silicone coaster mold
- epoxy resin kit
- alcohol ink
- drop cloth or parchment paper
Instructions
- Mix the epoxy resin according to the package directions and fill the cavities of the molds.
- Drip the alcohol ink into the wet resin. This is where you can experiment and play! The results will likely vary a great deal depending on the colors you use and how set the resin is before you begin adding the ink.
- If needed, cover your coasters until the resin cures. Check the package instructions but this will likely take 10+ hours (I left mine overnight). Once cured, you can remove them from the molds.
Notes
I want to note that epoxy resin gives off fumes/an odor when working with it. You need to take care and work in a very well ventilated area when working with this craft supply. I choose to work outside—it was a nice day and this offered plenty of fresh air. But if you are working inside be sure to be in a space where you can open windows or otherwise make sure the space is ventilated. You should also wear gloves when you work (the kit I’ve linked above comes with gloves) and I would also consider wearing eye protection if you don’t already wear eyeglasses. And take care to cover your working spaces to project any furniture or flooring.