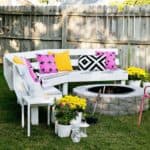
Fire Pit Bench DIY
How to build a curved fire pit bench
Ingredients
Tools:
- circular or miter saw
- straight edge/speed square 1 by 6s (for seating), 4 by 4s (for legs), 2 by 6s (for framing)
- drill
- sander
- pencil
Supplies:
- umber pressure treated
- 2½ in. exterior screws get the big box
- 6 in. exterior lag bolts five
- paint or stain
Instructions
- I used standard seating measurements (18″ deep, 18″ high, 18″ back support). After staring at my sketches (which consisted of a lot of paper rotating and deciphering of my handwriting), I decided to cut all of the frame pieces first (starting with the back/longest piece and building off that.)
- After I got the seating frame all screwed together, we flipped it over. Then I cut all of the legs out, put them in place, then screwed them in. The screws I was using were extra beefy, so I just put two in each. Since we were building on grass, I had to put a piece of wood under each section I was working on to make it somewhat even.
- We flipped the bench and I cut out all the back braces. I started out cutting them so they would lean back 20˚, expecting that I would have to dial it in with several cuts, but 20˚ was pretty perfect. I bolted the back in with a couple of the lag bolts, then realized we should have started by laying out and cutting the seat pieces.
- So, I unbolted all of the backrest pieces and we proceeded with the seat pieces. After actually doing it, I think the best way to go about it (in the future) would be to start with the longest piece that is flush with the middle front section. Once you have that, evenly space the rest off of that one. We worked our way through the pieces by placing, spacing, marking, cutting, and repeating.
- After all the pieces were cut, we bolted the back pieces back on, then screwed all of the seat pieces on (of course you can take the faster, smarter route and just fit the seat slats first.)
- Another last minute tweak: I had cut the back supports with 20˚ angle on top, thinking I was going to put a little ledge on top. Laura wanted a more streamlined and clean look, so I cut down the back of each one, leaving an inch on top. It does look good, but you can skip this step and screw some 2 by 6s (measure and cut to length) on top for a bit of a ledge to lean on or to place your drink on.
- In order to match up the angles on the back support pieces, we did a bit of improvising (sense a theme here?). We started with the top pieces: Laura held the piece for one side and I held one for the other, then marked where they met up. I cut the ends at 20˚only because the back braces were cut at 20˚, and that worked!
- After we got the top row screwed in, we debated putting the second row spaced like the seating or in the middle. Middle placement won, and it looks great. It always helps to have help on a project like this so you can bounce ideas off each other, and a helping hand is invaluable.