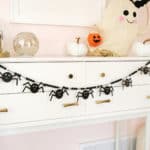
Wooden Spider Garland DIY
Garland made of wooden spiders and beads
Servings 1 garland
Cost $10
Equipment
- scissors or wire cutters
- glue gun
Ingredients
- 6-8 2" wooden circles
- wooden stir sticks or popsicle sticks four per spider
- spray paint black
- jewelry bales
- google eyes
- paint pen white
- twine black
- wooden beads make sure the bead openings are big enough to go on the twine
Instructions
- Use scissors or wire cutters to cut a wooden stick into four equal pieces. Glue the rounded edge to a piece with straight edges at an angle to create a leg. Repeat until you have four legs per spider (you’ll want 6-8 spiders per garland).
- Glue four legs to the back of your wooden circle.
- Spray paint your spiders black and allow paint to fully dry.
- Glue jewelry bales onto the back of each spider above the head area.
- Glue on your google eyes and draw on a smile with your paint pen.
- Thread your beads and spiders onto your twine (make a knot where the spiders are so they don’t slide around) and you are ready to hang your garland!
Notes
TIP: Thread your spiders onto your twine backwards so that they are facing front when you tie a knot!