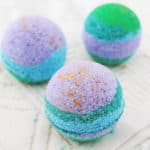
Rainbow & Gold Lustre Bath Bombs
make your own shimmery rainbow bath bombs
Servings 9 bath bombs
Ingredients
- 4 oz. baking soda
- 2 oz. corn starch
- 2 oz. citric acid
- 2 oz. epsom salt
- 1 ½ teaspoons water
- essential oils
- ¼ teaspoons coconut oil
- food coloring
- gold lustre dust
- plastic ball ornament to use as the mold
Instructions
- I first want to note that I used the above amounts for each color I created. I made four colors for my bath bombs, so you’ll want to make sure you have quadruple (or more!) of your ingredients depending on how many colors you make for your bath bombs.If following this recipe and doing four colors, you’ll be able to make 6-8 bath bombs.
- Carefully measure and combine all dry ingredients into one bowl. Baking soda, corn starch, citric acid and epsom salt. Mix together and set aside. Do make sure your measurements are pretty exact. I used a scale to measure everything out, and it made things much easier!
- In a separate bowl, combine your wet ingredients. Water, essential oils, coconut oil and food coloring. For the essential oils on top of the already scented epsom salt, I added about 10 drops of wild orange to each batch I made for each color. For the food coloring, I kinda eyeballed it until I got the desired color. I wanted these to be more of a jewel tone and make my bath water super colorful, so I added a lot more than I usually would.I suggest starting with 10 drops and going from there if you are looking for a more vibrant bath bomb. Mix all your wet ingredients together and set aside.
- Now for the fun part. Again, if you haven’t watched Emma’s video, check it out. It really helps clear up this step. Little by little you are going to add the wet ingredients into the dry ingredients. As you add in the wet ingredients, your mixture might start fizzing. We want as little fizz as possible, so be sure to add in your ingredients drops at a time and stir. Towards the end of adding your wet ingredients, I suggest using your hand to really mix everything together and make sure the consistency isn’t too dry. If it’s too dry, you’ll have issues with your bath bomb potentially crumbling or breaking. An easy fix is to add in just a sprinkle of water until it holds together when squeezed. Set aside your mixture and repeat steps 1-3 per color you wish to add to your bath bomb. For this recipe, I did four colors.
- Once all of your colors/mixtures are complete, it’s time to add everything to your mold. I sprinkled a pinch of gold lustre dust to the bottom of my mold before adding in the mixture to give it a little shimmer and sparkle. Just make sure your lustre dust is food grade. Mine was originally meant for cake decorating and worked beautifully. After the dust, start to layer in your colors. I used a spoon to add in the mixture and pack everything in. I suggest using your fingers to make sure everything is packed in too. Slightly overfill each side before putting them together and closing the mold.
- I let some of my bath bombs stay in their molds overnight and noticed that after they dried and expanded a little, they cracked the plastic mold. So I would suggest very carefully taking off one side of your mold after it dries for a few minutes. Finally, let your bath bombs sit overnight. Again, carefully remove the remainder of the mold the next day. If your bath bomb falls apart, you can put it back into a mixing bowl and add a little more water to try again.
- Wrap in colorful tin foil or store in a glass jar to keep it safe for giving or using in your own bath. Enjoy!
Notes
Please note, since we used a lot of coloring in these, I suggest doing a quick rinse out after taking your bath to prevent any staining.