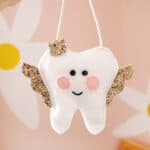
How to Make a Tooth Fairy Pillow (Free Printable With a No-Sew Option!)
Tooth-shaped pillow to use when baby teeth fall out!
Servings 1 pillow
Cost $7
Equipment
- sewing machine optional
- fabric scissors
- printer
Ingredients
- felt in white and pink
- Free Tooth Fairy pattern download
- fabric glue
- straight pins
- black embroidery thread or paint pen for no-sew
- small rope or ribbon for hanger
- batting or pillow stuffing
- google eyes
- glitter fabric
Instructions
- Print our your pattern download and cut out two teeth shapes from your white felt and two round circles and your pocket piece from your pink felt. Cut out your wing and crown pieces from your glitter fabric as well.
- Either sew with pink thread (or glue for no-sew) your pink round cheeks onto the face of your Tooth Fairy. To sew your mouth, use a thin marker to draw a smile and then embroider the line either by sewing little vertical lines all next to each other along the pen mark to make a smile or by using a method like this one. For no-sew, use a black paint pen to draw it on and allow the paint to dry!
- Make sure when you cut your wings to trace them facing one direction and then flip the template horizontally to trace it again the opposite way so the glitter is facing the right directions when you go to attach them together. Set your wings aside for a moment.
- Glue on your google eyes or you can embroider a different style of eye that you like or even use buttons for the eyes!
- For the back of the pillow, center your pocket on the back and either sew along the half circle line, leaving the top open to be your pocket, or glue along that line, leaving the top open for no-sew. You can also add a ribbon or trim detail across the top like I did.For the wings, take your two sets of wings, and line up the outer edges of each pair with the glitter sides facing out, gluing them together with fabric glue. You’ll notice that the front piece of your wings is a little wider on the inner edge so you have a strip of fabric that will get sandwiched between your front and back pieces and keep the wings in place.
- If you are using a hanger, cut a piece of ribbon or thin rope about 10″ long.
- Now it’s time to assemble! Place your wings so that you see the exposed inner strip facing up and add fabric glue to those exposed strips. Place your back Tooth Fairy pillow piece on top of the glued strips to connect the wings to that back piece. Allow the glue to dry. Flip the back and wings over so it’s facing down and add some batting or a small amount of pillow fill to the middle of your pillow (I found it easiest to cut a few layers of batting about an 1″ smaller than my tooth shape to be the filling).
- Place your top piece with the face on top of the batting, face side up. If you are using a hanger, slip the ends of your ribbon/rope in with the batting in the middle of your pillow sandwich and use straight pins to pin it all together.
- To sew the pillow, sew all the way around with white thread with a 1/4″ seam allowance, and for a no-sew, glue all the way around the edge between the front and back with fabric glue to seal up your pillow edges (you can pin it together while the glue dries to keep it from moving).
- Glue your two crown pieces together, glitter sides facing out.All you have left to do is to glue on your crown and your pillow is ready to use!