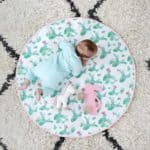
ROUND QUILTED PLAY MAT DIY
How to make a quilted baby mat
Ingredients
- 1 yard of printed cotton fabric for your top layer
- 1 yard of solid cotton fabric for your bottom layer
- 1 yard of cotton batting for your middle
- 3 yards of double fold bias tape
- sewing machine and straight pins
- parchment paper
- fabric pen
- fabric scissors
Instructions
- Lay out your material so that your bottom layer, cotton batting, and top layer are all stacked on top of each other and smoothed out carefully so that there are no large wrinkles. I would suggest washing all your fabric and batting before sewing so that if any of them are going to shrink a little, they do it before you sew them together. You can also do two layers of batting if you want to make it more plush, but you’ll probably want to try out a walking foot for your machine so it doesn’t bunch up on you.
- Use your parchment paper to make a 34″ wide circle template (I use the folded quarters method to make large circles). Place your circle template on top of your layers.
- Use a fabric pen to mark all the way around the edge of your circle and straight pin the layers together just inside of the circle.
- Cut out your circle with fabric scissors.
- Fold your circle template in half, line it up on your fabric circles and make a line of straight pins down the middle. Use a longer stitch on your machine to topstitch down that center line (the longer stitch helps it to not get caught up on the layers). You may also need to do some test stitching on a scrap piece of all the layers first to make sure the tension is correct for that many layers (I had to adjust mine a bit).
- Once you sew down the middle, you’ll make more pin lines every 4″ and sew down those to create one direction of your quilted detail (a yardstick can be helpful to pin along for a straight line too).
- Once you have all of those sewn, use your folded circle template to pin down the middle of your sewn lines so you’ll be sewing the opposite direction across those lines. Repeat the same process of pinning and sewing a line every 4″ until your whole circle is quilted. Trim off any fabric that got pushed out beyond the edge so you have a clean edge cut for the trim.
- Pin your double folded bias tape all around the edge of your play mat.
- To finish the tape edge when you get all the way back around, fold under about 1/2″ of the end of the bias tape and place it over the starting point of the tape so you have a clean looking finish.
- Sew your edge in place and your mat is ready for tummy time! You should be able to wash this machine cold with no problem (I just throw it in with the rest of her wash that should also be on cold).