Homemade Bath Bombs
A foolproof way to make bath bombs that don't crack or crumble
Servings 2 bath bombs
Equipment
- bath bomb molds
Ingredients
- 4 ounces baking soda
- 2 ounces corn starch
- 2 ounces citric acid
- 2 ounces epsom salt
- 1 to 1 ½ teaspoons water
- 5-10 drops essential oil of choice
- 1¼ teaspoon oil I like coconut or olive oil here
- 1-2 drop food coloring optional
Instructions
- In a bowl, combine the dry ingredients (the first four listed above). Whisk to remove any clumps (corn starch tends to be clumpy). In a small glass jar, stir together the wet ingredients (the last four ingredients listed).
- If you’re using coconut oil, give it a quick melt in the microwave or stove top so it will easily combine with the other ingredients.
- Slowly pour the liquid mixture in with the dry mixture, whisking as you go. If you see the mixture fizz or foam, you may be adding the liquid too quickly.
- Once the wet and dry ingredients are combined, take a small amount in your hand and squeeze it together. It should stick together fairly well in one or two big chunks.
- If it’s still too powdery to hold together, add a tiny bit more water and mix until it holds together. If you find that adding the liquid slowly is difficult use a spray bottle to add them instead of pouring.
- Next, fill half of your bath bomb mold with the mixture until it’s just slightly overflowing. Press together, and then gently remove one side of the mold. Place the bath bomb on a tray and allow it dry out before removing the other side.
- Wait one hour before removing the bath bomb and then see if it removes from the mold without breaking. If it breaks, just press into the mold again and let it dry out longer.
- The goal is to get the bath bomb out of the mold so it can further dry out overnight. I’ve found that if you leave them in the mold too long, they can begin to stick and then it’s more difficult to remove without cracking.
- Once you are ready to remove the other side, gently invert the bath bomb so the uncovered side is facing down, then gently remove the other half of the mold from the top. These can fall apart on you very easily if you’re not careful.
- If a bath bomb cracks in half while you’re removing it, you can gently press it back on top of the other half, or remove all the mixture back to the mixing bowl and start the molding process again.
- Once they are completely out of the mold, allow them to dry out for 8 hours or overnight. Once very dry, you can wrap them in plastic wrap and store in a dry place until you’re ready to use them, or you can gift them to friends.
Video
Notes
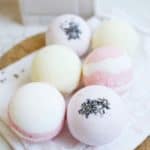
In case you’re curious, the flavors I created included: lemongrass (green), lavender (purple), and peppermint (white and red). You can mix essential oils into each bath bomb, too.
If you want to create two-tone bath bombs, like my peppermint ones, just mix up your batter in two separate bowls and only add the food coloring to one. Easy!