First, you’ll want to cut your plywood sheets down to two 2′ x 4′ boards if you didn’t buy the precut boards. To make a hole, make a mark 9″ down from the top and 12″ in from each side to find the center point of the hole location. Trace a 6″ wide circle with that mark as the center and cut out with a jig saw, or use a 6″ hole saw bit on a drill to make the hole.
Once your boards are ready, you’ll cut the rest of your wood! You’ll want four pieces of 2′ x 4′ that are cut to 4″ long each for the long sides, and four more boards that are cut to 2′ long each. Cut an inward 45° angle at each end so you can put them together like a frame.
If you don’t have a saw that can cut 45° angles, then just cut four boards to be 4′ long for the sides and four more boards that are 21″ long so they will fit in between the long side pieces.
Once the sides are cut, flip the board upside down and glue the sides in place one at a time, keeping them flush with the edge of the board. Clamp the boards in place and flip the board back over to nail gun or add wood screws through the top to attach the board to the side.
Make sure to nail or screw the corners together as well where they meet up for extra stability like above. Once all your sides are on, we can work on the legs!
Cut four 2′ x 4′ boards to be 11 1/2″ long. Round the top end with a jig saw (you can trace a bowl or cup there to get a good curve) and cut the other end at a 10° angle. Mark the center of your rounded radius with a pencil and drill a 3/8″ hole centered in that spot as you see above.
To mount your leg to your board, place one leg on the inside top edge of your board just far enough away from the top board that you have enough room to rotate the leg up and down at the hole site. Clamp the leg in place against the board in the down position and drill through the pre-drilled hole and out through the side board so you have a hole the whole way through. Slide your bolt through the hole from the outside and add the washer and wing nut on the other side. Repeat with all four legs.
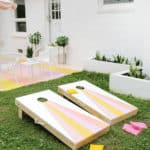
I chose to have a white board with four colors as a stripe up to the board. Just paint your white color and then once it’s dry, tape off your other stripes and paint each section. You can stain, seal, or paint all sides of the boards if you think it will be in tough weather or stored in humidity, but you can also get away with just painting the top if that’s not the case.
These boards can be a little heavy to carry for some, so adding a rope handle on the sides for easier carrying can help! Just drill two holes and add some rope that’s knotted on the inside of the frame.You can make your own bean bag with corn, but those tend to get moldy, so I bought some of these since they will last longer. Once your game is ready to go, it’s time to set up that puppy and begin to play!