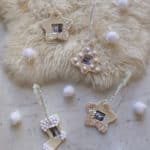
DIY Salt Dough Frames
Cost $10
Ingredients
- 2 cups flour
- ½ cup salt
- ¾ cup water
- mixing bowl
- rolling pin
- cookie cutters
- parchment paper
- Canon IVY printer + paper
- card stock
- glitter, paint, or mini pom poms
- glue
- pipe cleaners, yarn, or magnet backs
Instructions
- Mix together the salt dough. In a mixing bowl, add the flour, salt, and water. Mix with a spoon or your hands until a dense dough forms.
- Cut out the shapes and bake. I used holiday cookie cutters, but you could also freehand your designs and use a knife or X-Acto to cut out the shapes. For the frames, add a small square to the center of the shapes. And for any shapes that you want to be ornaments use the top of a piping tip (or a knife/X-Acto) to cut a hole. Place the shapes on a baking sheet lined with parchment paper and bake at 200°F for 2-3 hours, until very dry. Allow to fully dry out on a cooling rack as well.
- Print your photos. I did a mix of photos of memories from this past year with my nieces, family, and my dog who passed away a couple months ago. I choose to do black and white photos, but the Ivy printer can do color as well.
- Decorate the frames and assemble. I added glitter and mini pom poms to the frames, but you could do all sorts of things—the sky’s the limit! You could paint your frames, glue other elements like yarn or collage papers. Once you have those done, trim and stick the photos to card stock or other thick paper and glue this to the back of the frame. If you are making ornaments, add the pipe cleaner or yarn for the hanging loop, and if you are making magnets, glue on your magnet back.
Notes
For the salt dough, I choose to keep mine off-white, meaning I did not add acrylic paint to the dough (although you can, if you want). This meant all my utensils like a mixing bowl, rolling pin, and cookie cutters stayed food safe as the plain salt dough recipe is all edible ingredients (but don’t eat it, it’s VERY salty. ha). If you do add paint to the dough, you may want to consider using utensils that you keep for crafting rather than being food safe.