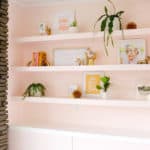
BUILT-IN SHELVES IN 4 EASY STEPS
Ingredients
- 1″ x 2″ boards for support rails
- 12″ wide boards for shelves
- 1″ x 3″ boards to trim the front of your shelves
- level
- stud finder
- screws (and anchors if needed)
- electric brad nailer or drill
- countersink bit
Instructions
Add your support rails:
- To determine your rail placement, use painter’s tape to mark where you want your shelves to be and check with a level to make sure your lines are straight and even with each other. You can decide if you want all your shelves to be the same hight or different heights, so play around with the tape locations until you find a combination you like. I left a little more room at the top of my shelf since my ceilings are slanted and I didn’t want it to look too smushed up top.
- Once you have your tape lines in place and level, measure the width of your wall and cut your support boards to that width. Find and mark the studs in the wall with a stud finder (you can just mark on the painter’s tape) to make sure you have a solid place to drill into with your screws (we love these screws for this type of job). If you can’t find a stud, you can use drywall anchors in the wall first (either self drilling or tap in) and that will give you a good hold for your screw as well. I highly recommend holding your board against the wall once you cut it to size and then marking directly on the board where you want your screw holes to be (screw into studs where you can!) and then take the board off to pre-drill your holes to make the process a lot easier. Line your board up with your level tape lines and attach your board to the wall with your screws (again, you may want to hold up your pre-drilled board and drill holes into the wall first, but some screws are “self-drilling” and you don’t need to do that for them to go in smoothly).
- Repeat the process on the sides of your nook by cutting your side support rails as long as they need to be to come right to the edge of your top board once that is put on, and mark your holes, pre-drill your board, and attach those to the walls as well.
Attach your main boards on top of the support rails:
- Now that your support rails are in place, cut your main board to the width of your nook (just a tiiiiny bit smaller actually so you can fit it in … you can caulk any gaps later) and place it on top of your rails. Use a nail gun (this inexpensive electric brad nailer is great to have around for projects like this—no air tank needed!) to attach your board to your rails or you can also screw in the boards if you don’t have a nail gun (pre-drilling recommended so as not to split the wood). I would also suggest laying down a line of wood glue on top of the rails before adding your board on top for a little extra bonding strength.If using a drill and screws to attach your main and trim boards, I highly recommend also using a countersink bit when you pre-drill so your screw head will end up slightly below the surface of your board and you can fill in the hole with wood filler and smooth it out completely flat at the end. What hole? I don’t see a hole … exactly.
Attach your trim boards to the front of your shelves:
- Once your main board is added, cut your trim board the width of the front of your main board and attach the board to the front of your shelf to finish off the look. I attached most of my trim boards with the brad nails and nail gun, but there were a few spots where the trim was bowed a bit, so I pre-drilled and used screws there to really keep the boards together (brad nails and glue should be fine for non-warped boards but screws are a stronger hold if they are trying to pull apart based on warping).
- Add finishing touches:
- Finish by filling any nail or screw holes with wood filler (let it dry and then sand smooth) and caulking seams between the shelf and wall with latex caulk before painting the boards with semigloss paint (I painted them Soft Stone by Valspar—the same color as our pink walls). Make sure you give the paint its full time to cure (and maybe even add a few more days on to the wait) before setting objects on the shelf. You really want that paint to be cured so it doesn’t stick to the objects and peel up. Adding little felt pads to the bottom of your shelf decor will really prolong the life of your paint job as well!