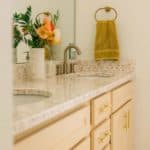
DIY Faux-Terrazzo Countertops
Learn how to give a bathroom countertop a faux-terrazzo makeover.
Cost $250
Ingredients
- degreaser to clean the surface
- bonding primer high adhesion
- latex paint in your desired base color
- paint roller small
- paintbrush for detailing small
- colored vinyl chips
- dry paintbrush to clear away loose chips
- epoxy highly recommend Stone Coat Countertops
- disposable bucket for mixing epoxy
- mixing attachment for a drill to mix your epoxy
- Trowel to spread epoxy
- short paintbrush(es) to "chop" epoxy
- blowtorch make sure it can be held vertically upside down; otherwise it will flare when the propane gets too low
- tweezers
Instructions
- Clean your surface with a degreaser, like Krud Kutter
- Tape off any surfaces that you do not want to get paint or epoxy on, like sinks and walls. Use plastic sheeting to catch any runoff down the front of the vanity.
- Prime your surface with a high adhesion bonding primer (we did 2 coats)
- Once your primer has dried for at least 4 hours, begin painting with your base color. Use as many coats as necessary until you get the desired coverage (we did 2 coats)
- Roll another layer of paint onto a small area (we did about 5x9" sections), then sprinkle your chips. If attempting to deposit chips on a vertical surface, throw the chips directly at the surface). Don't skimp on the amount of paint, you want there to be enough for the chips to stick to!
- Once the paint is dry, take your hand and press the chips into the surface. Be sure you aren't getting paint on your hands and tracking it onto the chips!
- When you are certain paint is dry, swipe your hand over the surface to loosen chips that didn't adhere completely. Use your dry paintbrush to brush loose chips into the sink or in another receptacle.
- If you notice any "bald spots," go in with your very small detailing brush. Apply paint to the surface, then sprinkle chips again over that spot. Repeat the pressing and swiping process to ensure you have as few loose chips as possible. You may need to do this a few times before you're completely satisfied with the coverage as chips WILL come off. The goal is to not have loose chips in the epoxy (you will have them no matter what, but we want to have as few as possible).
- Wait at least 12 hours for the paint to fully harden.
- Mix your epoxy (hardener and resin) with the mixing attachment for 2 minutes. Check your epoxy product for how much you need to mix and what the working time is (how long you have before the epoxy sets).
- After pouring the epoxy, take your trowel and spread it over your surface. Try to cover as much as possible with the trowel. It will get caught on the chips as they make a "bumpy" surface, but applying a very light pressure as opposed to trying to drag it right over the chips will help.
- "Chop" your epoxy with your new paintbrush by repeatedly tapping your brush over the entire surface area.
- If you're dealing with a vertical surface, you'll need to just keep adding epoxy to those surfaces. It will pool directly below, so just keep taking that epoxy where it's pooling and redepositing it onto the vertical surface.
- With your blowtorch, go over the entire flat surface to eliminate air bubbles. Do not torch your vertical surface as the epoxy doesn't settle in the same way on those surfaces.
- Before the epoxy dries, remove any tape around the perimeter and sinks very gently. If you wait until after the epoxy dries, the tape will become extremely difficult to remove.
- Look over your surface VERY carefully for hairs (I know, gross) or other foreign objects/pieces that have made it into your wet epoxy. With your tweezers, carefully remove them. Once the epoxy is set you will not have the opportunity to do this, so continually looking for anything like this is pretty crucial at this stage.
- Go over the surface with your blowtorch a few more times to eliminate any air bubbles that might have formed.
- Allow the epoxy to cure for 3 days before light use. It will continue to cure over 30 days.