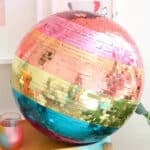
Rainbow Disco Ball DIY
make your own rainbow disco ball using metallic foil vinyl
Equipment
- 1 Pair of scissors
- 1 X-acto knife
Ingredients
- 1 disco ball
- metallic foil adhesive vinyl
Instructions
- Begin by cutting 3/8″ strips of vinyl. You can use a rotary cutter and ruler or just freehand it using the grid on the back of the vinyl as a guide.
- Remove one of the vinyl pieces from the backing and cut into squares. Then simply stick the vinyl square over the silver mirror.
- Repeat, repeat, repeat! For my large 16″ disco ball, I used one full sheet of each color plus about half of a second sheet for the orange and gold bands. Once you have added all the vinyl, your disco ball is done and ready to shine a rainbow all over your home.
Notes
Now for a few helpful hints when undertaking this project. For the middle bands, you can actually just add the intact strips over the mirrors and then come back with an X-acto knife to cut the squares.
This makes the process so much quicker, but only really works for the two middle colors as those are less curved and will allow the vinyl to sit flush on the mirrors without bubbling up.
And second, if you are looking to cut down on time even more and have access to a vinyl cutter, you can have your vinyl cutter cut out the square shapes and then just add them to the ball like stickers.