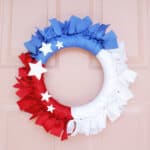
Make Your Own Easy Fourth of July Ribbon Wreath
Easily Make a Fourth of July Wreath with Tied Ribbons
Servings 1 wreath
Cost $20
Equipment
- hot glue gun
- small paintbrush
- -scissors
Ingredients
- wreath frame
- red, white, and blue acrylic paint
- red, white, and blue 1.5" ribbon I used grosgrain
- wooden star cutout
- twine or wire for loop
Instructions
- Step one: Paint your wreath. Divide your wreath into three even sections (you can just eyeball it) and paint them red, white, and blue so that you won’t see any gaps between the ribbons once you start to tie those. If your wreath frame is white you won’t need to paint the white, and you’ll probably need two coats to get a more opaque coverage.
- Step 2: Tie your first round of ribbons. Cut your red ribbons into 14″ long strips and tie around your wreath frame tying them into a knot on the outer edge of the wreath. Repeat until you have ribbon tied all the way down your red section. My ribbon spools were 21′ long and I used just a tiny bit more than one roll per color, so if you want to keep it to one roll each, cut them a little shorter or space them out a little further.
- Step 3: Fill in between each ribbon with another ribbon. Now that you have your first round tied, cut and tie a second round of red ribbons between each ribbon so that it fills the section and make it look more full.
- Step 4: Repeat with your blue and white ribbons. Cut more 14″ ribbons with your white and blue colors and repeat the process of tying one row just touching each other and then another row in between what you’ve done to fill in the gaps.Note: You’ll see that grosgrain ribbon tends to fray a bit on the edges once cut, so if that bothers you, you can run some Fray Check over the ends or use a ribbon that doesn’t fray as easily like a velvet option.
- Step 5: Add your white stars! Paint your wooden star accents white and hot glue them onto the red and blue parts of your ribbon wreath.
- Step 6: Add a hanging loop. Use some twine or wire to thread through the back of the middle ribbon in the blue section and tie a loop so that you have something to hang your wreath from.Now your Fourth of July wreath is ready to hang!