") In my world, cute is king. I am totally one of those suckers that will pay extra or spend more time making something that is a cuter version of an everyday object. I’ve been in love with a few cactus pincushions I’ve seen online, and while I wanted to make one for myself, I couldn’t just choose one type to make! Solution? Make them all! This way you can pick your favorite and make just one, or make a few different types and have your own cactus garden for all your pincushion needs. Thankfully they are so easy to make, you really don’t have to choose just one!
In my world, cute is king. I am totally one of those suckers that will pay extra or spend more time making something that is a cuter version of an everyday object. I’ve been in love with a few cactus pincushions I’ve seen online, and while I wanted to make one for myself, I couldn’t just choose one type to make! Solution? Make them all! This way you can pick your favorite and make just one, or make a few different types and have your own cactus garden for all your pincushion needs. Thankfully they are so easy to make, you really don’t have to choose just one!
") This is pretty much the perfect project to team up with our good friends and go-to craft store, JOANN Fabric and Craft Stores. Here are the supplies:
This is pretty much the perfect project to team up with our good friends and go-to craft store, JOANN Fabric and Craft Stores. Here are the supplies:
-assorted colors of felt
–fabric scissors
-terra cotta pot
–floral foam cone
–hot glue gun
–pillow stuffing
–embroidery floss
–yarn needle
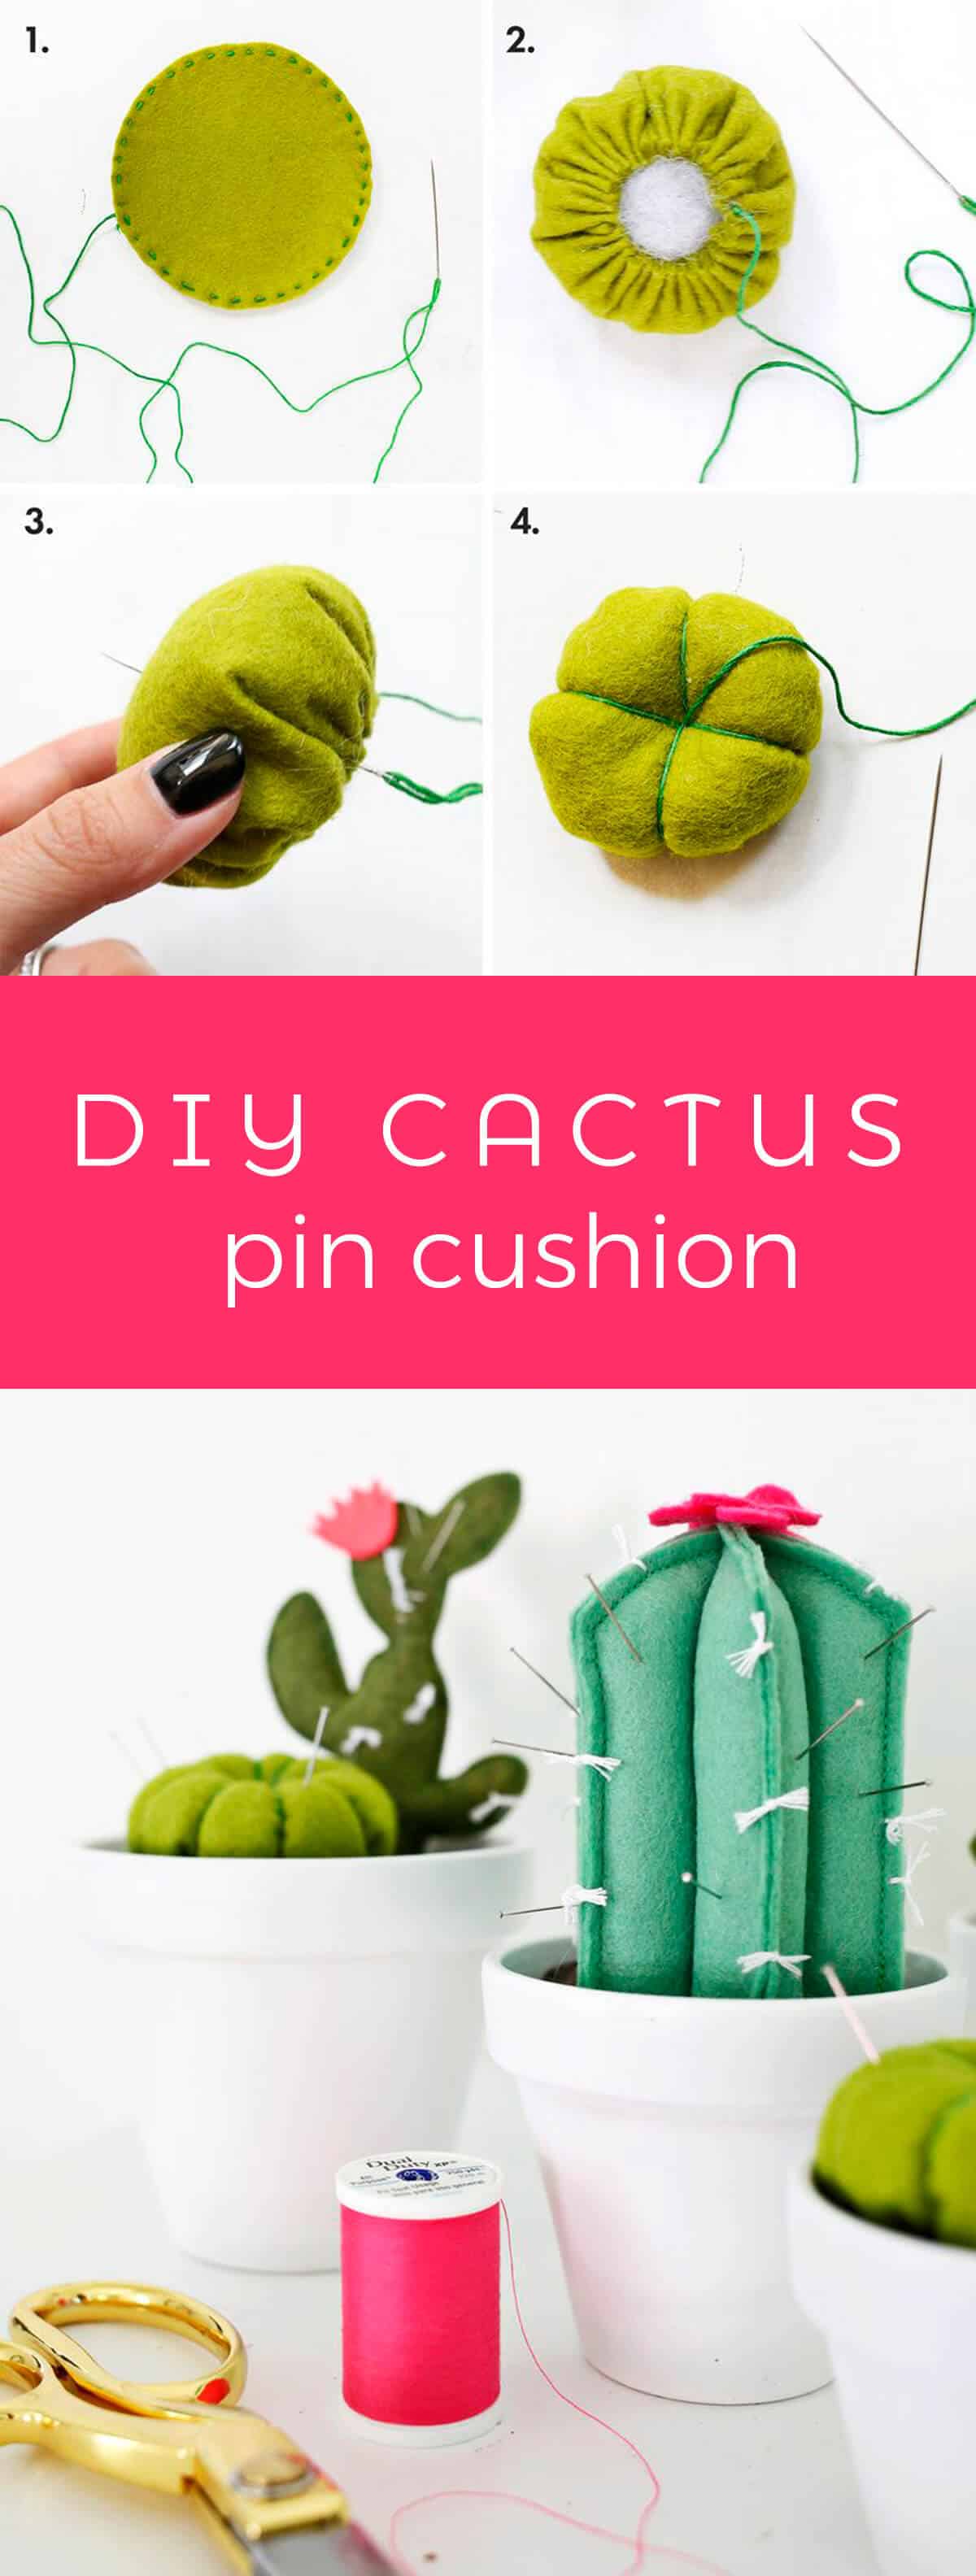
") For your first cactus (kind of like a low-to-the-ground barrel cactus), cut a circle of wool felt about double the width you want your final cactus to be. Use a yarn needle and embroidery thread to sew all the way around the outer edge of the circle. Pull the thread tight to create a rounded pouch and stuff the pouch with some stuffing. Once you have it stuffed to your desired fullness, knot the thread to secure. Thread a long thread into your needle, knot the end, and come up through the middle of your puffy circle out through the top. Go around and down the sides and go back up through the middle again to create one of your sections. Keep repeating this motion, staggering the placement as you go until you have 8 evenly spaced sections. You’ll end up with your needle having just come up through the top to create your last section, so just go right back down again through the middle to knot your thread on the bottom out of sight.
For your first cactus (kind of like a low-to-the-ground barrel cactus), cut a circle of wool felt about double the width you want your final cactus to be. Use a yarn needle and embroidery thread to sew all the way around the outer edge of the circle. Pull the thread tight to create a rounded pouch and stuff the pouch with some stuffing. Once you have it stuffed to your desired fullness, knot the thread to secure. Thread a long thread into your needle, knot the end, and come up through the middle of your puffy circle out through the top. Go around and down the sides and go back up through the middle again to create one of your sections. Keep repeating this motion, staggering the placement as you go until you have 8 evenly spaced sections. You’ll end up with your needle having just come up through the top to create your last section, so just go right back down again through the middle to knot your thread on the bottom out of sight.
")
")
") For this prickly pear type shape, make a quick sketch of the shape and size cactus you want on a piece of paper (remember to keep your openings big enough to stuff some stuffing through later). Cut out two layers of wool felt with the pattern and use your sewing machine (or sew by hand) all the way around your shape. Leaving the bottom open. Use a wooden skewer or crochet needle to push stuffing up into all the different compartments. You can also add some wires or pipe cleaners into the different branches if you want this cactus to be posed in different ways.
For this prickly pear type shape, make a quick sketch of the shape and size cactus you want on a piece of paper (remember to keep your openings big enough to stuff some stuffing through later). Cut out two layers of wool felt with the pattern and use your sewing machine (or sew by hand) all the way around your shape. Leaving the bottom open. Use a wooden skewer or crochet needle to push stuffing up into all the different compartments. You can also add some wires or pipe cleaners into the different branches if you want this cactus to be posed in different ways.
") For this extra 3D cactus look, make a rounded dome paper template that is a little bigger than you want your final cactus to be. You can use this technique to make a much taller cactus or a short and squatty one, so just resize the paper accordingly. Use the paper template to cut three sets of your dome shape from your wool felt. Sew all the way around the edge of each of the dome sets leaving the bottoms open. Stack the three sets on top of each other and sew a line down the middle of the fabric, sewing all the sets together. Stuff each section with the desired amount of stuffing until your cactus takes shape.
For this extra 3D cactus look, make a rounded dome paper template that is a little bigger than you want your final cactus to be. You can use this technique to make a much taller cactus or a short and squatty one, so just resize the paper accordingly. Use the paper template to cut three sets of your dome shape from your wool felt. Sew all the way around the edge of each of the dome sets leaving the bottoms open. Stack the three sets on top of each other and sew a line down the middle of the fabric, sewing all the sets together. Stuff each section with the desired amount of stuffing until your cactus takes shape.
") Now that we have our cactus bodies, use a needle and thread to secure the bottom of the cactus onto the brown wool felt that you’ll use as the cactus dirt. Depending on the shape of your cactus, you may be able to get away with using fabric glue for this part instead of sewing (like for the rounded ball cactus). If your cactus is properly stuffed, you shouldn’t have a problem with it standing up properly once sewn onto the wool bottom.
Now that we have our cactus bodies, use a needle and thread to secure the bottom of the cactus onto the brown wool felt that you’ll use as the cactus dirt. Depending on the shape of your cactus, you may be able to get away with using fabric glue for this part instead of sewing (like for the rounded ball cactus). If your cactus is properly stuffed, you shouldn’t have a problem with it standing up properly once sewn onto the wool bottom.
")
") Cut a piece of floral foam with a bread knife or hand saw to fit into your tapered pot, use a hot glue gun to attach your cactus to the middle of the foam piece, and trim the wool to fit the foam circle. Glue the sides of the foam and press the cactus down into your pot to secure.
Cut a piece of floral foam with a bread knife or hand saw to fit into your tapered pot, use a hot glue gun to attach your cactus to the middle of the foam piece, and trim the wool to fit the foam circle. Glue the sides of the foam and press the cactus down into your pot to secure.
If you want to add a little more detail, you can use more embroidery floss to make knots and cut off the ends for a needle detail or use some colored felt to glue little flowers on top as well. Stick some pins in your new pincushion because this cactus is done!
")
")
") Aren’t they just adorable?? I mean, I love a cute accessory for any type of crafting, but I know that having one of these sitting on my sewing desk is going to make me smile every time I see it. I was also thinking these would be great to give out as little favors if you ever had a sewing-themed party or crafting night event since they are so easy to make. I don’t know about you, but I think I would be a pretty happy party goer if someone “stuck” me with one of these…xo. Laura
Aren’t they just adorable?? I mean, I love a cute accessory for any type of crafting, but I know that having one of these sitting on my sewing desk is going to make me smile every time I see it. I was also thinking these would be great to give out as little favors if you ever had a sewing-themed party or crafting night event since they are so easy to make. I don’t know about you, but I think I would be a pretty happy party goer if someone “stuck” me with one of these…xo. Laura
Credits // Author and Photography: Laura Gummerman. Photos edited with A Beautiful Mess actions.

I fell instantly in love with these.
Just absolutely love these. Gotta try them ASAP.
I just love these! They are so cute. My pincushion is a classic tomato one that I’ve been using for years, so I am definitely going to upgrade now! Thanks for the awesome tutorial!
Love these cactus and see some fun coming!
So cute! And will probably last a lot longer than my real cactuses :/
Oh my gosh!
This is too cute!!
Thanks for this Diy 🙂
These are amazing!!!
Cutest idea yet!
https://www.2minxinx.com/blog
Good tip Marilyn! Never thought of that!
Laura 🙂
These are adorable. Perfect for the summer sewist and craft room.
These are too cute! One of my favorite projects to date!
This is so utterly cute that I don’t know what to say!
This is the cutest ever!
This is super cute!!
This is so cute! Love this idea!
Abbie E.
http://abulouslife.blogspot.com/
Love them! Have to try!!
Omggg so stinkin’ cute!!
I love this! Such a cute idea. I want to make one for myself, but they would make darling gifts. Kay
This is such a cute idea, thank you thank you!
Love & Light
www.verawilde.blogspot.com
These are so cute, definitely adding it to my to do list. Thanks for sharing.