 I am forever hunting for simple, unique solutions for hanging large photos. These gold corner frames are my favorite so far. Otherwise I’ve been a little noncommittal about hanging photos up until this point. But these walls aren’t going to decorate themselves… It’s time to get busy!
Today I’m excited to team up with Canon USA to share a fun, budget-friendly, EASY solution for creating a cute DIY frame. You can make them in any size and wood stain to fit your unique vibe.
Ready, set, go!
") Supplies:
Supplies:
-14″ long wood strips that are 1 1/2″ wide by 1/2″ thick (x4) (either have your pieces cut at a home improvement store or cut to size with a jig saw)
-3/4″ wood screws or nails
-small eye screws (x2)
-wood stain and rags
-leather cord
–Canon PIXMA iP8720 Crafting Printer
 First you’ll want to print your photo. I printed mine the largest I could—13×19″—on my PIXMA iP8720. To get the most out of the page and the largest possible print, you’ll want to ensure you’re selecting borderless printing in the print options. I can’t say enough about how well this printer handles black and white photos—really captures the contrast of the photo.
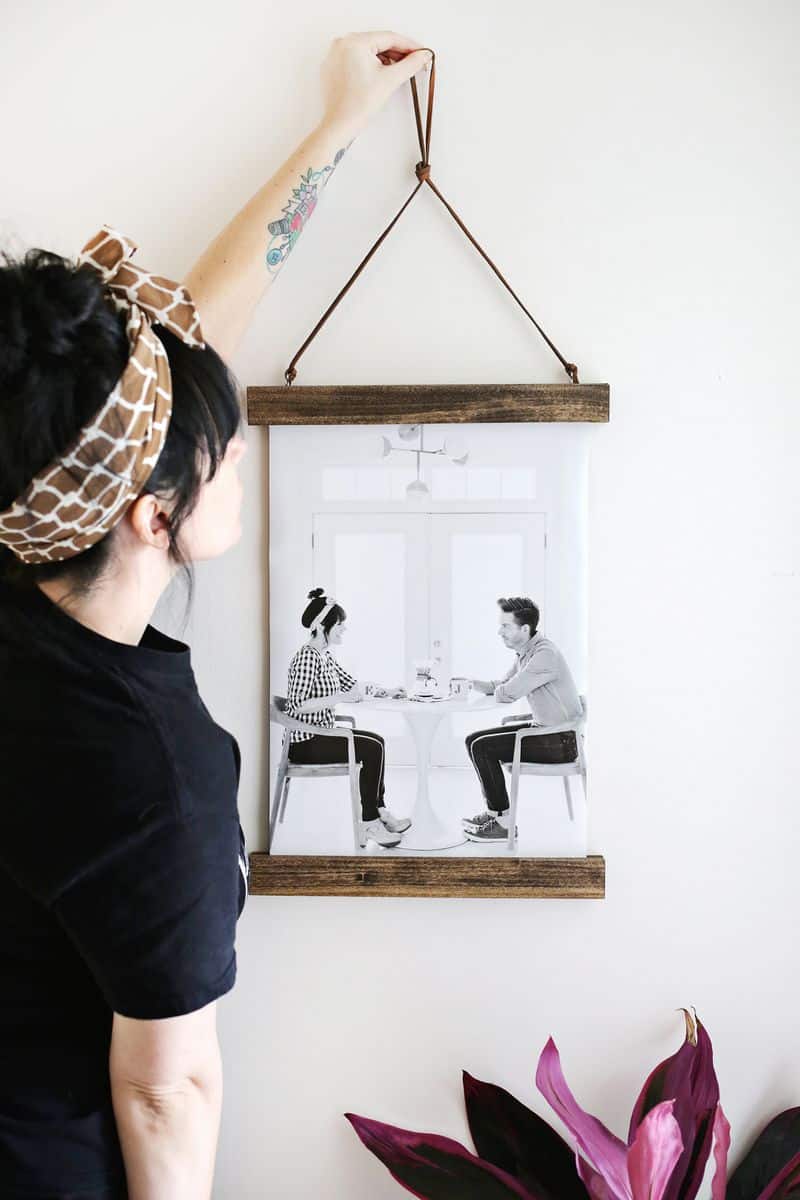
 Begin by using the wood stain and rags to stain the wood whatever shade you desire (you may need more than one coat to get the best color). You could also paint the wood. You’ll need two wood pieces for the bottom hanger and two for the top part of the hanger. On the back piece of the top hanger, screw in two eye screws about 1 1/2″ from either edge.
 Take your printed poster (face down) and sandwich the bottom of the poster between the two bottom pieces of your hanger. Use three nails or screws to attach the two pieces of wood together from the back side, but make sure you are attaching them in a spot that will go through the poster as well so that the wood doesn’t just fall off the bottom when you lift it up. If you don’t plan on changing out the photo in the future, then it’s easier to use nails, but if you think you’ll want to take the hangers apart and change the photo, then I would use screws.
 Repeat the process with the top two hanger pieces, attach a piece of leather cord to the eye screws to create a loop to hang your frame from, and you are ready to hang your frame!


 Who wants to make one this weekend?
I think they would also look super cute in a row of three in a hallway. Maybe with white wood and gold cord? Customize it to your heart’s desire and be sure to tag us at #ABMcrafty when you make one! xx- Elsie
Love this post? Sign up for our newsletter for more ideas!

Get creative ideas for recipes, crafts, decor, and more in your inbox!
 Get the How-To

Supplies
Equipment
- 14″ long wood strips that are 1 1/2″ wide by 1/2″ thick (x4) (either have your pieces cut at a home improvement store or cut to size with a jig saw)
- 3/4″ wood screws or nails
- small eye screws (x2)
- wood stain and rags
- leather cord
- Canon PIXMA iP8720 Crafting Printer
Instructions
- First you’ll want to print your photo. I printed mine the largest I could—13×19″—on my PIXMA iP8720. To get the most out of the page and the largest possible print, you’ll want to ensure you’re selecting borderless printing in the print options. I can’t say enough about how well this printer handles black and white photos—really captures the contrast of the photo.
- Begin by using the wood stain and rags to stain the wood whatever shade you desire (you may need more than one coat to get the best color). You could also paint the wood. You’ll need two wood pieces for the bottom hanger and two for the top part of the hanger. On the back piece of the top hanger, screw in two eye screws about 1 1/2″ from either edge.
- Take your printed poster (face down) and sandwich the bottom of the poster between the two bottom pieces of your hanger. Use three nails or screws to attach the two pieces of wood together from the back side, but make sure you are attaching them in a spot that will go through the poster as well so that the wood doesn’t just fall off the bottom when you lift it up. If you don’t plan on changing out the photo in the future, then it’s easier to use nails, but if you think you’ll want to take the hangers apart and change the photo, then I would use screws.
- Repeat the process with the top two hanger pieces, attach a piece of leather cord to the eye screws to create a loop to hang your frame from, and you are ready to hang your frame!
Author: Elsie Larson. Photography and Project Assistant: Laura Gummerman. Photos edited with A Beautiful Mess Actions. 

Very simple and effective. Really so much excited!!! Next week i will go to try it with follow your instructions. can you please let me know What types of paper you used here? if possible please share link.
Hi! You can use any kind of photo paper for this project.
This was super easy to follow DIY, and I absolutely LOVE the results! I highly recommend this to anyone. Thank you
Did you give Joann Fabrics permission to re-use your image? https://www.joann.com/diy-post-hanger/1479260P144.html
Yes! Thanks for checking 🙂
This is really awesome, planning to print the picture and hang on my wall as well. Loved it.
I’m planning to print the picture at staples . What kind of print should I get , I mean any particular type of paper ?
Can you change out the picture in this frame or would you have to make a whole new frame for a new picture? I’ve seen some where they have magnets in the wood so you can change the picture. Just wondering if this is something similar.
This was a super easy to follow DIY, and I absolutely LOVE the results! I highly recommend this to anyone. Thank you A Beautiful Mess!
I’m so excited!!! Going to try and make my own from recycled fence pieces for a local dance studio. Hurricane Michael has left or county fenceless and treeless with debris piles in some places 15-20ft. So much just waiting to be DIY’d. Making lemonade out of ????;-) thanks for the idea!
i adore this! defo trying it!
This isn’t on my to do list but I also read that you could attach magnets inside so that you don’t have to damage your art! I have several pieces I want to do this to but I just don’t want to put a hole in them as they’re not just prints but art I’ve purchased ????
These look so lovely!
I love It!!! thanks ♥☻
Nice diy art . thanks for sharing .
Absolutely beautiful idea!
Awesome. Great ideas. I am making a product for family picture. It is nice.
Wow! nice ideas for wall hanging, nice art for wall. Thanks for posting……
A note on the grommets or eyelets: Can you tell me the difference? Because I can’t figure it out. I compared the grommet kit and the eyelet kit at the craft store. Aside from having different names, they are exactly the same. Grommets. Eyelets. Use whatever makes you happy (or whatever is on sale at the craft store).
This is beautiful Elsie ! Love this DiY wall hanging poster which gives an artistic look to this living room wall. You are so creative and talented.
Such a great idea! I have actually been needing leather cord for a project I’m doing. Where did you get yours?
This is stunning! Gonna have to try it for myself!
Sheena Sreekeessoon
http://afashionstudentsdiary.blogspot.co.uk/
Great idea. I love when you have the DIY projects that look more complicated than they are. I feel even more accomplished after finishing them lol.
www.throughmyowneyes.com