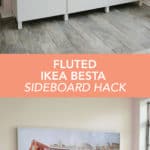
 OK, can I just tell you up front that this is one of my top fave DIYs I’ve ever done?! When we were planning out our new living room space I was dying to buy this amazing fluted sideboard that I saw online, but it was $1,000 and it had a hefty shipping fee for such a large item.
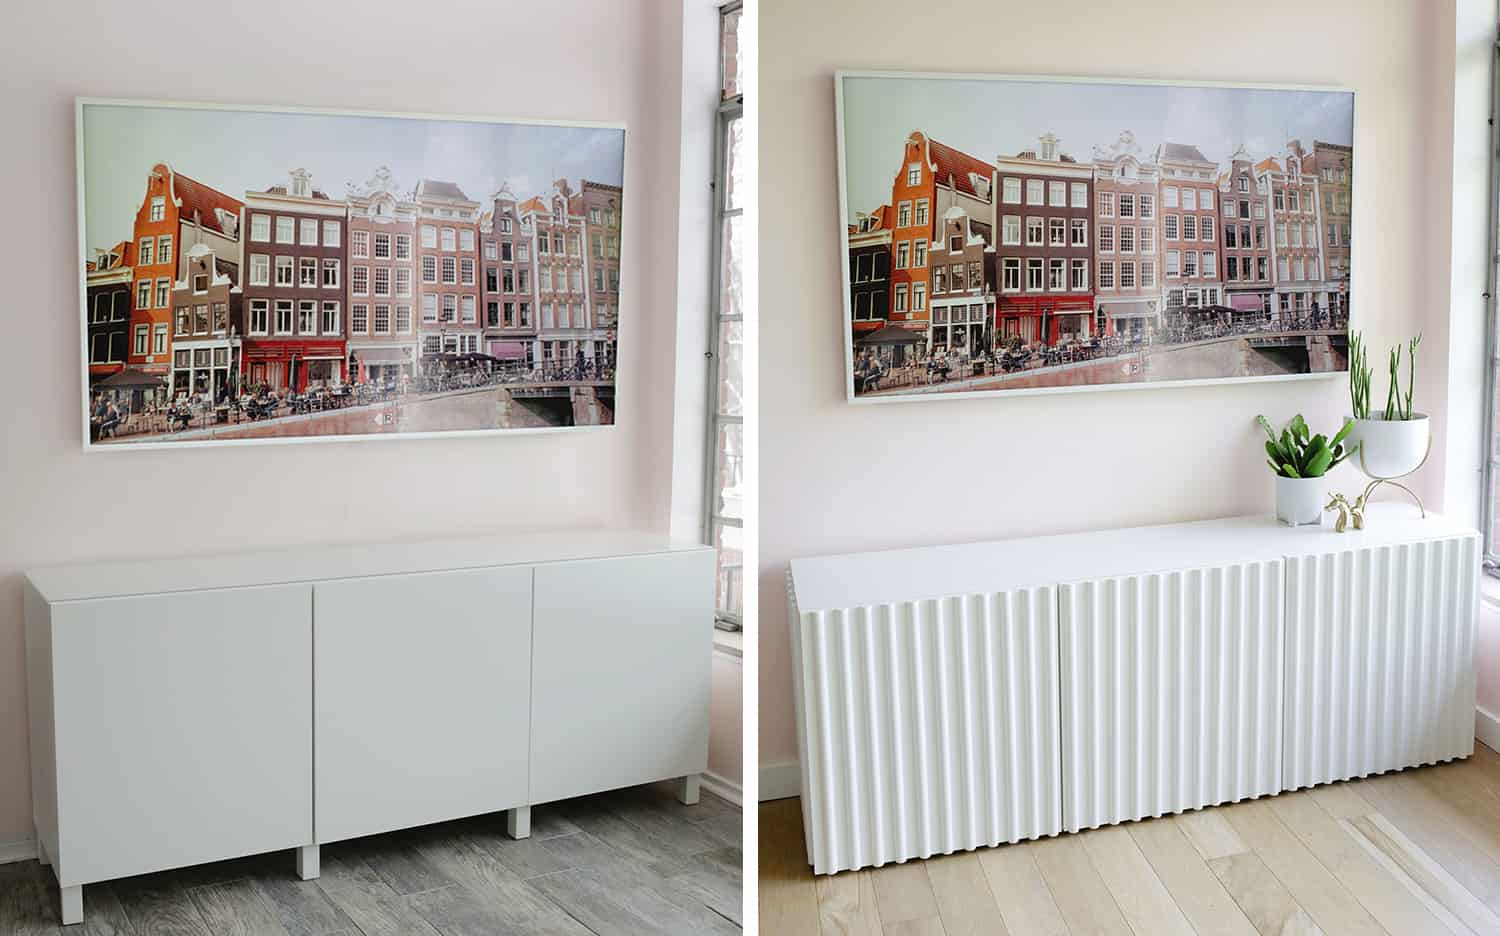
I knew it just wasn’t going to be in our budget. Once I realized that the size and fluted details were the main thing I liked about the piece, I decided to hunt down a budget-friendly plain sideboard that I could add some fluting details to and the IKEA Besta was just the right size and price for the job!
This is definitely a bit of a time consuming project, but let me tell you that the results and the savings made it all totally worth it! There’s only thing I wish I’d done differently in the process, but I’ll give you a head’s up so you can avoid that mistake if you make your own … here we go!!
 Supplies:
–IKEA Besta sideboard
–glass top for IKEA Besta (optional)
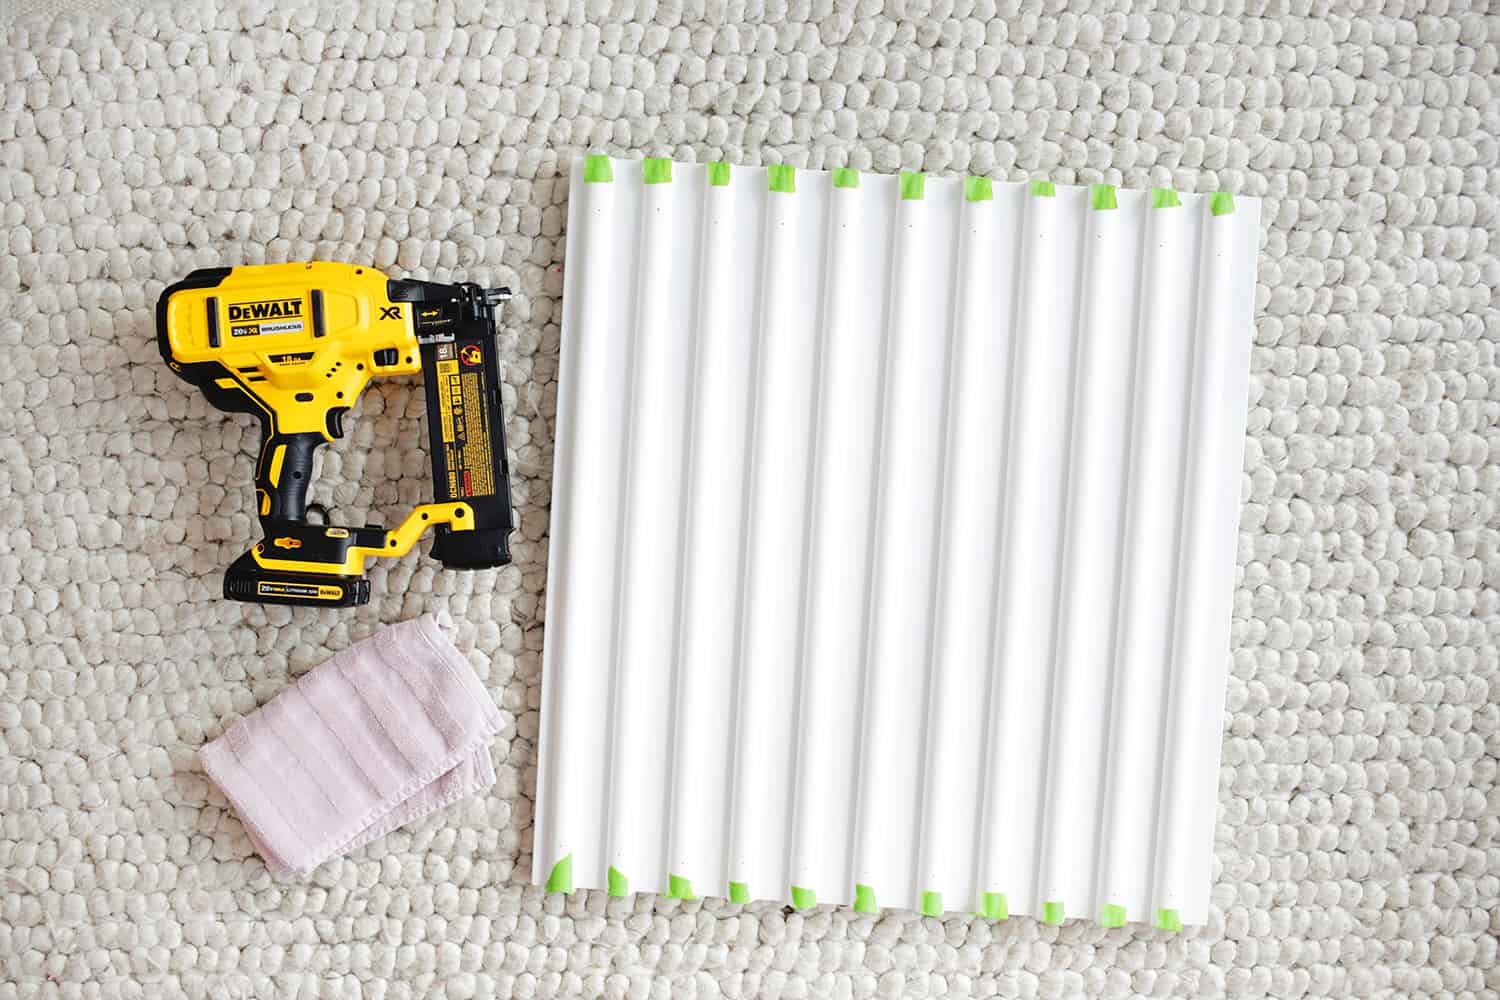
–16 pack of half round moulding
–miter saw or hand saw and saw box to cut moulding strips
-caulk and caulk gun (I like this caulk since it’s paintable in 20 minutes)
–wood filler
–B-I-N primer
–round spindle brush
-Quart of satin paint (in Melting Icicles by Behr)
–fine sandpaper
–nail gun and 3/4″ brad nails OR epoxy glue (a nail setter is helpful too if you are using a nail gun)
–painter’s tape
-1/4″ birch plywood sheet and either a jig saw/circular saw/table saw to cut to size (optional)
 First, you’ll want to lightly sand the doors and sides of your console to rough up the surface just a bit.
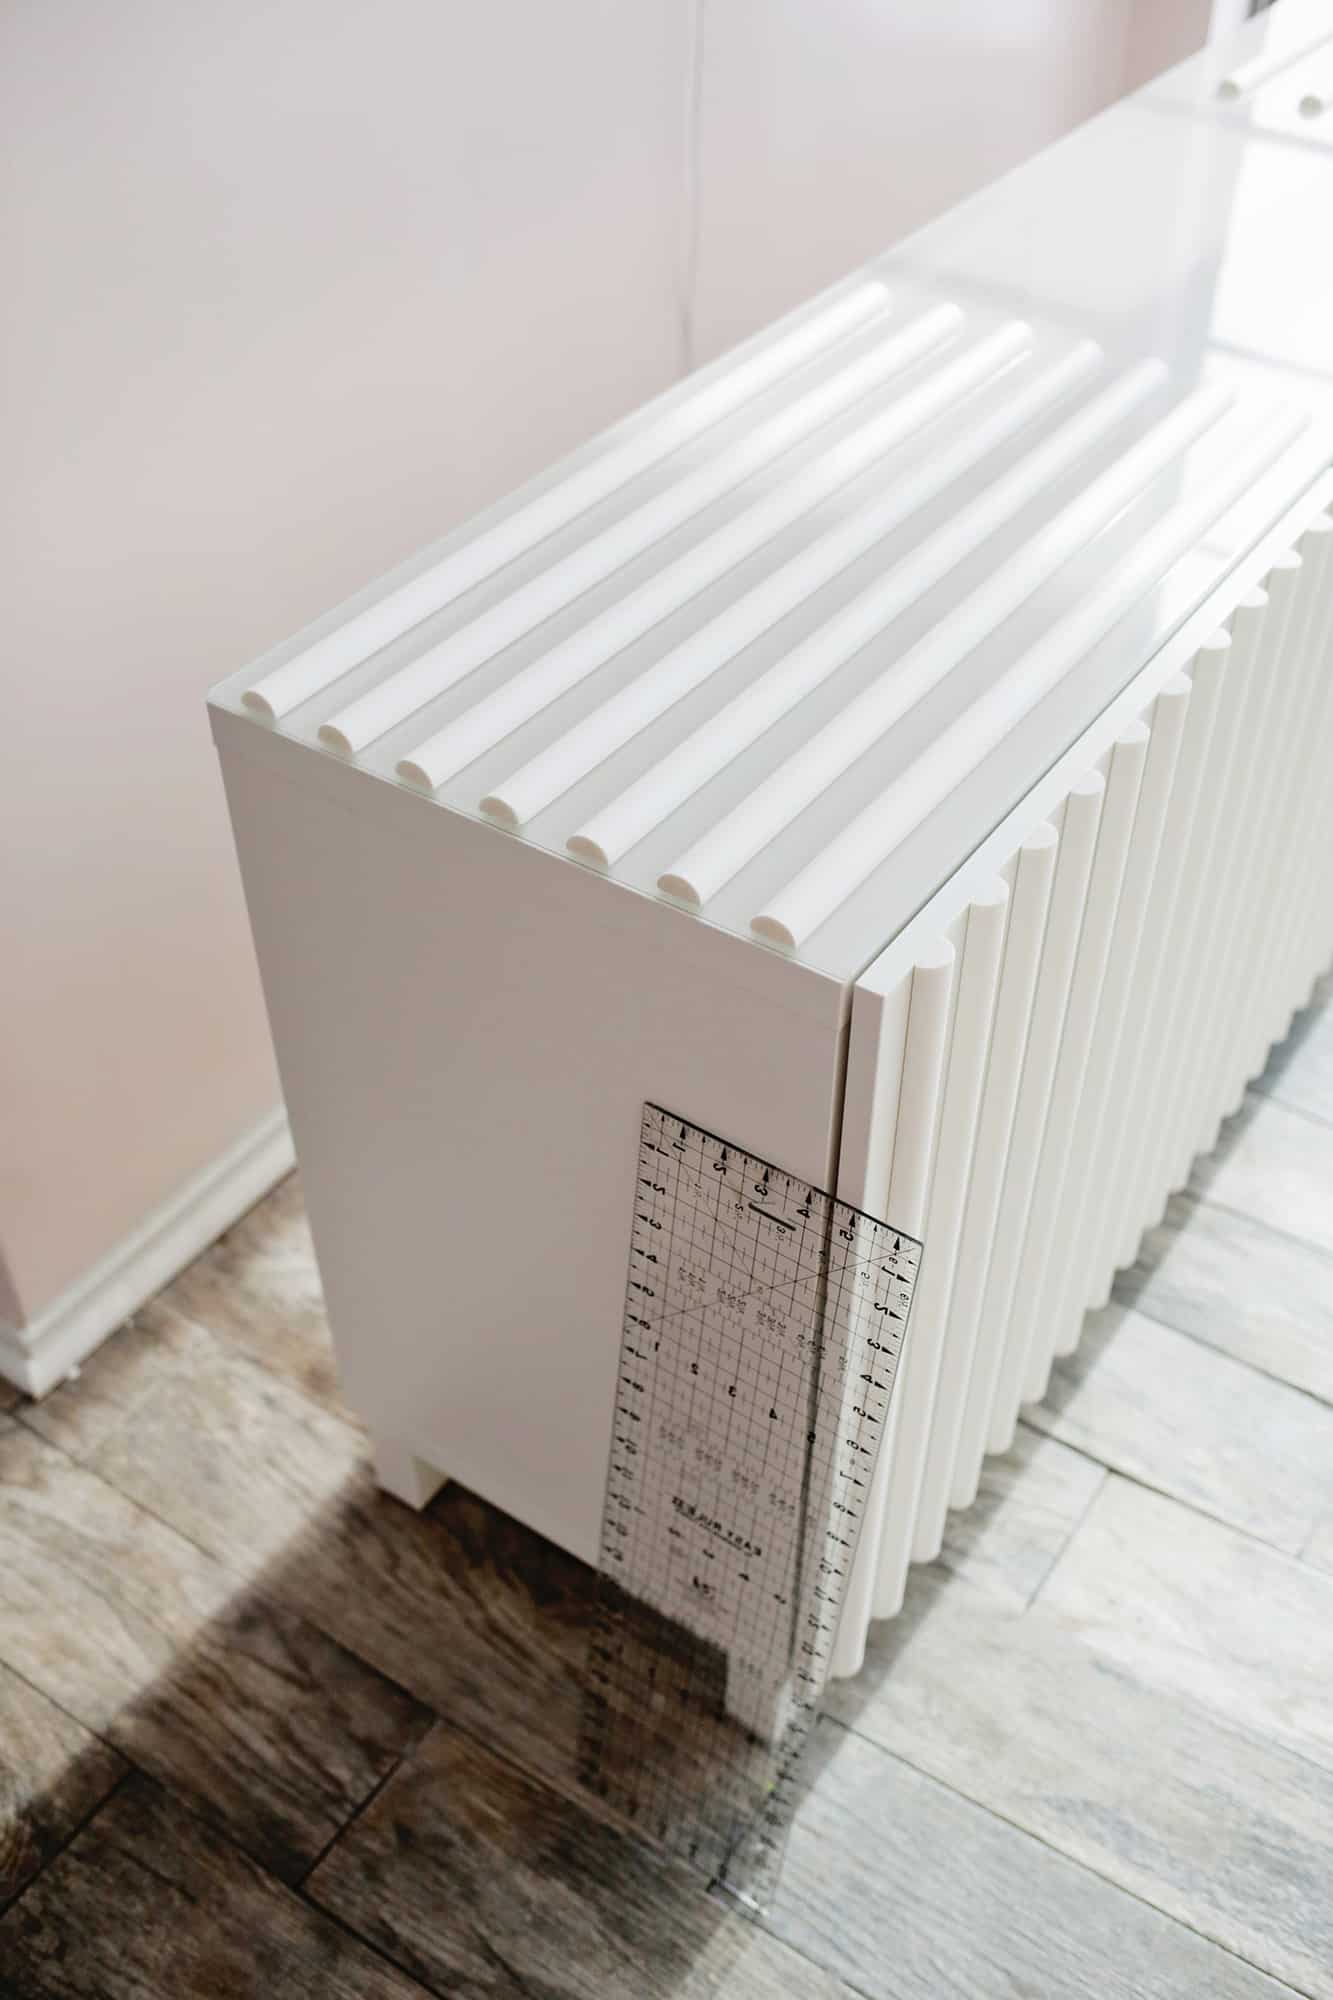
Also, to make ours looks a little more trendy, I also took off the legs that match the Besta and just put it on the little round discs that come with the units, in case you want to put them on the floor. I did this at the end of the project, but I wish I had done it at the beginning so I’m adding that step in here in case you want to do it too.
Then, you’ll cut your half round moulding into 33 strips that are the exact height of the doors on the front of the sideboard, and 14 strips that are the exact height of the sides of the sideboard (the sides are a little longer than the front doors).
Just measure and cut one strip that’s a perfect height and then use that as your guide stick to cut the rest of that length. Use your sandpaper to rough up the front rounded length of the molding a little and also use it to sand down any rough edges on the cut ends from the saw.
Next, you’ll want to attach your strips to the sideboard. To find the right spacing, divide out seven of the side strips for each side, and 11 of the door strips for each door.
I found it easiest to first place all the front pieces on top of the sideboard to evenly space them out visually, and then I would take the doors off and attach one at a time to the door on the floor with painter’s tape so I could still gauge the spacing off of where the other strips were sitting.
The spacing is just about a 1″ gap between each strip, so just do your best to eyeball it and once it’s all together you won’t really be able to tell if one’s a little further apart with all those stripes going on.
 You’ll notice that since you are wanting to have 1″ gaps between each strip, the door edges that are next to another door will only have 1/2″ gaps between the strip and that edge of the door—that way when it’s hanging by the door next to it, that other 1/2″ gap that starts the next door will look like a full 1″ gap when put together.
So those strips will be closer to the edge but the strips that start and end the front will be a full 1″ away from the edge since there are no doors next to those edges.
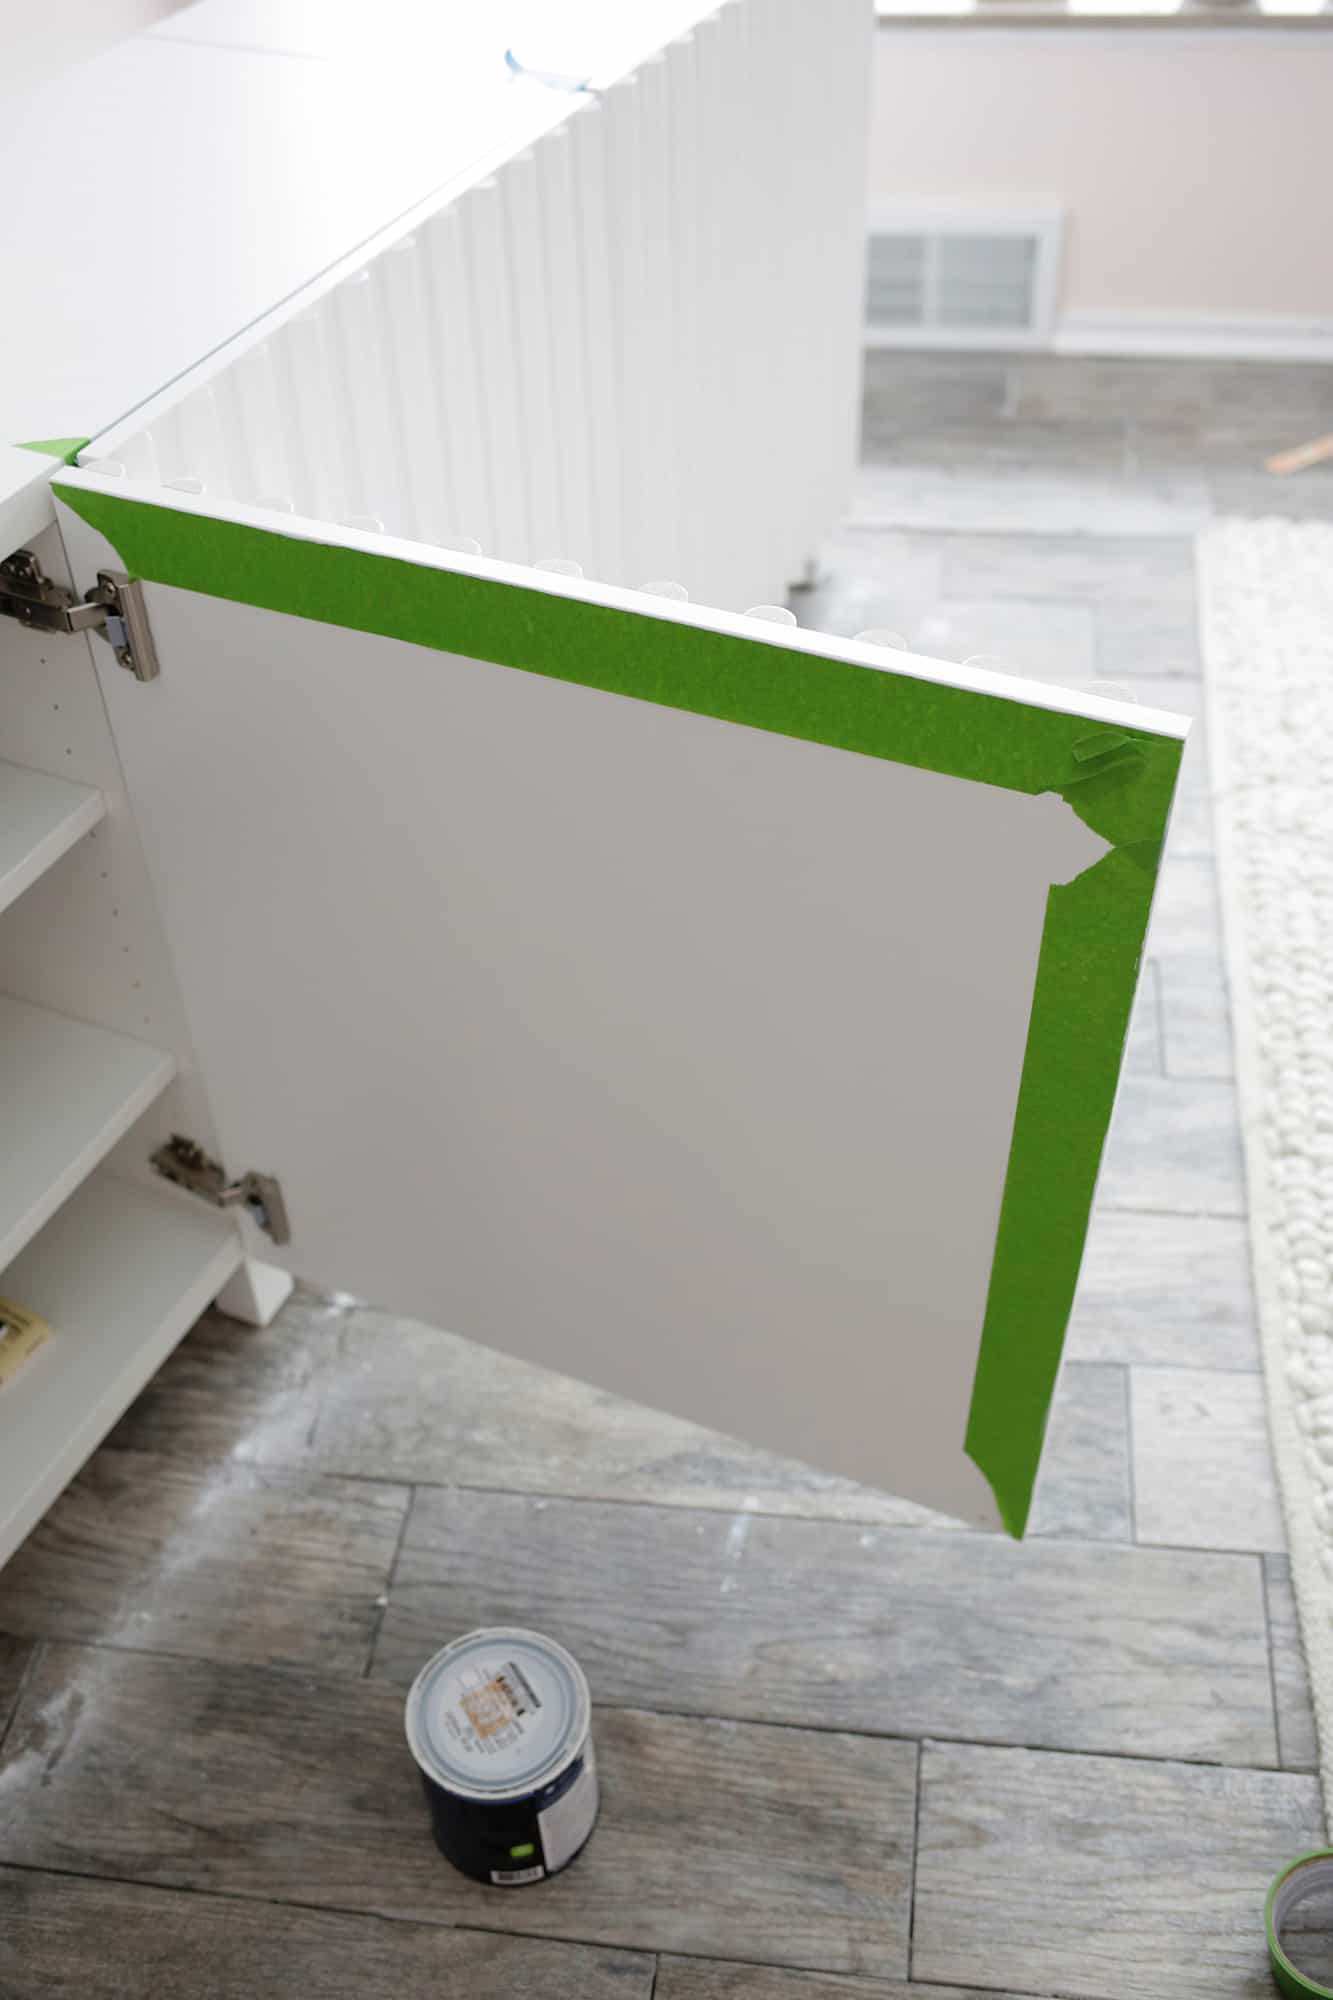
The photo above is of the third door on the right, so there’s only a 1/2″ space on the left side (since that’s next to another door) but a 1″ gap on the right side (there’s no door next to that panel as it’s the end).
Once all the strips were attached with painter’s tape, I used a nail gun to nail near the top, middle, and bottom of each strip. Make sure to line up the top of your strip with the top edge of the sideboard—you want the top to be pretty perfectly lined up and it’s OK if the bottom is a little off since you won’t be able to tell that low down.
Make sure to set the pressure on your brad gun so it’s burying the nail head below the surface so you can fill the hole and it will look nice and flush when filled. It’s helpful to have a nail setter handy in case your nail doesn’t bury itself beneath the surface so you can hammer it fully in if needed.
You can also try a less expensive corded brad nail gun like this one, but I found it wasn’t quite powerful enough to bury the nail head so you’d have to use a nail setter and hammer on each head to bury it. Not impossible, but an extra step.
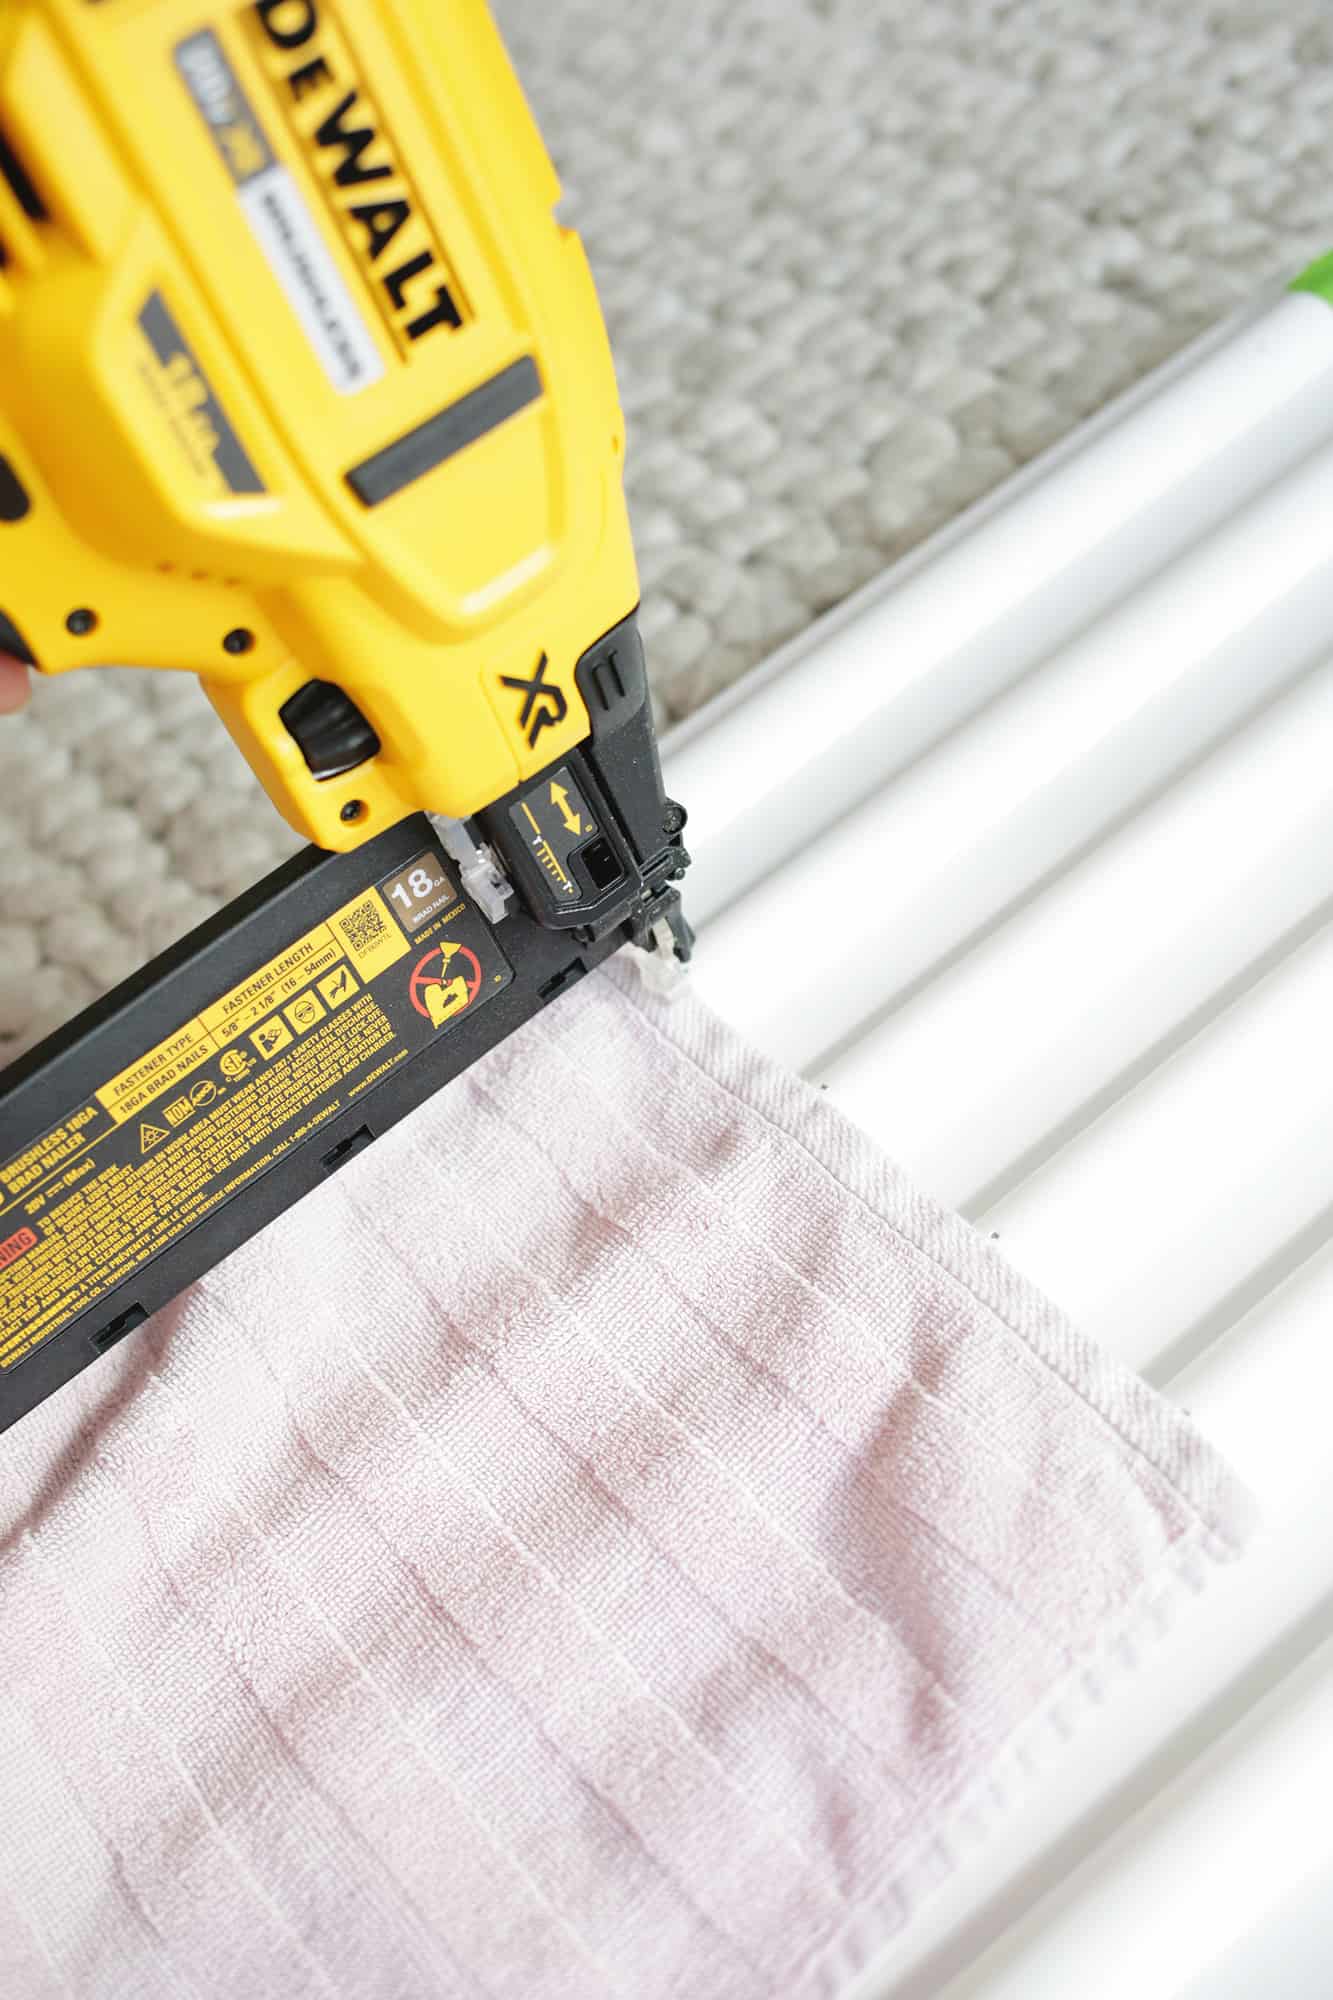 Since the strips are of a softer material, I put a soft rag under the tip of the nailer so that part wouldn’t make a mark in the strip as you press it down each time you nail. I did three nails per strip—one a few inches from the top, a few inches from the bottom, and near the middle.
If you don’t have a nail gun, you can also glue each strip on with some epoxy, but you’ll need to tape them in place after gluing and use a few strap clamps to keep them tight against the sides (for the doors you can just lay the door on the floor and put heavy books on the strips to weigh them down while they dry).
Just don’t use too much glue or it may squish out the sides while drying and look messy!
 For the sides, lay the strips on top to visually space them out like you did for the front, and then tape them in place so you can nail them on.
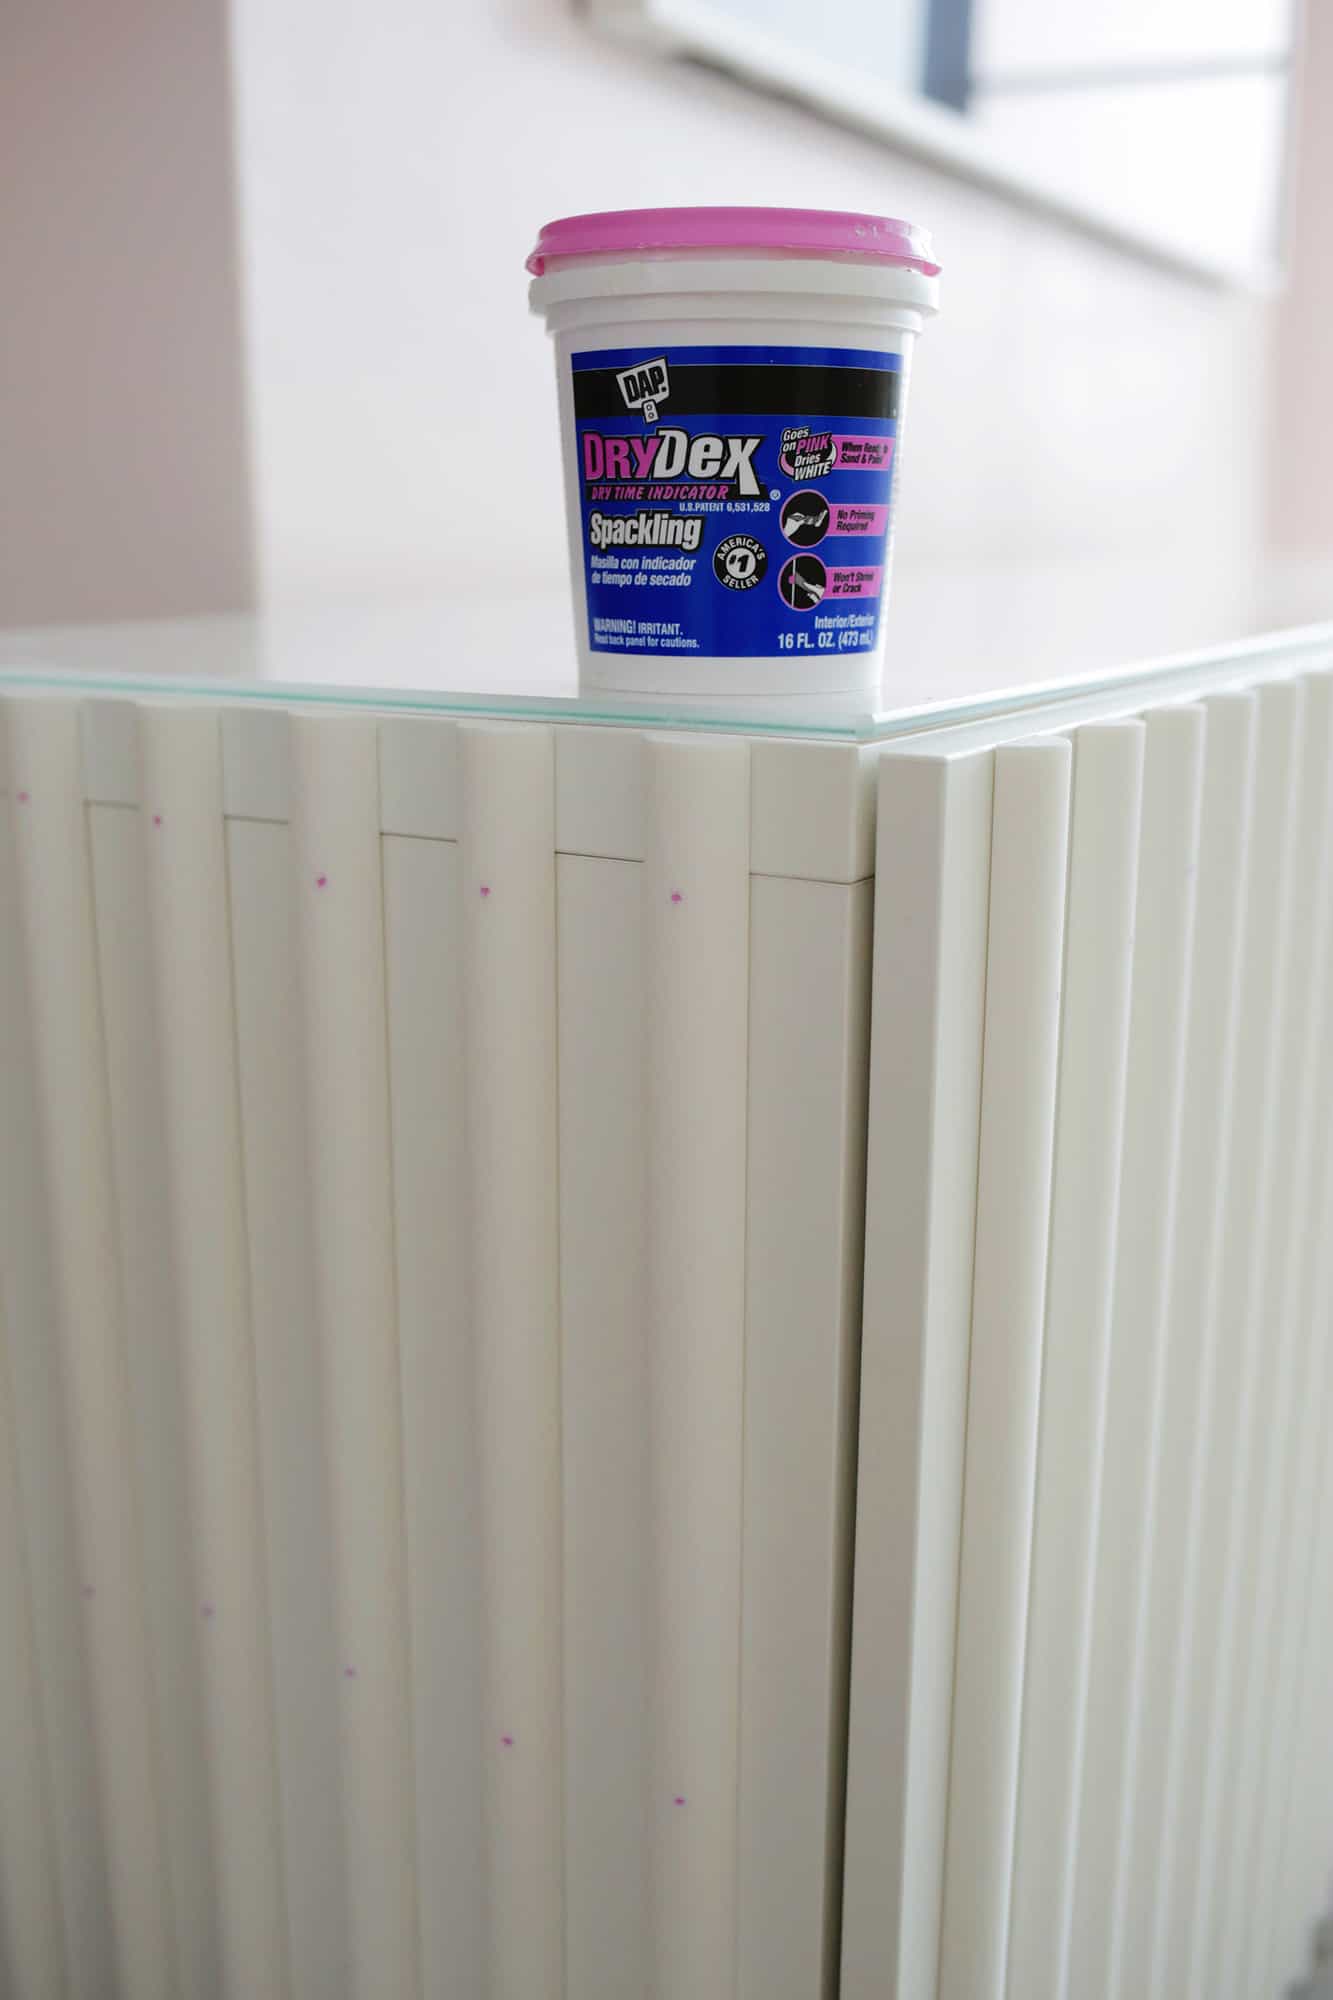 Next, you’ll want to fill your nail holes with some wood filler (spackle for walls works too since it’s such a small hole). The faster way is to just fill the hole and wipe over it quickly with a damp rag so you don’t have to sand later, but that will leave a small indentation where the hole is.
To completely cover the hole, fill the hole and leave a little mound of extra filler on top of the hole. When the filler is dry, use a fine sandpaper to sand it down smooth and the hole will totally disappear.
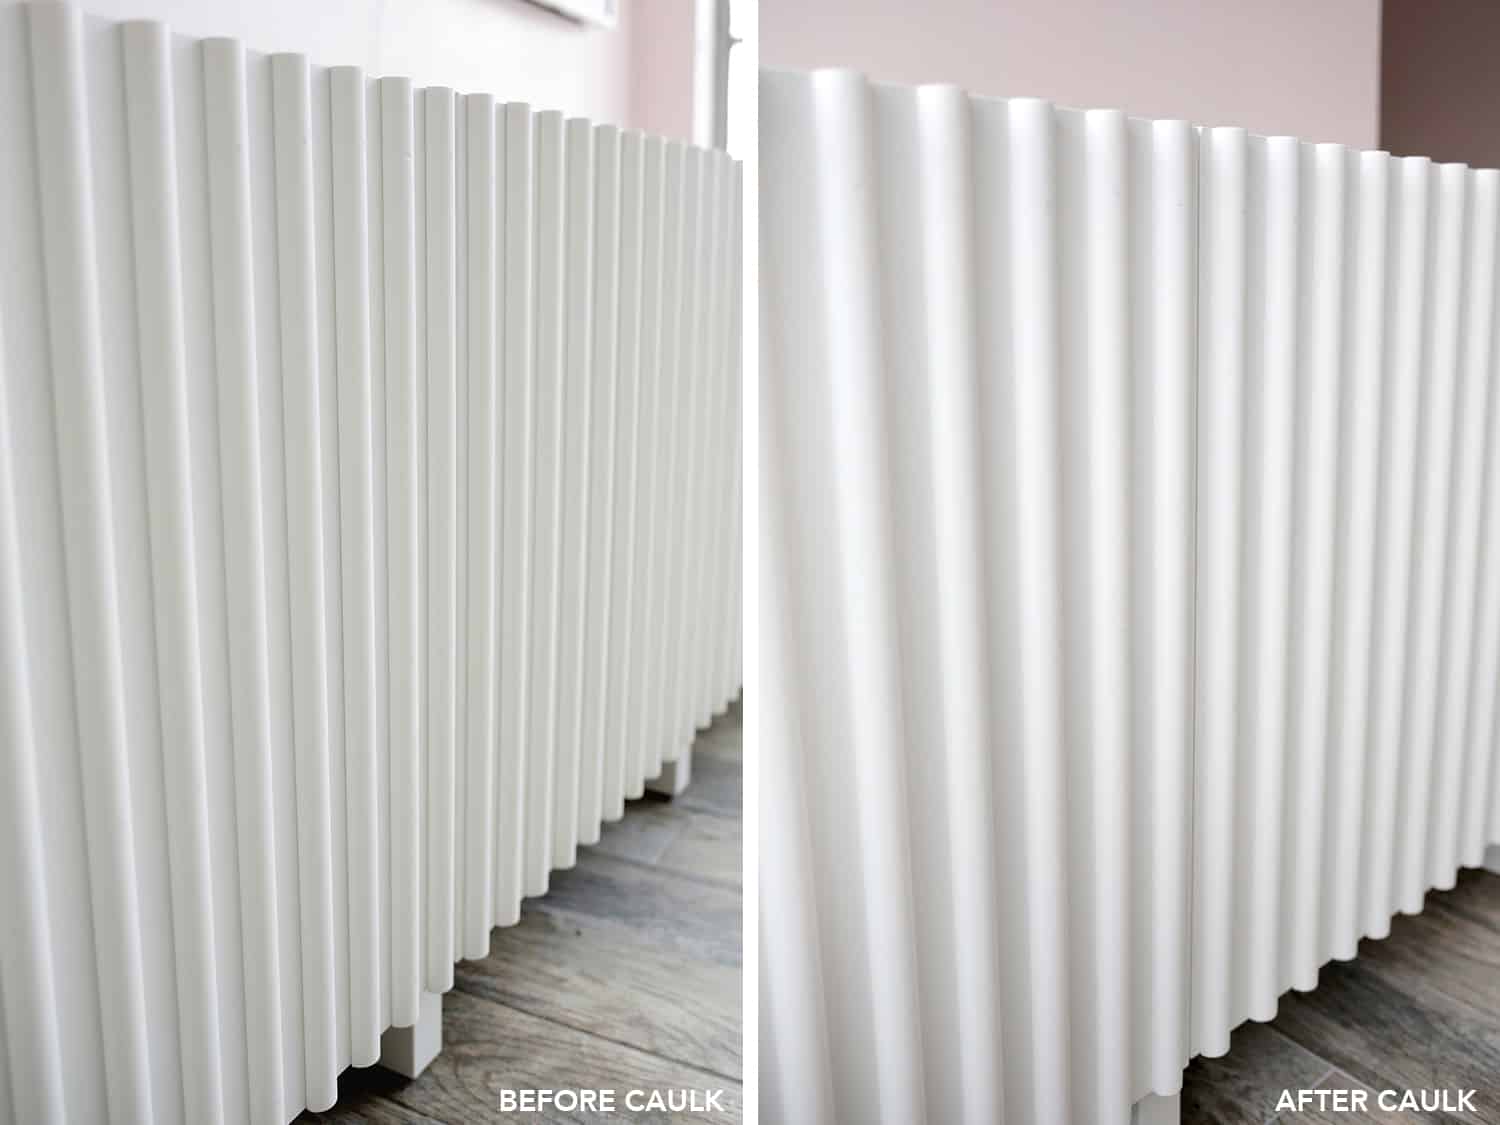 Once all the strips were attached and holes were filled, I took my caulk and filled the side gaps on both sides of each moulding strip.
This step may seem a bit over the top, but it makes the strips look completely integrated with the doors and sides rather than just stuck on and makes the whole thing feel and look much more expensive as well (you can see the difference it makes above!).
Just squeeze a small amount of caulk between the cracks and run a damp finger down the line to smooth the caulk and press it into the crease. When the caulk is dry, tape off the top, back, and insides of the doors, and you’re ready to paint!
 Now, this is where I’m adding an extra step for you that I wish I had done but didn’t think I needed. Because I roughed up the sideboard and strips with sandpaper, I didn’t think I needed to use this primer (it’s a great prepping primer for painting laminate furniture or other surfaces that don’t take paint as well).
But I could tell once I started painting that the paint would be adhering more easily had I done a coat of that first. I still got it to look good, but it took a little more finessing with the brush to get it to look covered and smoothed than it should have.
I also color matched the sideboard to Melting Icicles by Behr and it’s a perfect match, so I would highly suggest that shade if you don’t have a paint swatch that you can find that matches the color.
I also was SO happy that I picked up a spindle brush when I was gathering supplies for this as I haven’t used one before, but it really made painting the unique shape of the fluting so much easier, so I very highly recommend it for projects like this.
Once the two coats of paint are dry, remove the tape and your new fluted sideboard is almost done!
 Now, you can technically be done here at this point and use the glass topper piece that IKEA recommends you use to cover the seam between the two units (this size sideboard is a small and big unit sitting side by side).
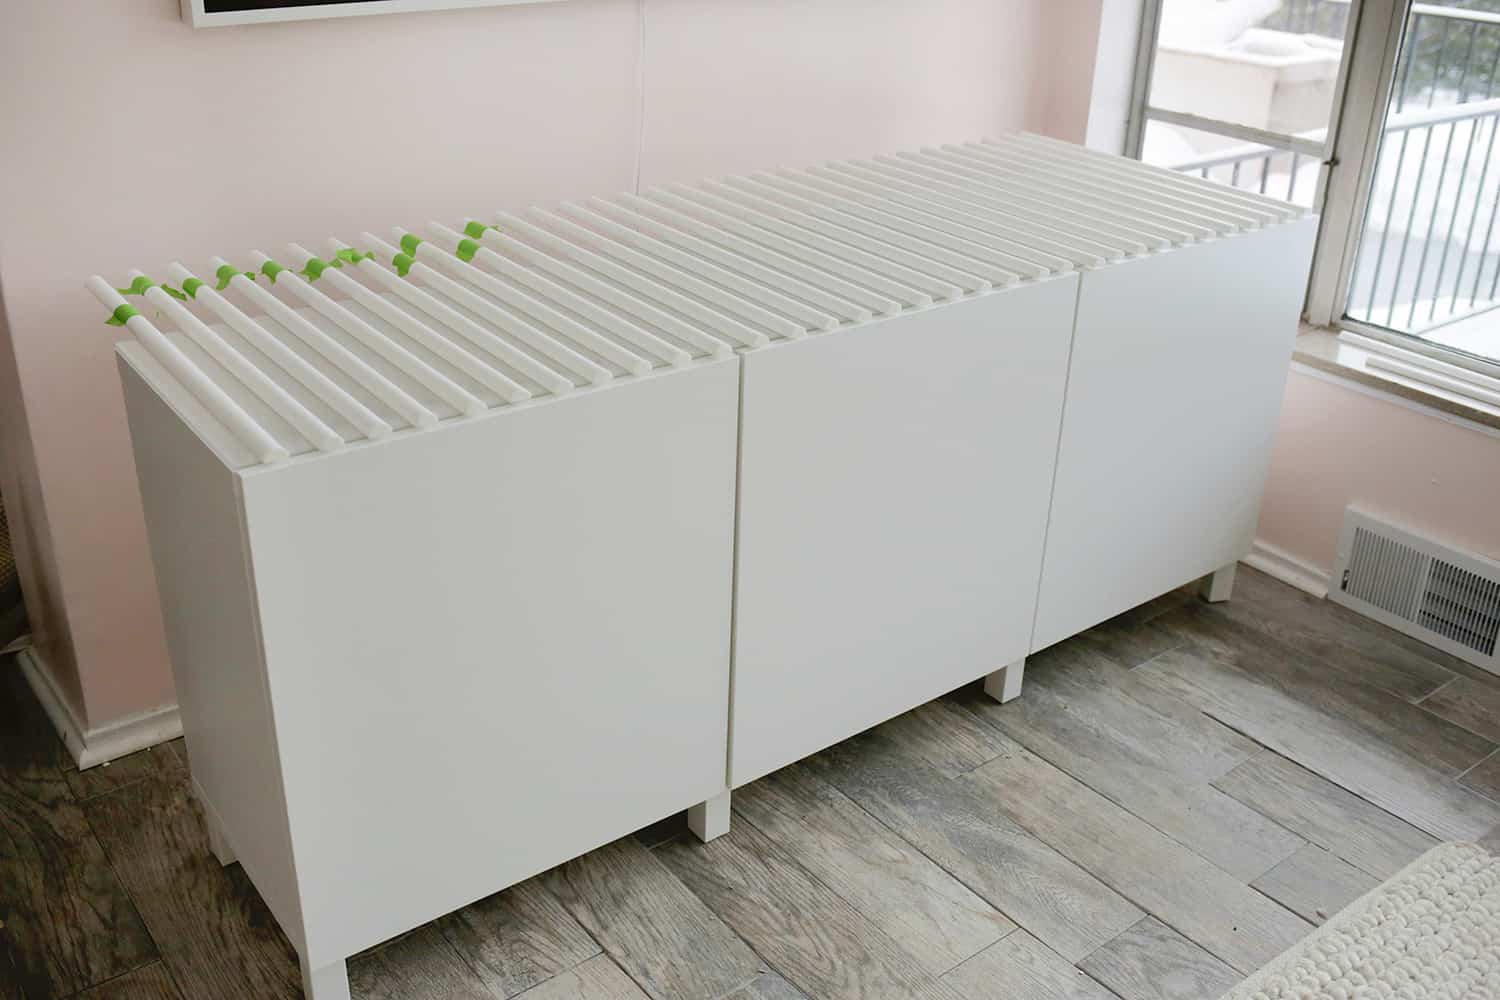
But I decided to cut a piece of 1/4″ birch plywood to be the exact size of the top of my sideboard so I could attach it with the nail gun, fill and sand the holes, and then paint it to match the rest of the unit.
The glass top is nice, but it’s a slightly different white and a different material, so it kind of stands out more than I would have liked and adding the thin wooden top worked perfectly!

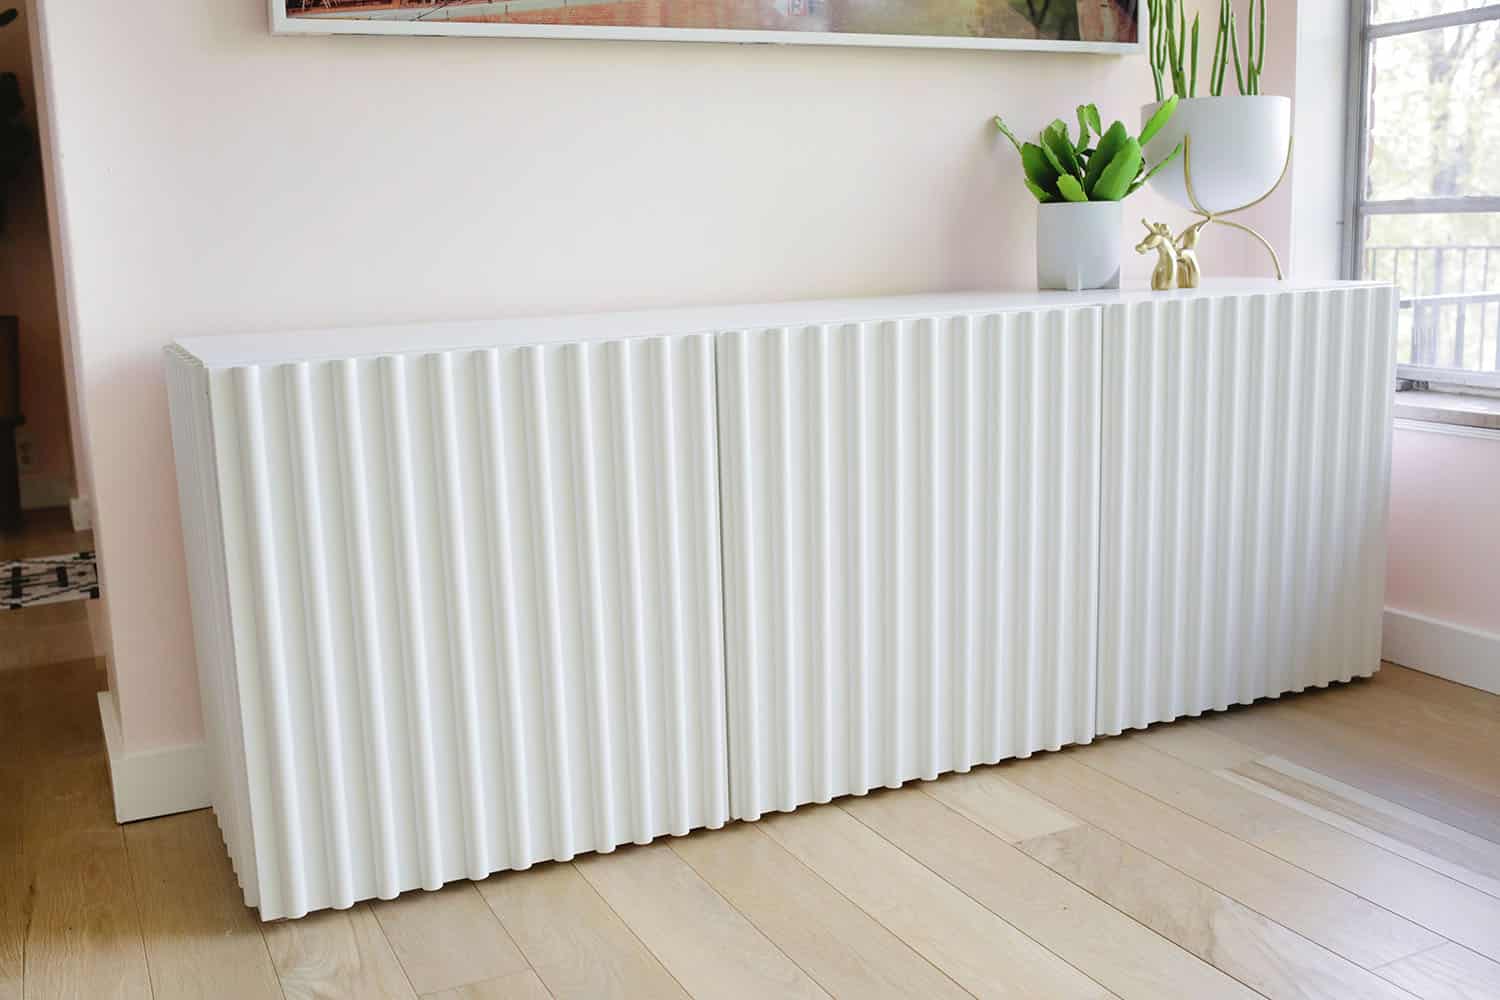

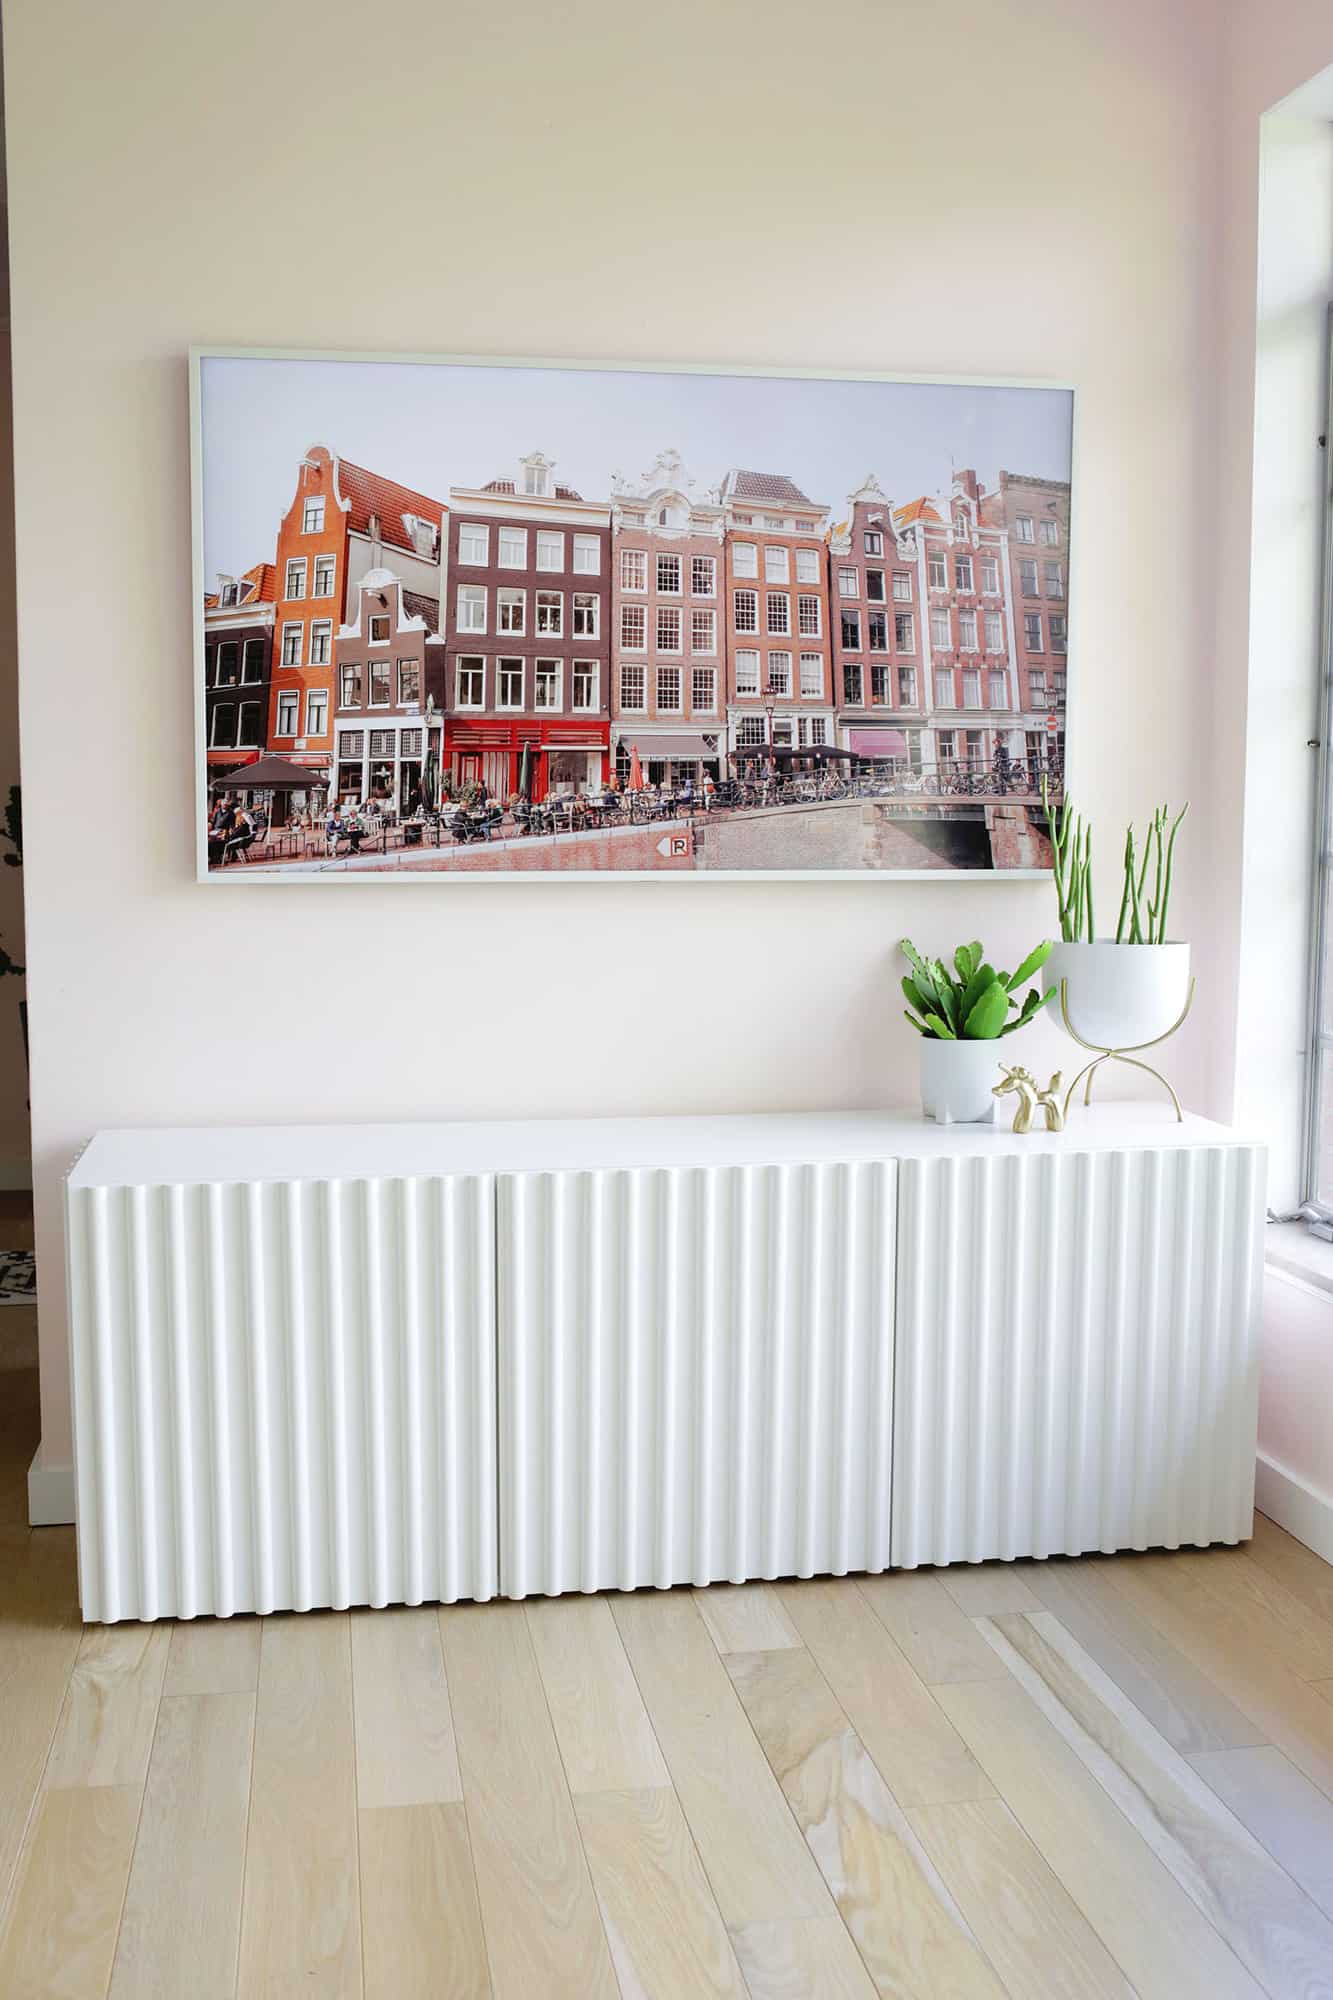
 I just have to say that while I thought this would come out pretty good, I’m just thrilled with the results! It really looks like an expensive piece of furniture and you would never know it was a DIY.
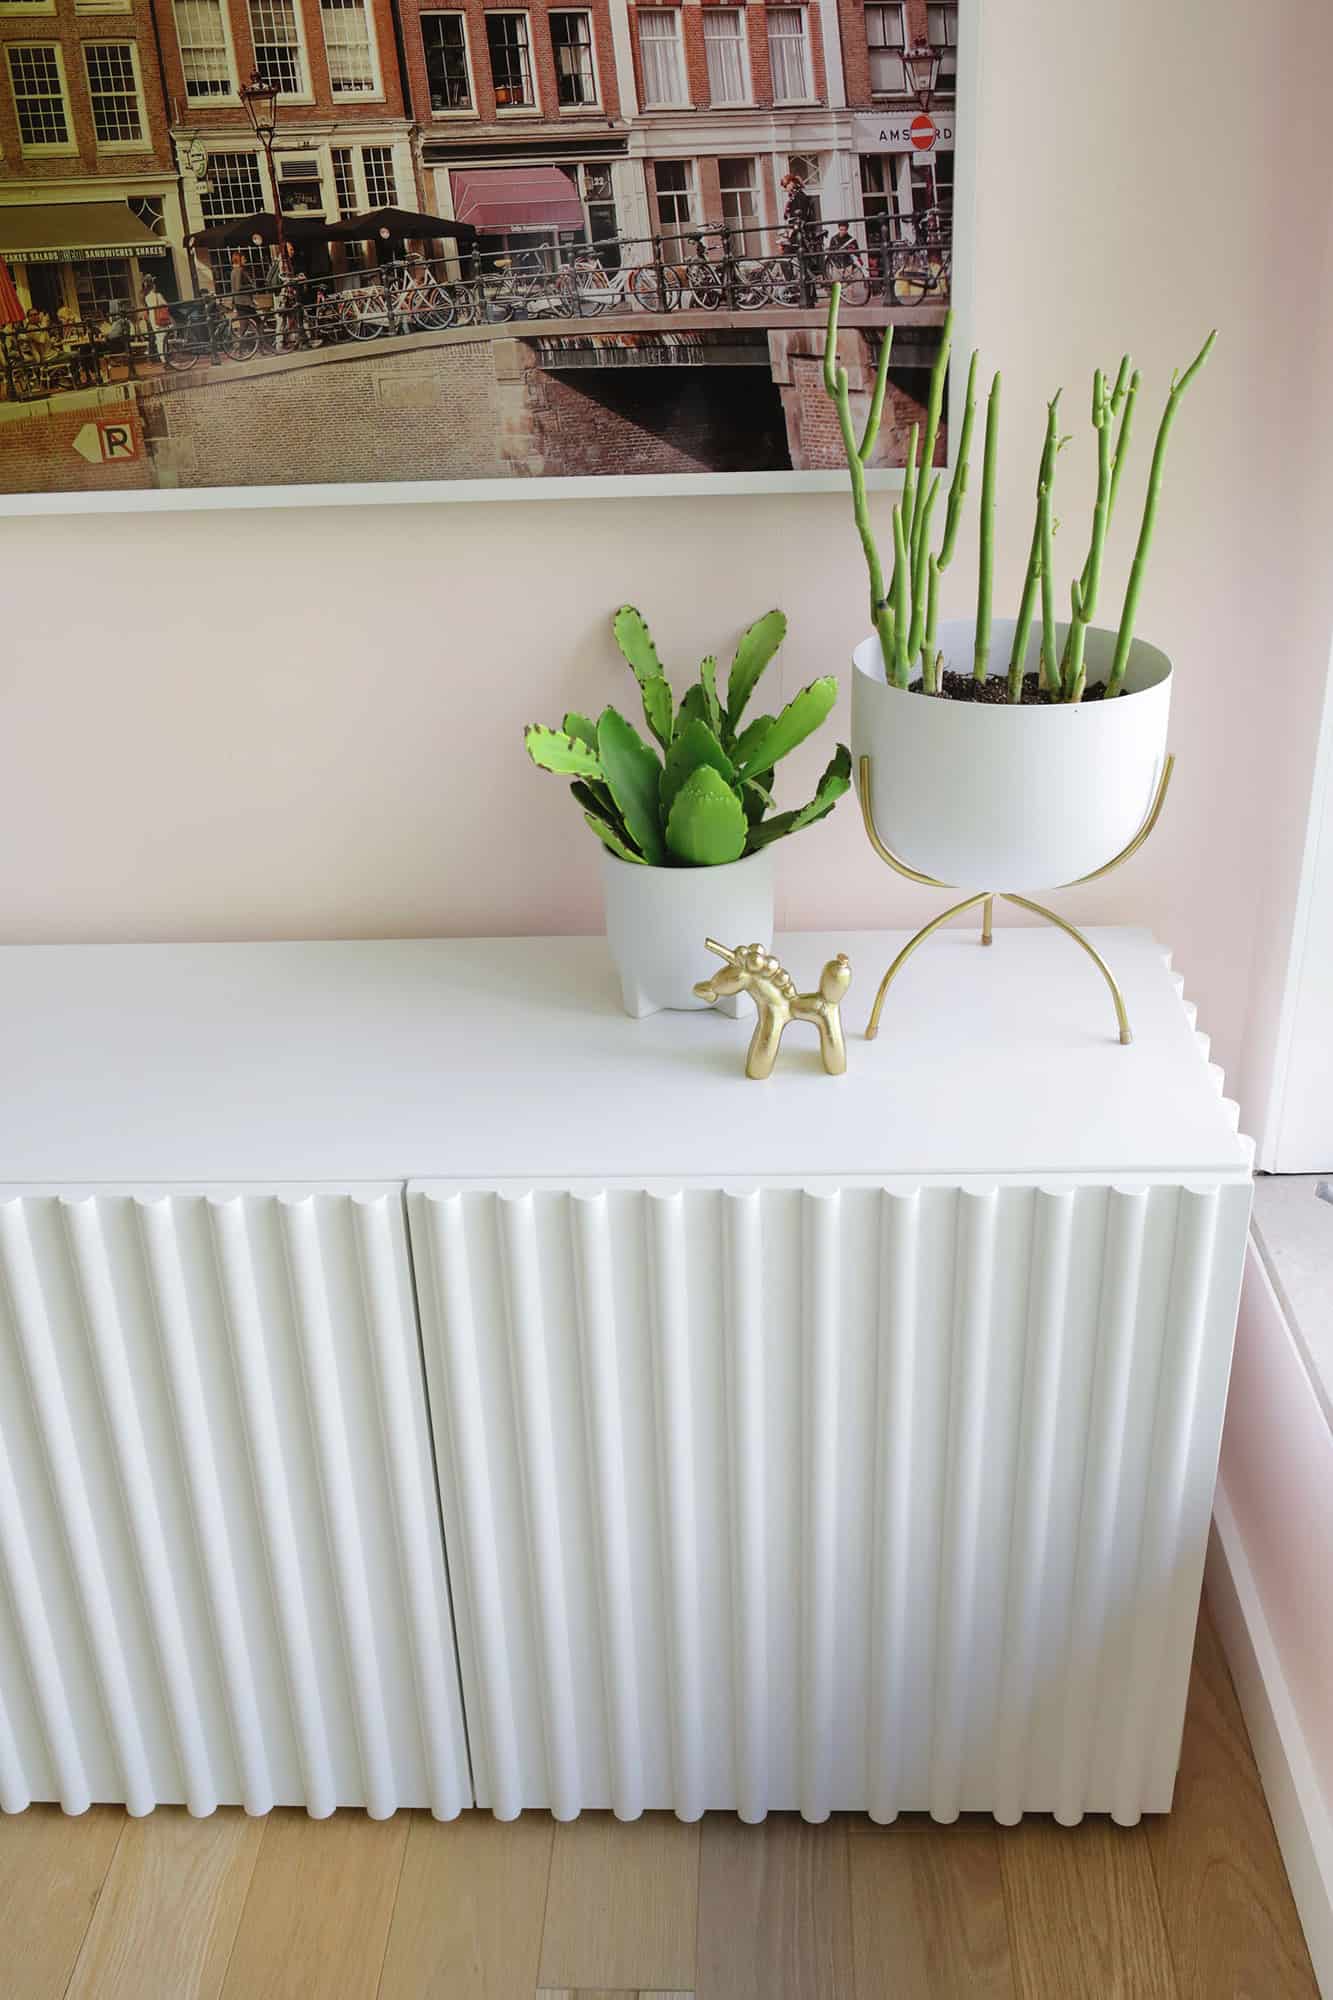
We use this sideboard to house all our TV cords since it’s under our Frame TV (which we love, by the way). But you can use this in a dining room or as an entry table … wherever you like!
And this method of fluting can be used on lots of different projects (you could make a side table like this!), so feel free to use it on other items as well. Hope this inspires you to create something fluted for your home as well! xo. Laura
P.S. Like this post? Check out all our favorite furniture hacks!
Love this post? Sign up for our newsletter for more ideas!

Get creative ideas for recipes, crafts, decor, and more in your inbox!
 Get the How-To
Supplies
- IKEA Besta sideboard
- glass top for IKEA Besta (optional)
- 16 pack of half round moulding
- miter saw or hand saw and saw box to cut moulding strips
- caulk and caulk gun
- wood filler
- B-I-N primer
- round spindle brush
- Quart of satin paint in Melting Icicles by Behr
- fine sandpaper
- nail gun and 3/4″ brad nails OR epoxy glue (a nail setter is helpful too if you are using a nail gun)
- painter’s tape
- 1/4″ birch plywood sheet and either a jig saw/circular saw/table saw to cut to size (optional)
Instructions
- First, you’ll want to lightly sand the doors and sides of your console to rough up the surface just a bit. Also, to make ours looks a little more trendy, I also took off the legs that match the Besta and just put it on the little round discs that come with the units in case you want to put them on the floor. I did this at the end of the project, but I wish I had done it at the beginning, so I’m adding that step in here in case you want to do it too.
- Then, you’ll cut your half round moulding into 33 strips that are the exact height of the doors on the front of the sideboard, and 14 strips that are the exact height of the sides of the sideboard (the sides are a little longer than the front doors). Just measure and cut one strip that’s a perfect height and then use that as your guide stick to cut the rest of that length. Use your sandpaper to rough up the front rounded length of the molding a little and also use it to sand down any rough edges on the cut ends from the saw.
- Next, you’ll want to attach your strips to the sideboard. To find the right spacing, divide out seven of the side strips for each side, and 11 of the door strips for each door. I found it easiest to first place all the front pieces on top of the sideboard to evenly space them out visually, and then I would take the doors off and attach one at a time to the door on the floor with painter’s tape so I could still gauge the spacing off of where the other strips were sitting. The spacing is just about a 1″ gap between each strip so just do your best to eyeball it and once it’s all together you won’t really be able to tell if one’s a little further apart with all those stripes going on.
- You’ll notice that since you are wanting to have 1″ gaps between each strip, the door edges that are next to another door will only have 1/2″ gaps between the strip and that edge of the door—that way when it’s hanging by the door next to it, that other 1/2″ gap that starts the next door will look like a full 1″ gap when put together. So those strips will be closer to the edge but the strips that start and end the front will be a full 1″ away from the edge since there are no doors next to those edges. The photo above is of the third door on the right so there’s only a 1/2″ space on the left side (since that’s next to another door), but a 1″ gap on the right side (there’s no door next to that panel as it’s the end).
- Once all the strips were attached with painter’s tape, I used a nail gun to nail near the top, middle, and bottom of each strip. Make sure to line up the top of your strip with the top edge of the sideboard—you want the top to be pretty perfectly lined up and it’s OK if the bottom is a little off since you won’t be able to tell that low down. Make sure to set the pressure on your brad gun so it’s burying the nail head below the surface so you can fill the hole and it will look nice and flush when filled. It’s helpful to have a nail setter handy in case your nail doesn’t bury itself beneath the surface so you can hammer it fully in if needed. You can also try a less expensive corded brad nail gun like this one, but I found it wasn’t quite powerful enough to bury the nail head so you’d have to use a nail setter and hammer on each head to bury it. Not impossible, but an extra step.
- Since the strips are of a softer material, I put a soft rag under the tip of the nailer so that part wouldn’t make a mark in the strip as you press it down each time you nail. I did three nails per strip—one a few inches from the top, a few inches from the bottom, and near the middle.
- If you don’t have a nail gun, you can also glue each strip on with some epoxy, but you’ll need to tape them in place after gluing and use a few strap clamps to keep them tight against the sides (for the doors you can just lay the door on the floor and put heavy books on the strips to weigh them down while they dry). Just don’t use too much glue or it may squish out the sides while drying and look messy!
- For the sides, lay the strips on top to visually space them out like you did for the front, and then tape them in place so you can nail them on.
- Next, you’ll want to fill your nail holes with some wood filler (spackle for walls works too since it’s such a small hole). The faster way is to just fill the hole and wipe over it quickly with a damp rag so you don’t have to sand later, but that will leave a small indentation where the hole is. To completely cover the hole, fill the hole and leave a little mound of extra filler on top of the hole. When the filler is dry, use a fine sandpaper to sand it down smooth and the hole will totally disappear.
- Once all the strips were attached and holes were filled, I took my caulk and filled the side gaps on both sides of each moulding strip. This step may seem a bit over the top, but it makes the strips look completely integrated with the doors and sides rather than just stuck on and makes the whole thing feel and look much more expensive as well (you can see the difference it makes above!). Just squeeze a small amount of caulk between the cracks and run a damp finger down the line to smooth the caulk and press it into the crease. When the caulk is dry, tape off the top, back, and insides of the doors, and you’re ready to paint!
- Now, this is where I’m adding an extra step for you that I wish I had done but didn’t think I needed. Because I roughed up the sideboard and strips with sandpaper, I didn’t think I needed to use this primer (it’s a great prepping primer for painting laminate furniture or other surfaces that don’t take paint as well), but I could tell once I started painting that the paint would be adhering more easily had I done a coat of that first. I still got it to look good, but it took a little more finessing with the brush to get it to look covered and smoothed than it should have. I also color matched the sideboard to Melting Icicles by Behr and it’s a perfect match, so I would highly suggest that shade if you don’t have a paint swatch that you can find that matches the color. I also was SO happy that I picked up a spindle brush when I was gathering supplies for this as I haven’t used one before, but it really made painting the unique shape of the fluting so much easier, so I very highly recommend it for projects like this. Once the two coats of paint are dry, remove the tape and your new fluted sideboard is almost done!
- Now, you can technically be done here at this point and use the glass topper piece that IKEA recommends you use to cover the seam between the two units (this size sideboard is a small and big unit sitting side by side). But I decided to cut a piece of 1/4″ birch plywood to be the exact size of the top of my sideboard so I could attach it with the nail gun, fill and sand the holes, and then paint it to match the rest of the unit. The glass top is nice, but it’s a slightly different white and a different material, so it kind of stands out more than I would have liked and adding the thin wooden top worked perfectly!
This is amazing. The product you recommended for the half mound has been discontinued. Do you have another recommendation?
Really pretty, Laura! At first glance, I thought it was fluted. It wasn’t until I read that you used half-round moulding that I took a closer look. Nicely done!
Laura! This turned out phenomenal! Love, love, love!
I wish you guys would make video tutorials for something as complicated as this. It’d be a lot easier to follow and I’d be more inclined to try tutorials if I can see how it’s done.
Videos can be really helpful and we do make them for some projects! This project really is just cutting the molding strips the height of the object and attaching them evenly spaced with glue or nails so if that sounds doable to you then I would go for it!
Laura
So beautiful! . You are exceptionally talented!
Agree. This looks awesome Laura!
Thanks Deb!
Laura
I loved how this turned out!
Thank you! I do too!
Laura 🙂