 As Trey and I were planning how we wanted to makeover our home office we knew we wanted a desk. He planned to play and record music in the room while I wanted space to write and possibly work on some smaller craft projects. Even though we feel we need lots of desktop space we didn’t want a giant desk taking up all the space in the room. Hmm… what to do?
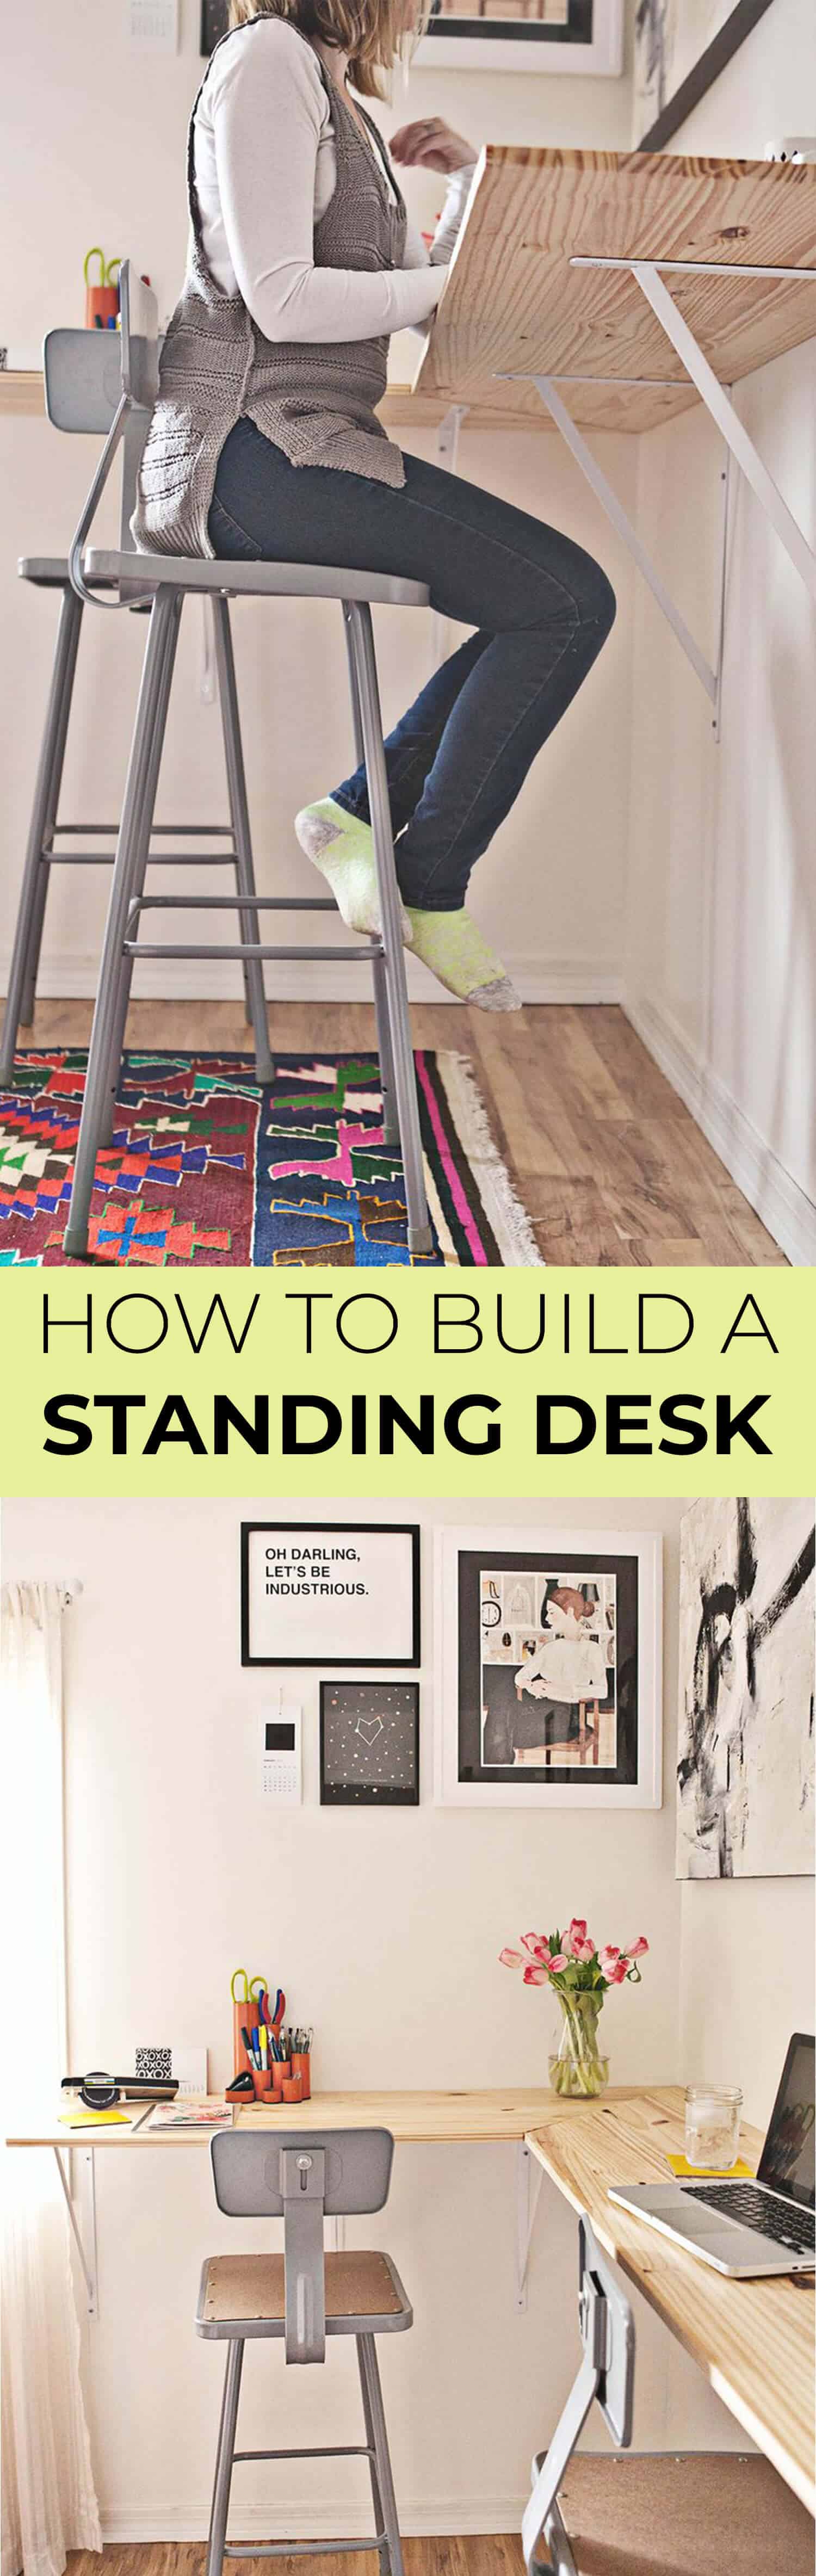
 We decided to build a wrap around standing desk. This allows for a few things: we can work in separate areas, we have plenty of desktop space, the center/majority of the room is free and uncluttered. Hooray! Creating the desk turned out to be quite simple too. Double bonus!
 The supplies we used will likely be very different from what you’d need if you build a standing desk in your home office. What’s so great about making your own furniture is you can customize it to fit your space exactly! So, the following measurements represent what fit in our space. Measure your walls to see how lumber and how many brackets you may need.
Supplies: (1) 1 in. x 2 ft. x 6 ft. pine board, (1) 1 in. x 2 ft. x 5 ft. pine board, (1) 1in. x 2 ft. x 4 ft. pine board, 7 large shelf brackets, screws to fit in the bracket, power saw, powder drill, level, sand paper, hand sander, polyurethane (we used a semi-gloss) and clean rag or brush.
1.) Cut the boards to fit your space. Probably your local lumber supplier will not have the exact measurements you need. Use your own saw, or have them cut the boards down to size. We cut two of our boards at an angle to fit one corner of our room. You could also avoid cutting angles but still outfit a corner by doing something similar to this.
 2.) Sand the cut edges as well as the entire surface area of the wood. The reason you need to sand the entire surface area is to keep the wood feel smooth even after you seal. Polyurethane can make an un-sanded surface feel a lot more rough than it did before.
3.) Once sanded, wipe down the surface. Seal with a coat or two of polyurethane. If you want to stain the wood, do so before you seal. We left ours the raw color it was because we liked how light it was.
 4.) You’ll first want to attach your shelf brackets to the wall before attaching the wood. I think we bought the largest we could without exceeding the width of our wood. We wanted these to be very sturdy, so we didn’t have to worry about putting too much weight on them. That said, you’ll definitely want to find studs for at least 2 of the shelf brackets per section of board.
Finding studs is always that frustrating step we never allocate enough time to do. I heard quite a few mumbled curse words from Trey during this process. So I was standing by with the spackle. 😉 Here are some tips for finding studs:
• Stud finders. You can find these at any hardware store. You just slide across your wall, until they beep. They always give you a good starting point, but be sure to double-check using the below techniques. Stud finders are often wrong
• Look for indicators. There are a few parts of a room that will always have a studs: corners of the room, right next to an outlet, door frames, window frames. This the best method to be sure you’re on a stud.
• Standard widths between studs are 16 inches or 24 inches. Depending on the age and size of your house, chances are it’s following building standards that require studs to be consistently spaced at 16 inches (most common) or 24 inches. Ours is 16 inches, and that’s center to center of the studs.
• Good ole fashioned knock test. You’ve probably seen your dad do this one or even tried it yourself. As you can guess, drywall + insulation sounds a lot more hollow than drywall + a 2×4 piece of wood (a stud). So look for that less hollow knock. If I’m being honest, it’s the most frustrating technique. I’m just never sure if I heard it quite right. So I mostly use this to verify the previous techniques.
Typically, we look for an indicator and then measure 16 inches (or 24 inches) in either direction. Then, we use the stud finder and the knock test to verify. Of course, you can always use drywall anchors. We would just recommend you’ve got at least 2 of those brackets mounted to studs if you plan on doing a lot of work at these desks.
As you’re finding your studs, mark them, and then use a long level to ensure your brackets are all positioned at the same height. Fasten the brackets to the wall. Then, fasten the wood to the brackets. Bam!
 We absolutely LOVE how our wrap-around desk turned out. Even though the height is perfect for standing and working, we also purchased a couple of simple metal chair (bar stool height) so we can sit sometimes too. Thanks for letting us share our desk with you. We’ll share all the photos of the office with reference links later this week! xo. Emma
P.S. Learn how to make a modern wood stool for your desk here!
Credits // Author: Emma Chapman & Trey George, Photography: Janae Hardy & Emma Chapman.
I’m also wondering where you sourced your giant brackets, I can’t find any in the stores near me!
Hi! Love this idea, but I have a clarification question: you list three different lengths of pine board in the supplies ((1) 1 in. x 2 ft. x 6 ft. pine board, (1) 1 in. x 2 ft. x 5 ft. pine board, (1) 1in. x 2 ft. x 4 ft. pine board), but I see only two boards used in your pictures. I assume that you just need two pine boards 1 in. thick, 2 ft deep, and however long you need for your space. Before I go making this myself, can you confirm?
What a great project! We will be attempting it this weekend.
My question is, where did you get that beautiful sweater vest? Is it store bought or handmade? I’d love to know what pattern it is, if handmade.
Thanks so much for all the inspiration!!
Love this idea so much! Will you pleaseee tell me where you purchased those brackets from?
This is great! I can’t wait to adapt it to my workspace.
What are the measurements of the brackets you used?
I like your designs. Because Your all designs are getting look like shine and. You are making simple to best quality designs. I like it…..
Wow! You just heped me solve huge space issue! Thanks!????
I was just wondering where you found a board that was 1 in x 2ft bc I’m having a hard time finding that. All anyone seems to have is 1ft wide boards.
I believe mine where from either Lowe’s or Home Depot.
Emma – this is awesome! Did you join the boards along the diagonal cut at all, or just butt them up against each other? Thank you.
Did anyone ever figure out where to get that rug??
It’s a turkish rug from Etsy. The shop is no longer open, but here’s a link to some similar ones! https://www.etsy.com/search?q=turkish+rug
omg this is so perfect
Woah! Classy room it is! The wonders drywall insulation can do!
I have had a similar idea after my DIY office in my garage went out the window as soon as it became cold. I have a wall that I want removed between my kitchen and living room that is about 12 ft long. Since I cant remove the wall or actually afford remodeling right now I thought I would create a shelf, desk, bar area. And your post has solidified my thoughts. New DIY project coming soon for me! Thanks!
Love it. We are in the process of creating a portable standing desk which will allow anyone to turn their everyday desk into a standing desk. Check it out here (https://www.facebook.com/ZestDesk)
Wow! Thanks for such a great idea! I love it so much!
Love this idea! A great space saver too (:
I just did this, too! Posted on the same day. Great minds. Mine was an Ikea hack, though. Yours is beautiful! http://heartsandsharts.com/ikea-hack-creating-a-standing-workstation/
These are awesome. Where’d you get these?
Awesome idea!!
Lulu xx
https://www.luluslittlewonderland.blogspot.com
I’d love more info on the heart string-art in the first and second pics!
Where are your stools from?! I love this idea for our bedroom office space since we just added another kid to the bunch and lost our office/guest room. I also love how high it is to keep little hands from getting into things. =)