
 The HFHS house needed a dining room table, so I made one! With the style we wanted, it was like putting together an open-ended puzzle. I had a bunch of scrap wood from other projects that worked out great for the tabletop (I hate throwing out wood, so I have piles of scrap wood). This table cost about $125 to make (not including tools).
Supplies:
-1.5″ x 1.5″ x 36″ poplar boards (9 at around $6 ≈$55)
-4×8 3/4″ plywood (≈$40)
-.75″ x 3.5″ x 8′ poplar boards (2 at around $14 ≈ $28)
-assorted 3/4″ thick plywoods, scrap wood
-1 1/4 nails
-stain (optional)
-wood seal
Tools:
-table saw
-miter saw
-drill
-Kreg jig/1 1/4″ Kreg screws
-nail gun (optional)
-sander
-measuring tape
-pencil
 Step one: The first thing I put together was the base (in yellow), which is made out of the 1.5″ pieces. Here’s the cut list:
-three 36″ (no cuts needed!)
-four 28.5″ (legs)
-four 18″ (just cut two boards in half)
Refer to diagram to see how I connected legs to base, then the cross support to legs. I put together section A first using pocket holes. Then I put together section B, and then attached it to the legs (all with pocket holes). Then I flipped it over and attached C (plywood). I screwed the plywood to the base, then nailed on section D (which is the 3.5″ ply boards ripped down to 1.5″ wide pieces). I knew I was going to use 3/4″ scraps on the top, so I wanted it just wide enough to trim out the plywood and patchwork pieces.
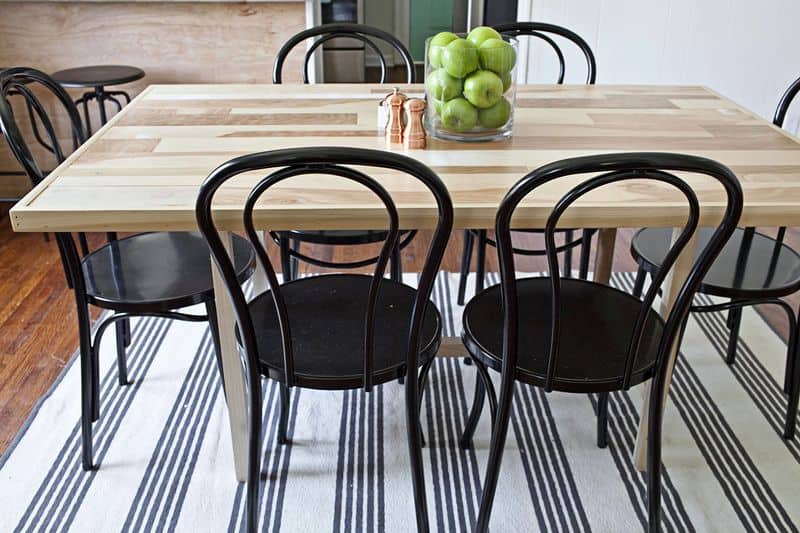
 At this point it was time to start piecing in the scrappy scraps. I used a bit of walnut ply, poplar, birch, whatever I had lying around. I tried to make sure the pieces were 3/4″ thick so the surface was as flat as possible. I also tried to keep the color range pretty even, no stand out pieces! At this point, the placement and fitting is up to you!
 I had some fun with it and threw in some 45˚ angles here and there. I was originally thinking I was going to stain some pieces, but the natural wood tones worked out great. After I had all the pieces cut and fitting nice and snug, I nailed everything down. Then I filled the holes in with a neutral colored wood filler and sanded everything nice and smooth.
 The surface ended up pretty even, some pieces were a bit thicker here and there, but that’s the nature of the biz. Three coats of poly was applied to finish up the project.
I hope whoever ends up in the house enjoys the table for years to come! -Josh
Credits // Author: Josh Rhodes. Photography: Janae Hardy and Josh Rhodes. Photos edited with A Beautiful Mess actions.
Hoping to do something similar. Is there any concern that having to boards attached to plywood won’t allow for wood movement?
Thank you for your website, which I just chanced upon. Now I have no excuse but to make the stuff myself haha. Great motivator. So I can plan, can you please tell me roughly how long it would take a beginner to make this table. Can it be done in one day or realistically 2-3 days.
Thanks
Wow! Such a beautiful table! I just moved to a new home and now my days pass with cleaning, but when I finish it, will start with its decoration. I think that I can save money if I do it myself, also there is a big chance to not find it in any store, so this is a good solution. Thanks for the great idea!
Hi Dana! We will be listing all of the sources from the Habitat house in a few months. Stay tuned! 🙂 -Jacki
Hi- I’m sorry if you’ve already answered this elsewhere, but, where is the rug from? It’s perfect for what I’m looking for!
This looks amazing. Thanks so much for sharing this project. My fiance and I have been thinking that it would be more fun to make our own dining room table, and we could get exactly what we’d like. We love vintage and cottage style for our dream home, and this is perfect. I am going to show this to him. Thanks so much again. So excited 🙂
Diary of Elegance.
http://diaryofelegance.blogspot.ca/
Looking at this post makes me want to have a woodworking workshop! The table you created is exactly what I have always wanted. I can’t believe how you can do it yourself. I am deeply impressed =)
Juju Sprinkles
http://www.jujusprinkles.com
Oh my goodness. This is wondrous. As are all y’alls DIYs.
I LOVE this! Thanks for the DIY furniture projects. They are soooo helpful.
I love this! Whenever I can use scraps from other projects I always feel great.
wonderful post and beautiful table. keep up the wood working posts!
Awesome tips!
xo
baanou
WWW.BAANOU.COM
#SHOPBaanou
The process looks so simple, but the table looks amazing.
I wish i was good at making these types of things
This is absolutely stunning!! The combination of the different scraps of wood really gives it character!
-Melanie-
http://www.theseblankwalls.com
Wow, it´s fantastic!!. Muakes from Seville Spain)!!.
http://openingwindowsculture.blogspot.com.es/
That seems really advanced. I wish I could make my own furniture.
http://askmelissaanything.blogspot.com/
Oh wow it looks really great! I love old wood tables so this is definitely a DIY for me ! HA
Also, I have a simple table like yours was so I think I will start working on that 🙂
http://inspiremeland.com
Betty
That looks great! Love pairing it with the black chairs
This is so cute! I love the finish of all the different boards on the top. so pretty!
The White Corner Creative
Oh my goodness…I LOVE THIS!!! Wishing I had a saw right about now to try it for myself!