 Vintage headboards are pretty easy to find at antique shops and flea markets, but the caveat is that they usually don’t come with bed frames. I wasn’t sure how I would make this frameless metal headboard work when I found it last year, but that didn’t stop me from taking it home with me! I did what I normally do and just figured it out after the fact. A family member ended up giving us an old, unused metal bed frame that I bolted to the headboard, the ugly steel and a tattered box spring was completely visible underneath the pretty bedding. Not wanting to settle for just any ol’ bedskirt for this pretty vintage bed, I figured it was a good candidate for an easy sewing DIY!
This velcro bedskirt was very simple to make and it really elevates the entire look of the bed. I don’t have any wasted fabric that rests on top of the box spring, as I would with a normal bedskirt, and if your bed is in the corner, you don’t even have to make three sides! I also love how easy the velcro attachment makes pulling off the skirt in case it needs to be washed. Check out how you can make one too!
 Supplies:
–muslin fabric (check step one to figure out yardage and width)
–fringe trim
–sticky-back velcro for fabrics (I used 1.5 packs for a twin bed.)
-straight pins
-matching thread
-tape measure
Not Pictured:
-sewing machine
-iron & ironing board
 Step One: Take measurements of your box spring. This will determine the lengths of fabric you will cut in the next step.
Measurement one: (Length of bed sides) + (4″ hem allowance and overlap allowance) = length of pieces you will cut in step two
Measurement two: (Distance from top of box spring to floor) – (2″ hem allowance) – (preferred breathing space below) – (any trim overlap) = width of pieces you will cut in step two
Determining width of muslin to buy:
Multiply “measurement two” x 3 and that is the minimum width of muslin you should buy. My combined total was 36″, and thankfully that is a standard muslin width. So I was able to buy one piece of 36″ muslin the length of my bed and cut it into three long strips as shown below. Be sure to add about 1/8 yard to the total fabric you purchase to account for shrinking when you wash the fabric before beginning the project.
 Step Two: Wash and dry your fabric before doing anything! Then cut three fabric strips to the measurements you figured in step one.
 Iron 1/2″ of your fabric edges, and fold it over another 1/2″ and iron to make a hem.
Step Three: Pin down the hem and stitch it into place.
 Step Four: Repeat steps 2-3 for the ends of the pieces.
Step Five: Pin your trim material to the nice edge of your bedskirt and stitch into place.
 Step Six: Attach the fuzzy and poky sides of the velcro strips together and cut out 1″ pieces. Peel off the backs of the fuzzy sides and attach a few inches apart from each other on the top of the back side of the fabric pieces. It’s important to use the fuzzy sides on your fabric and the poky sides on the box spring so you can wash them later and not worry about the poky velcro ruining delicates in the washing machine.
 Step Seven: Peel off the back of the poky velcro pieces that are attached to the velcro on the fabric and push it into the the box spring. Make sure you overlap the pieces at the foot of the bed as length allows.

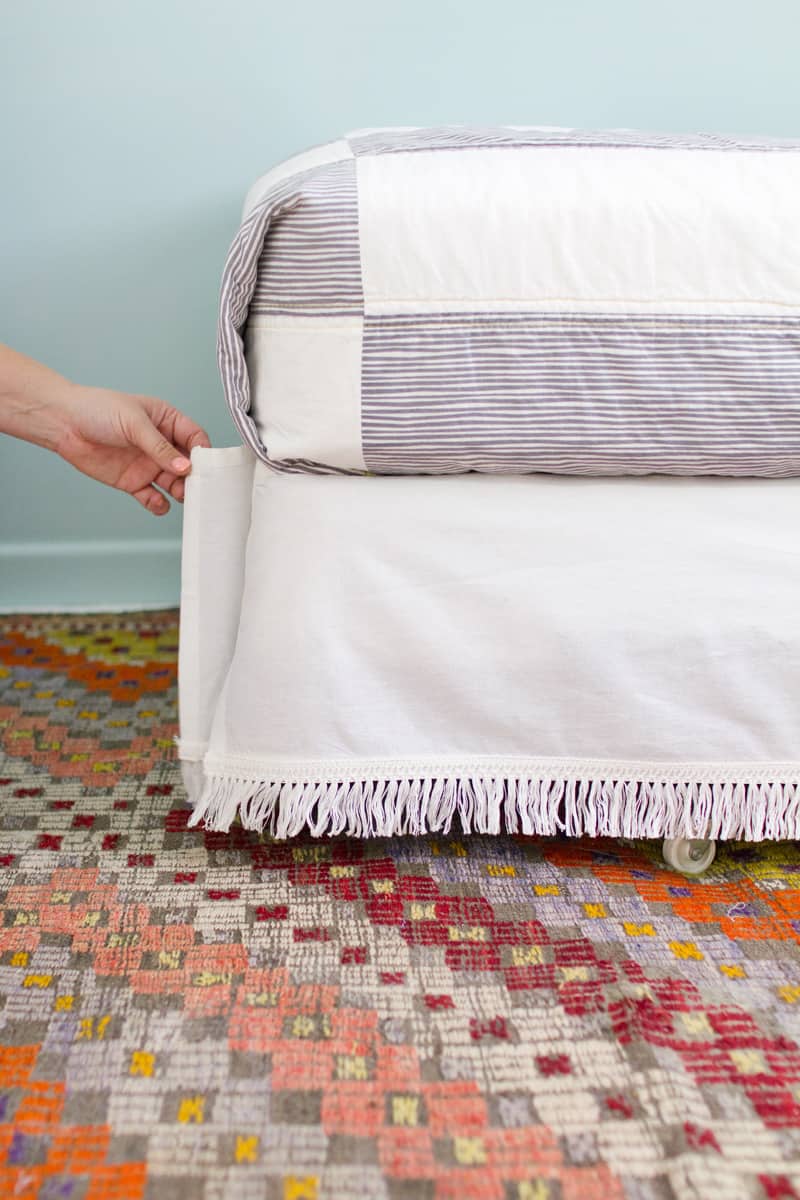
 Look how easy it is to remove! No more wrestling with the mattress when the bedskirt needs laundering.
 This bed looks 100% better than it did before the bedskirt, and what an easy little sewing project to do! –Mandi
Credits // Author and Photography: Mandi Johnson. Photos edited with A Beautiful Mess actions.

I love this idea. I always make my own using an old sheet to attach it to. This is great though as no trying to lift mattress and get bedskirt centered. I will be watching for your reply on washing though as I have not had good luck with stick on staying stuck and my sewing machine HATES velcro. So let us know. Thanks for the great idea!
Oh My Goodness – I’m going to use this when I need new bedskirt! But I’ m going to take my king size bedskirts and redo them to make into queen size since I now have a queen bed.
I have the same question as Yvette. Won’t the fuzzy part of the velcro come off in the wash?
Good information. Lucky me I came across your site
by accident (stumbleupon). I have book marked it for later!
You don’t mention sewing the fuzzy sides to the bed skirt. Won’t they come off in the wash?
Oh my gosh, you are a life saver! I live with chronic pain, which makes certain tasks very difficult. Making the bed is insanely hard for me. The bed skirt? Yeah, not happening. So when I took mine off last month to be washed, it didn’t go back on. With this tutorial, however, I can totally put my bedskirt on – by myself! By myself is a HUGE plus! <3 Thank you 🙂
Looking very nice.. And so simple! Thank you for sharing!
Our boxspring sits high so you can see it despite having a wooden frame around the base – so I was only just thinking I needed to figure out a solution – and I only need to do the two sides, because the footboard and headboard hide the rest. so YAY! Thanks!
Wow,what a gorgeous result! The headboard is super cute.
Thanks for this! I have an iron daybed, and this will be so handy for making a one-sided bedskirt for it.
The bedskirt looks great. I have a lot of trouble finding them in stores. When I home stage occupied properties, I run into many clients who just have the boxspring and mattress on top. The duvet only covers the mattress so you see the ugly boxspring with the bedframe.
I like the thickness of the fabric you used and of course the velcro keeps it even around the edge. Many times it slides when you bump the mattress making the bottom edge uneven.
How long did it take you Mandi to make?
This is such a great DIY. So useful and not too difficult. Thank you for sharing, you create such great content for this blog Mandi!
Such a cute bedding!! I really want to try it!!
http://yumiandyuji.blogspot.kr/
It’s really cute! We don’t really know bedskirts as a product in the Netherlands, I’ve never seen one in a store or in a bedroom. I don’t know why really. But now I can make one myself 🙂
This is a timely tutorial for me. We just moved and have only a headboard and ugly standard bed frame. Thanks! Hope I can find the time to try it soon. Www.moveablemess.com
This is so beautiful!! i need to make this!
Super! Love the transformation the skirting made to your bed! 🙂
I actually have a pretty small house, but bedskirts and the like don’t really take up any extra space. All of the contributors here have different homes, so not all of the projects on this website end up in the same space. 🙂 -Mandi
It’s from Land of Nod. So fun! -Mandi
The velcro sticks straight to the box spring which is under the mattress. The mattress is covered with a fitted sheet, so permanently sticking velcro to it wouldn’t work out very well, long-term. 🙂 -Mandi