The concept of edible flowers has always delighted me. As a teenager, I was completely obsessed with faeries, so the idea of flower-covered cupcakes or lavender-flavored bubble gum was totally captivating.
While the novelty has worn off a bit over the years, I still have a special place in my heart for delicate edible blossoms.
Related: Tips for Using Edible Flowers on Cake
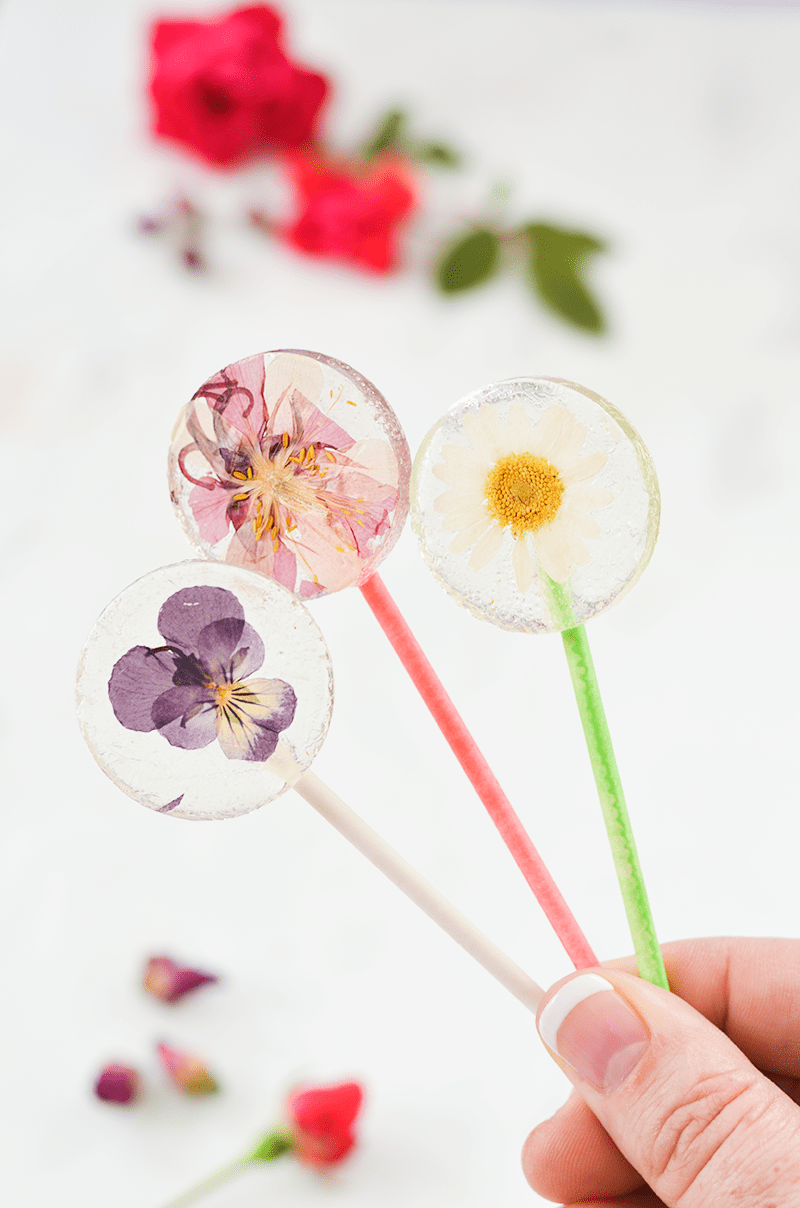
Seeing their beauty encased in a sweet, sugary treat brings back all of those warm fuzzy faerie feelings. Tea party anyone?
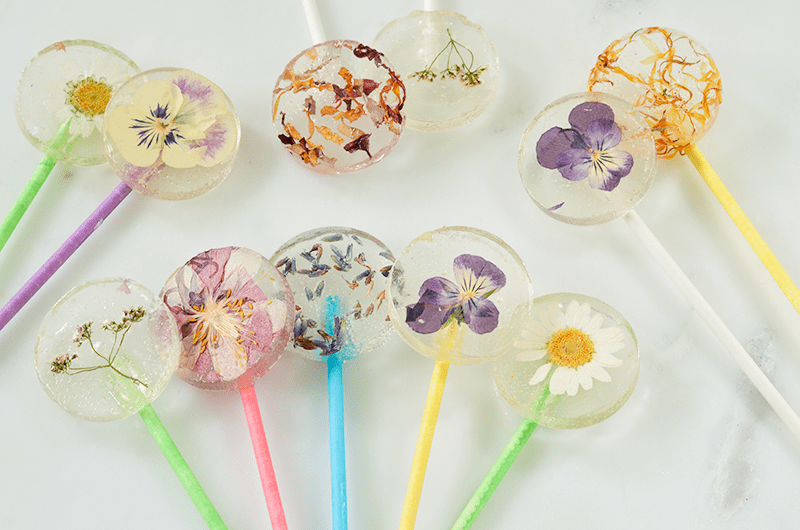
This project uses a super easy and virtually mess-free method for making lollipops. No need for candy thermometers or stovetop heroics—this recipe uses your oven and a silicone mold to slump hard candy into a pretty lollipop shape.
I used peppermint candies since they were the only clear ones I could find. The flavor actually ended up being perfect! The pops were light and sweet, which matched the delicate vibe of the project really well.
I also experimented with colored candies, but I found that the clear candy did the best job of highlighting the natural beauty of the flowers I was using.
 Speaking of the flowers—it’s really important to make sure to use only edible flowers for this project. While all flowers are pretty, plenty of them are also poisonous! Choose wisely.
I used this guide to pick the flowers for my lollipops. You can purchase pressed flowers online, but since there are a ton of edible flowers that can be grown in the garden, pressing your own flowers is one way to make this project even more special.
I used daisies, pansies, columbine, marigold, lavender, rose petals, and tiny flowers from my cilantro plant that had gone to seed. Dried edible teas and herbs, like chamomile, mint leaves, jasmine tea, or lemon verbena would work really well too.
Supplies:
–clear peppermint hard candies
–dried pressed flowers
–silicone lollipop mold
–lollipop sticks
–cello treat bags with twist ties

Step One: Preheat oven to 250°F. Place silicone mold on baking sheet and add one flower (face down) in each cavity.
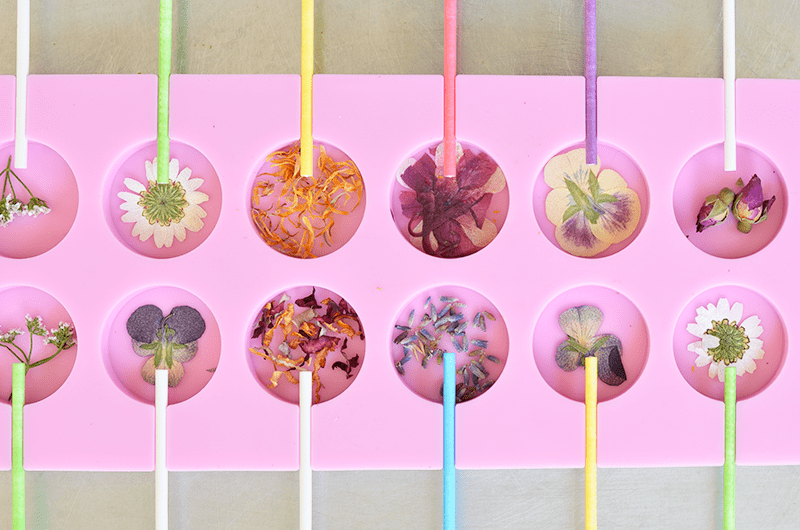
Step Two: Place lollipop sticks in each cavity.
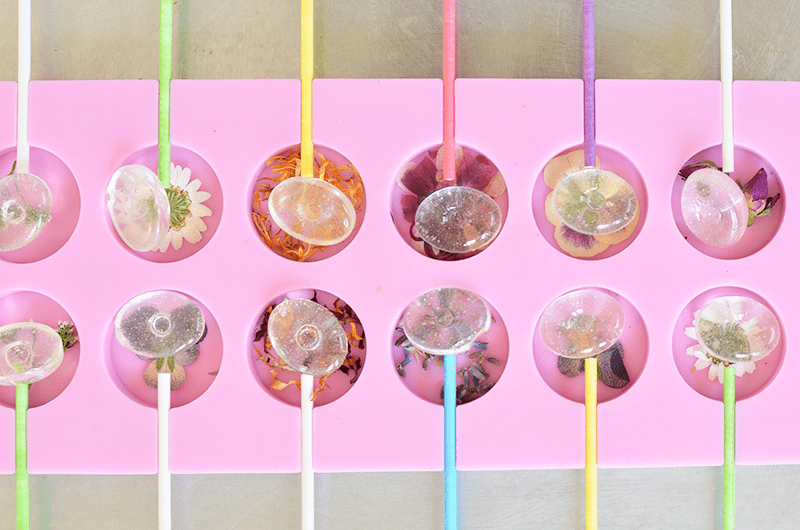
Step Three: Place one or two peppermint candies in each cavity. If you are unsure of how much candy your mold will hold, try melting one candy first, then adding a second and melting a second time. I figured out that these molds worked best with two or three candies.

Step Four: Place the baking sheet and mold in the oven and bake for 30-60 minutes, or until the hard candy has melted completely. If necessary, rotate the lollipop sticks to make sure they are completely coated with melted candy.
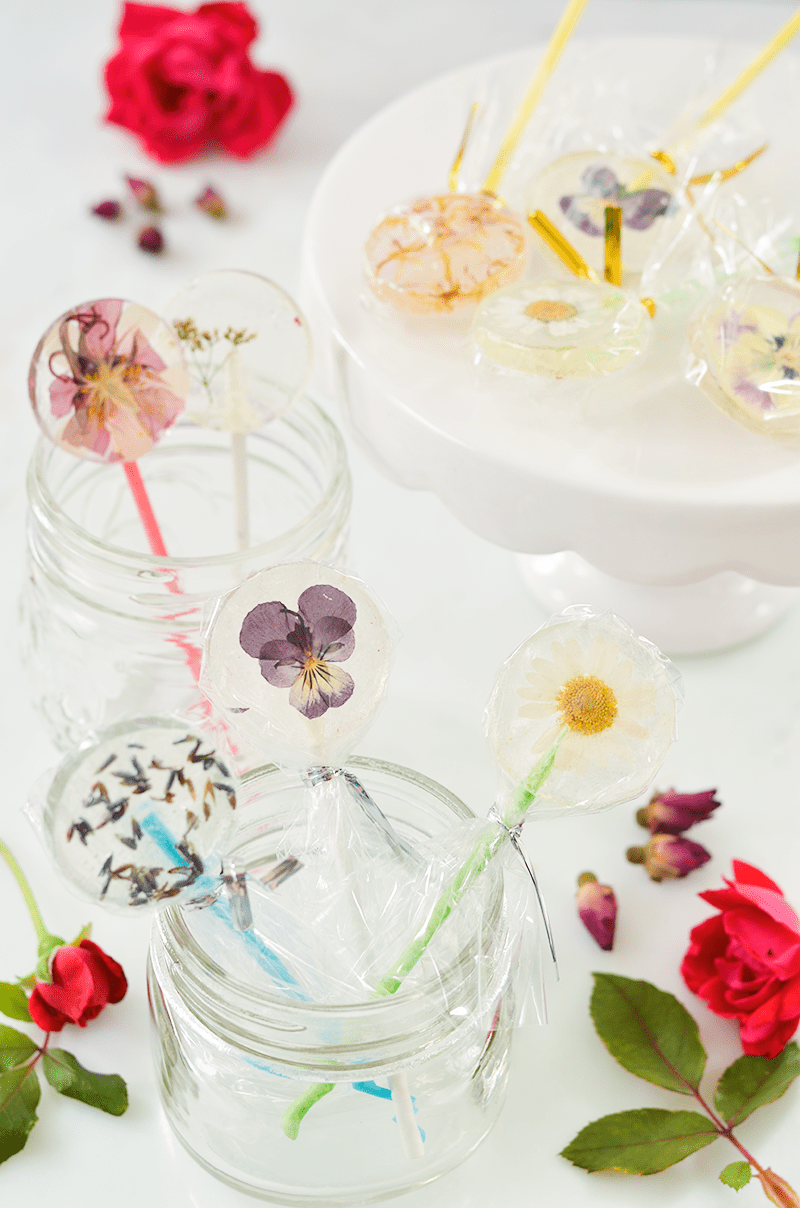
Allow the lollipops to cool and harden completely before gently popping them out of their molds. (This should take less than 30 minutes.) Cooled lollipops should be enjoyed right away or packaged in cello bags to keep them from getting too sticky.
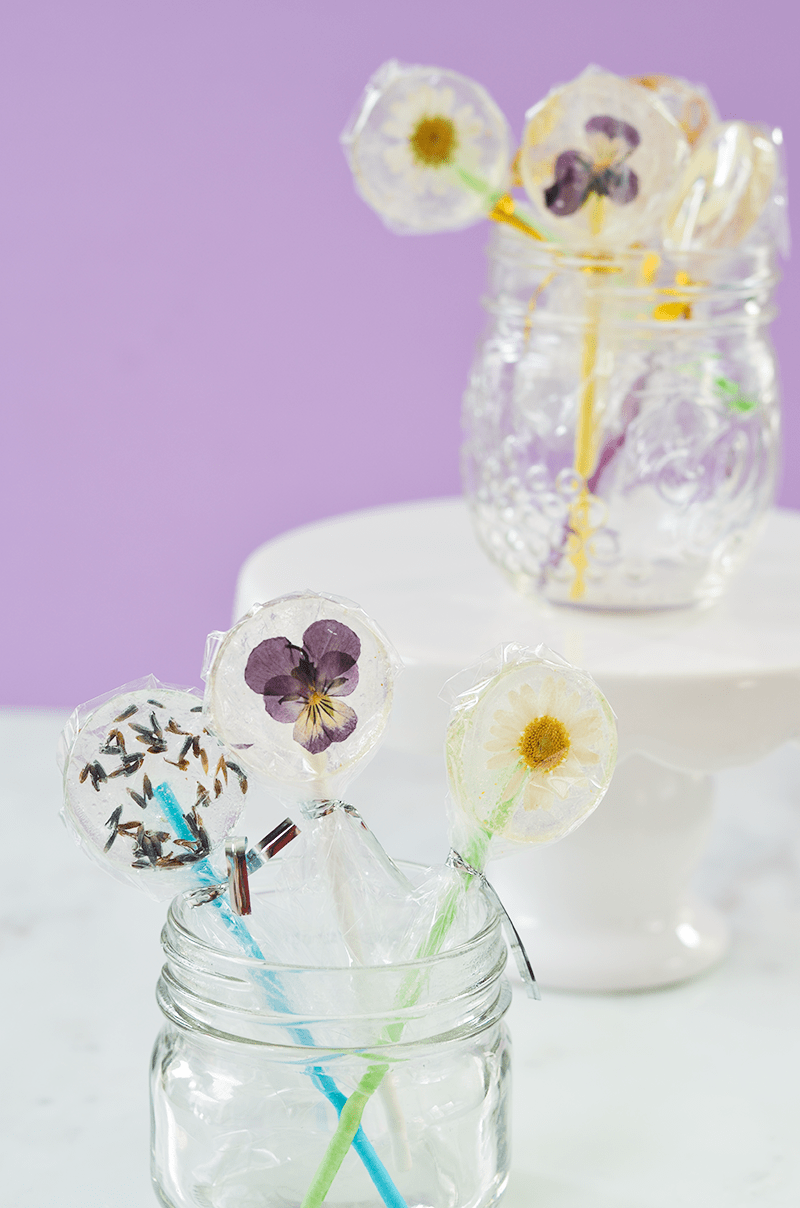 These beautiful lollipops make great party favors for spring and summer showers, weddings, and birthday celebrations.
Try adding a hand-lettered tag to the packaging to personalize the project for your next event. I hope you’ll have fun experimenting with different flowers and candy flavors! xo. Mary Helen
Get our FREE recipe guide with our most popular recipes of all time!
Free Popular Recipe Guide
Our top 25 recipes of all time!
 Get the Recipe

Ingredients
- peppermint hard candies (clear)
- dried pressed flowers
Equipment
- 1 oven
- 1 silicone lollipop mold
- lollipop sticks
- cello treat bags with twist ties
Instructions
- Preheat oven to 250°F. Place silicone mold on baking sheet and add one flower (face down) in each cavity.
- Place one or two peppermint candies in each cavity. If you are unsure of how much candy your mold will hold, try melting one candy first, then adding a second and melting a second time. I figured out that these molds worked best with two or three candies.
- Place the baking sheet and mold in the oven and bake for 30-60 minutes, or until the hard candy has melted completely. If necessary, rotate the lollipop sticks to make sure they are completely coated with melted candy.
- Allow the lollipops to cool and harden completely before gently popping them out of their molds. (This should take less than 30 minutes.) Cooled lollipops should be enjoyed right away or packaged in cello bags to keep them from getting too sticky.
Can we melt in microwave?
Hello these are lovely but never made them this way!!! Love the idea..??
I was wondering, doo you think you could use your rose-flavored rock candy recipe and pour the mixture into these molds? Or would the hot mixture affect the flowers?
Hello,
These are stunning, would love to make them for a wedding and wondered how long they keep after you make and wrap them?
Love this idea! Thank you for it! It was the best thing I decided to make for my daughter’s birthday. The girls loved the lollipops so much. This year I made a flower birthday party for my girl, and added some flowers on top of the cake too. Greets!
Okay, this is a new level of adorable. I’m afraid they’re so darn pretty, I wouldn’t want to eat them! They’re particularly beautiful because as a lollipop, they resemble individual flowers on their own stem. I just love it!
How beautiful!!! I really really want to try to make them (: I love anything with edible flowers. This year I planted several edible flowers in my garden, so as soon they bloom I’ll try tis diy!
These look amazing! What a great idea.
These are the absolute CUTEST! I can’t wait to give them a go for my summer picnic xo
The Art of Being Holly
These are so pretty, like too pretty to touch! I will make these a bouquet out of these lollipops and treat them like art <3
https://www.myblackcloset.com/
what a wonderful idea. these are so beautiful. they’ll be a big hit for any event.
Anything flowers makes me ridiculously happy. Storing this away for future events and keeping them in mind for bridal shower favors!
I can see my cat being utterly fascinated by these!
They are way too beautiful to eat!
https://www.makeandmess.com/
I LOVE these! I’ve also been enjoying all the edible flower recipes on Pinterest.
This is such a great idea! I always see edible flowers at my local fancy grocery store and this seems like the perfect project for summer <3
I love these – they’re so pretty!!
wow, amazing! They are very special, and what is really interesting about them- they will look great on a kinder party as well as on a sophisticated tea party! great post x
Be sure to get ORGANIC edible flowers, or grow them from seed yourself. You have no idea what has been sprayed onto the starts you get at a big box store, and it may not be food safe!
(This is also true for anyone planning a wedding–if you want roses on your cake, make certain they’re organic. You do not want heavily sprayed roses from South America or wherever touching your buttercream frosting.)
Great point, Julia! Another good reason to press flowers from your own garden.
I made them and am pleasantly surprised with the outcome. I used fresh flowers not dried. Just 2 points I need to improve: 1) One side of the lolly is clear & transparent, the other side (that was face down in the mould) came out turbid; 2) Some of the lollipops stay syrupy – dripping even. Anyone knows why?
These are the cutest things I’ve seen in a long time! I do have a question though: do the flowers float neatly in the middle or do they sink or float when the candy melts? I’m asking because I sometimes tried to make pudding /jelly layered or with something in it and it was really difficult! (at my students union we had a yearly pudding contest. It was my favorite!)
I experimented with putting the flowers on the bottom of the mold, in between two candies, and on the top. I found that placing them on the bottom of the mold with the candy melting OVER it helped them stay in place best. They have a tendency to shift or spread out in unpredictable ways if they are layered inside the lollipops.