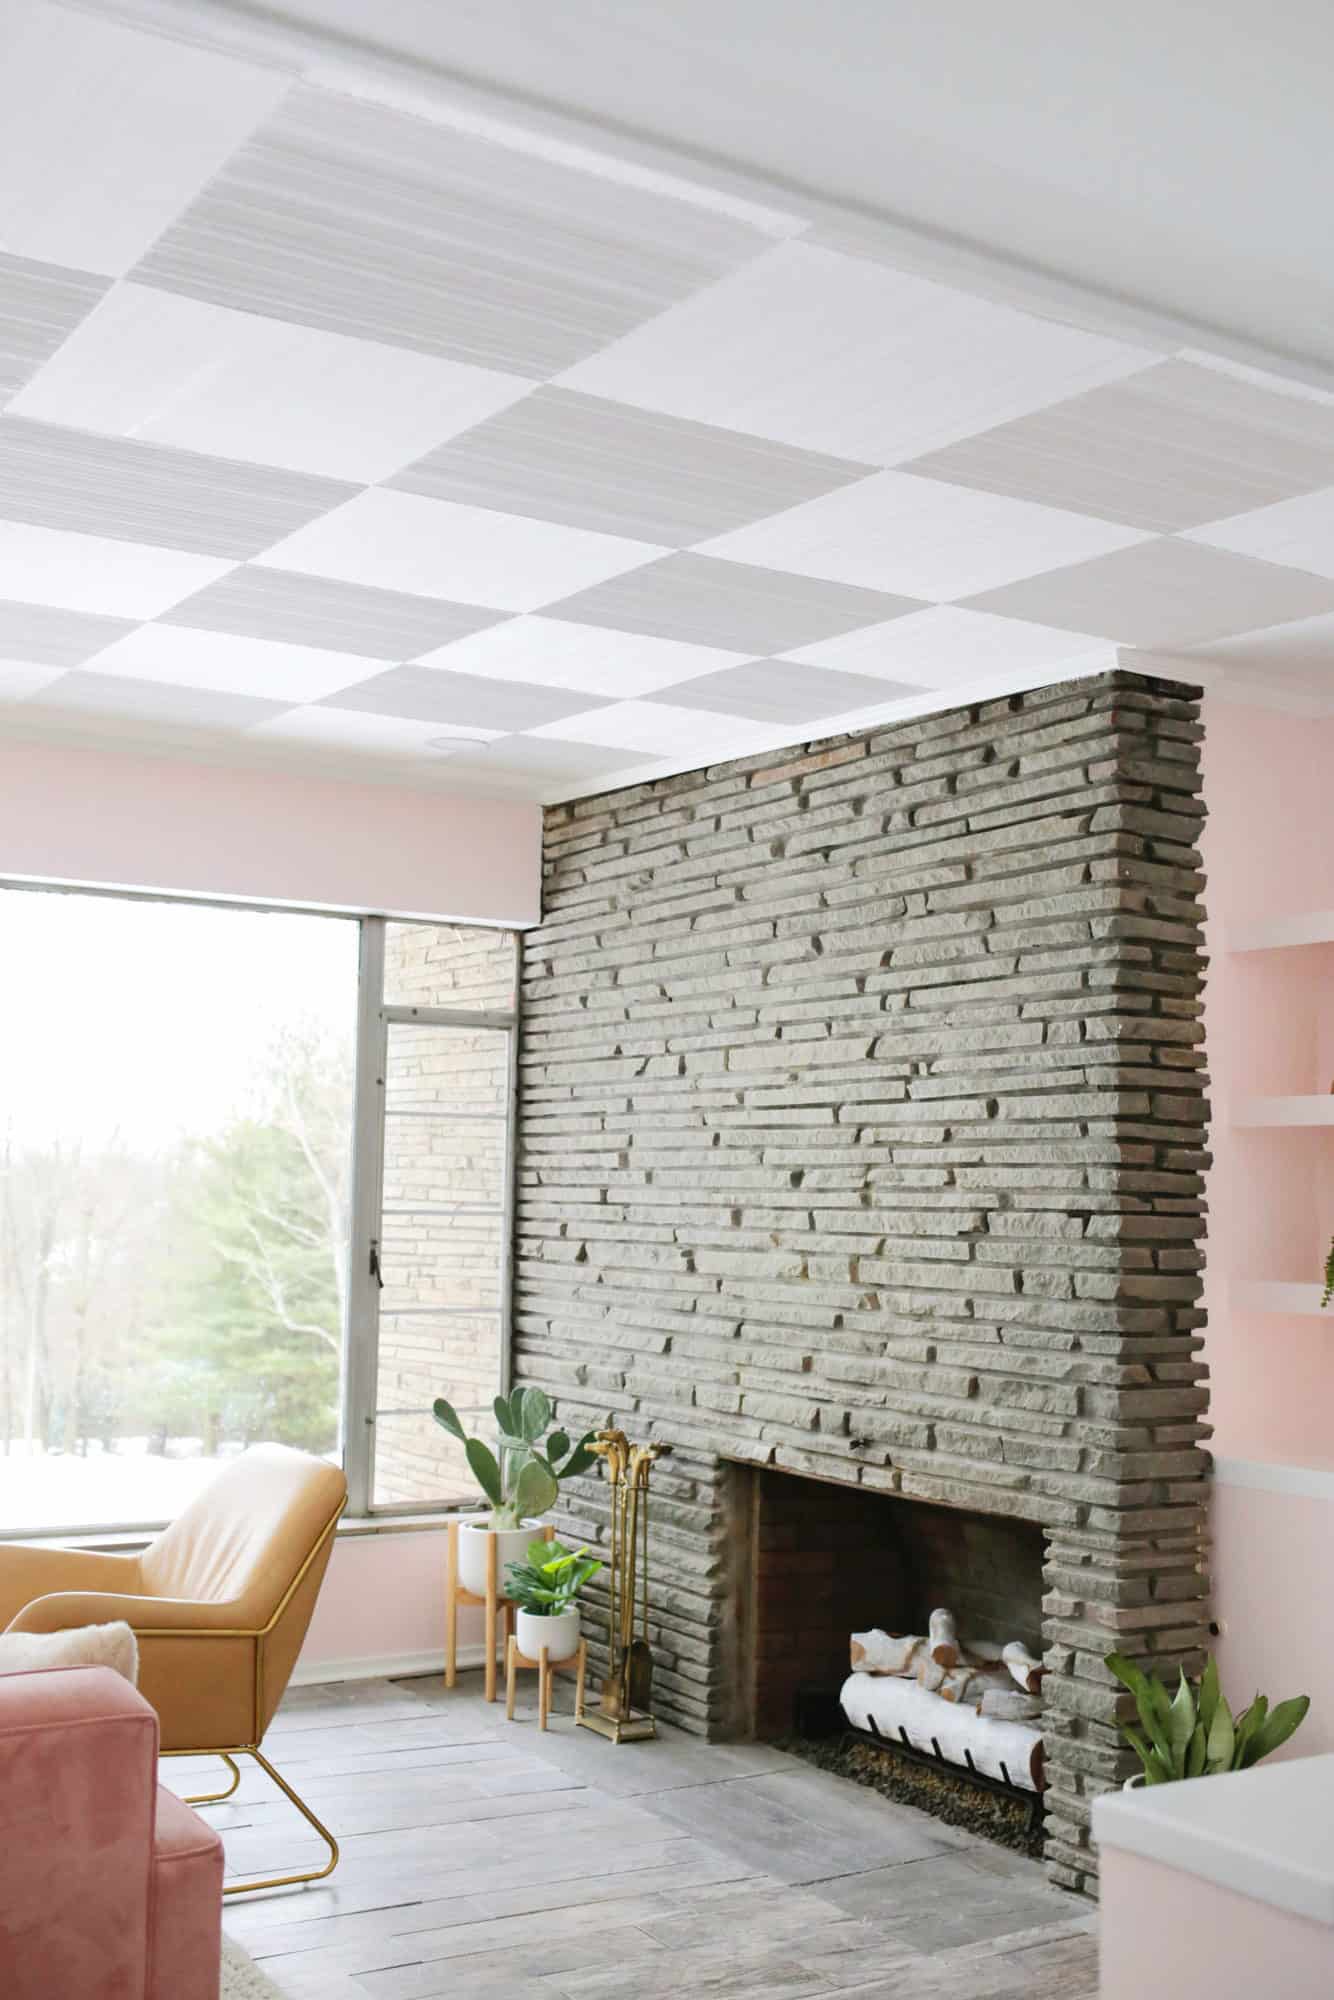
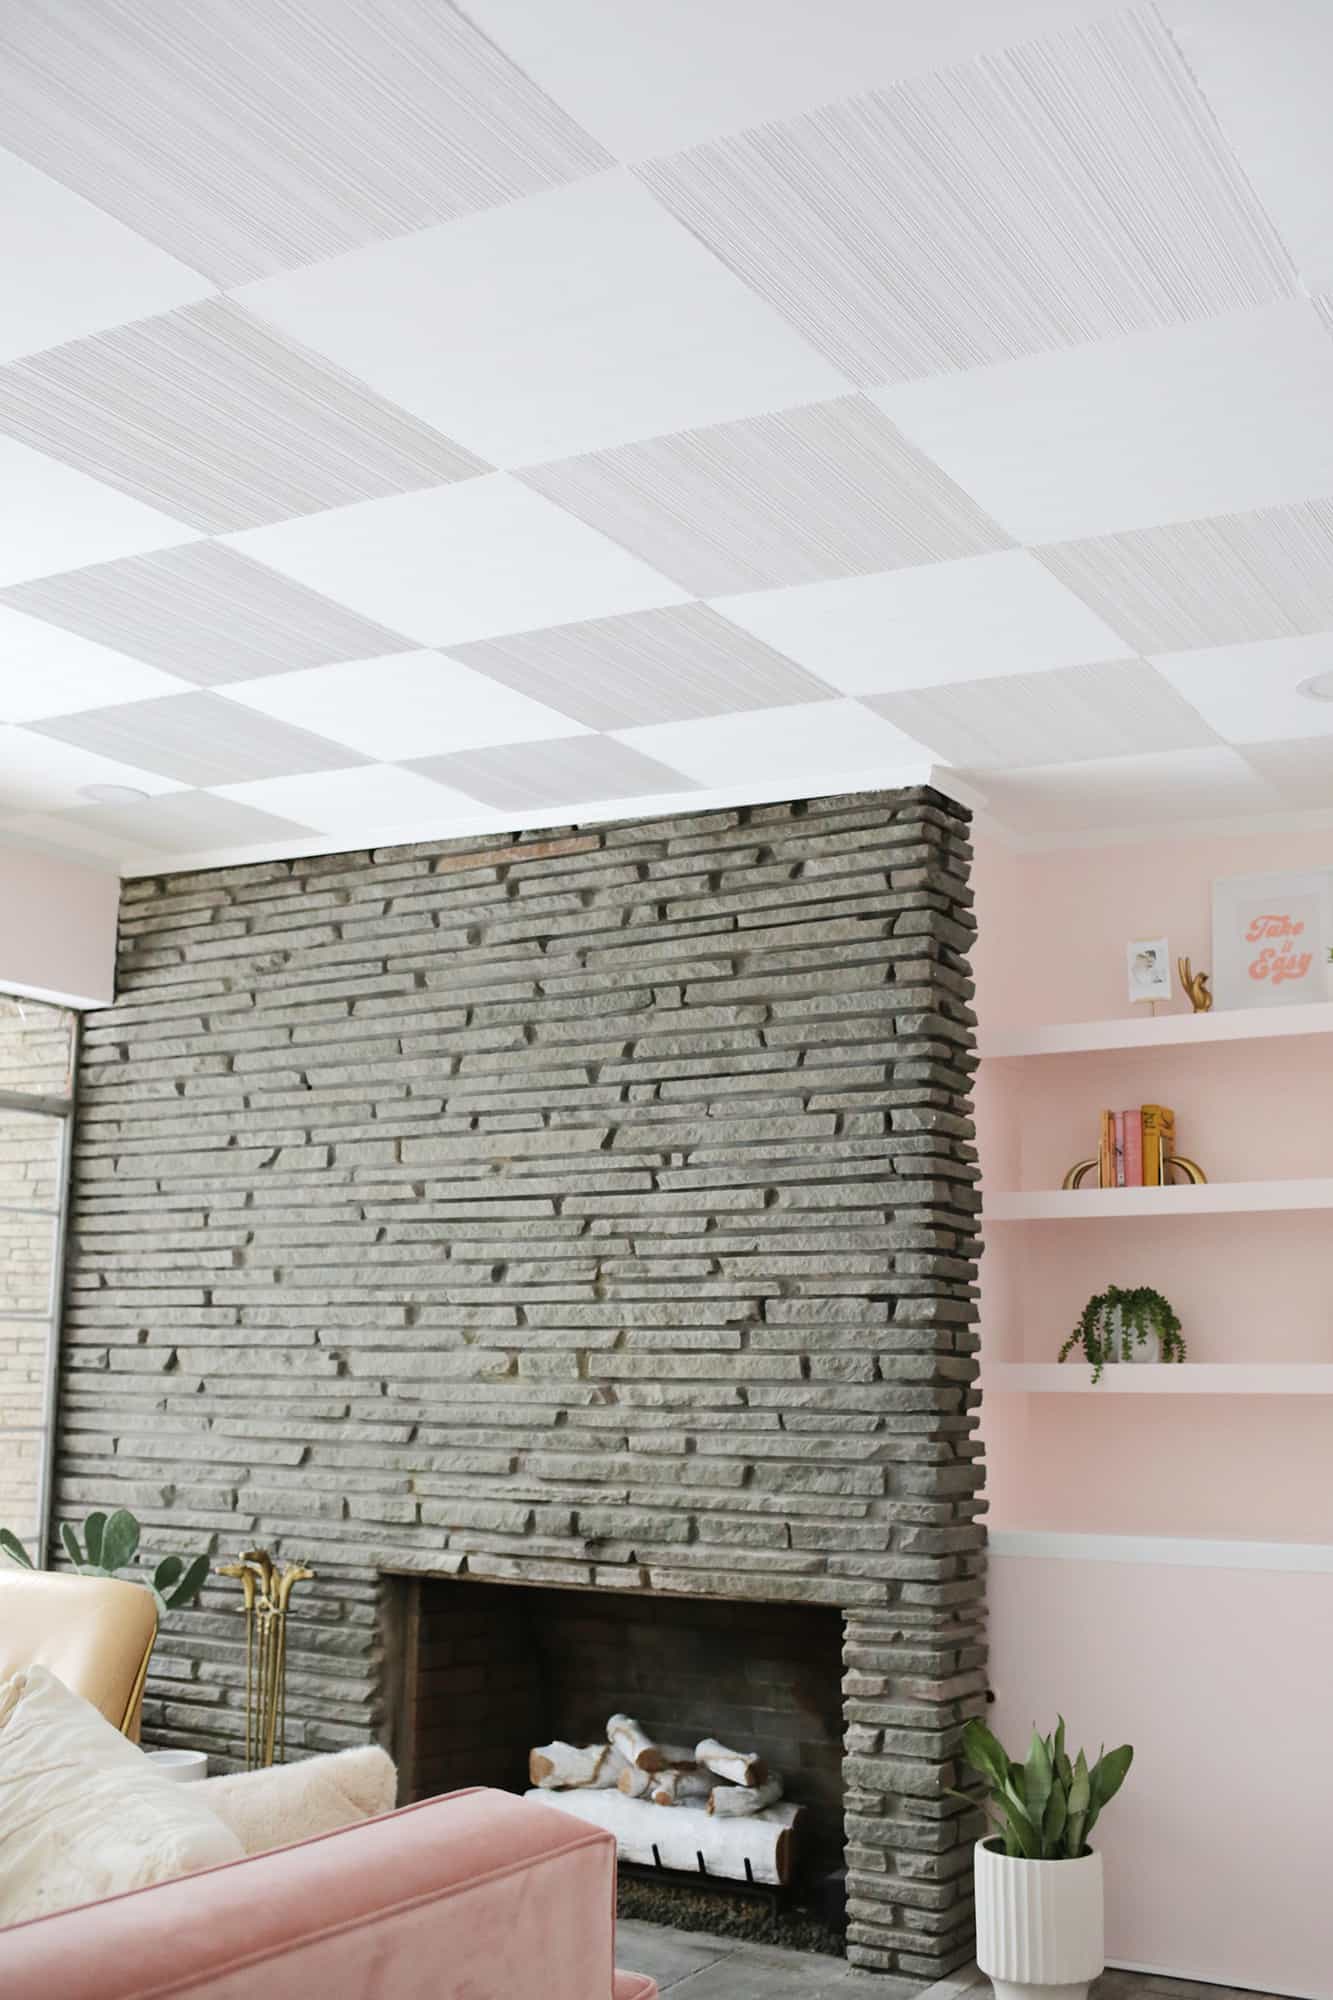
 When sharing photos of the mid-century home we moved into a few months back, the first thing that people seemed to say is, “What is going on with your ceilings?! Are they checkered?!” When we first looked at photos of the house, I didn’t understand what was happening with the main ceilings either until we got a much closer look. I actually thought it was a fabric type wallpaper on the ceiling until I got up close (and my parents did an internet search to find out exactly what they were), but they are actually made up of wooden combed plywood panels that are mounted to a ceiling backing in alternating directions so they look a bit like a checkerboard pattern.
These tiles, called “Weldtex panels” were most popular in the 1940s-1950s (although our home is from the ’60s and has them) and they came in various sizes to be either ceiling or wall panels. Our ceiling was painted, but you can see what the tiles looked like when stained in this vintage home. When people see our ceiling they have also thought that the tiles were painted two different colors, but no, it’s just the direction of the combing that makes it look a little darker or lighter depending on where you are standing. 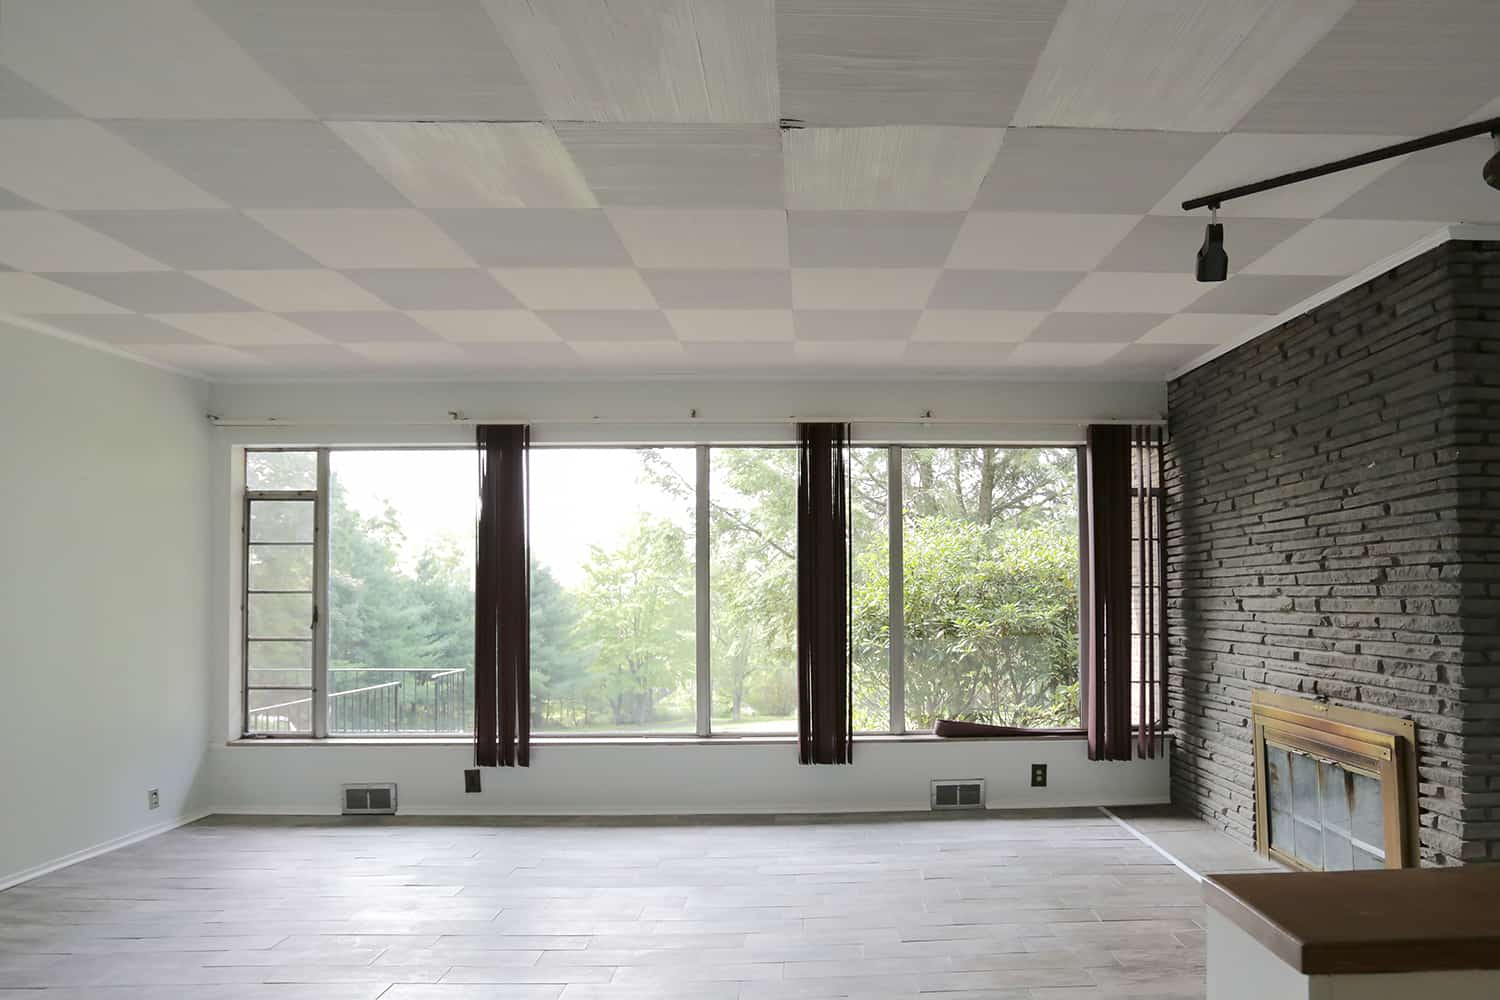 Once we moved into the house and found out more about what the panels actually were, we had to decide what to do with them! Our home needs a LOT of TLC and the ceiling had obviously sustained some water damage at some point in the past, as a big section of the panels were warped, broken, discolored, and wavy (you can see some of the waved and broken panels in the photo above).
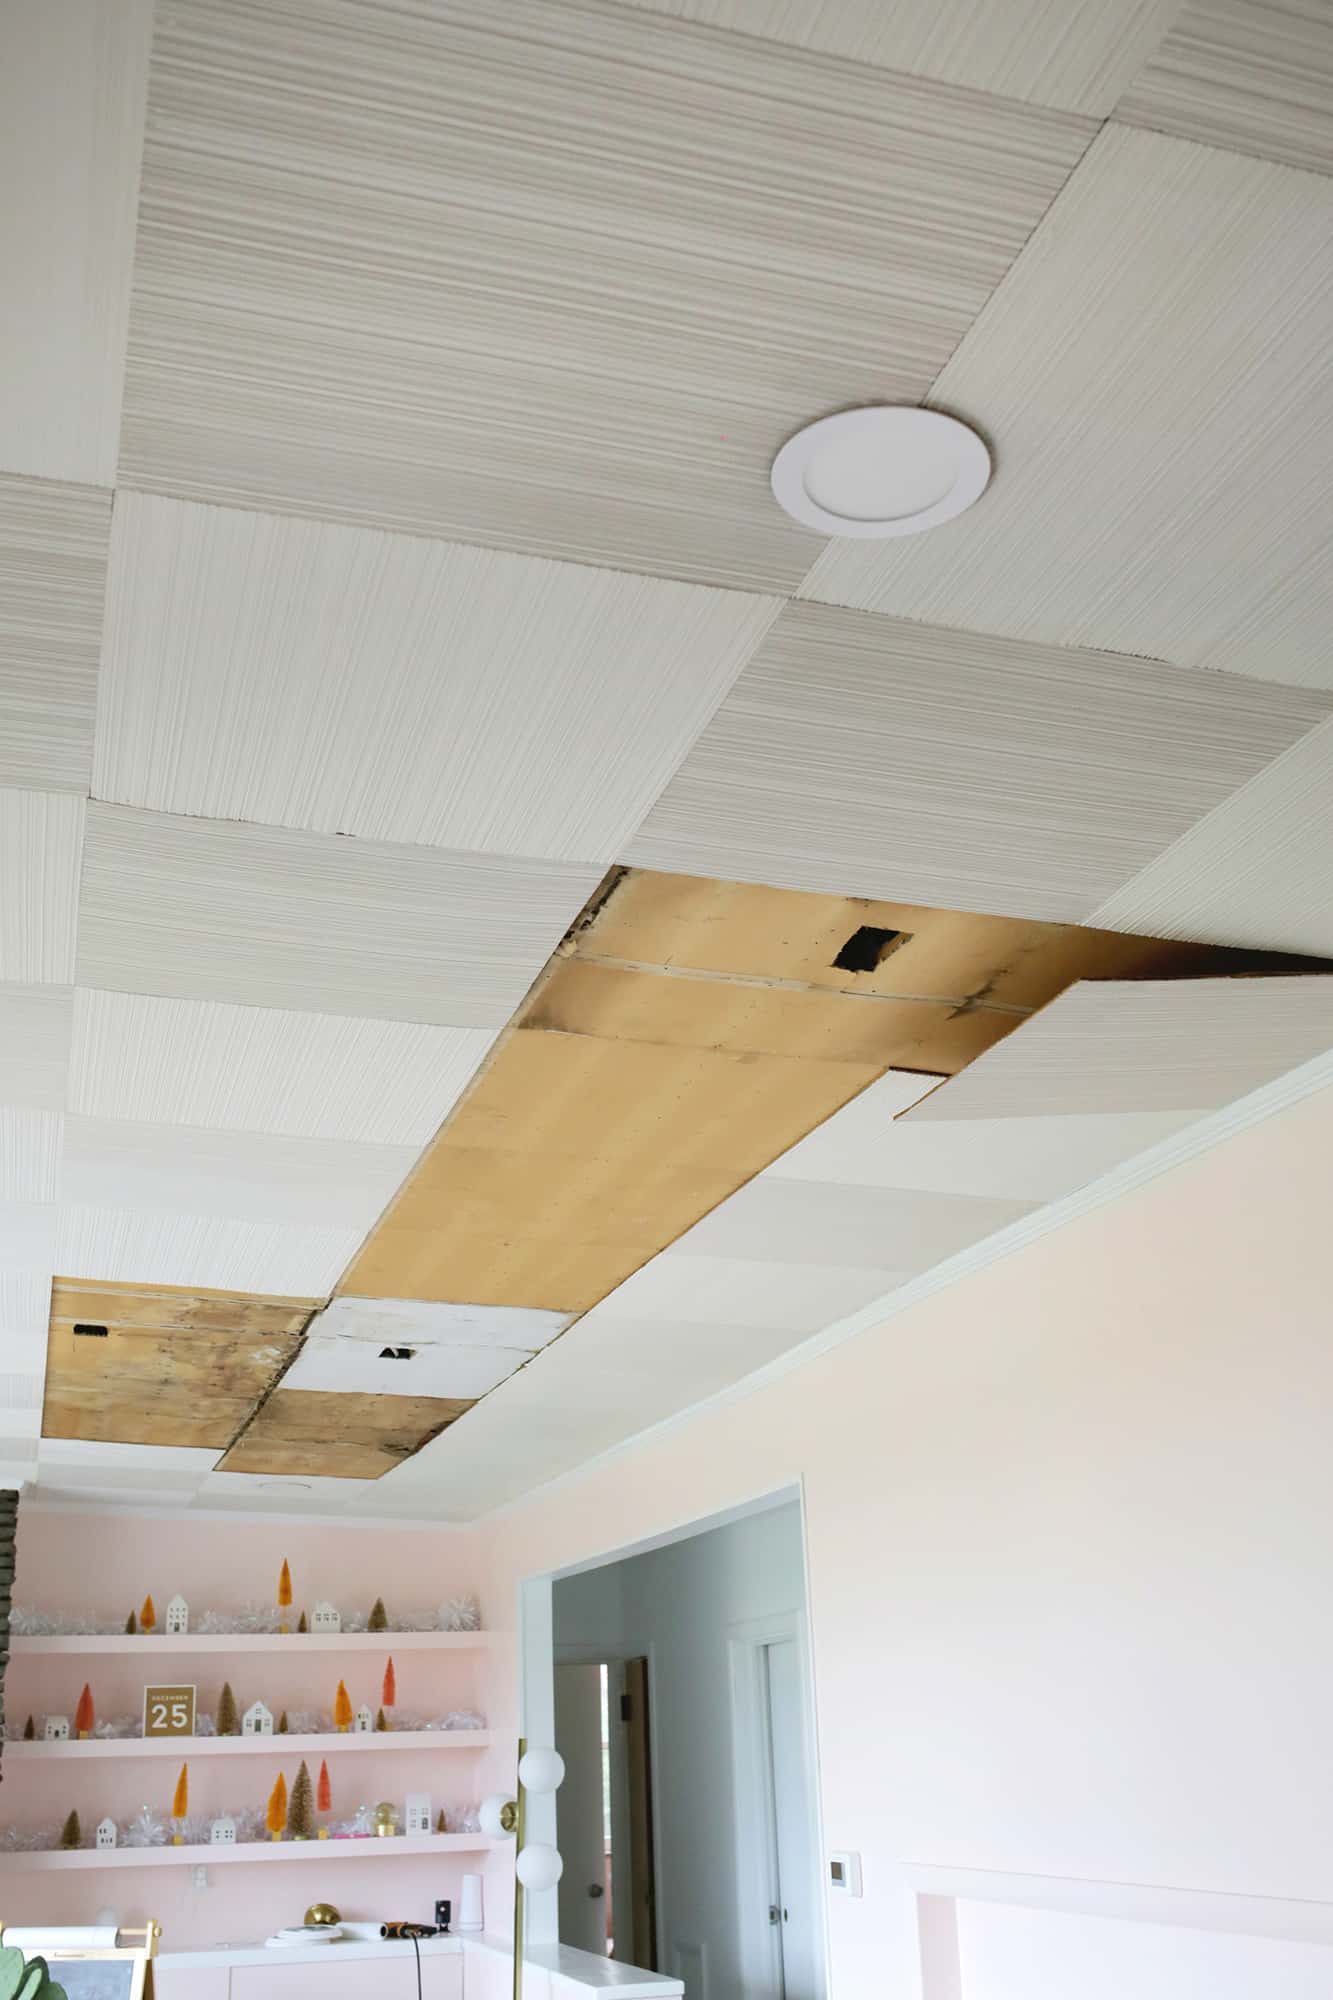
So, the question was, do we replace and repair those panels or replace the whole ceiling with a traditional drywall ceiling? In the end, we decided that it was more budget friendly to replace the panels and put some elbow grease into giving the ceilings a much needed refresh. We actually have two sizes of panels in our home—a larger panel in our entryway and living room, and smaller panels in our hallway and bedroom. Some rooms in the home have “regular” drywall or plaster ceilings, so they didn’t do the panels everywhere, or if they did, I guess they changed some of them to drywall eventually. We also found a stack of extra small panels in the basement, so we only needed to order extra larger panels to get started.
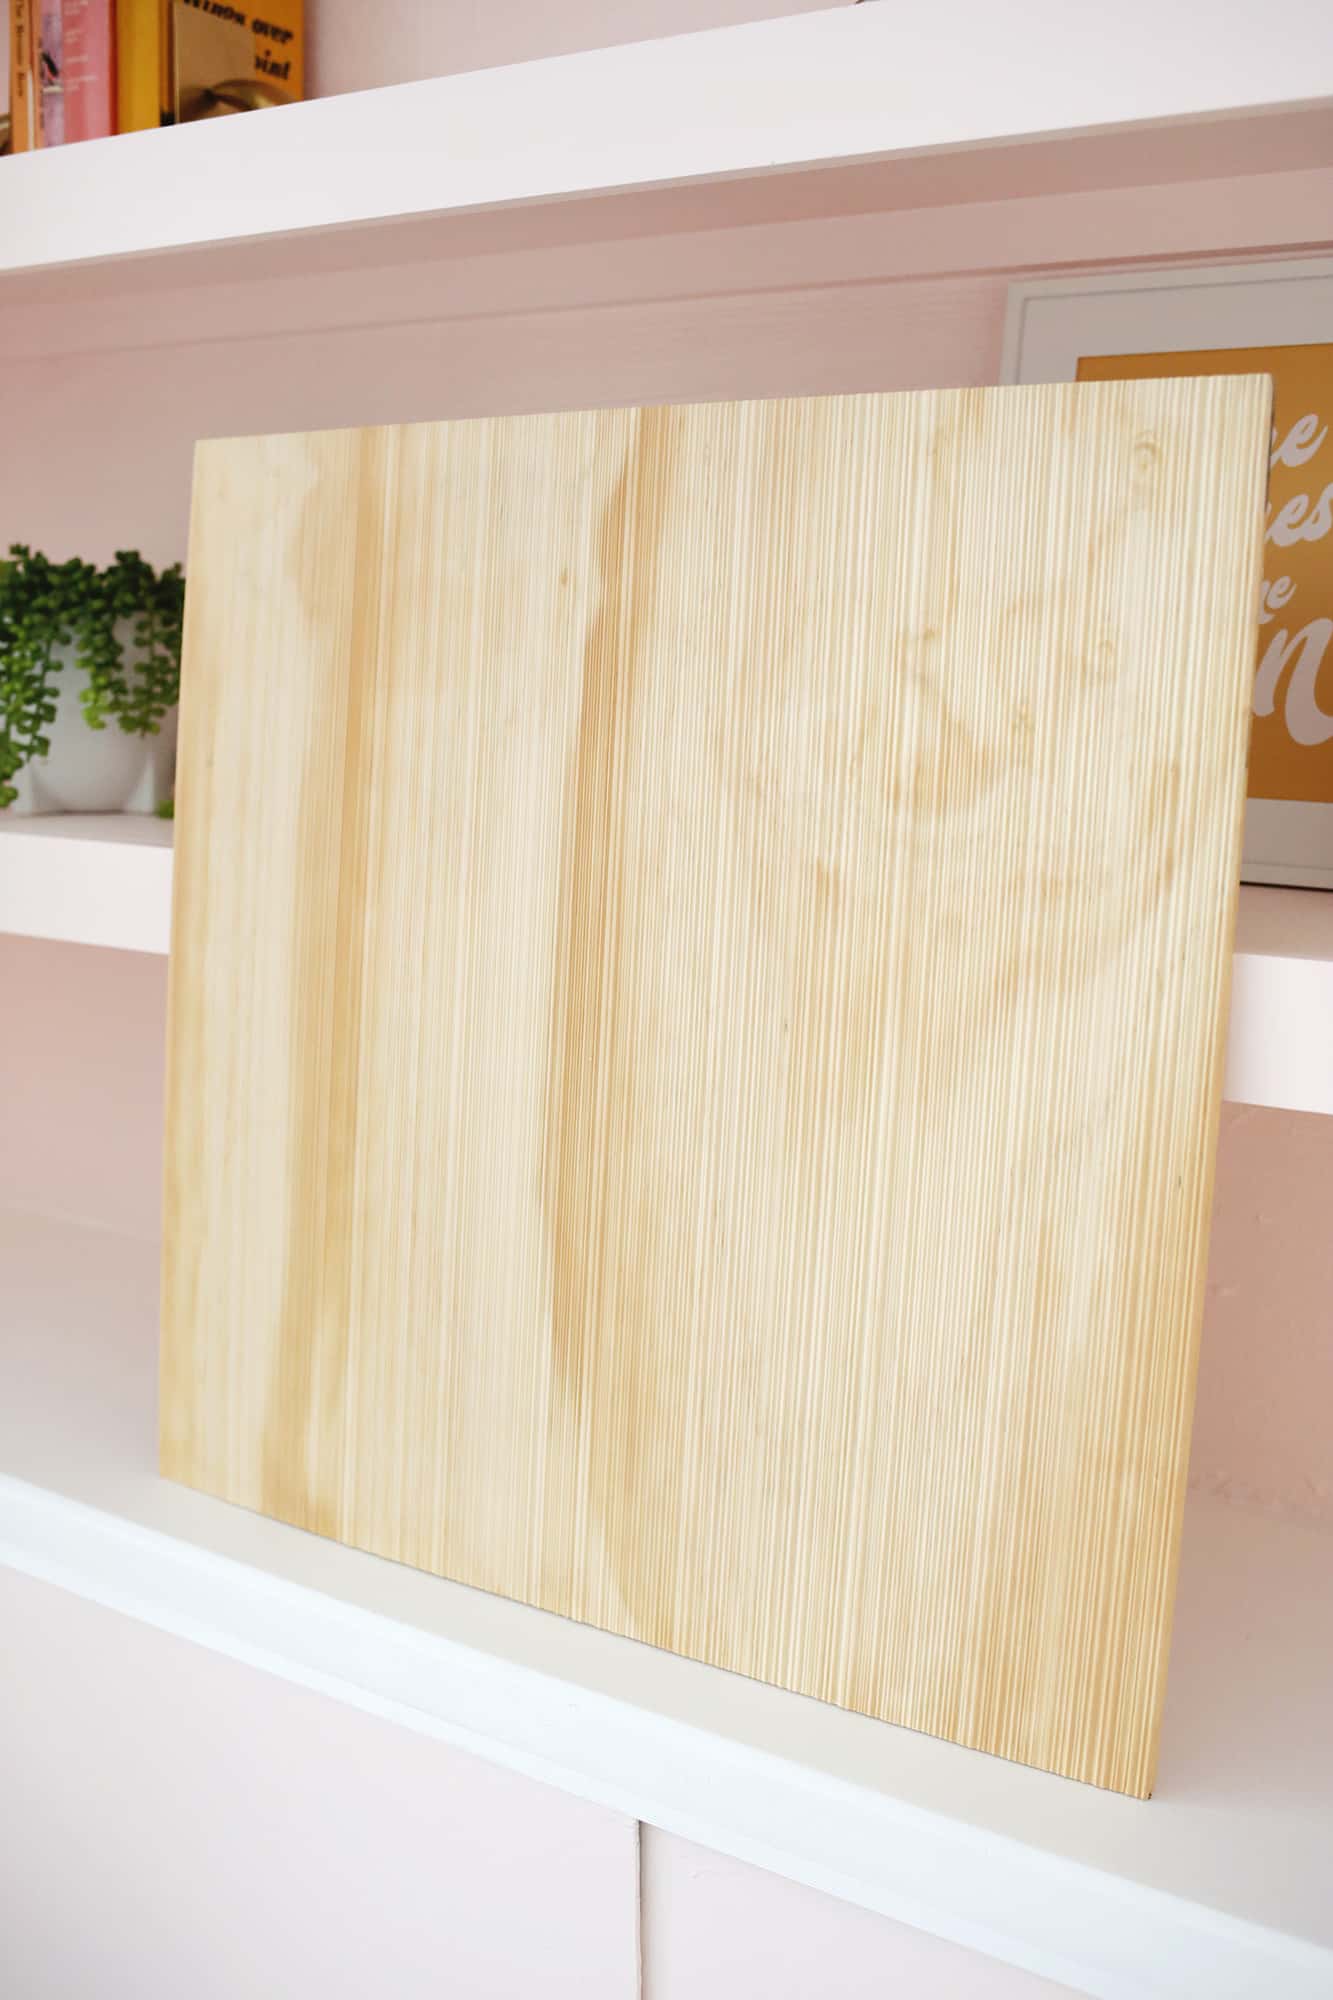 Here’s what a new unpainted panel looks like! Once we ordered some new panels from this site, we set about pulling down the damaged ones with a crowbar (very carefully so as not to damage ones we wanted to leave up) and fixing any areas that were in conflict with the lighting we wanted to install. We ended up replacing a few tiles where they had cut a hole for an old light fixture that needed to be smaller for modern fixtures (took down those panels and used a jig saw to cut smaller holes in new panels and then reattached the new panels so the opening was smaller) and we moved the location of a light in our room, so we had to move some panels around there and cut a new hole in one of those panels as well. Since we don’t have an attic crawlspace in this house, we figured this was also a good time to add some lighting while some of the tiles were down (and you could more easily get to the wiring). We also added a light box for a chandelier over our coffee table and more recessed lighting in the corners of our living room before putting the tiles back up.
 We didn’t have any warping from water damage on the small tiles in the hall and our bedroom, but there was still staining/discoloration on them and the seams between the panels were pretty noticeable. So we caulked each gap between the tiles with some basic acrylic caulk (I like this one because it dries fast and you can paint it quickly) and then painted the tiles with a stain blocker (I used this one because it’s non-toxic and VOC-free) before adding a flat coat of white paint as a final step.
I highly recommend using a thicker nap roller on paint projects like this (or anything else that has some groves or lots of texture) so you can easily get the paint into the little grooves, and an extendable painting pole is basically a must for all ceiling painting. We also found that when caulking the gaps between the tiles, a damp kitchen sponge was actually the best tool to smooth out the caulk. So we would squeeze a line of caulk into the gap, smooth it down with a wet finger and pull off the excess, and then smooth out what was left with the sponge in the direction of the combed lines. The most annoying thing about all of this (besides it all being on the ceiling, which makes everything harder) is that you have to always paint or smooth things out in the direction of the grooves, so you are constantly switching directions at every seam of every square—definitely not a fast process!

 Once we had all the small tiles back up, caulked, primed, and painted, we moved to the larger ones in the living room and attached the new tiles with a nail gun (electric brad nailers like these are really budget friendly and you don’t need an air tank for them! They make projects so much easier) to close up all the openings where the damaged tiles were. Then it was back to more caulking, priming, and painting until the whole ceiling was done! It looks SO much brighter and fresher than when we first moved in—love it!
We didn’t have to mess with the crown molding in the living room and hallway, but we did have to pull down and install crown molding back into our bedroom.
Like I said, it would have been much easier on our part to hire someone to pull them all down and put up drywall instead, but a lot more expensive (our costs were several gallons of paint, caulk, and $300-$400 of new tiles) and it’s a fun detail to have a (mostly) original vintage ceiling in the home to give it some character as well. So next time you see a combed checkerboard ceiling or wall in an old home or on Pinterest, you’ll know exactly what it is! Would you have kept the ceiling or changed it out to a drywall one? Let me know below! xo. Laura
Credits // Author and Photography: Laura Gummerman. Photos edited with A Color Story Desktop.
P.S. Here’s the matching stand planters on the fireplace hearth and a similar fluted planter here!
Thank you thank you for this article/story. I have these exact same ceiling tiles in my kitchen/dining area, which was an addition to the house back in the 50s. They’re stained very dark and I thought that was the way they came and I had no idea what they were called until I stumbled across your article. So now I’m so much more Informed about how to replace and or redo these. It’s so very dark in there. I would love to paint them, but I do have some damage to some of them from a leak above the cabinet. Nothing major. Anyway, thanks so much again for this article.
My Mom and Dad put these in our home when they built it in 1957. I love the look, but it makes the house so dark. My sister and I inherited the house and are taking them down to put up regular ceilings to give us more light. I am trying to figure out what I could use some of the squares for to save the history so we can look at them and remember.
Ceilings are such a pain to fix and you did such a good job! It’s so much work to fix stuff like this, but so satisfying when you do. It looks really great!
I have these same ceilings in one of the rooms in my house. Our house was built in 1949 in South Louisiana, but the ceiling is in an addition not sure what date Everyone when they see the ceiling comments on them. I agree that painting them is not an easy task besides being the ceiling , the grooves make it so much harder. I actually need to repaint mine because I painted them wrong. I did not go with the grooves so you see the roller marks. Thanks for the post it was so fun to read and say “I have that”?
Oh Laura the ceilings look fab!! I would 100% keep them too, I think they look very cool and it is little vintage features like this I would love to have in my home! I’ve just painted a whole house worth of ceilings so my arms feel your pain ♡ homes are truly a labour of love!!
This is absolute magic from you! I have never seen a more wonderful post than this one. “Weldtex” also called combed or striated wood. Most commonly produced in the mid-century is 3/8” thick pine plywood. You may have seen this in an older home but never knew what it was called. Most often used as an interior panel and as ceiling tiles in the plywood version (pine only).
Glad you liked the post, sounds like you know all about the tiles!
Laura
I’m so glad you kept this original feature and that they’re still made so that you could repair them affordably! It’s such a unique feature, it would really be a shame to see them removed.
This is so cool! I love when buyers of a vintage home go through the effort to research and restore the small details of the home’s era. This is my first time seeing these tiles but now that I’m aware of them I’m sure I’ll start noticing them!
I really like that you chose to fix and keep the ceiling as is! It’s nice to see that awesome bloggers like yourself have to make the hard decisions, with money being a factor. I can definitely relate! My husband and I bought our first house this year in Central PA, and there were so many different types of tiles in our ceilings. We chose to drywall the ceiling that was in the roughest shape, pull the tiles off of the ones that were in decently bad shape and fix the plaster they were stuck to (why you would tile block over a perfectly good plaster ceiling is beyond me), and keep and refresh the tile ceilings that were in good shape. All in all, I’m super happy with how they all look. Thanks for sharing your journey through the ceiling!
Oh man, sounds like you definitely know about ceiling repair also! Glad it turned out well in the end!
Laura
I really love the tiles, and am glad you kept them. I could not pull this off in our home, wrong era and it would look like I was trying way too hard given my personal home style does not lean towards this look, but I really like seeing it in your home! If we ever end up in an era of home that this style would fit I’d totally consider it!
Glad you like them!
Laura 🙂
I’ve never heard of these tiles before, but I live in an area that doesn’t have a lot of homes built before the 90s. I think it’s so cool that you saved them!
I hadn’t heard of them before either but they are looking pretty good now that they are cleaned up!
Laura
Now I know that they’re actually made of wood, I’m on team ‘keeping em’ all the way. I used to think they were some kind of fabric, almost like a carpet tile, or like the ceiling panels you find in offices ?
I thought they were fabric too at first from the photos! They look more solid in person as well…
Laura 🙂
I can’t believe they are all white. They truly look like two colors. I’m so glad you saved them and gave them new life!