 Lately, it feels like the most first world problem in my life is too many cardboard boxes! Between moving to a new home and the convenience of online shopping (lookin’ at you, Amazon Prime!), my recycling pile can get out of control.
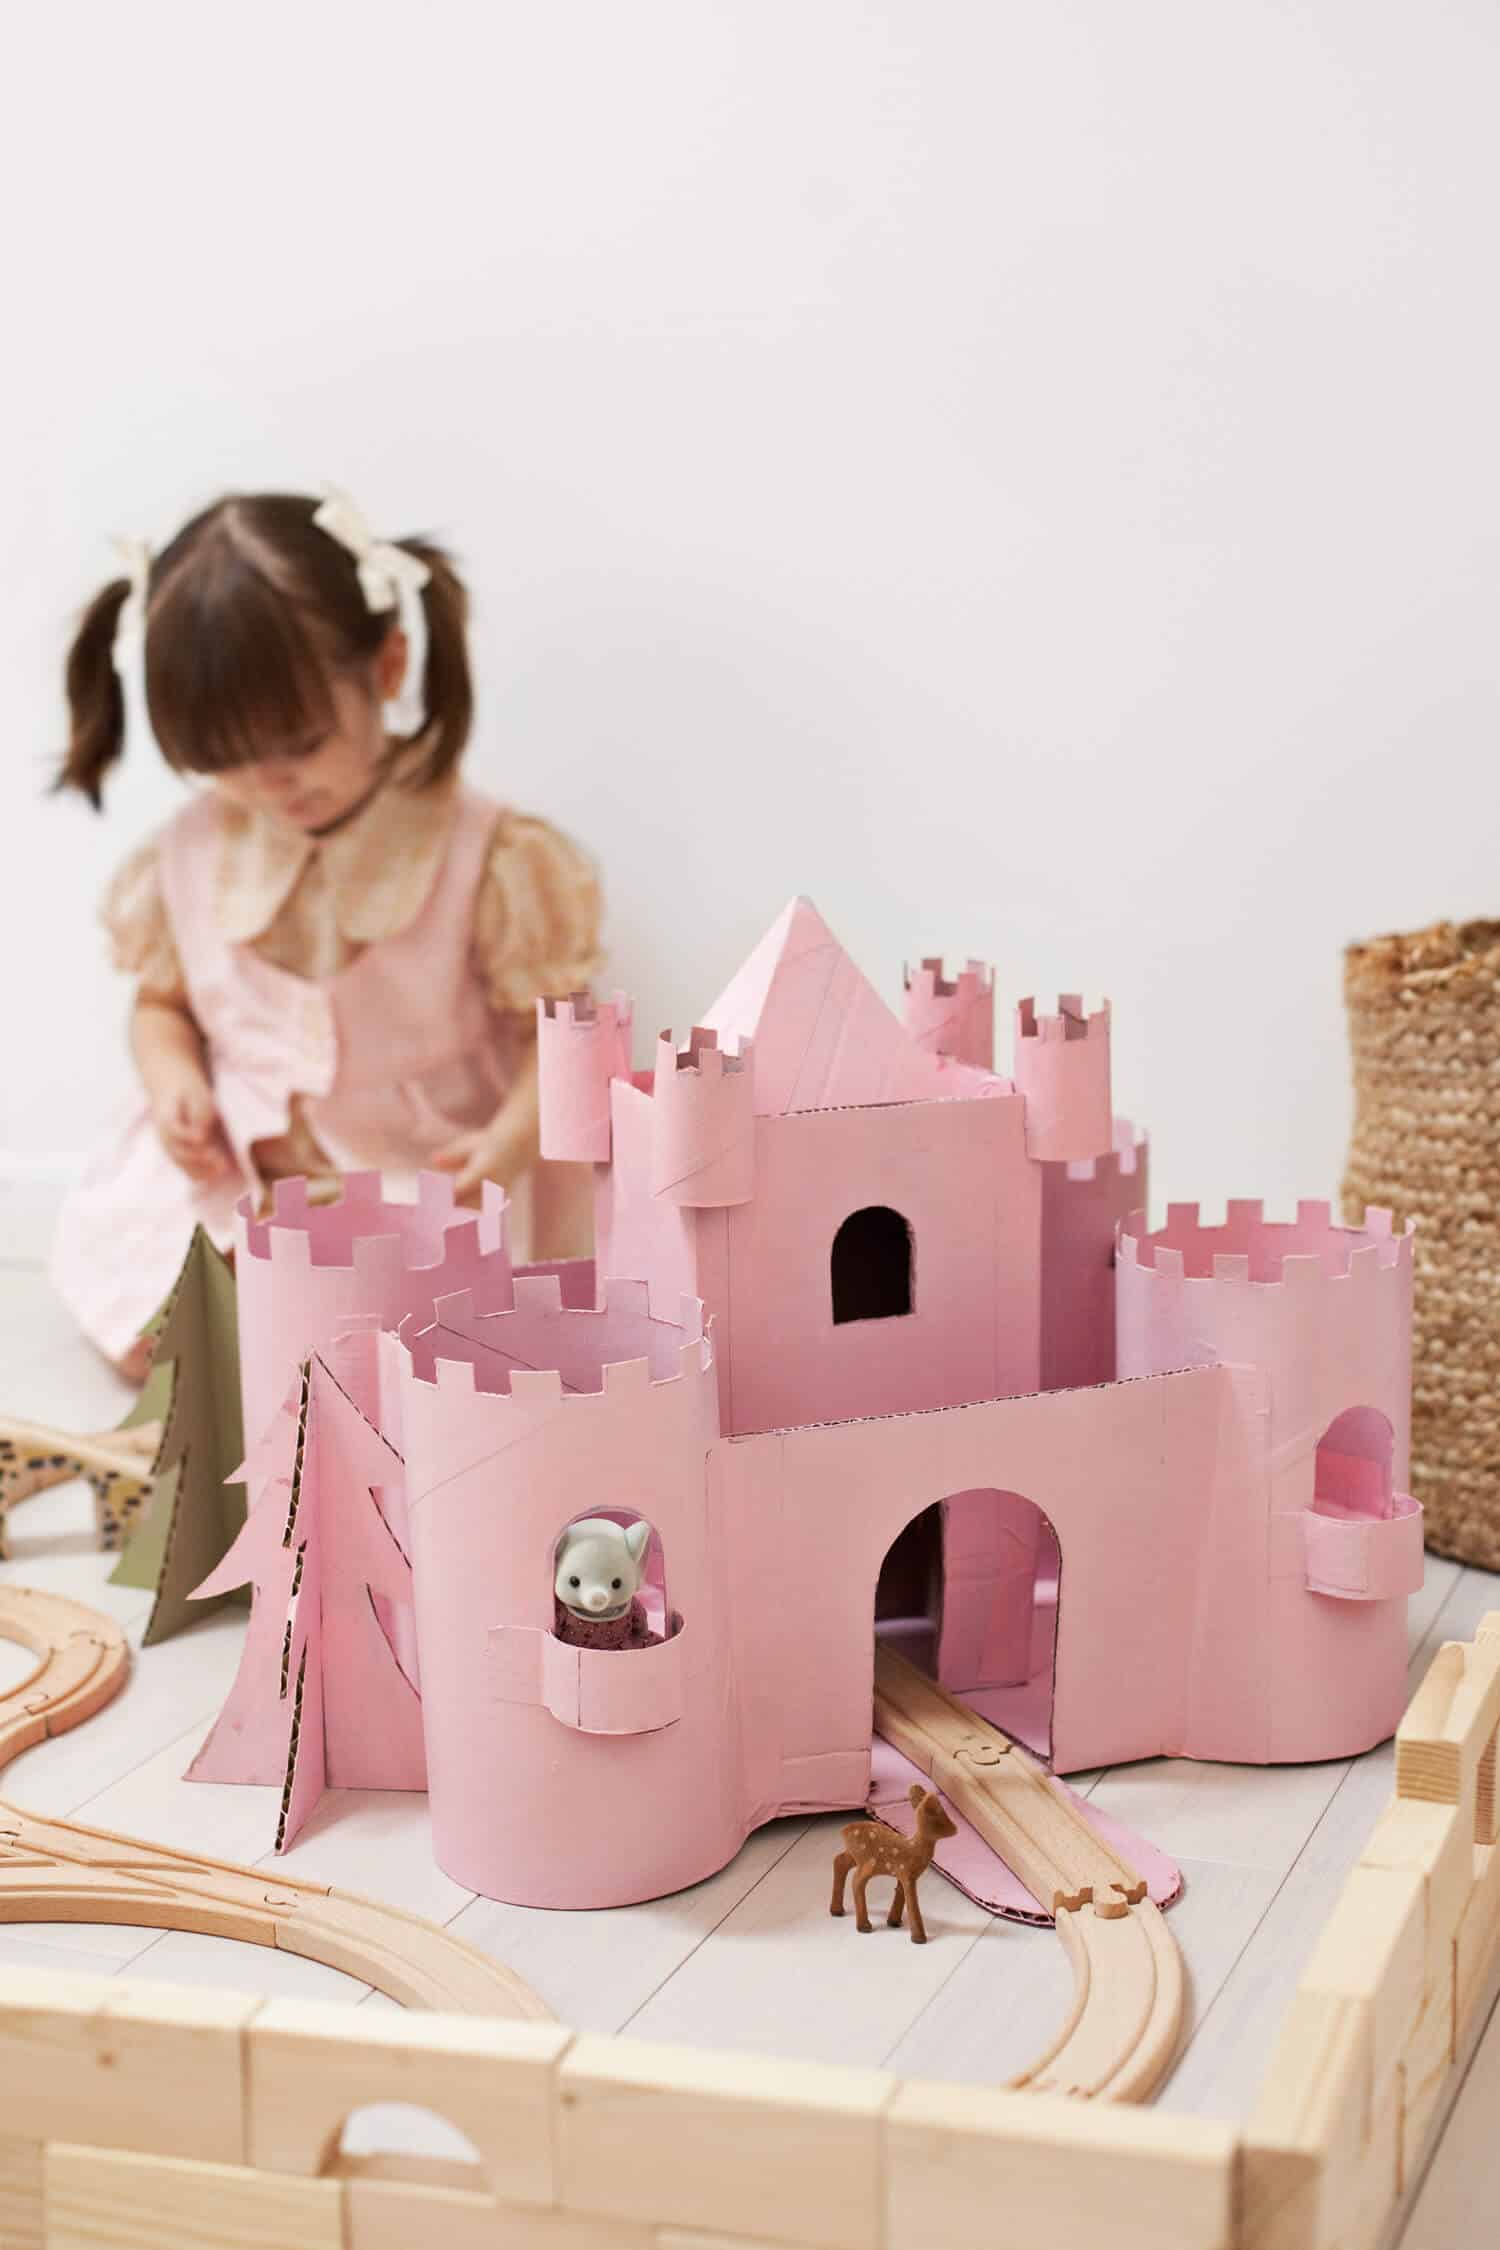
So my girls and I decided to do something different than just recycling—we upcycled some of our cardboard waste into a fun and magical toy castle!
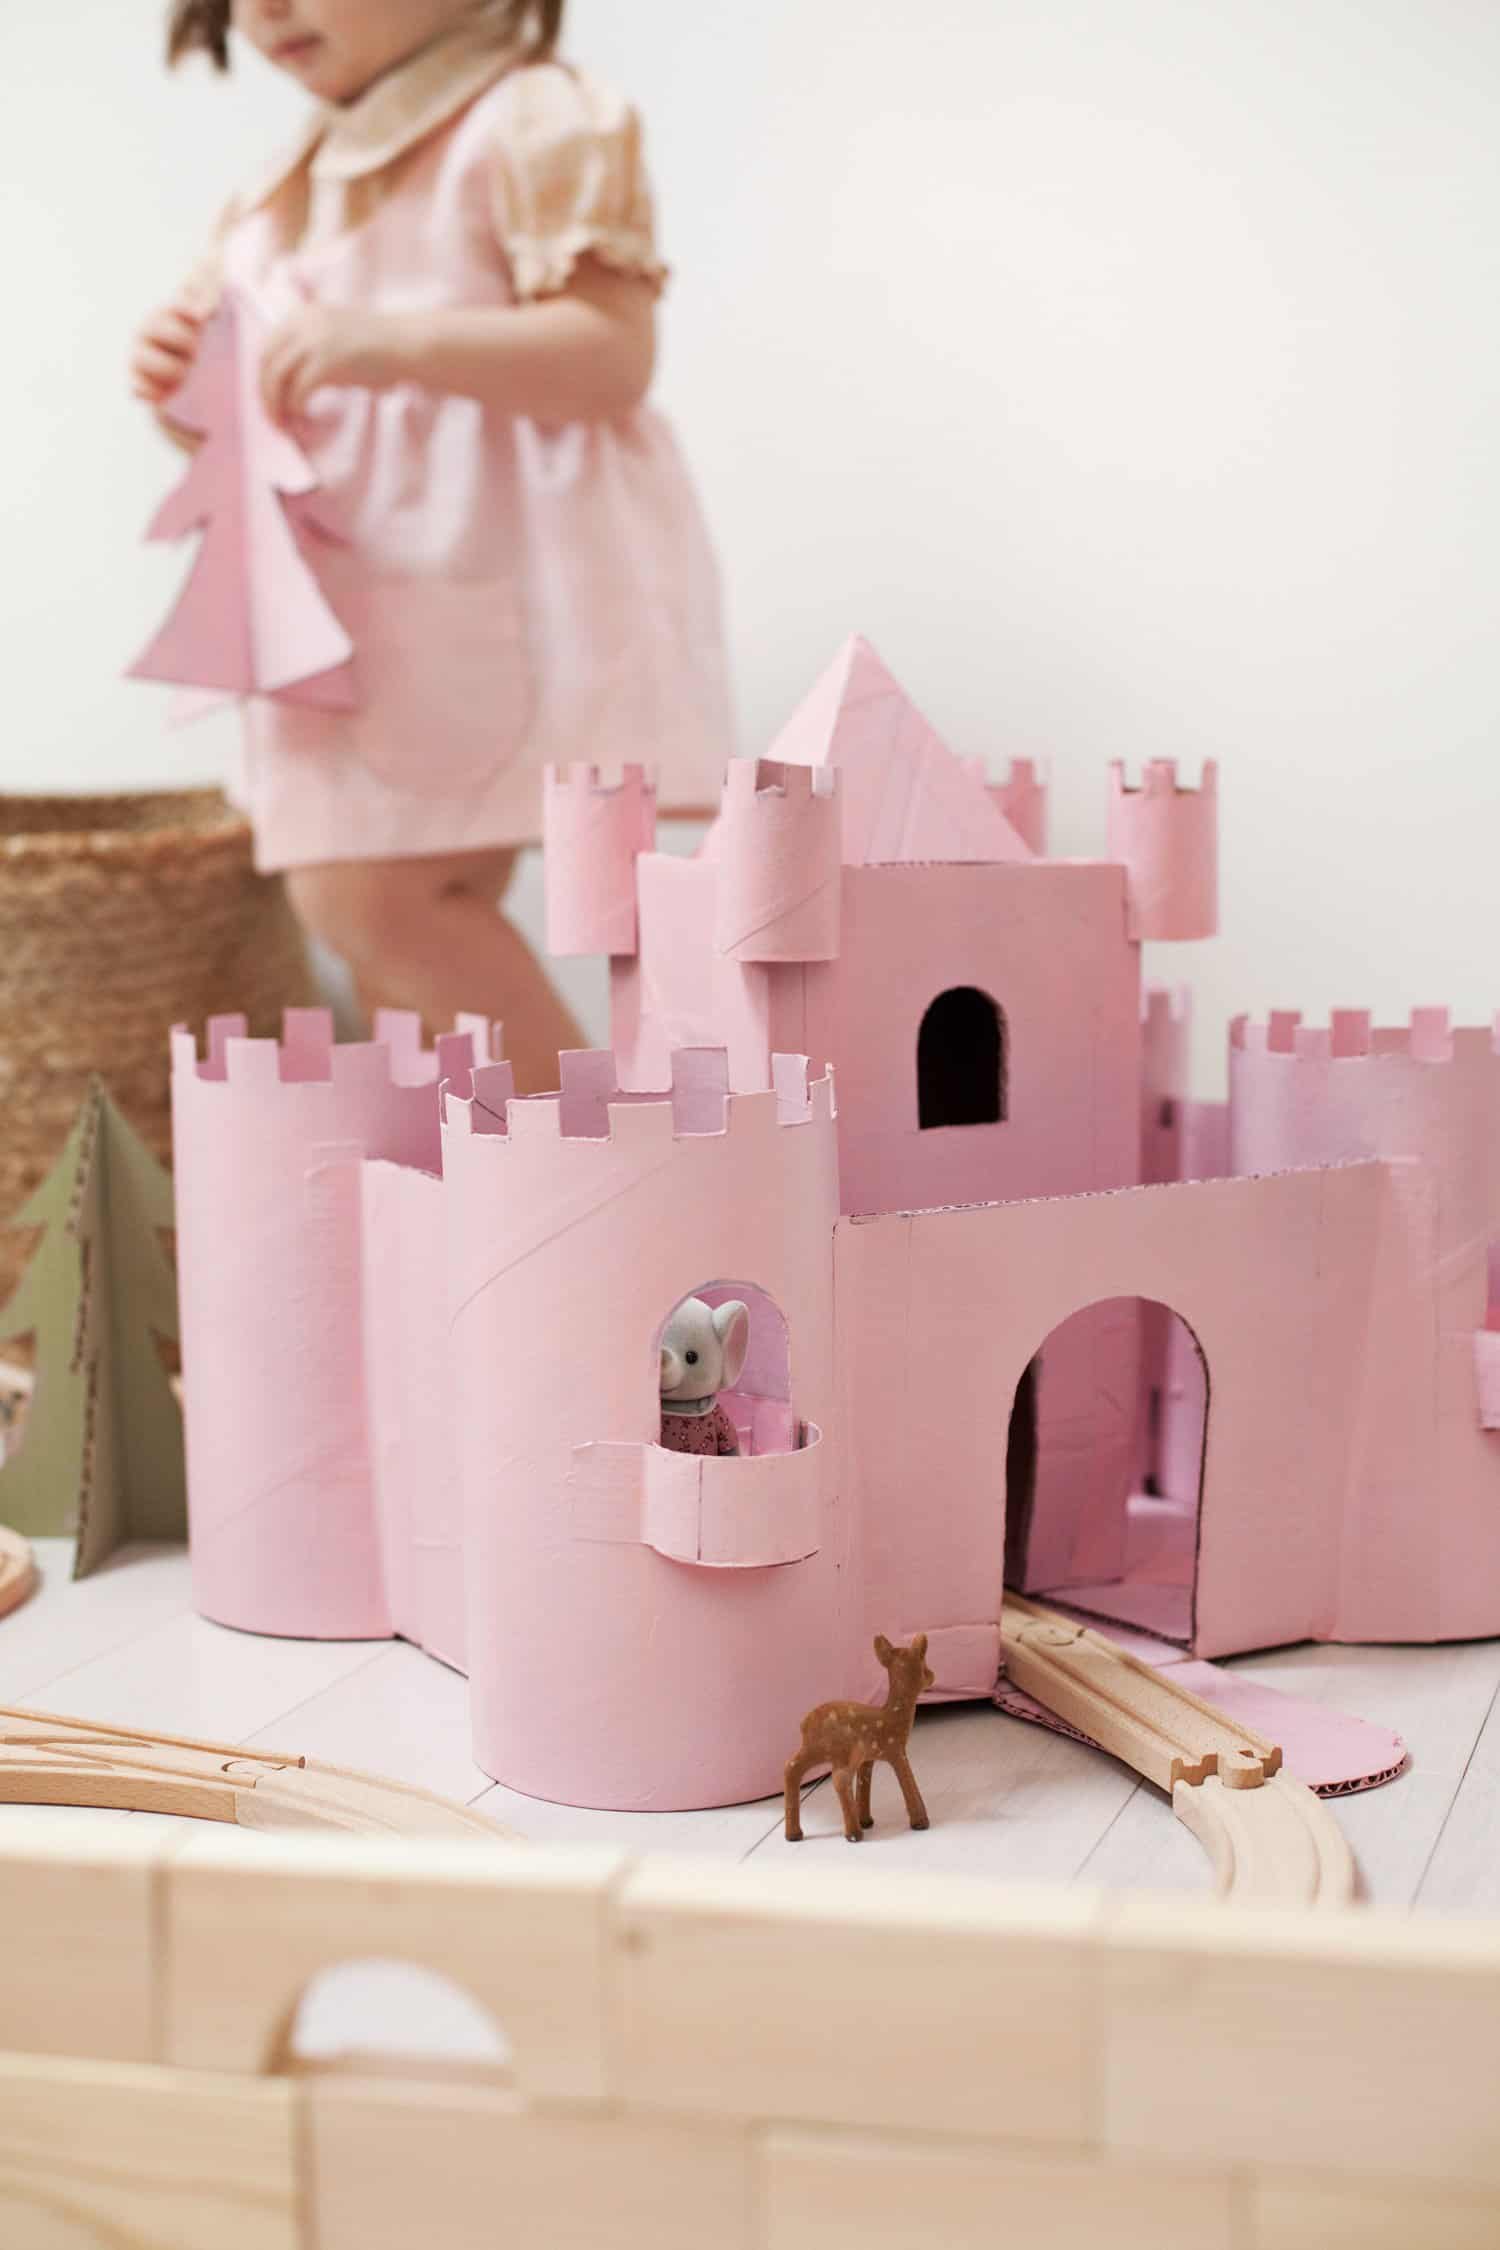
The girls have been playing with their new castle for hours every day, and my oldest daughter has plans to transform some of our other smaller boxes into an entire hamlet. And I’m definitely game!
It’s a bit addicting once you realize how easy these cardboard structures are to make, and how loved they are by children. Who needs to spend a lot of money on fancy dollhouses? (Well, I do, actually. But cardboard is pretty fun too!)
 To make a cardboard castle, you really just need a series of boxes and a little imagination. If you haven’t been saving oatmeal canisters as I was, you could make square castle turrets rather than round ones by using milk cartons or other tall and narrow boxes.
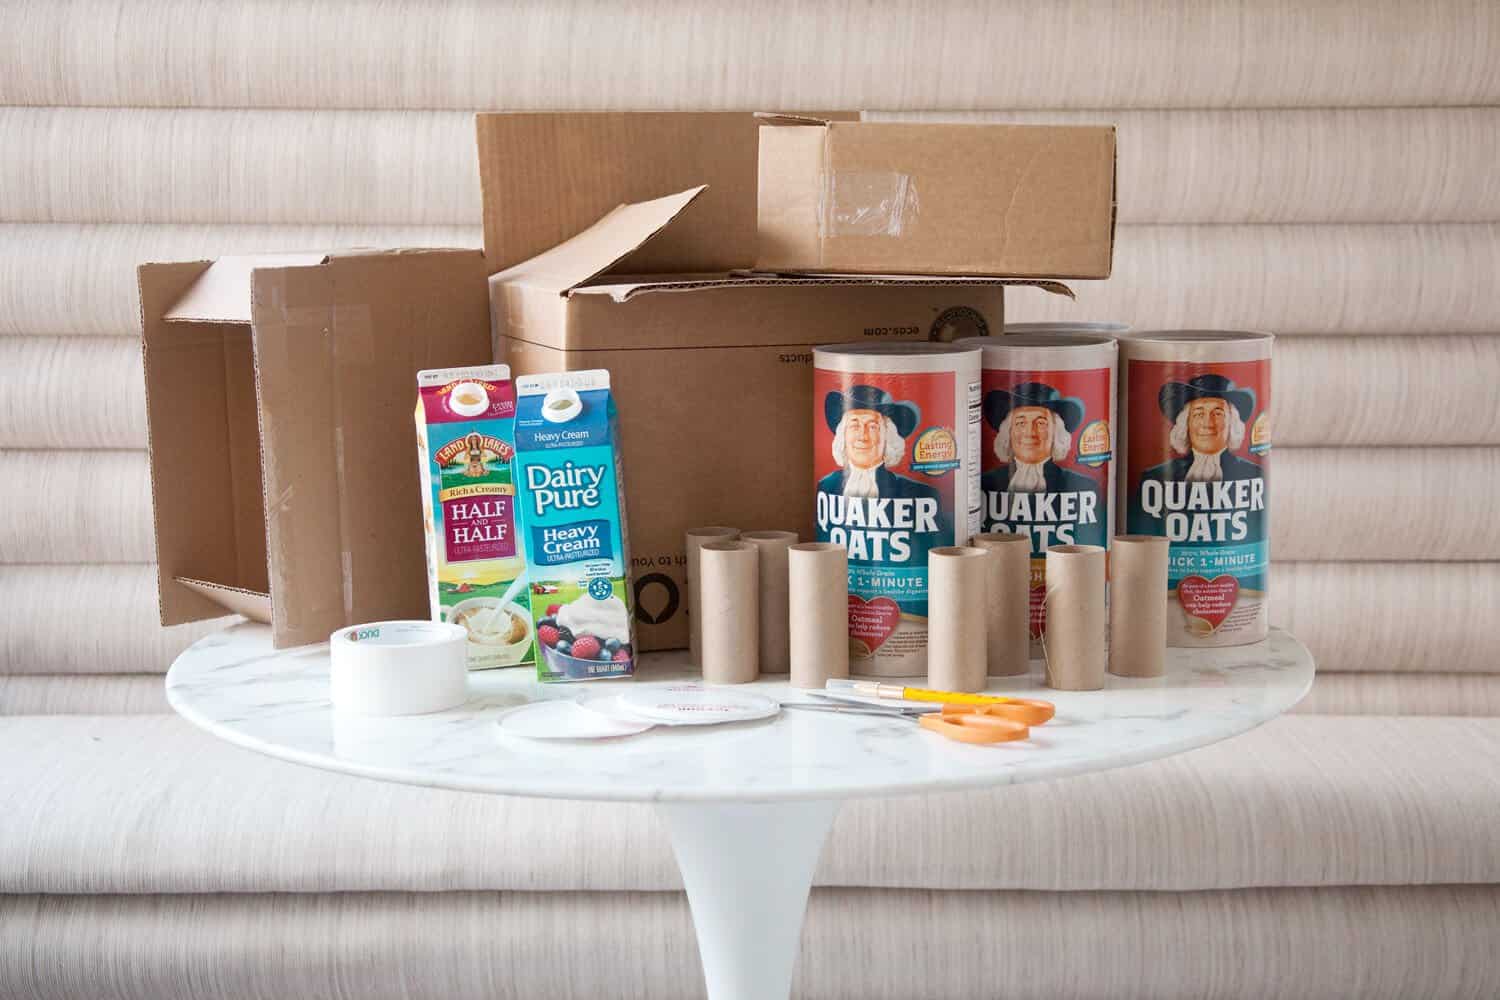
Start saving your paper towel rolls and bathroom tissue rolls! They’re great tools for castle building, and other kiddo crafts too. Here are some of the supplies you’ll need to make this exact castle.
Materials:
-4 cardboard canisters (like these oatmeal ones, or even from bread crumbs or other food packaging)
-6 TP rolls (for tower turrets and balconies)
-1 medium-size box (for main castle walls)
-1 narrow/taller box (for center tower)
-duct tape
-paint (acrylic craft paint or spray primer + paint)
Tools:
-craft knife with fresh blades
-scissors
-paint brushes
-marker/pen
 Step One: Make the corner turrets of the castle. Use a sharp craft blade to cut off the top and bottom portion of the cardboard canisters.
Save the the canister bottoms and lids to use in other steps. Draw the pattern for crenelations of the turret, then carefully cut them out. I made the vertical cuts with scissors, then the horizontal cuts with a craft blade.
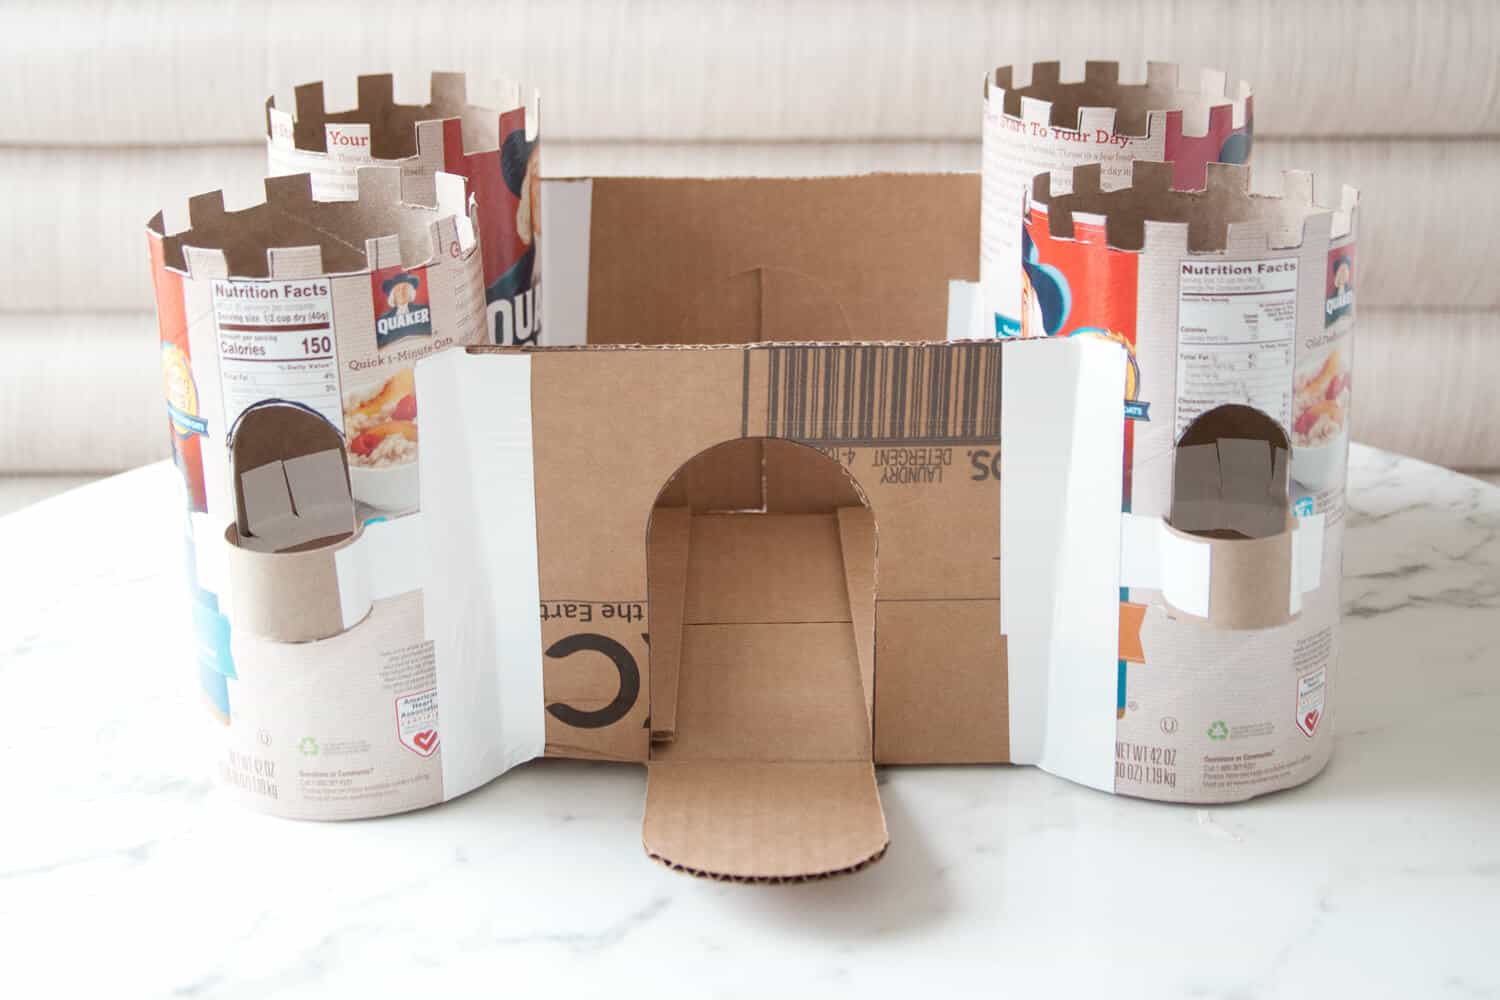
Step Two: Cut out an arched opening on one side of the turret. You may want to make a template for this, or just use the nutritional facts as your guide.
I made a balcony for each of these openings by using a section of a TP roll taped to a floor which I made from the salvaged bottom of the oatmeal canister. After making the balcony, just tape it in place on the turret.
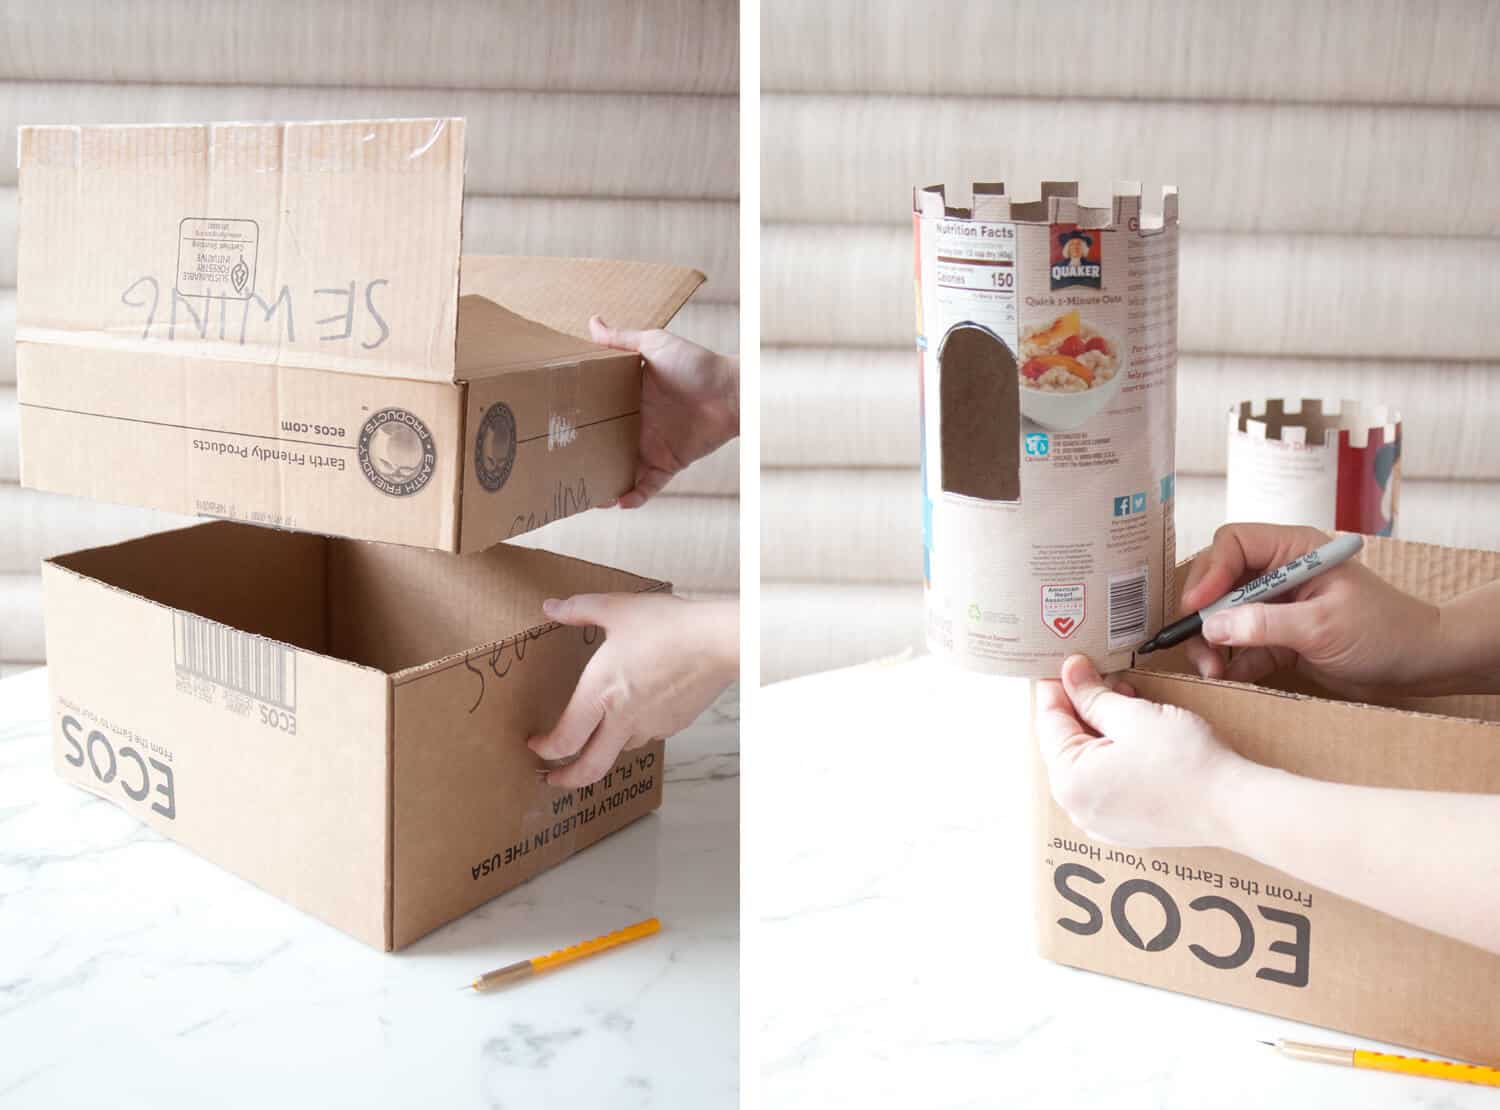 Step Three: Cut down the height of the big box you’re using for the main walls of the castle. I cut mine to be about three inches shorter than the top of the turrets.
Step Four: Mark the place where the castle turrets will join the castle walls. Mark both the turret and the box you’re using for the main castle walls. Make sure your balcony windows are facing the correct direction as you make your marks!
 Step Five: Cut out the corners of the main castle walls where you have just marked, but don’t cut all the way to the bottom of the box.
Also, cut out doorways in the front and back of the castle walls. I did a drawbridge-style door on one side, and double doors on the other. Before cutting the doors, draw the shape nicely, using a circular object as a template for the arched top.
Step Six: Cut slits into the turrets, using the guidelines you marked in step four. This is where the turrets will slip into place at the corners of the cardboard box. The slits should be the width of the cardboard box.
Then slip the turret onto the corner of the castle walls. When the turrets are in place, secure them with strips of duct tape on the outside and inside of the castle.
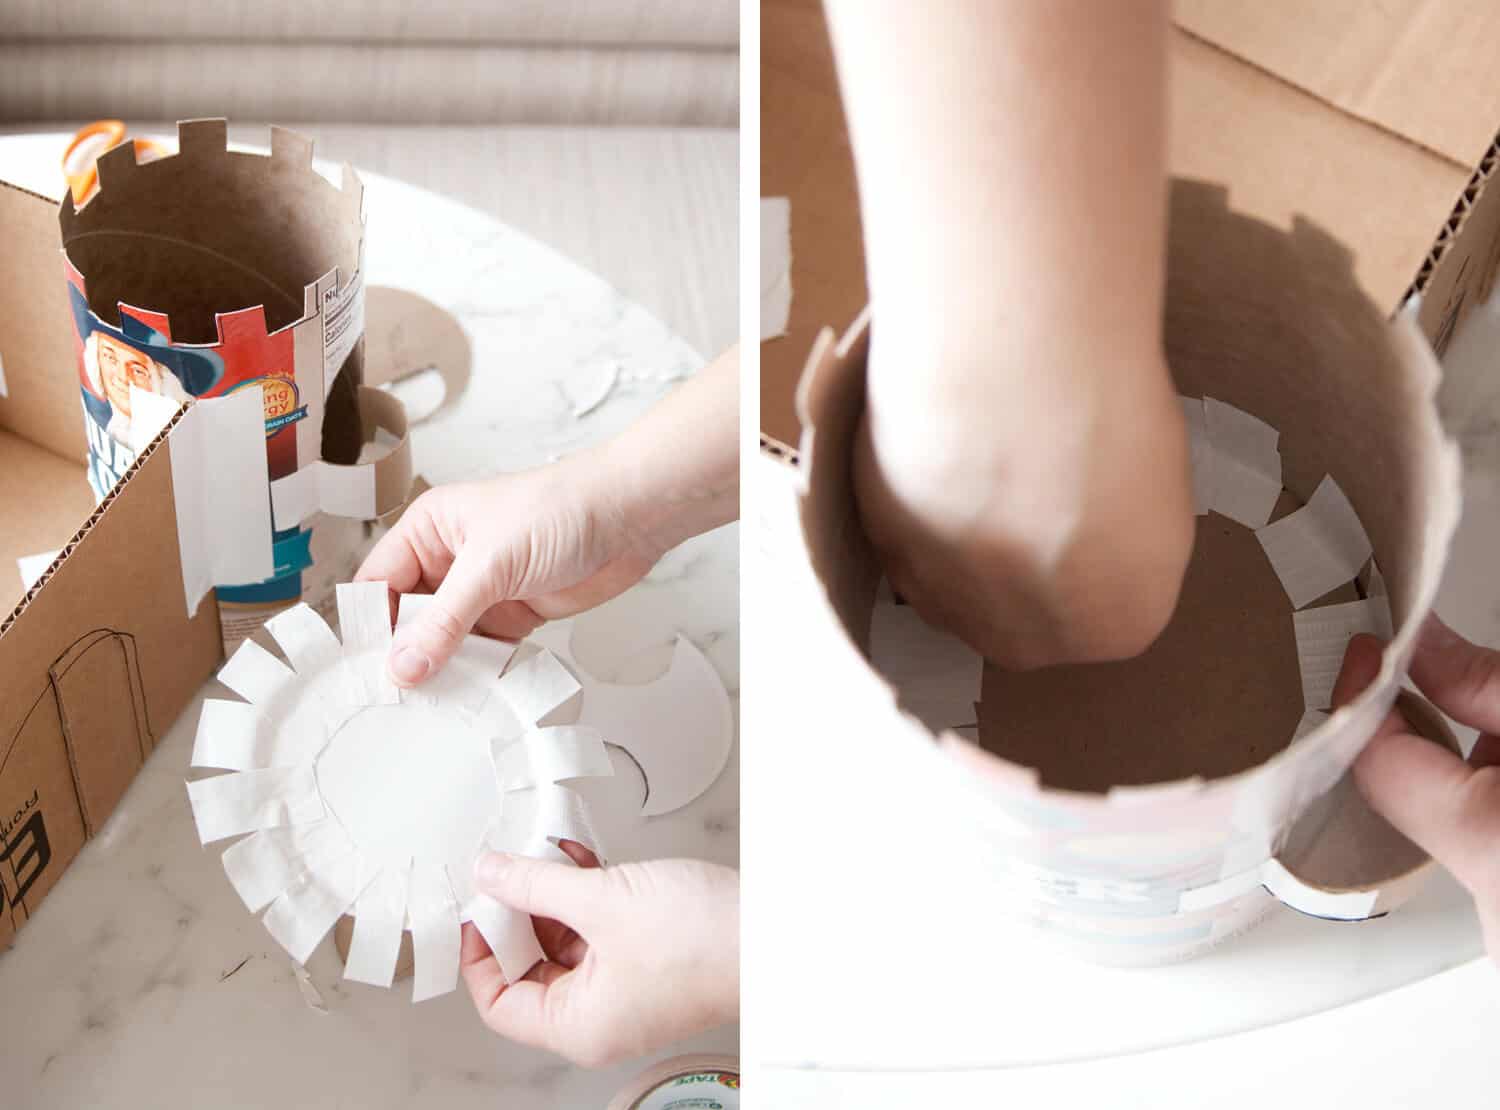 Step Seven: Make a floor for the turrets. I used a combo of salvaged bottoms and lids from the oatmeal canisters to make these floors. I attached little strips of duct tape to the perimeter of the floor, put the floor into place, then pressed the duct tape to the walls to secure it. I lined up the floor with the level of the balcony of the turret.
 Step Eight: After the turrets are in place, complete with the balconies and floor, then you’re ready to paint the castle! If you are using a spray paint, I recommend using primer first. If you’re using acrylic paint, no primer is needed, though it might be helpful for the duct tape areas.
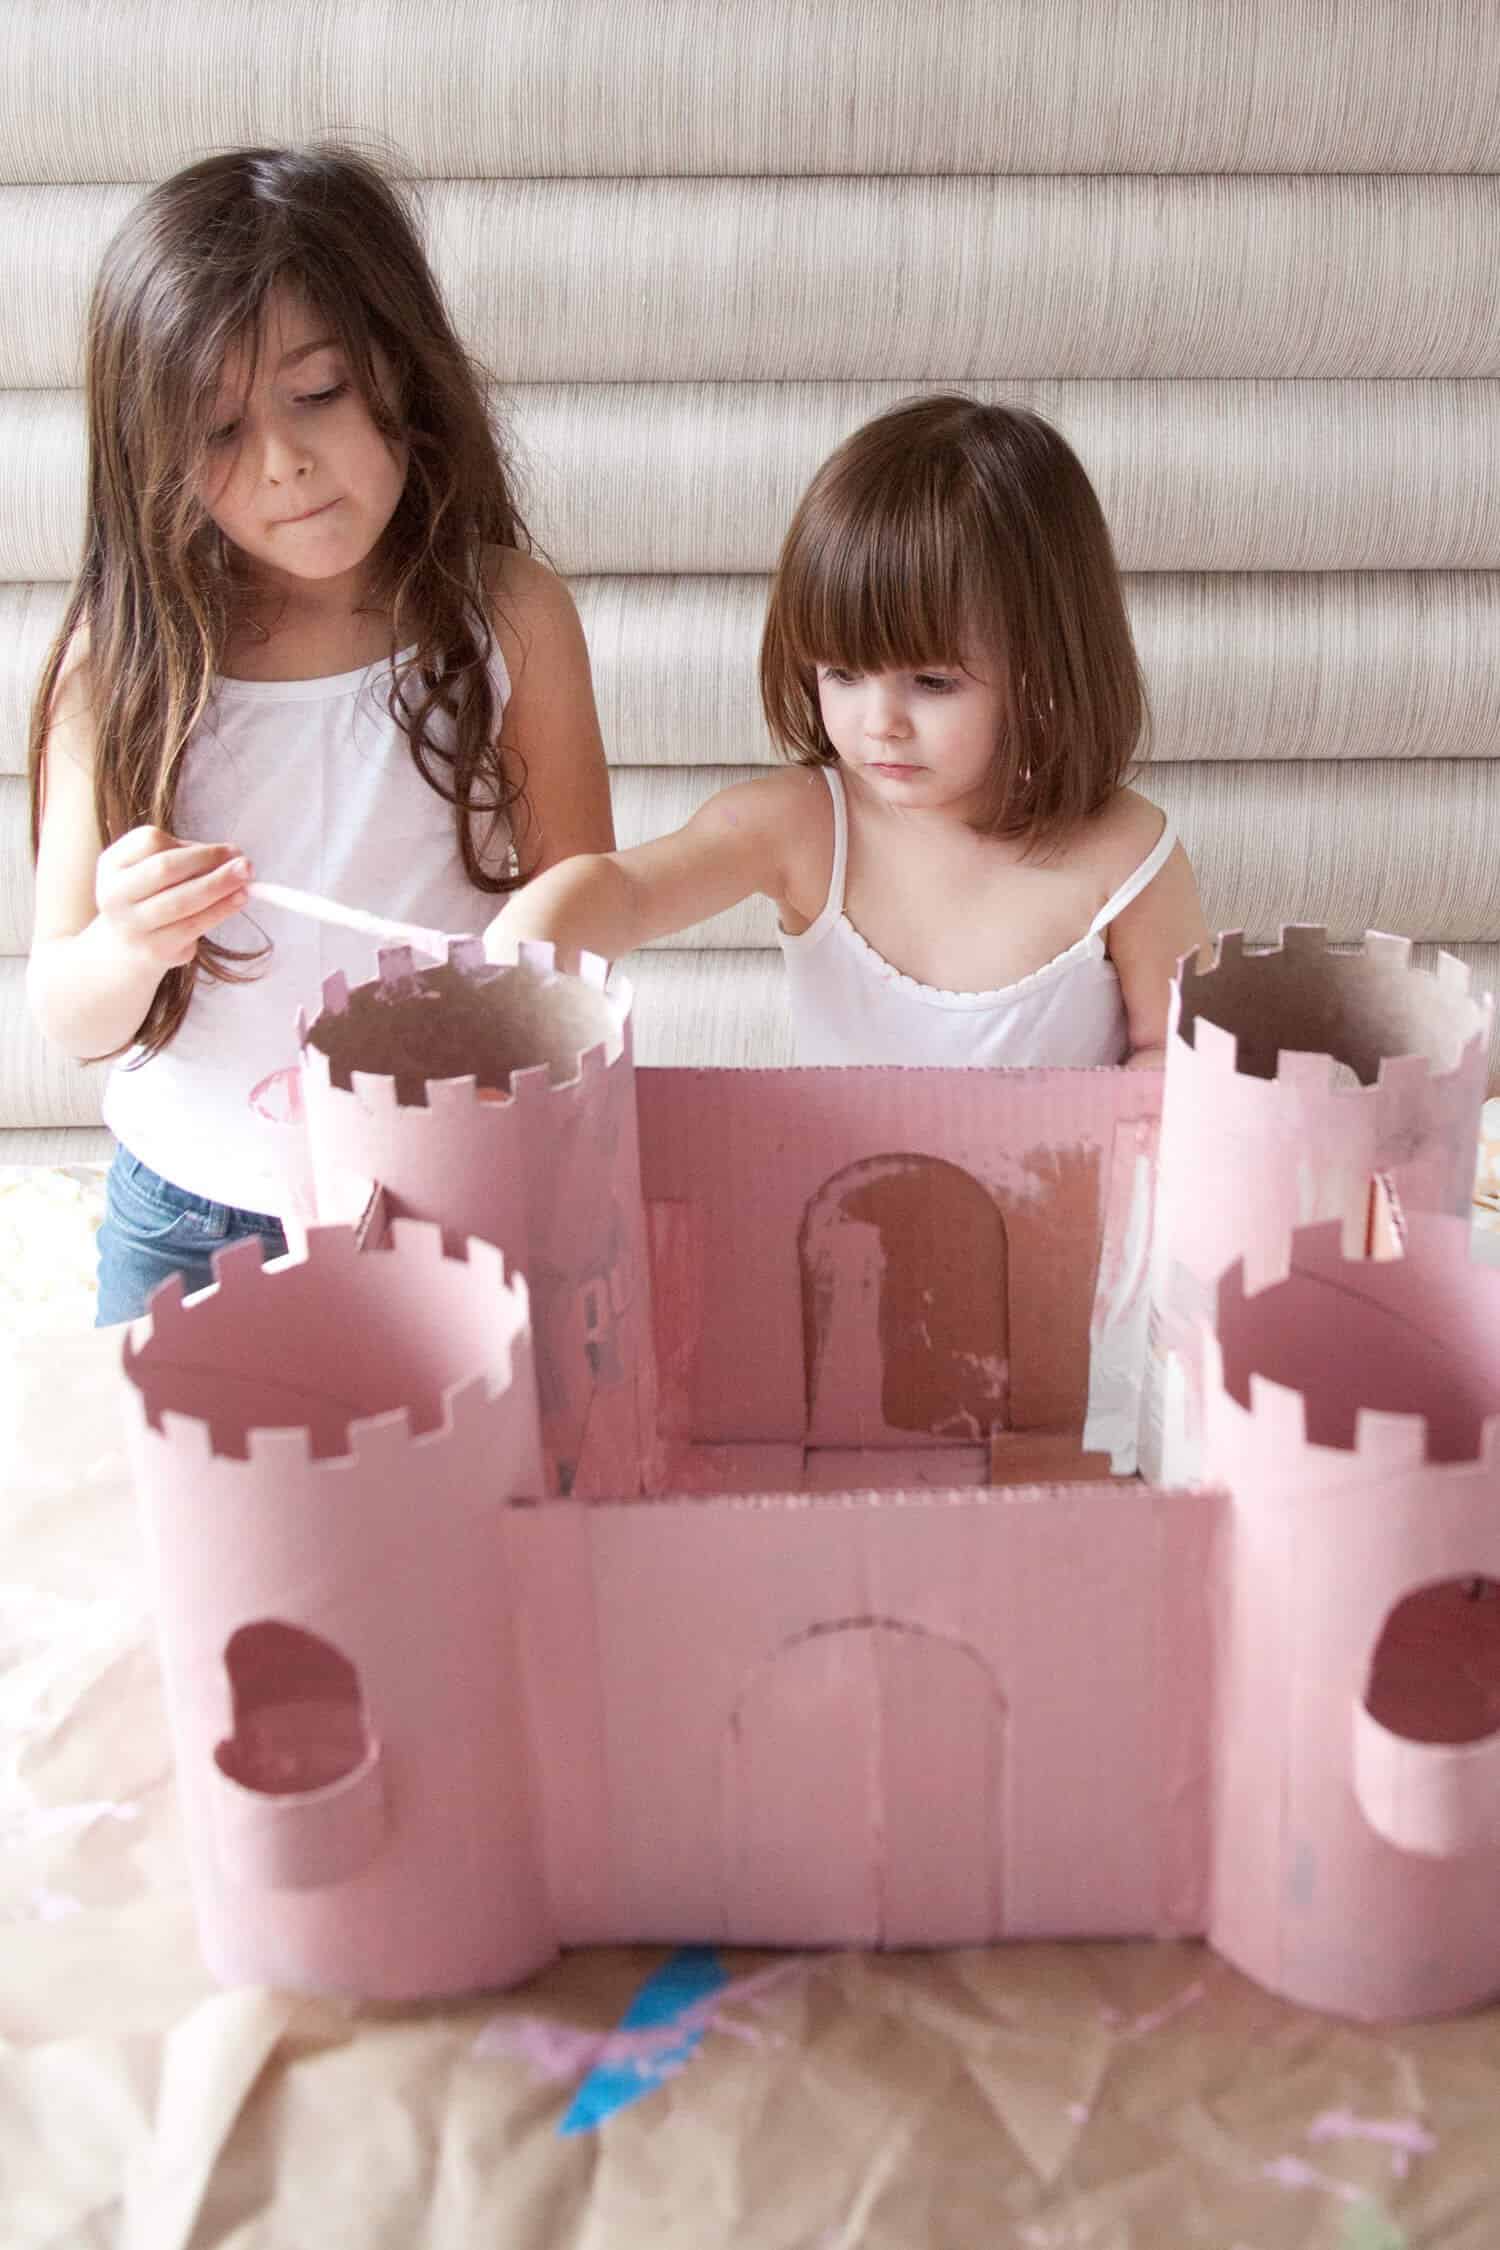 I chose to use acrylic paint because the girls were excited to paint the castle. Most kids are excited to paint, and I know my kids will paint for hours! If my kids hadn’t been helping, I definitely would’ve spray painted (with primer first). It’s just easier to get into the nooks.
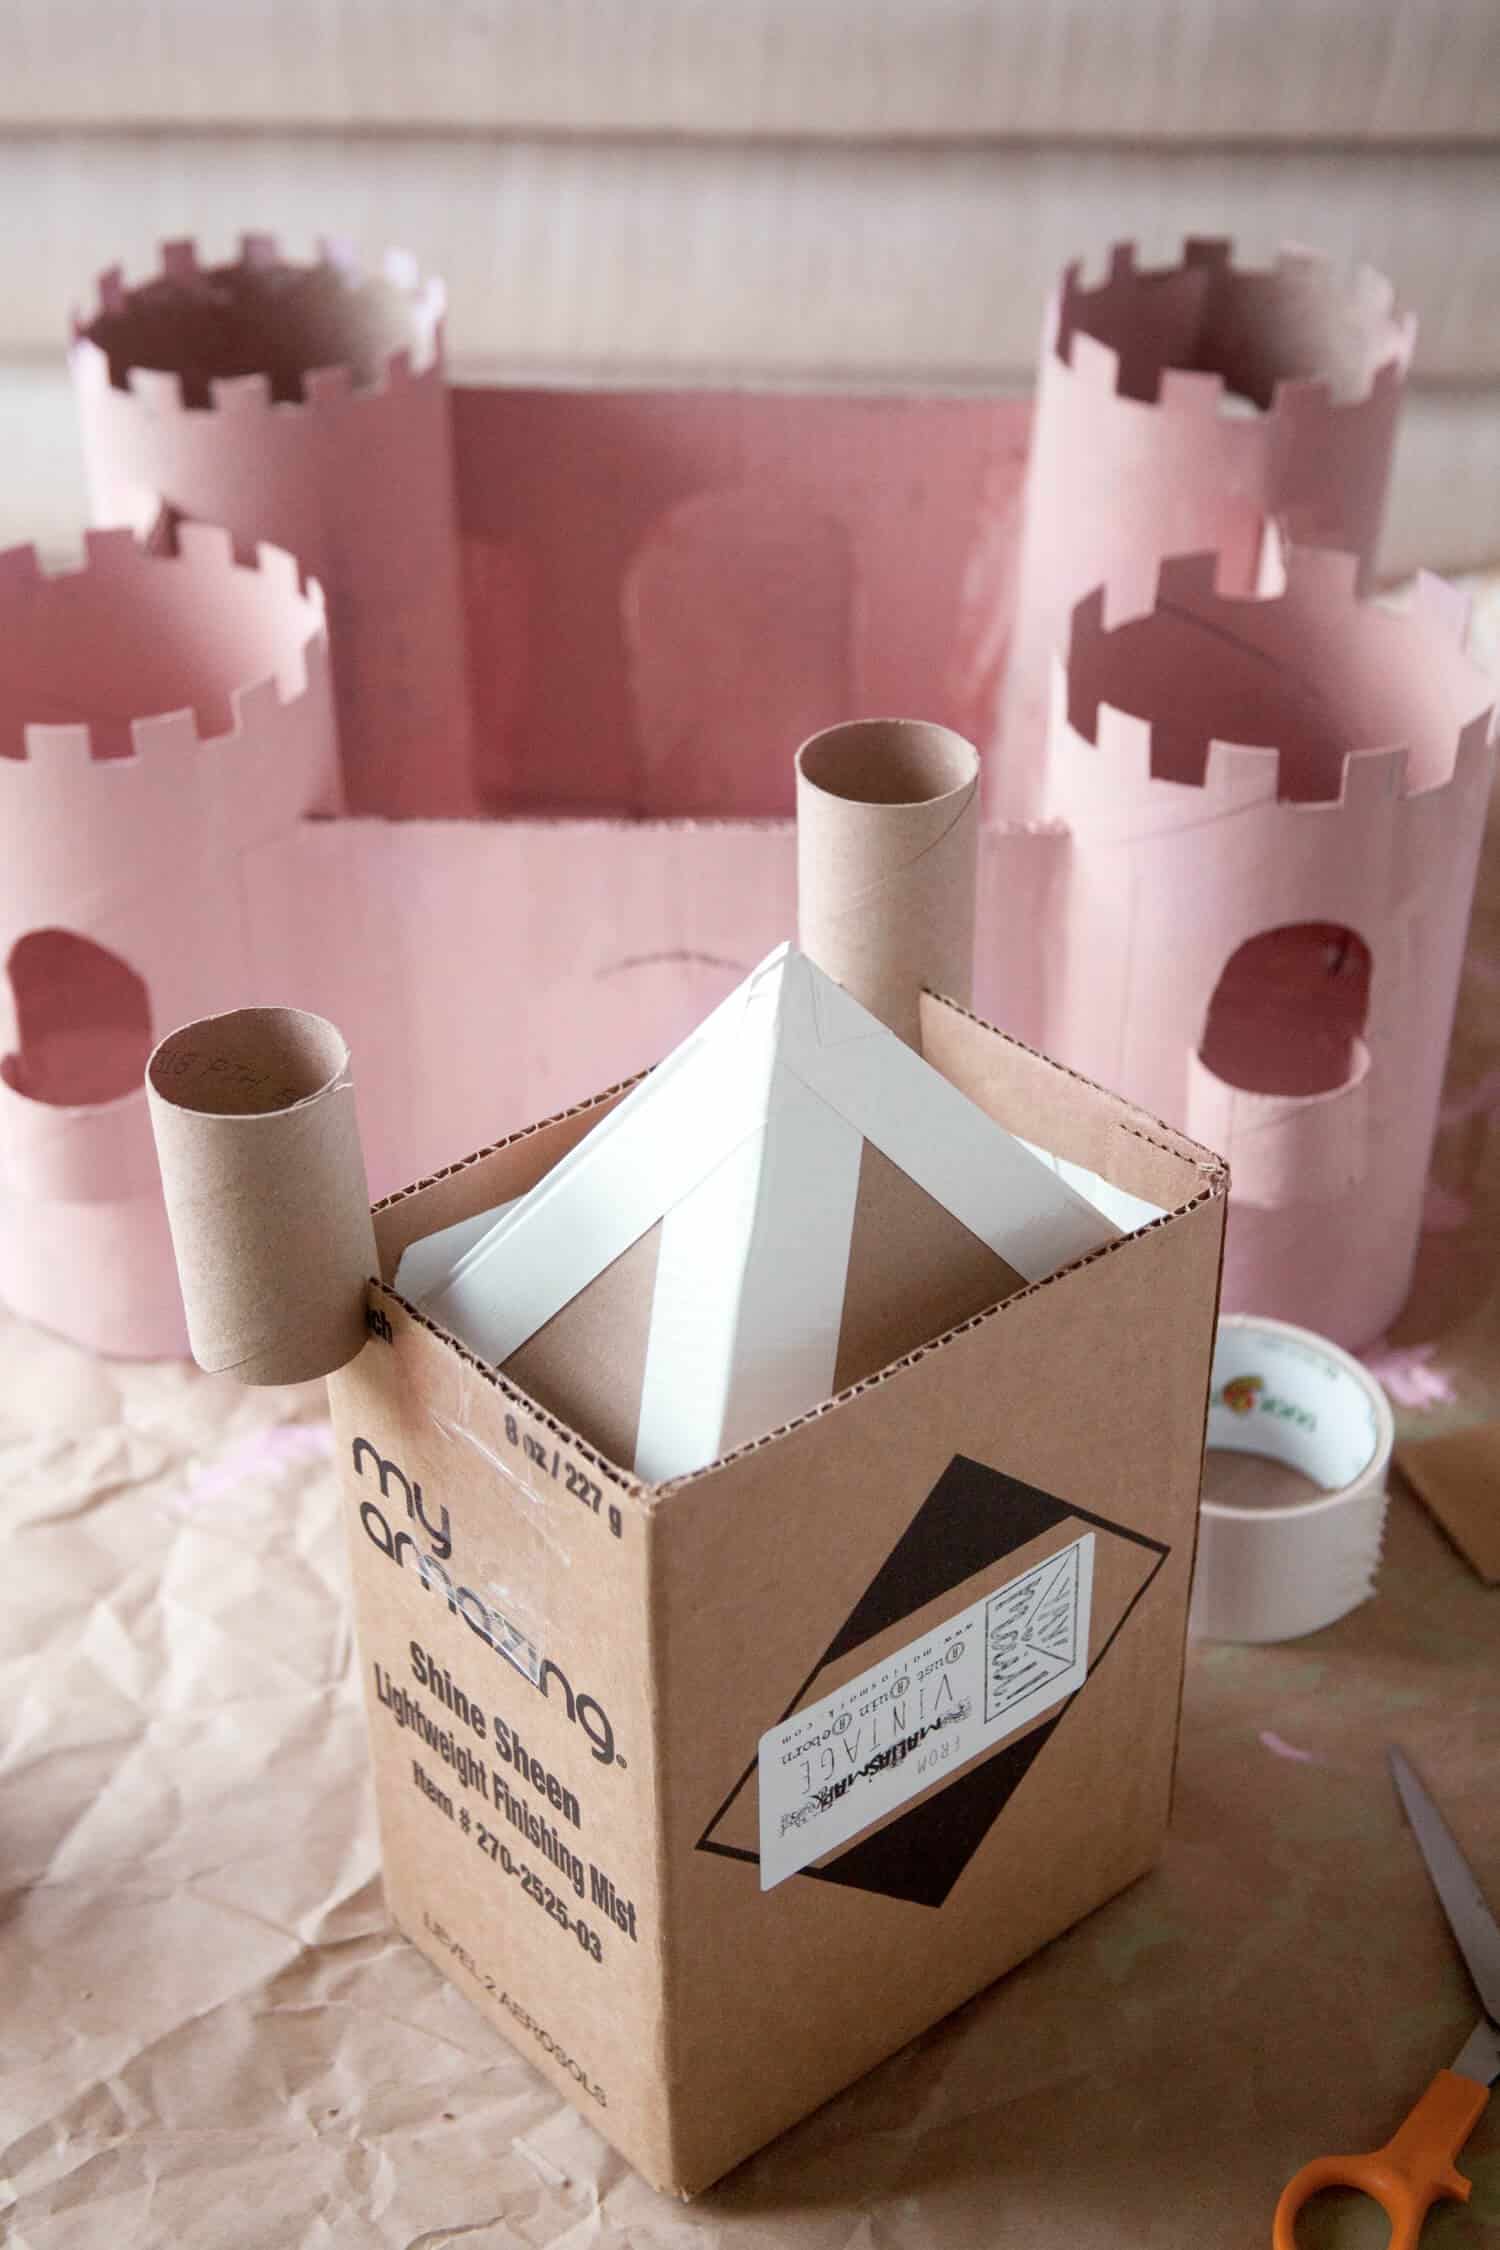 After we painted the castle, I realized it needed a little something extra. So I quickly transformed an extra box into a central tower. All I did was cut off the top and bottom of the box, taped together scrap pieces for a peaked top, made some little turrets with TP rolls, and then cut out openings.
We made a flag for the top, but I forgot to include it in the pictures. Oops! The flag was made out of a bamboo skewer for a pole and a duct tape flag.
 The castle isn’t perfect by any means, but I think it looks quite nice, especially for being made out of waste materials! It was definitely easy to create, and surprisingly sturdy. I’m sure it won’t last forever, but that’s okay! Half the fun is making it.
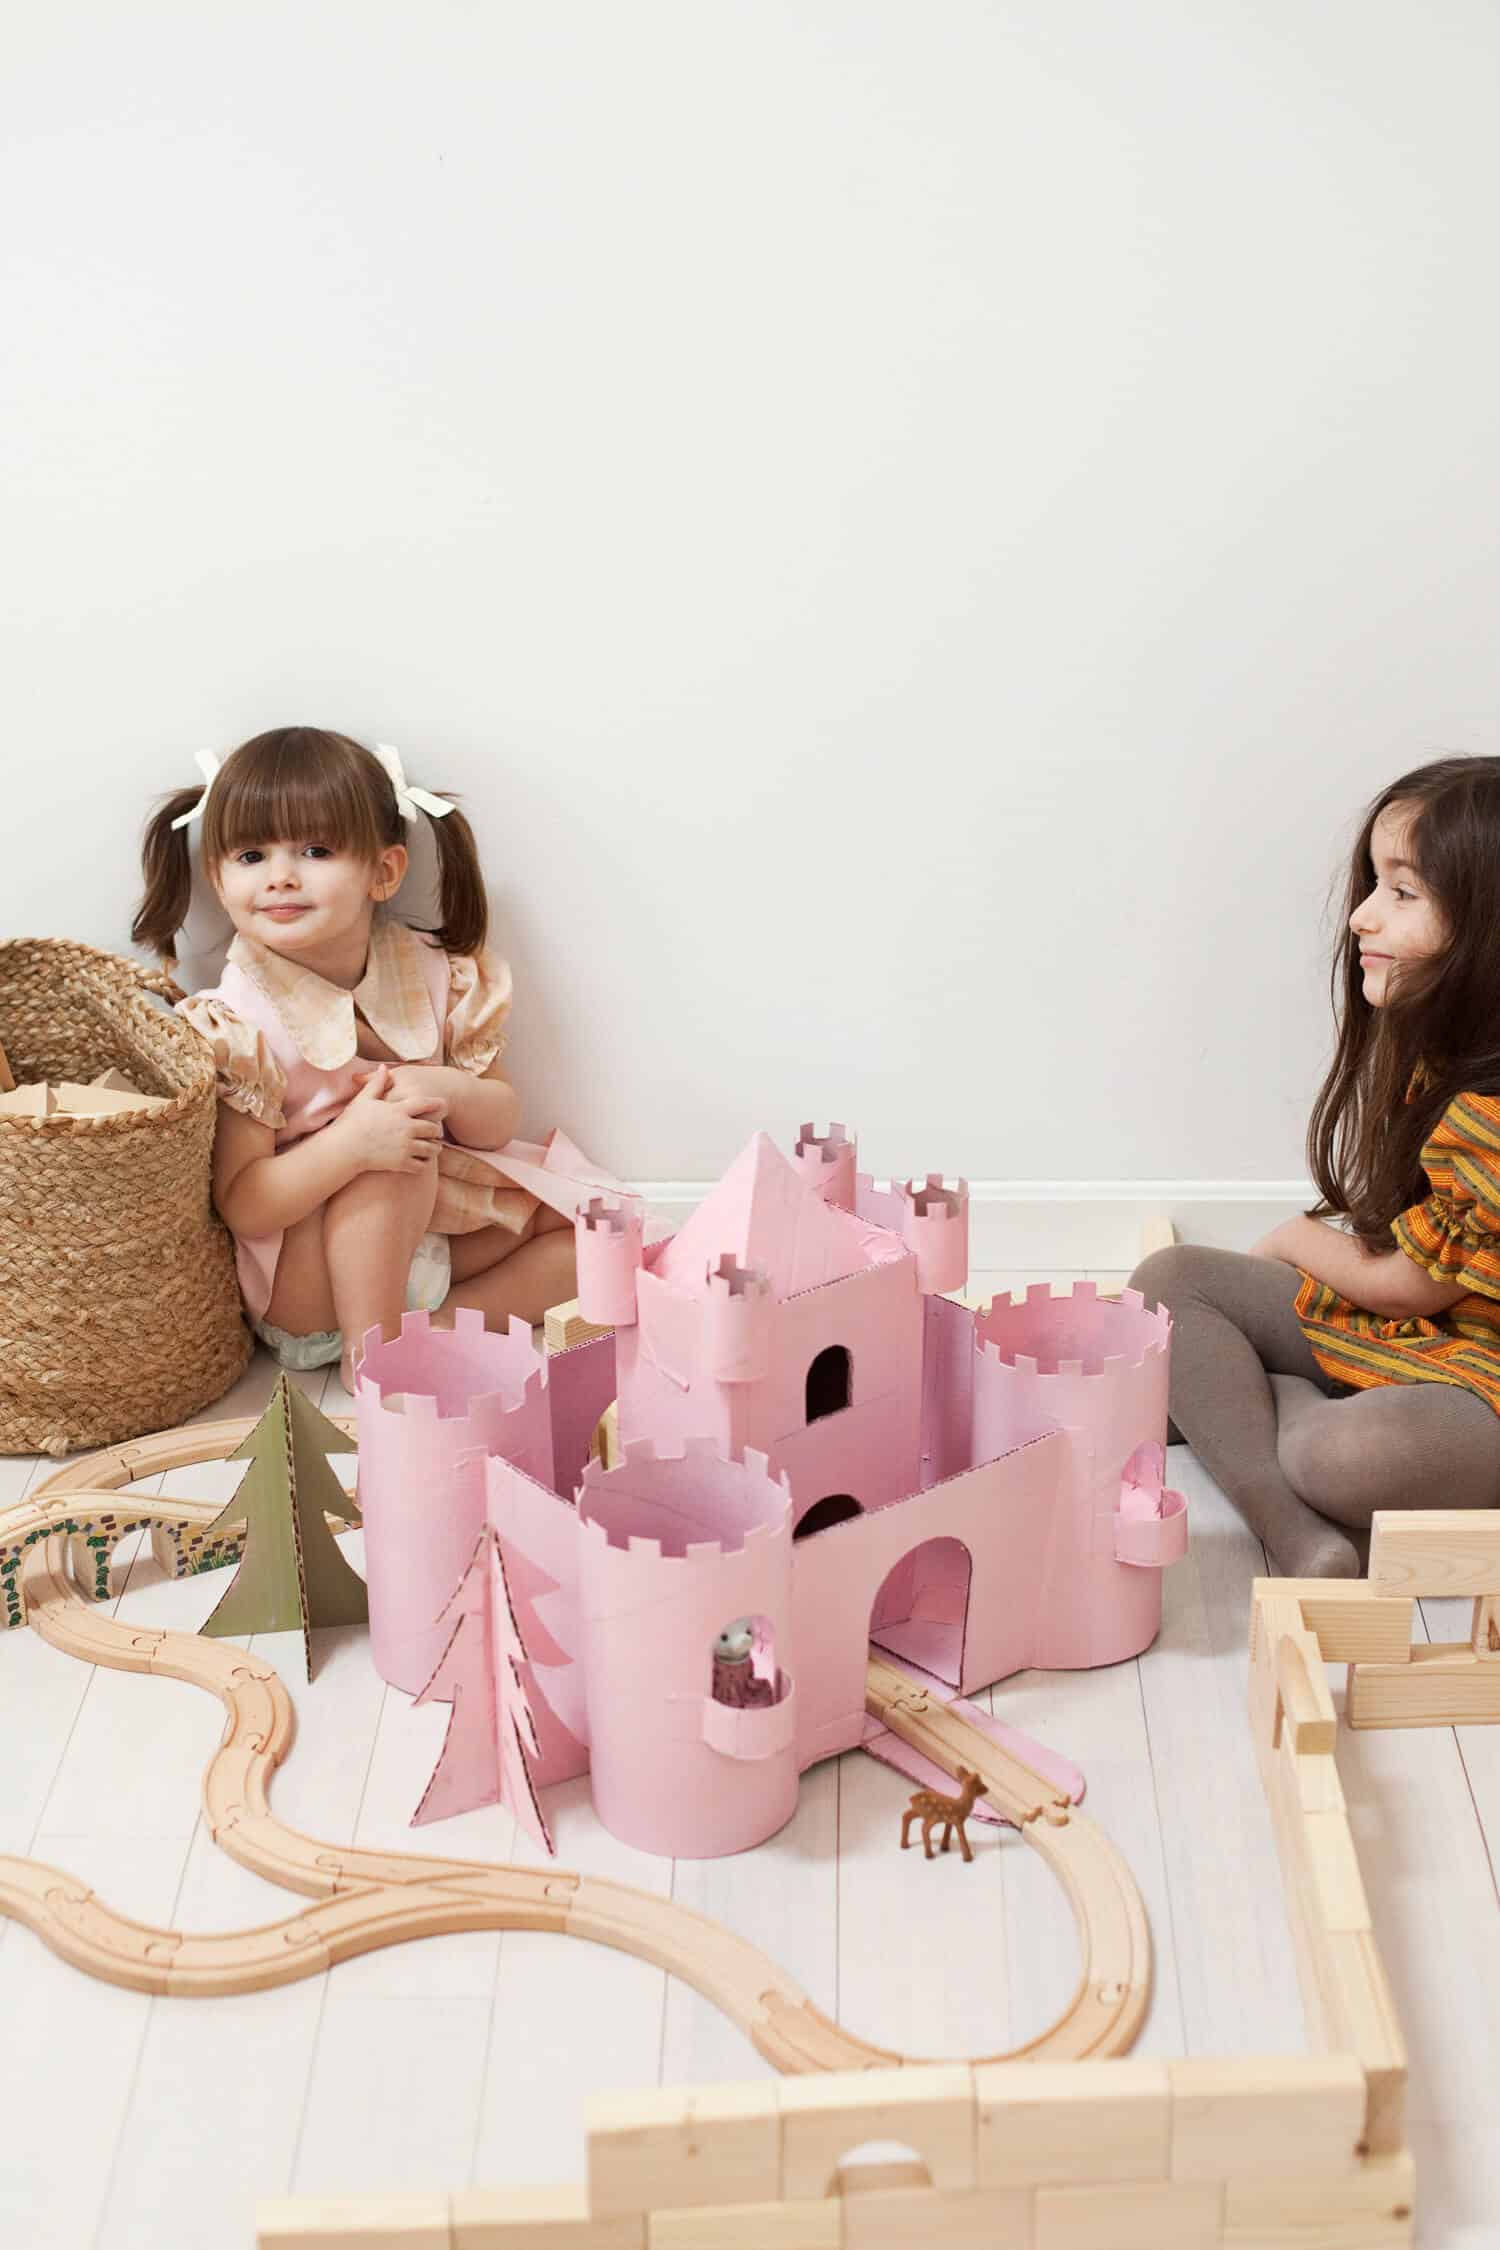
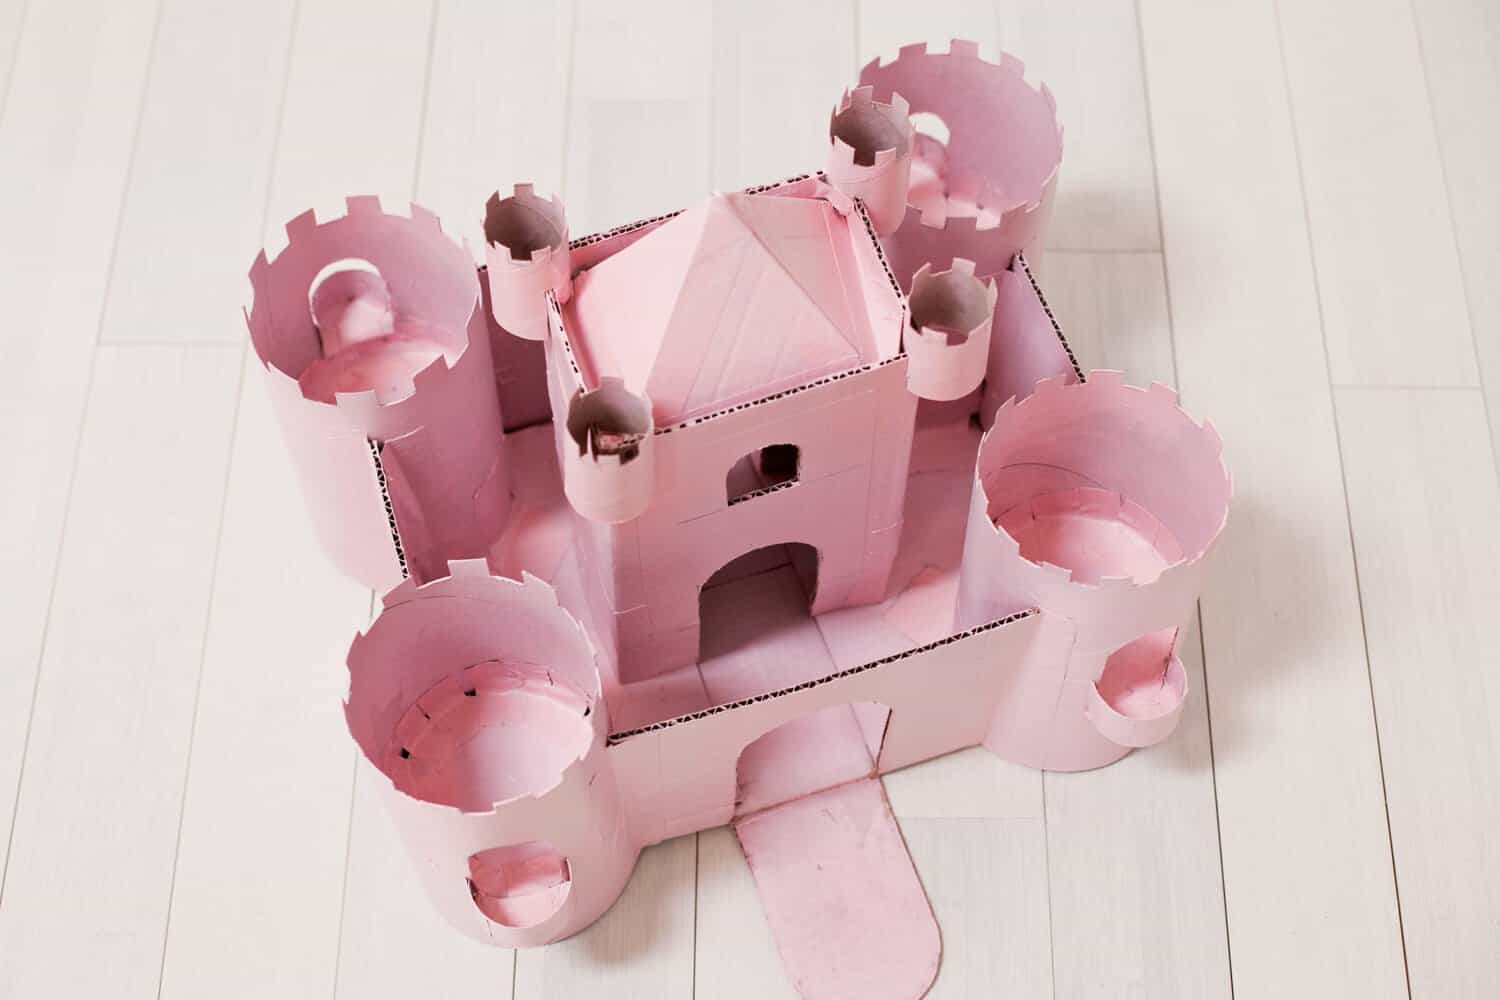 Here’s an inside shot of the castle. You can see how imperfect it looks here, because of all the tape. But I guarantee the kids won’t care! I kept the interior tower unattached from the rest of the castle, so my girls often remove it and pretend it’s a separate, smaller castle for their village.
 Have you ever made cardboard toys for the kiddos in your life? Lucy would like a washer and dryer to clean her doll clothes, so I’m thinking the next time we get the perfect sized boxes we’ll make a stackable set, complete with cardboard buttons and maybe round, windowed doors!
Be sure to tag us in any cardboard crafts you do—we’d love to see your creativity at play! – Mandi
I know this post is a few years old, but I just came upon it, and my granddaughters are (the older one for sure) the perfect age for it. I just can figure out a substitute for the oatmeal cartons – I don’t have any and don’t really eat oatmeal anyway. I guess we could go with all rectangular boxes in the corners, but the round turrets really make this castle.
This is beautiful! I’m going to try to add fairy lights on mine as well! <3 Thank you so much for the ideas and inspiration — I love that this is virtually free.
It is so well as mine
I remember years ago when My Little Pony first came out in the 80s, I was a single parent with not much to spare, cash wise. My daughter loved her ponies and really wanted the castle for them, so I made her one from cardboard boxes and other stuff and I had pink emulsion left over from painting her bedroom. I made blue roofs for the towers and my daughter loved it. In fact her friend who had got the shop bought MLP castle wanted a cardboard one because it was bigger and they could get more ponies in for their parties 😀
Seeing this post took me back more years than I care to remember 😀
Very cool DIY project. this is such a cute idea! I will try to make it for my nephew. Thanks!
This is awesome. I have the best childhood memories of making tiny dollhouses/rooms out of shoeboxes with my friends, but I never really thought to go larger scale. Definitely keeping this in mind for future kids, I could go crazy on cardboard playthings!
What a special way to entertain and connect with your kiddos for (nearly) free! I want to remember this for the future. <3
Such a cute idea . My daughter is 27 we need to find a little one to make this with !
This is lovely! Your girls are adorable 🙂
Debs @ tiger-mint.com
This reminds me of the farm and silo I built when I was a kid, out of a big coffee tin I painted red. I played with tiny plastic farm animals from the dollar store with it 🙂
We didn’t have a lot of toys growing up. I remember spending hours crafting cardboard and paper into playthings and the joy of creating what my friends had bought.
This DIY made me smile so big! Can’t wait to make one with my nephew in a couple years. Beautiful execution, and the pink is so fun!
This is such a cute idea! I love all the household items you’ve used in this project! I will for sure be trying this!
Aww love it!!! It reminds me of all the crafts we would do growing up and that I am now tucking away to do when I have kids that get a little bit older!
What a fun way to upcycle what a lot of people have piled up, cardboard boxes. I look forward to these crafts when our daughter gets older. Yours came out really cute!
-Felicia
Www.casalibrablog.com
Thank you so much for this. The idea probably would seem too daunting to non-creative, time-pressed parents. But the way you illustrate your method makes it very doable. Plus this is good on SO many levels:
–it’s good for the environment–because it’s made from what otherwise would be waste AND because it’s not made of plastic that will sit in a landfill for eons, whereas little girls are in the princess stage for just a few years.
–it costs almost nothing (paint).
–it sends a very positive message to your kids that possibilities depend on creativity not money.
–it can evolve with them–they will be able to decorate it and add to it. The creativity isn’t just for you but also for them.
When I was little, times were tight and I had Barbies but no Barbie house. My best friend and I made our own, with nesting boxes (for easy carrying to each other’s house), decorated with pictures we cut out of Penney’s catalogs. I am sure it made a big impact on my decor aesthetic.
PS: Adorable kids. Enjoy this time. They grow up too fast!
Cutest castle ever, especially with it being in pink! So good to see recycled projects too! 🙂
Charmaine Ng | Architecture & Lifestyle Blog
http://charmainenyw.com