 Hey, guys! It’s Katie here. I recently made one of my most favorite toys for my kiddos and I just had to share! I have to admit, when this idea popped into my head I may have gotten a little overly excited.
You see, one of our very favorite things to do as a family is tend to the garden, but since we live in the Midwest there has been none of that for many months now.
Soon, the weather will be warm and we will be growing goodies in the garden again, but until then this toy garden box will help tide the girls over. Here’s how to make your own.
Related: For more kids activities and printables check out Childhood Magic!
 Supplies:
-A color variety of felt (purple, orange, green, and red were necessities for me)
–green pipe cleaners
-velcro
–brown paint
–paint brush
-brown jersey cotton
-needle & thread
–scissors
") Now, let’s start with the garden box. Grab any good-sized box you have lying around your house. I chose one that was pretty shallow so it would be easy to “plant” in.
Now, let’s start with the garden box. Grab any good-sized box you have lying around your house. I chose one that was pretty shallow so it would be easy to “plant” in.
Step One: Cover the entire box in brown paint.
Step Two: In between coats of paint, you can start on your “dirt.” Cut a piece from your brown jersey fabric to fit the width of the box (mine was 13″ x 14″). Fold it in half and run a stitch up the edge with your sewing machine.
Step Three: Flip right side out and cinch one end closed with a running stitch pulled tight and tied off. Stuff it full and cinch the remaining end closed. Repeat as many times as needed to fill your box.
Step Four: Insert your “dirt” pillows and make sure they fill the box. Now, onto the carrots!

 Step One: Cut out a large triangle from orange felt and fold in half (mine was 5″ at its widest point and 5″ long). Stitch from the bottom to the top edge. Be sure not to stitch it closed.
Step Two: Cut out a circle for the top of your carrot, along with the leaves. Stitch the leaves to the top portion of the carrot.
Step Three: Flip the carrot right side out and stuff. Hand sew the carrot top on.
") To make the beets:
To make the beets:
Step One: Cut out a large circle from your purple felt (mine was 7 1/2″ in diameter). Clip four even triangles out of the circle (as shown above). Join each edge with the one next to it with your sewing machine. Repeat until the beet is sewn all the way around.
Step Two: Flip right side out and stuff until firm. Cinch the top closed and tie off.
Step Three: Cut a long leaf shape from your green felt (mine was 8″ tall). Stitch a purple stalk piece to your leaf to create a sort of pocket. Leave the bottom open.
Step Four: Insert a pipe cleaner into the stalk. Cut off the excess and repeat.
Step Five (optional): I used contrasting thread to sew veins onto the leaf to make it look more realistic.
") Step Six: Insert three leaves into the beet and hand sew them in place. Tie off and you’re all finished! Repeat as many times as you’d like. I made two beets for my box.
Step Six: Insert three leaves into the beet and hand sew them in place. Tie off and you’re all finished! Repeat as many times as you’d like. I made two beets for my box.

") Now onto the strawberries!
Now onto the strawberries!
Step One: Cut out a simple strawberry shape (as seen above—mine was 2″ at its widest point and 2″ long). Stitch around the edges, leaving the top open.
Step Two: Flip right side out and stuff. Cinch the top closed and tie off with a knot.
Step Three: Add small, decorative stitches all over the strawberry. Cut a small green top and sew a piece of soft velcro to it. Hand stitch the top onto the top of the strawberry. Repeat as many times as you’d like. I made four strawberries for my plant.
 Step Four: Twist a group of pipe cleaners together. I used three.
Step Five: Cut out leaf shapes in groups of three. Create jagged edges and then stitch the leaves to the pipe cleaners on the bottom side. Repeat this step until the pipe cleaners are entirely concealed.
Step Six: Grab another pipe cleaner and insert it through a leaf shape (this leaf looks more like the top of the strawberry, with four points). Round the edge of the pipe cleaner and lay flat against the felt leaf.
Step Seven: Stitch a rough piece of velcro over the rounded pipe cleaner. Repeat on both ends.
") Step Eight: Twist the pipe cleaner around the base of the plant. Now you’re all done!
Step Eight: Twist the pipe cleaner around the base of the plant. Now you’re all done!
")
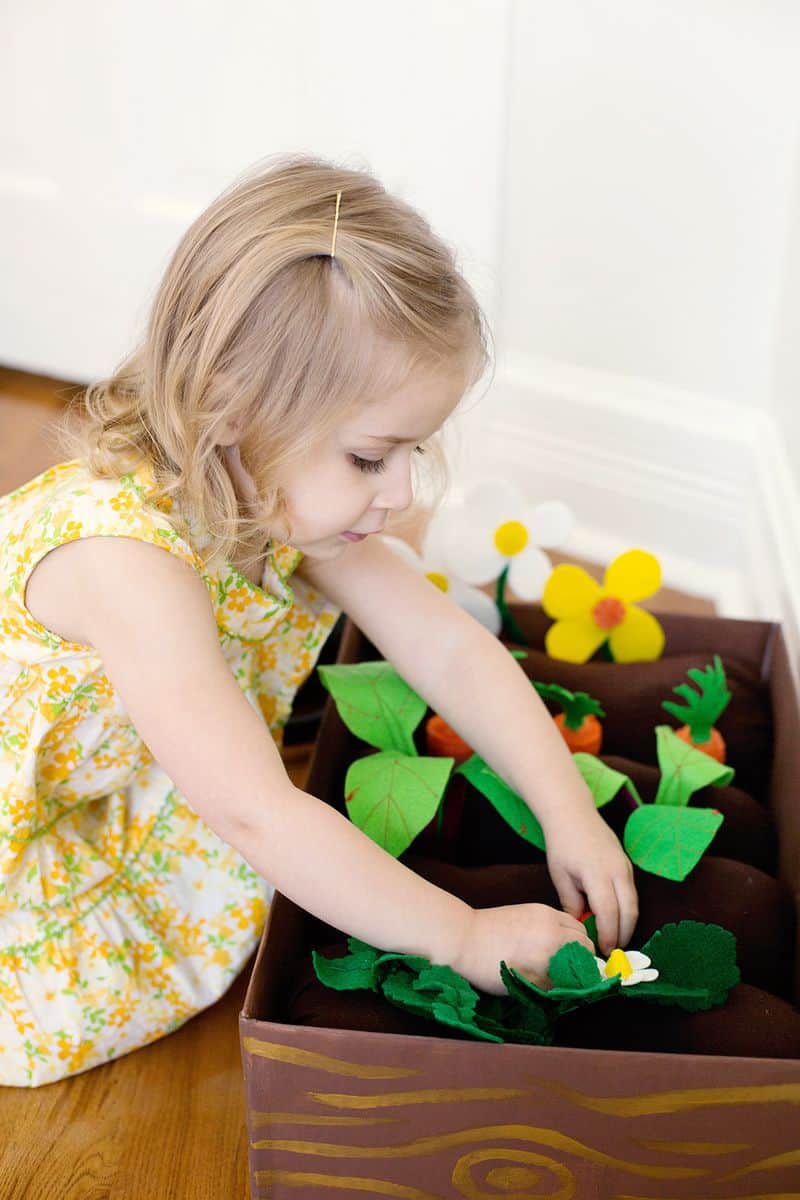
 Now it’s time to plant (and unplant) your garden in the box! My little Poesy girl had so much fun with this part!

")

") I added some simple felt flowers and some store-bought ladybugs to add to the fun of the garden box. This is one of my very favorite children’s toys to date! It’s a great way for little ones to learn about gardening. Happy crafting! xo. Katie
I added some simple felt flowers and some store-bought ladybugs to add to the fun of the garden box. This is one of my very favorite children’s toys to date! It’s a great way for little ones to learn about gardening. Happy crafting! xo. Katie
P.S. Looking for more cute kiddo crafts? Check out ….

Yo
I can’t figure out how to cinch the tops of things where the gathered fabric isn’t all sticking up at the top. Particularly the beets because I want a clean top to add my leaves. Help?
Love it !! Just waiting for my kid to grow up and actually make her this ????
I love this! I’m just debating what sort of age range this would suit…I’ve got a 3yr old niece and a 5yr old. Do you think it’s too young for the 5yr old? I remember playing with things like this in reception and year 1 of school but not sure!
Wow.. this is soo Cute ????
Thanks for sharing
Looking forward to reading more. Great post.Really thank you! Great.
What a seriously adorable idea! I can’t wait to make this for my toddler. She is going to love it!
I loved it! Thanks for your idea! I made mine for my small daughter. The result can you see here: https://photos.app.goo.gl/EbDL4vkMm8pZvII33
Beautiful idea! I love it. ??
Thanks for the idea! I just made mine. But without your inspiration, it would not be possible. This is the result: https://bycousinas.com/huerto-de-juguete-para-ninos-en-crochet/
This is so cute, and I love how you did the step by step tutorial with the photos. Makes it so do-able and easy to understand for someone like myself with limited sewing skills. Thank you!
This is so adorable !
It’s always a pleasure to visite your blog and see your pictures and creations.
Xoxo
Michelle
You’re a pro Katie. I’ve been making mine and I’ve put in 12 hours! eeek! Still not done but almost. I really love it still and is a grat idea. The cutting took most of my time up for sure. Thanks again.
Absolutely lovely. We included a link on our FB page (https://www.facebook.com/KidsCareList/posts/236354646556275) for other parents to see this.
What a wonderful idea, my girls would love this!
This is such a great idea! My kids will love it. Thanks for this DIY, I really like the strawberries…
Love ur blogs , so much to be inspired about . My friend natalia( lazy girl world) told me to follow you if I Wana start blogging .
N yet she was so right ! I have learned a lot from u !
Where did you get the little ladybugs? :)Too Cute!
This is adorable! If you had no sewing skills (like me) I would use dark brown tights to make the dirt rows (fill the ‘legs’ of the tights with the stuffing) and tie off ends with brown ribbon. Maybe hot glue it shut? I could also see myself hot gluing most of the vegetable parts together(like the flat leaves) and maybe drawing the veins on the leaves with Sharpie marker? The berries I can hand sew…I may make this for my granddaughter for Easter! Even if I only had flowers growing for pulling and making bouquets, I am sure kids would love that too- they can put little vases of flowers they ‘grew’ all over the house..What if they put ‘seeds’ in the night before, and you replace them after they’re asleep with the flowers! I am having fun exploring this! Thanks for the great ideas:)
Since Facebook is notorious for not letting page owners know when I tag them, I thought I would stop by myself and let you know I featured this post and my readers loved it! https://www.facebook.com/CraftsbyAmanda/photos/pb.323548680216.-2207520000.1397173019./10154010907870217/?type=3&theater