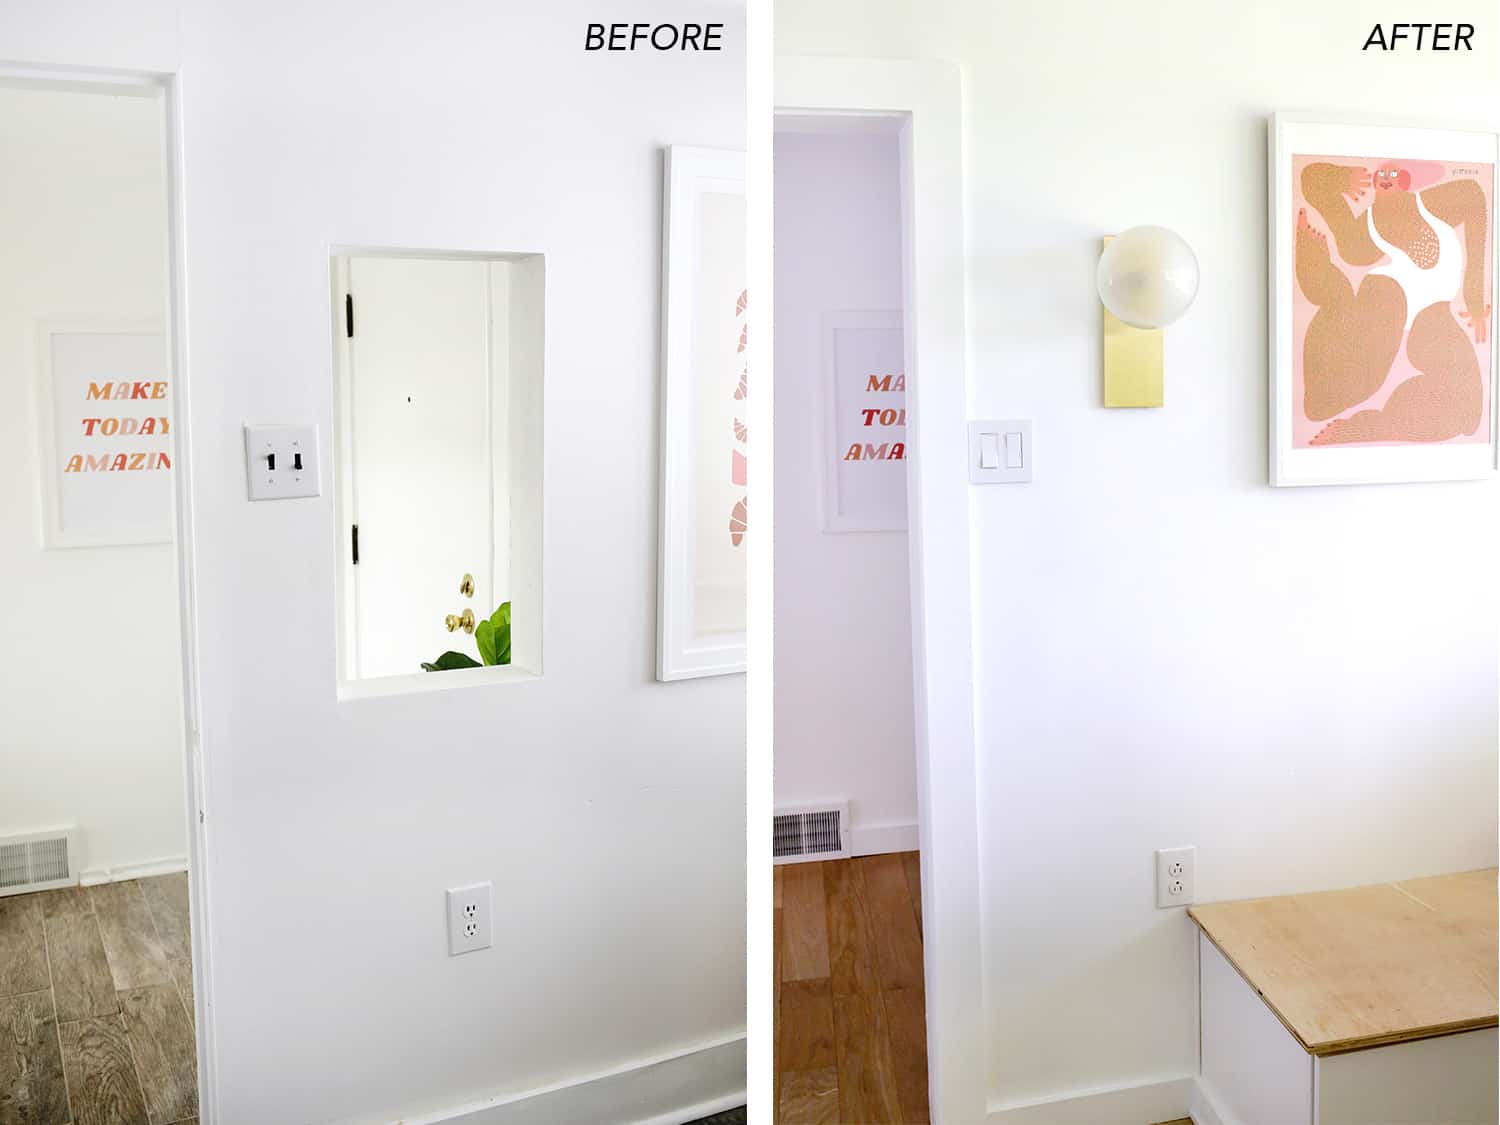
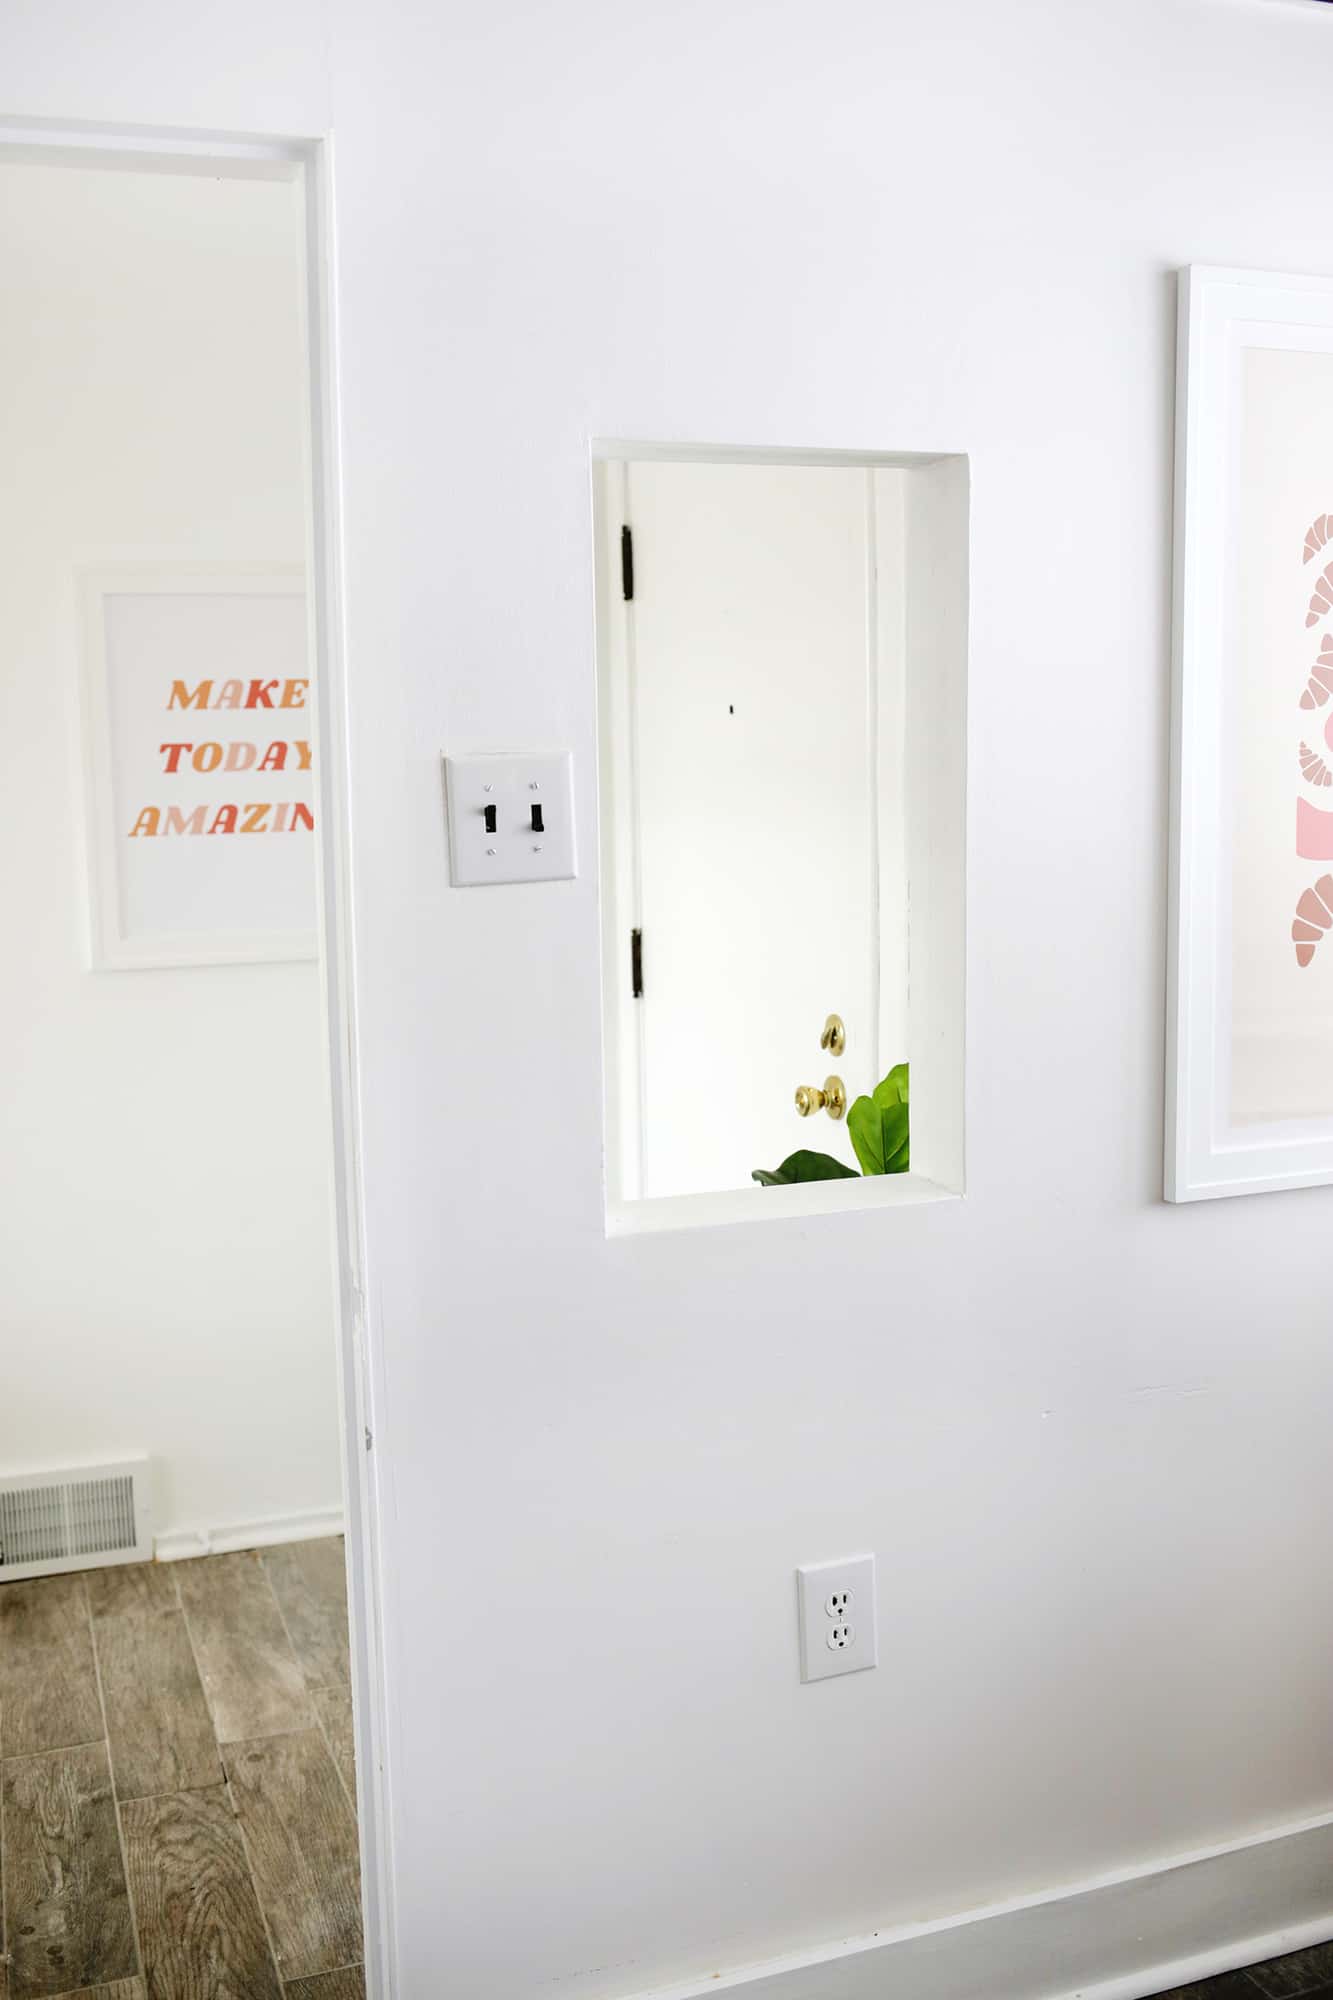
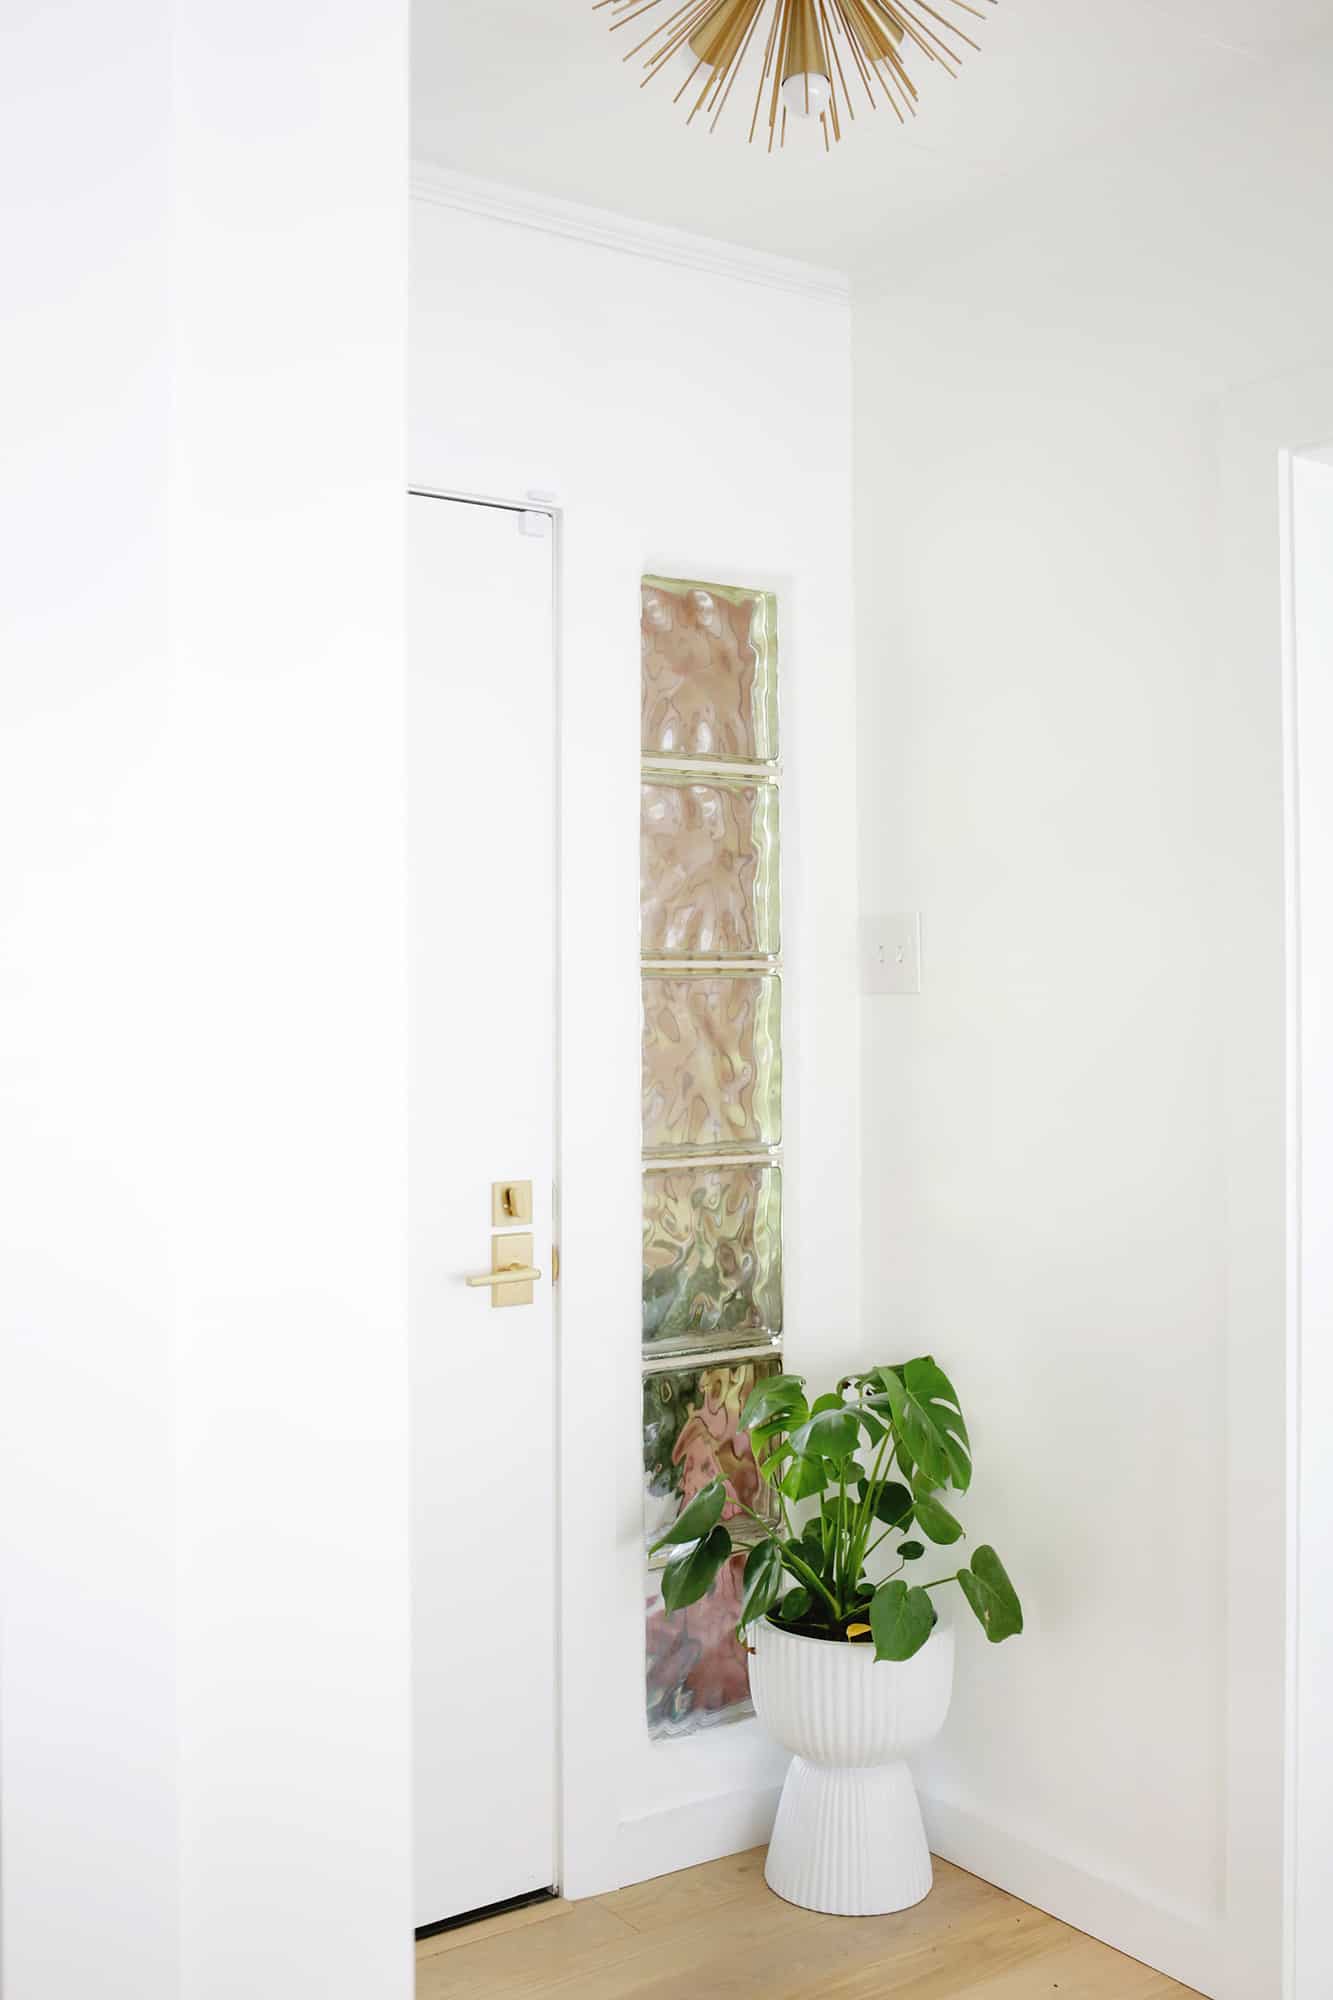
 It’s always a bit of an adventure when buying an older home, and you’re bound to run into some surprises along the way. Our current home that we are renovating has more than its fair share of quirks, but one thing that really bugged me when we moved in was this plastic stained glass window of a ship that had been fit into an interior window at some point in the kitchen area. Once the ship was pulled out, we were left with a kind of window pass through that just looked odd, so it was apparent that it needed to be filled in to look like a normal wall. Since I had already taken on the challenge of my first drywall attempt to close up a long niche window in our living room, I thought this would also be good drywall practice in closing up this opening as well! Basically, you build a frame inside the window to attach drywall to on both sides, mud, sand, and paint, but I’ll walk you through what I did below …
 Supplies:
–utility knife
–1/2″ drywall sheet
–table saw (if you need to rip 2″x4″s smaller)
-nail gun (I love this battery operated one!) and brad nails
–drill
–1″ and 6″ drywall knife
–10″ drywall knife
–12″ drywall knife
–paper joint tape
–lightweight drywall mud
–all-purpose drywall mud
–drywall screws
–metal mud pan
–sanding pole or hand sander
–fine grit sandpaper and sanding screens
–sander vacuum attachment (optional but really helpful!)
–drywall primer
–higher nap roller for painting
–dust mask
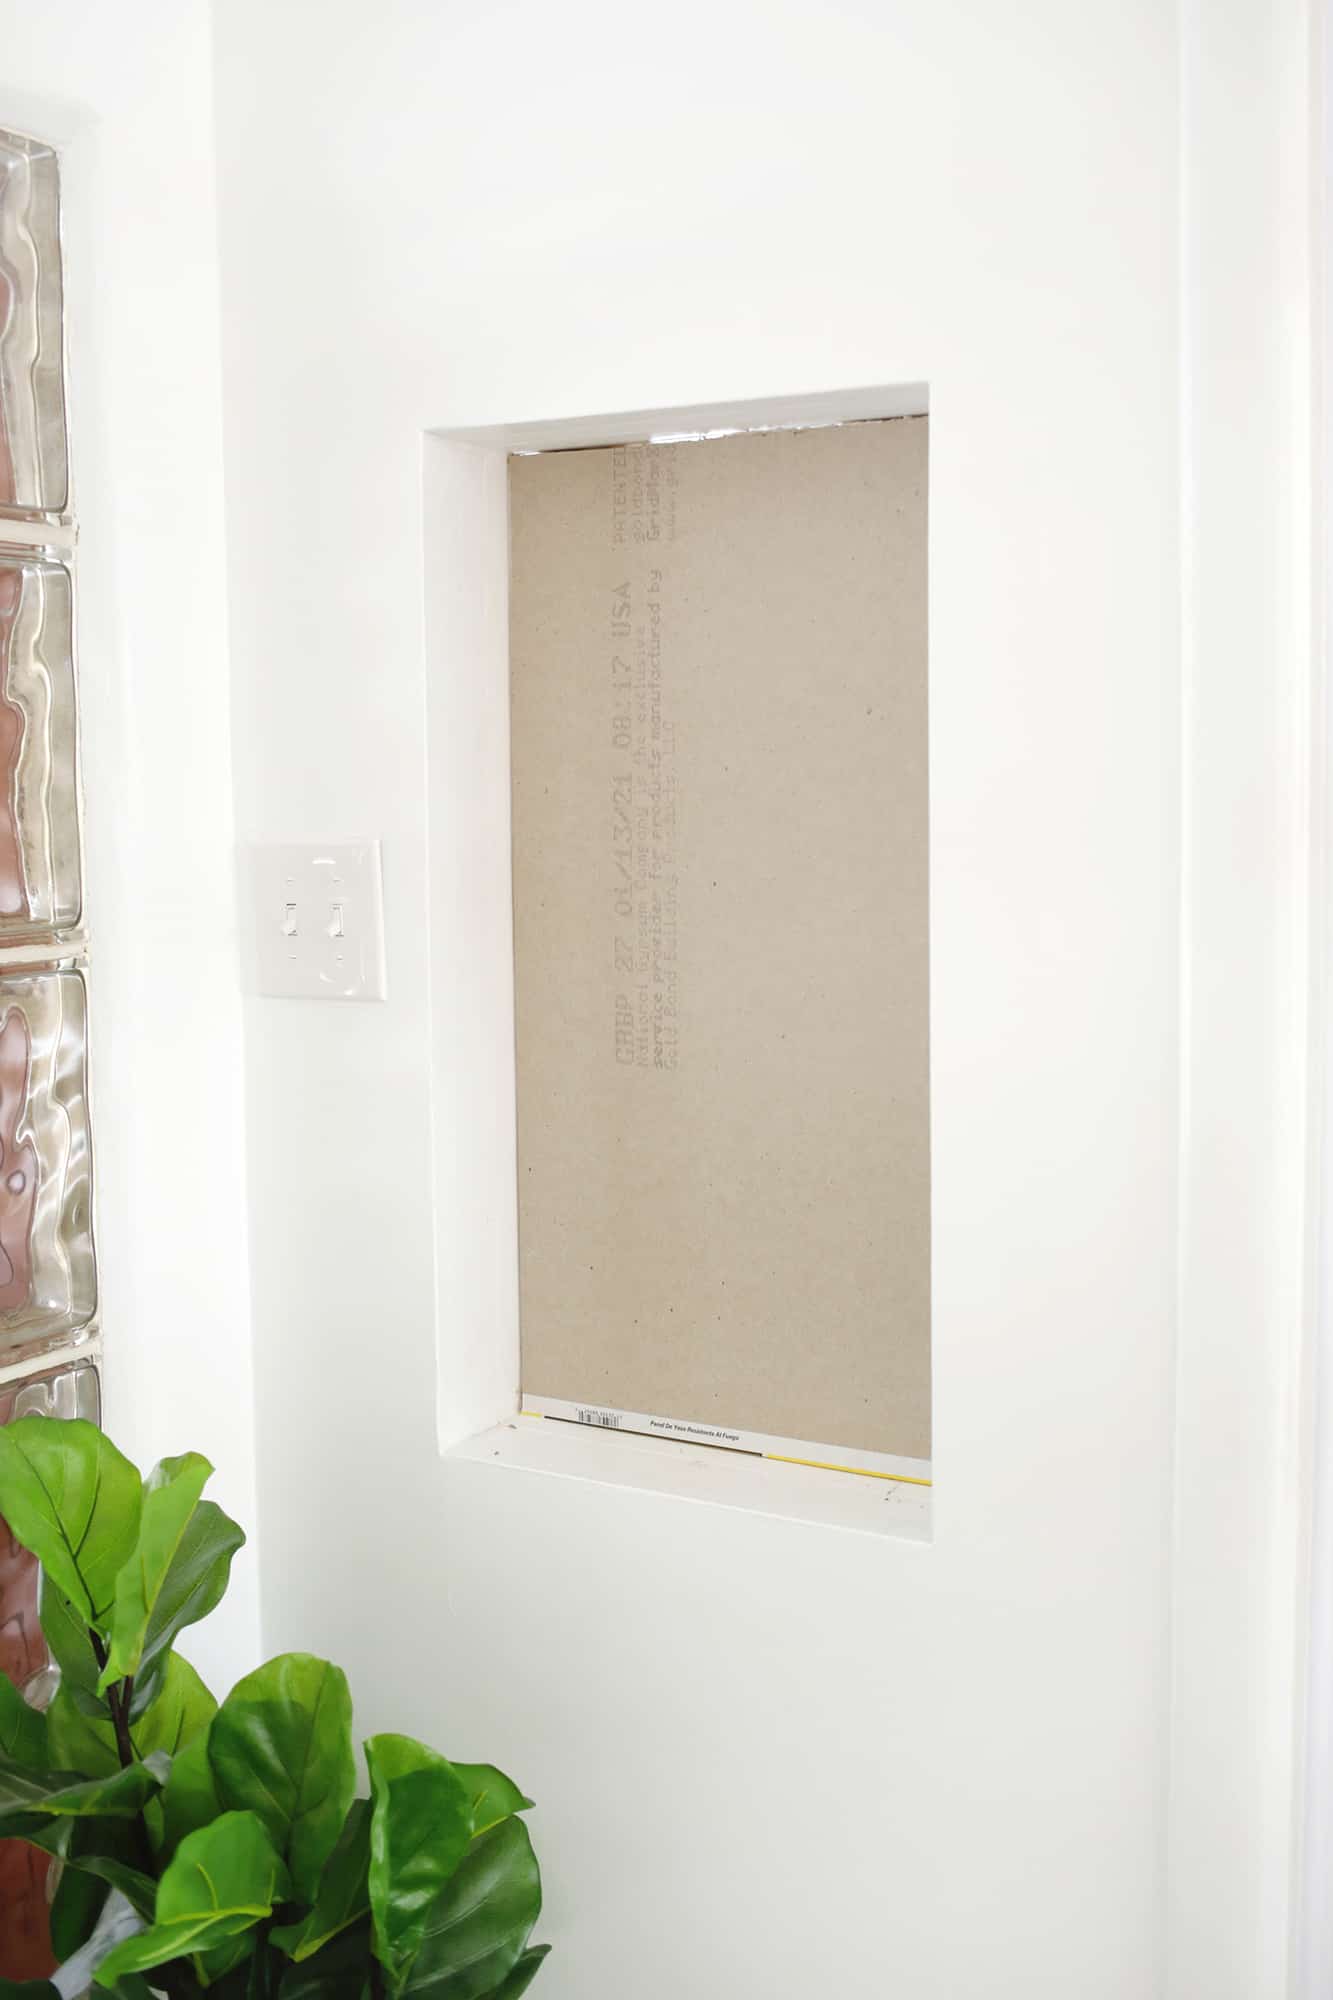 First, you’ll want to trace your window opening dimensions onto drywall sheets while you still have your opening accessible—that way you can cut (with a utility knife) and snap your drywall to those lines and you know it will be a perfect fit for the opening! Just hold the backside of your drywall against one side and use a pencil to trace the shape of the opening from the opposite side of the window. Switch sides and repeat for the other opening (they will probably be slightly different sizes) and mark with a pencil which piece goes where. Score and snap your drywall. Put in one side of your drywall panels with the outside paper facing out.
  To keep the board in place, screw in some scrap boards or 2″x4″s longer than your opening to make a brace against the piece of drywall. The boards are temporary to keep the drywall piece in place and flush with the wall while you work on the depth of your support frame (you’ll remove them later).
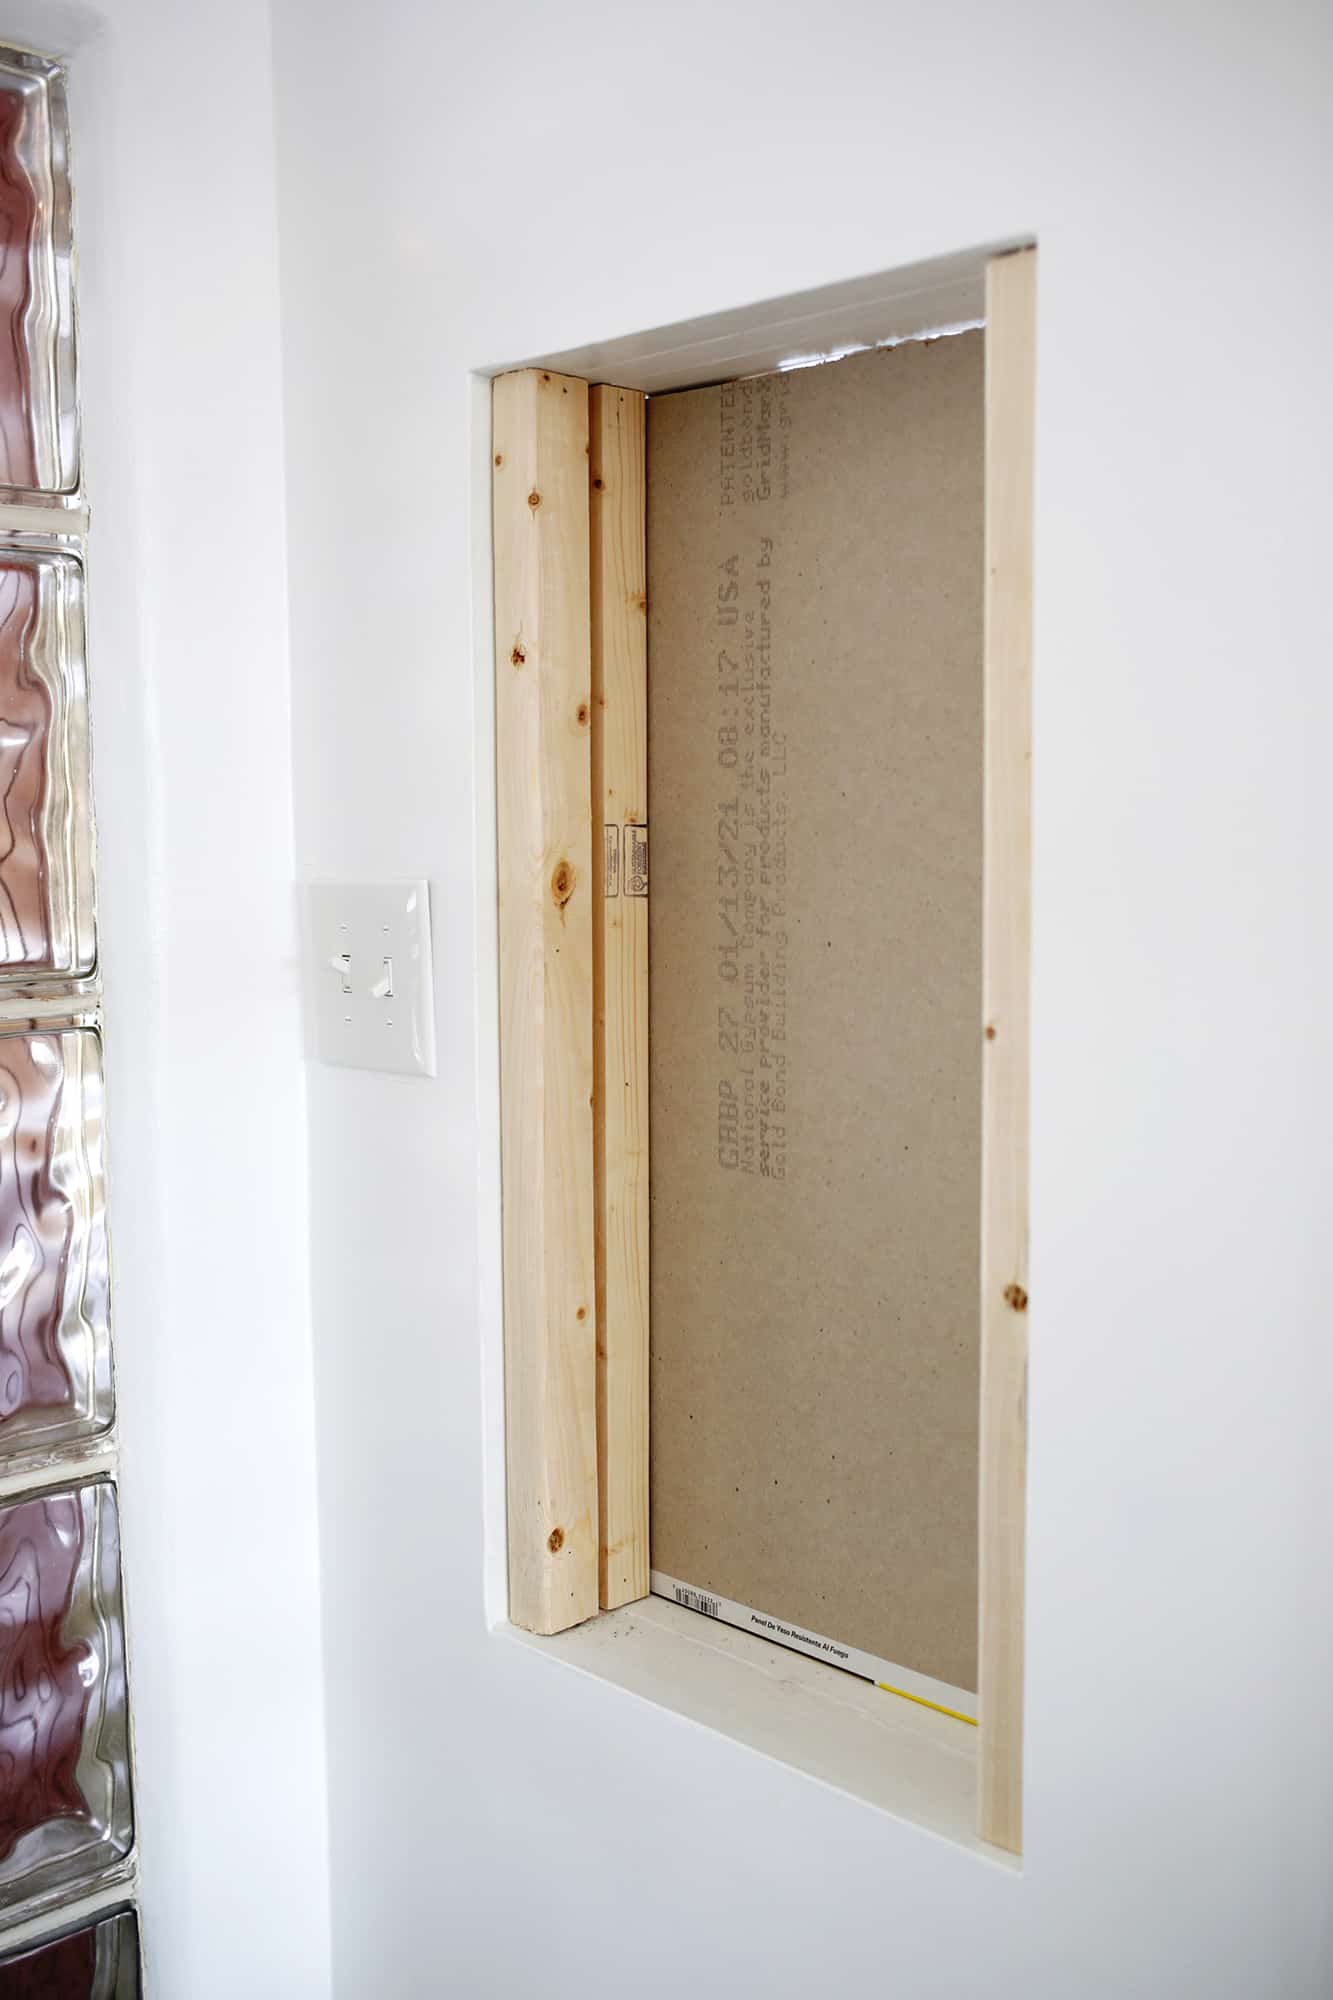 Now, from the other side, you want to build a frame inside your window that is inset to the thickness of your drywall (so mine was inset 1/2″ since I had 1/2″ drywall) so you can attach your drywall pieces to the boards and have the drywall be flush with the wall. Depending on the thickness of your window ledge, you may need to rip your 2″x4″ thinner (this foldable table saw is so helpful to have around!) to get that perfect width so both sides of drywall are flush with the wall. But, in my case, I needed a little more width than the 2″x4″, so I cut mine down the middle and separated them some so I had the proper width of frame to screw in to.
This is a smaller opening, so I just attached my boards with a nail gun at an angle. But if you have a large opening, you’ll probably want to use some screws to be more heavy duty. Also, if you have a bigger opening, you’ll want to cut some frame boards for the bottom and top of the inside of your frame rather than just the sides. And you’ll want to add some vertical support studs placed every 18-24″ in the middle of the opening so you have more areas to attach a larger drywall board. My opening was pretty narrow, so I was able to get away with just the side pieces for mine.
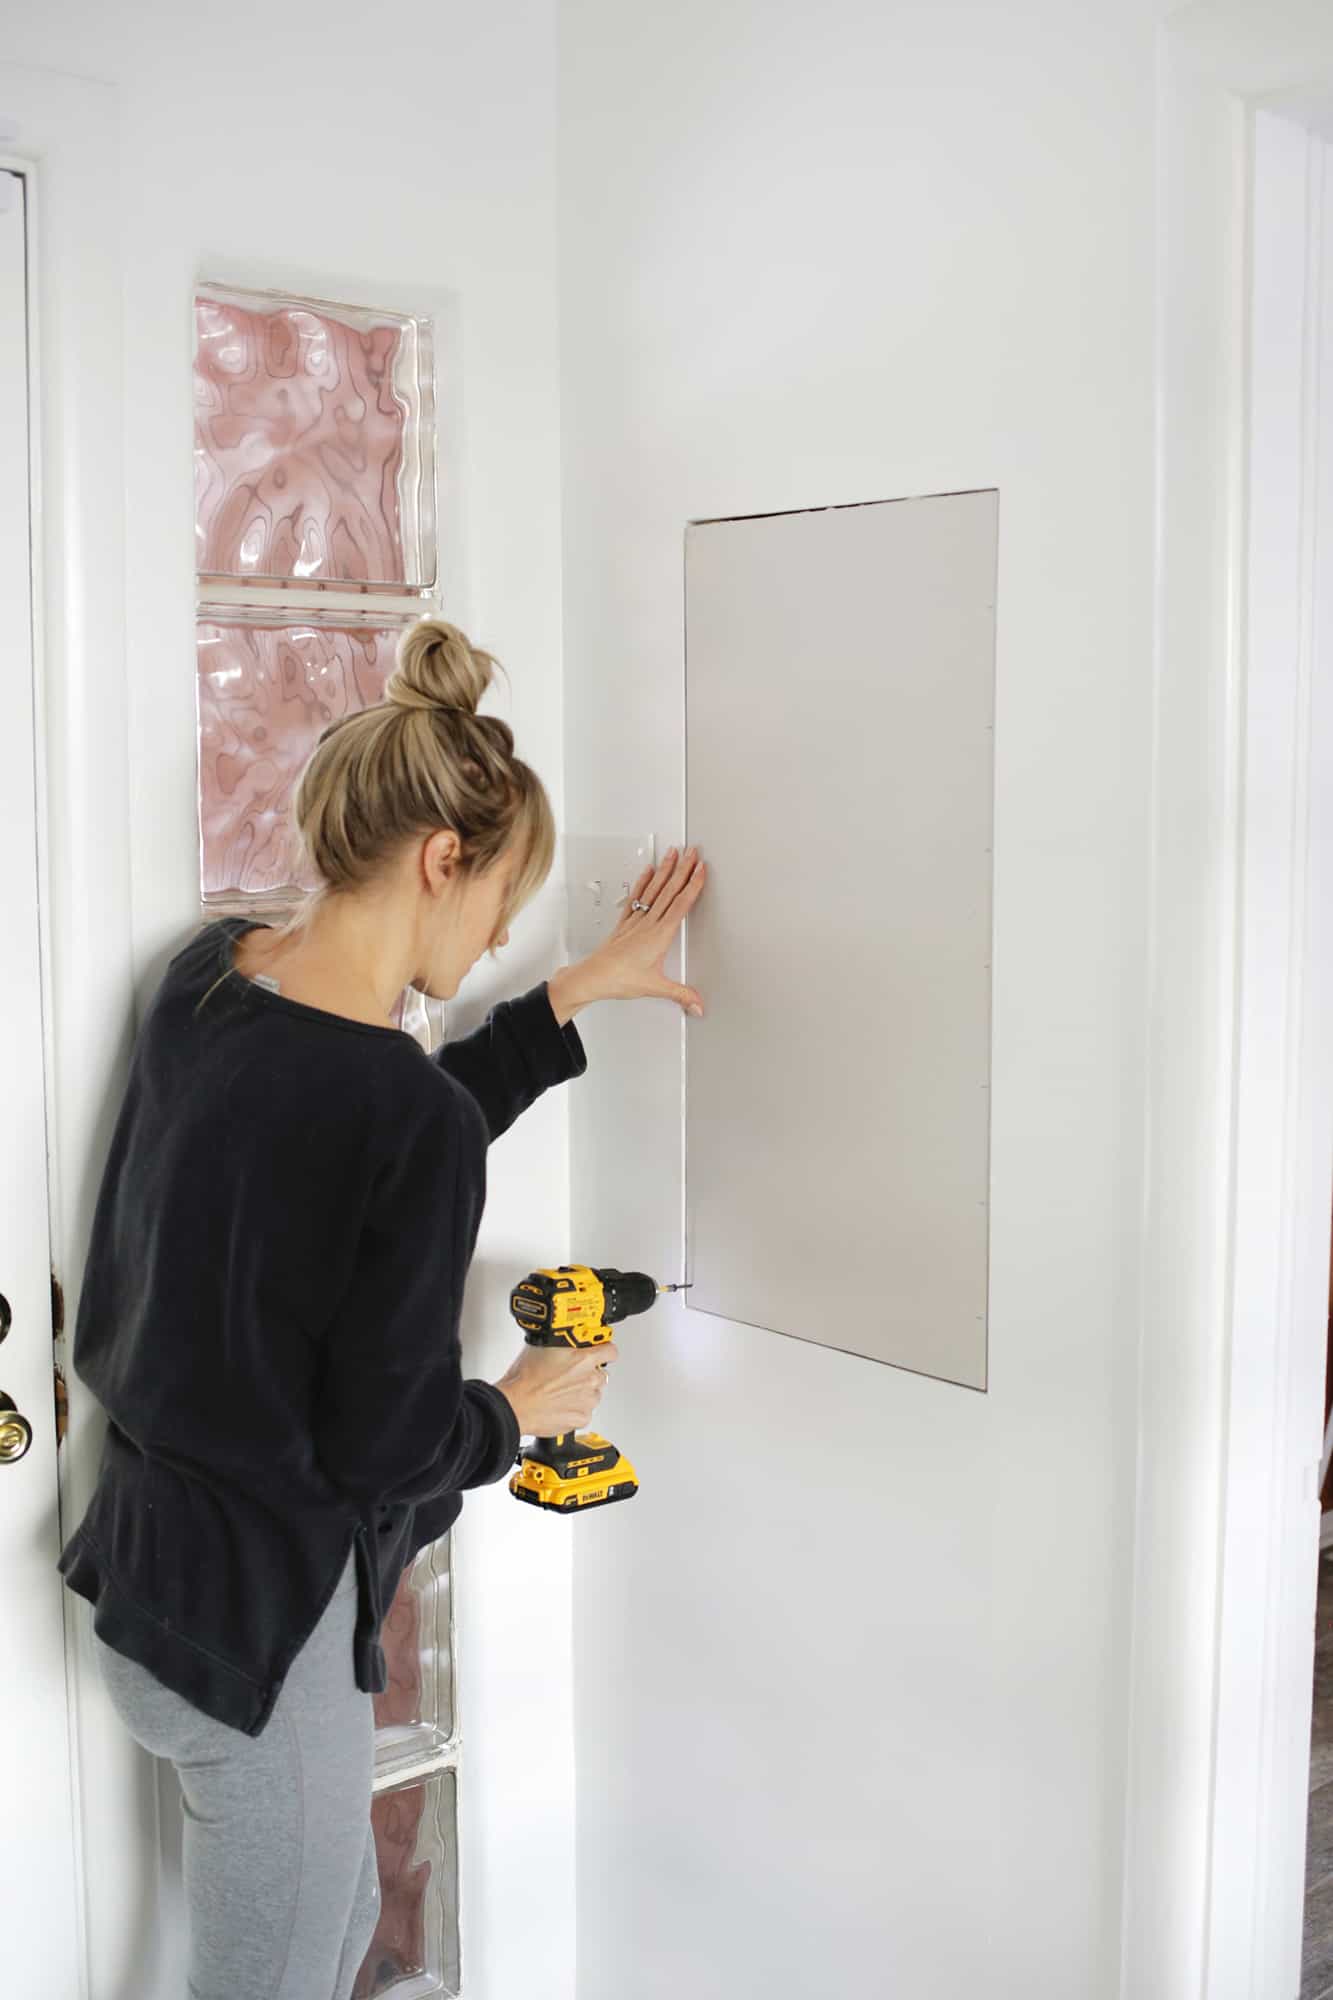 Once the frame pieces were in, I could use drywall screws to attach my corresponding drywall piece so it was secure on the wall.
 Then, I could go around to the other side, remove the brace boards, and attach that board to the frame as well.
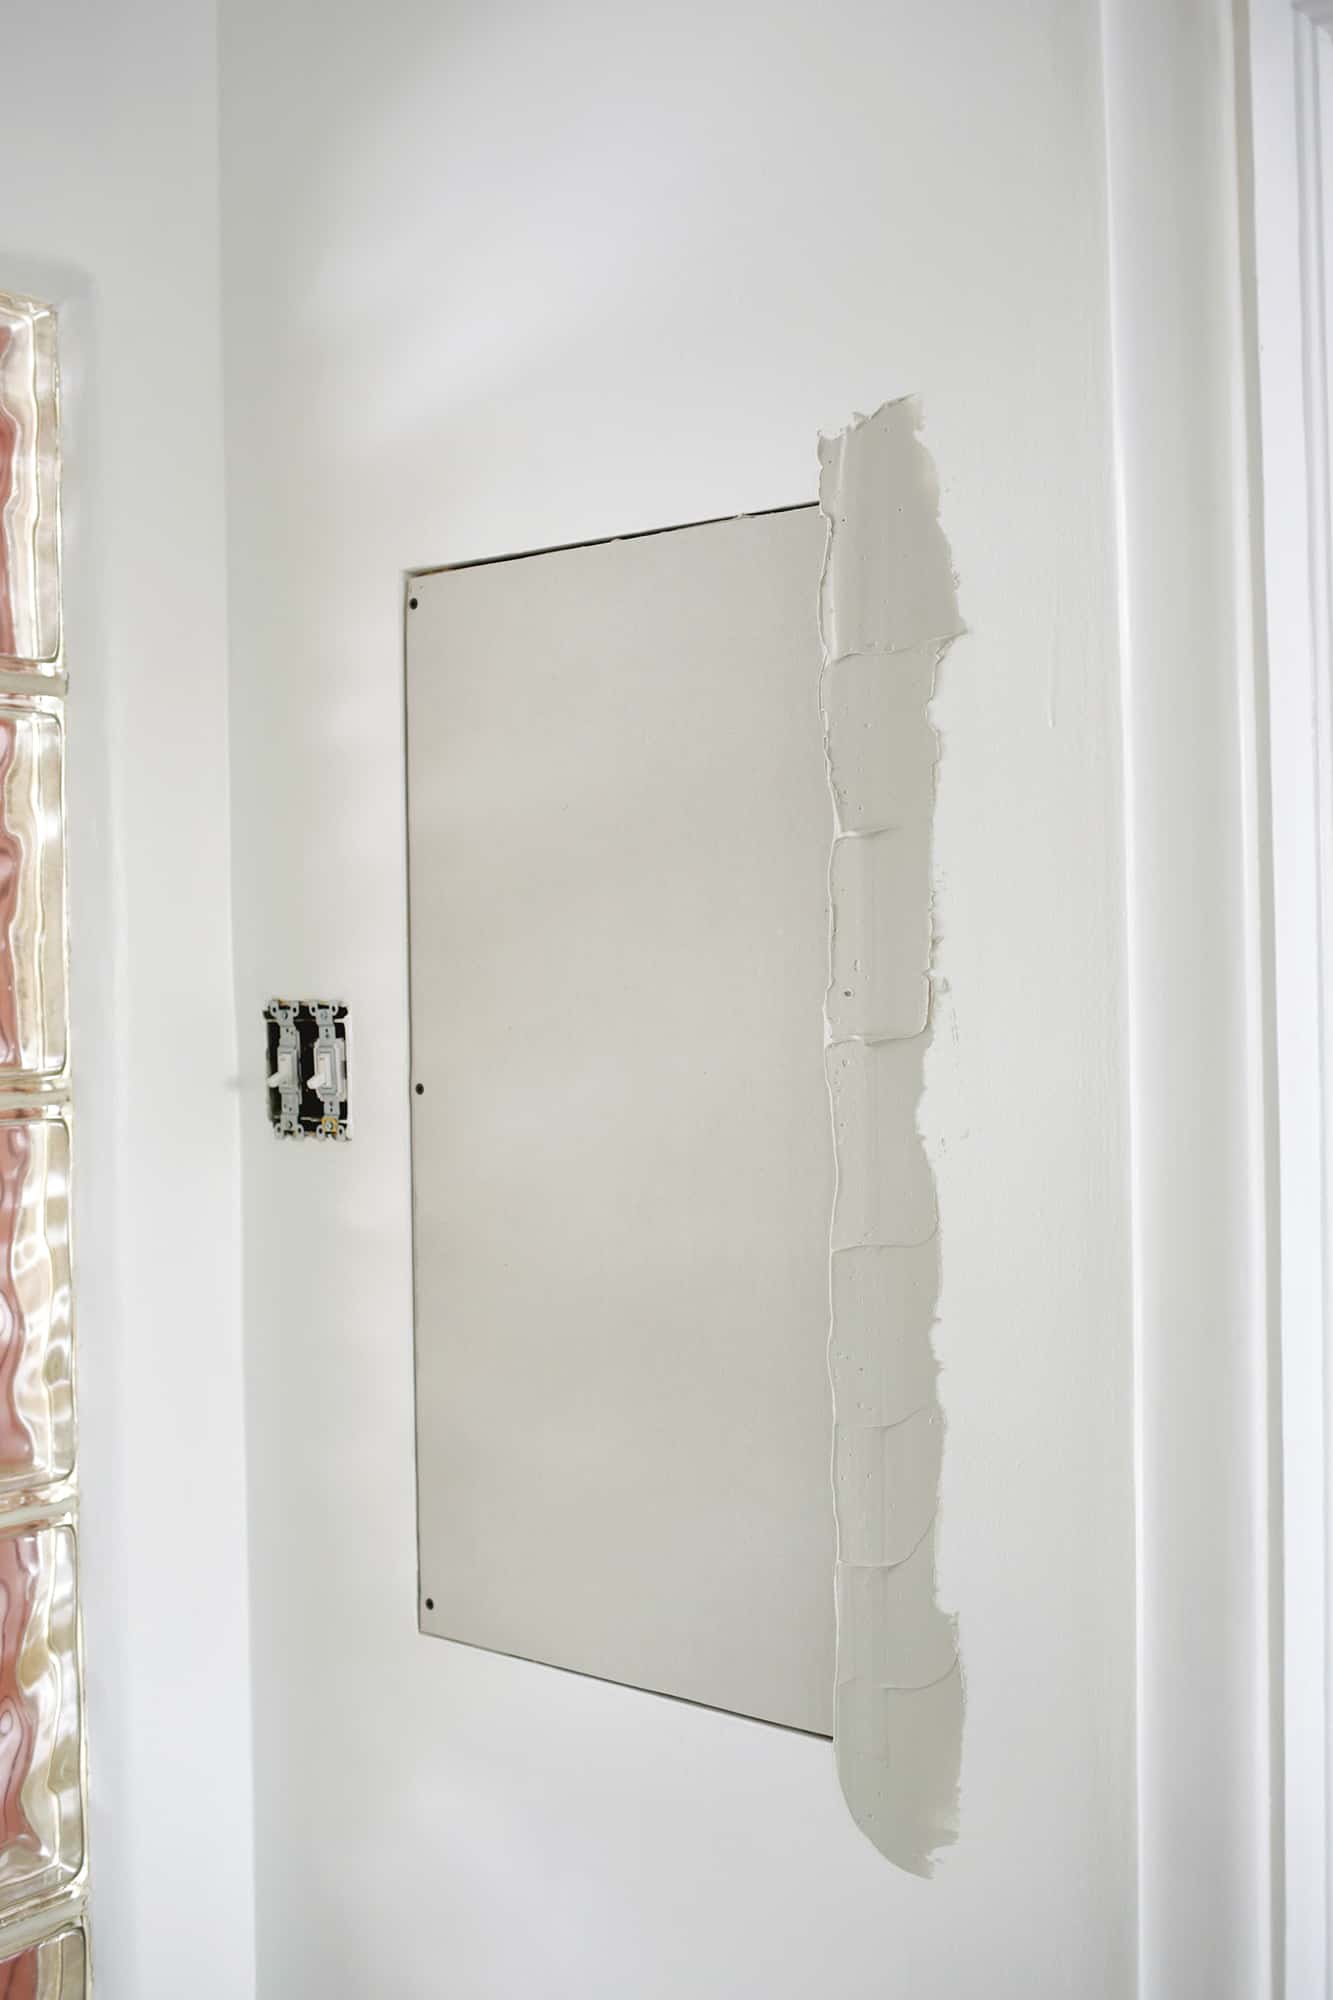
 Once both boards were attached, I used all-purpose mud that I mixed with a little bit of water in my pan to thin/smooth it out a bit (1″ knives are great for mixing smaller amounts of mud in your metal pan) and used a 6″ knife to fill the gaps with a thin layer of mud. Once the mud was on, I cut pieces of paper joint tape to length and placed them over the mud, and used my knife to smooth out the tape so that the mud squished out the sides a bit. It usually takes one pass to press the tape down (you can use your fingers to gently pull the tape down and flat if you get a crease) and then another pass with the knife to really smooth it out nicely (this is a great tutorial video on taping).
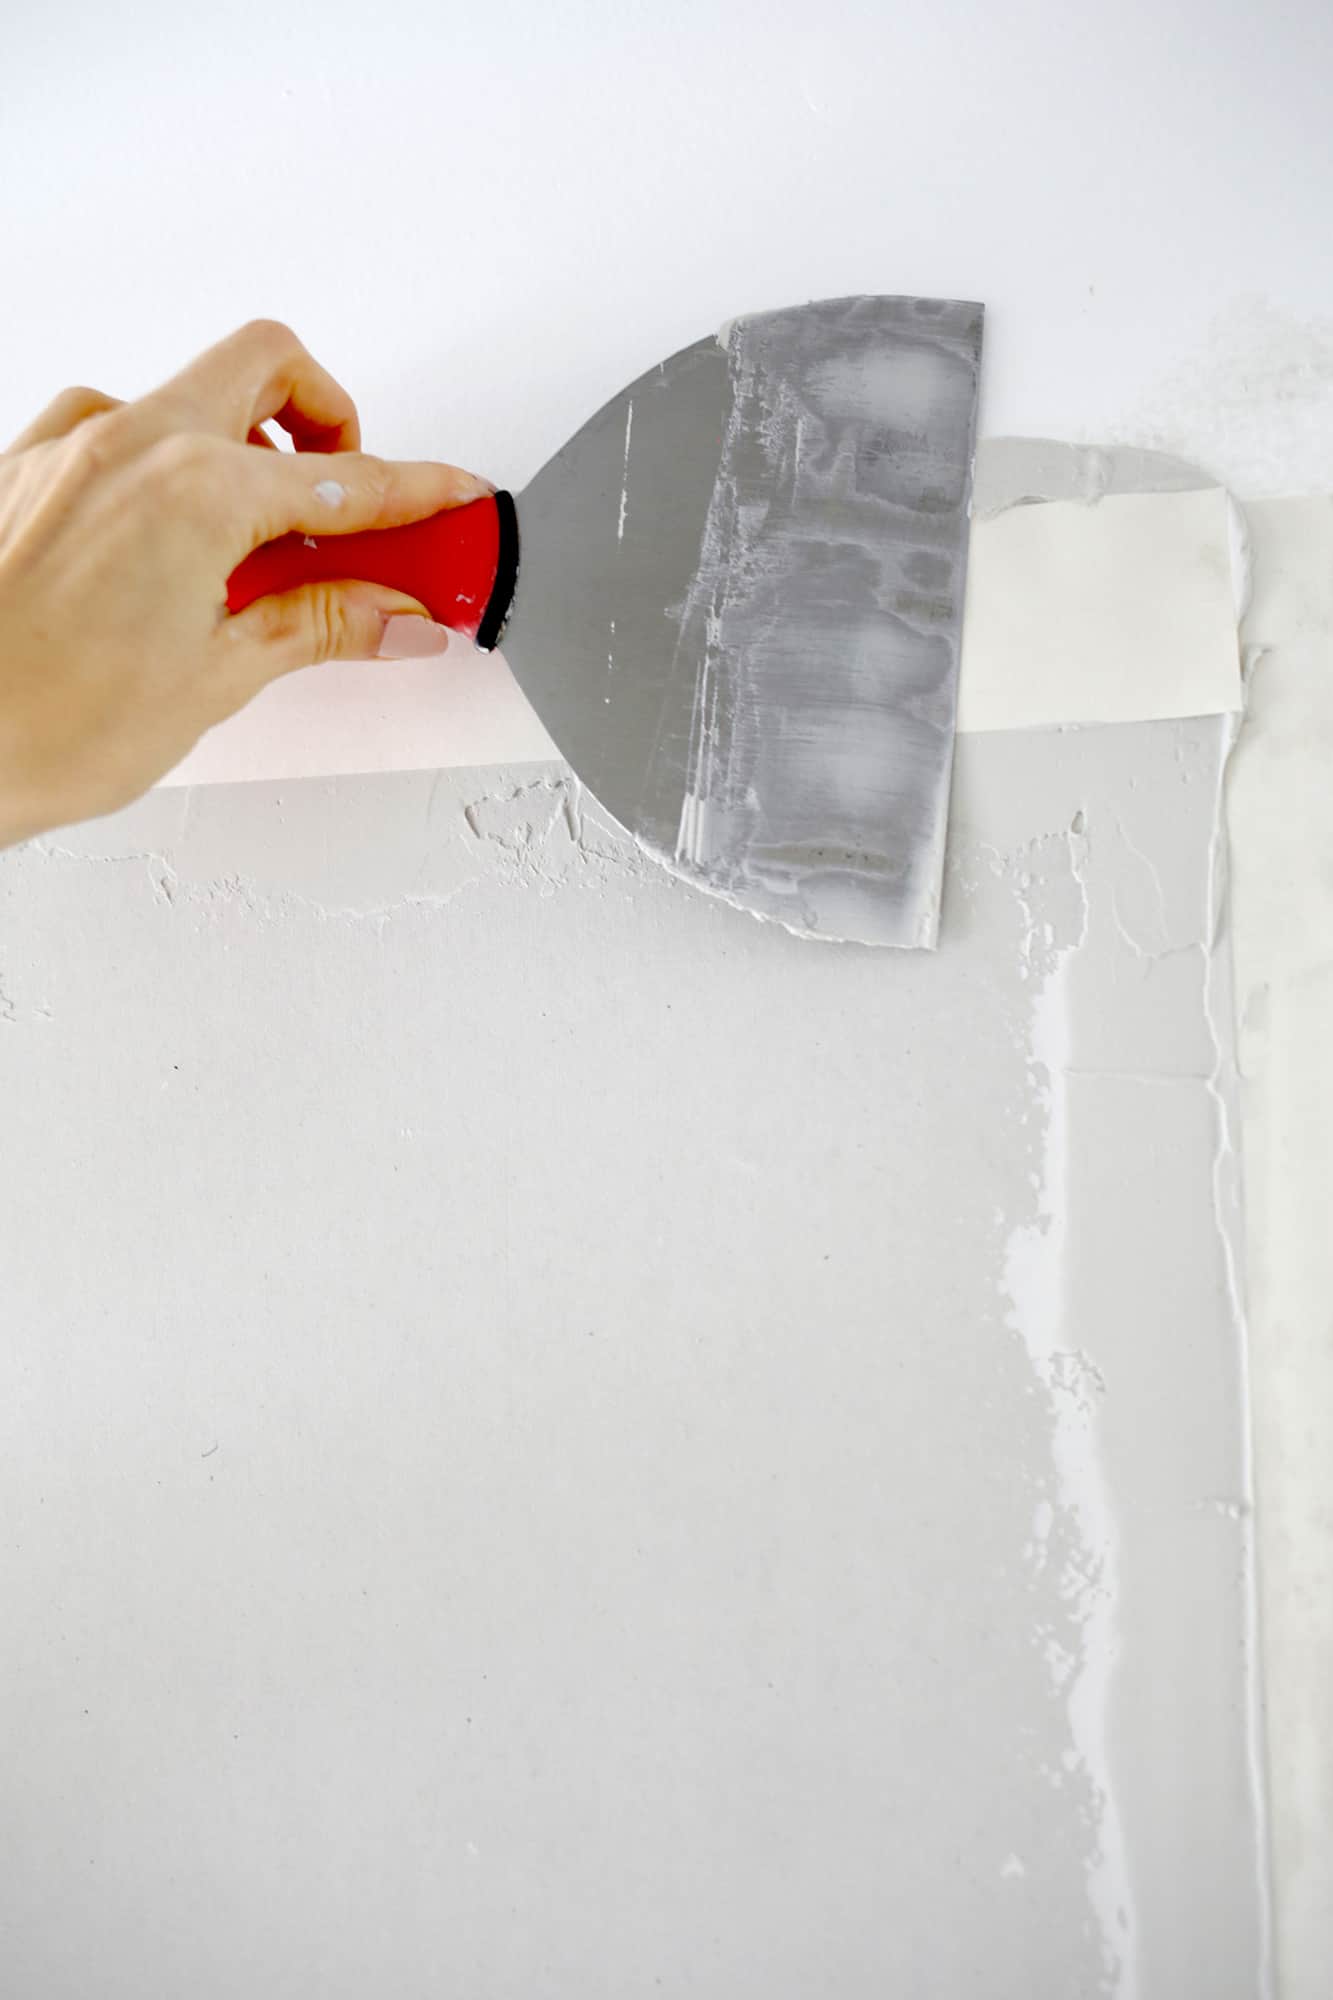
 Allow the tape and mud to fully dry and then do another coat of mud over the tape (I like the lightweight mud for skim coats since it’s easier to sand) that’s also been mixed in your pan and watered down a bit more so it’s like a pancake batter texture. You’ll want to use a larger 10″ knife for this second coat of mud and go out further than the previous coat did. There’s tons of great DIY drywall videos out there, but I found this guy and this video to be the most helpful when watching people’s technique. You’ll want to cut/feather the edges of your coats as you go to help cut down on sanding time later (this is a great tutorial to watch on cutting as well as the whole process). I’ve seen tutorials where people do and don’t cover in the entire middle of a drywall repair like this rather than just mudding over the taped edges, and while I didn’t do the whole middle on this job, I did fill in the middle when I drywalled over the long narrow niche in our living room and I do think that one looks a little better on the fade out. So if I had a time machine I’d probably fill in the middle on this window as well, but it’s not that noticeable overall.
As I am still a beginner at drywalling, let me say that it is totally possible to not yet achieve perfectly smooth skim coats and still come out with a pretty good looking wall at the end. I know it’s frustrating to see the pros make it look so easy to perfectly butter up all those joints and only need three seconds of sanding, but it’s OK to have a more bumpy looking product while you learn to mud. You have to sand more to get it all smooth, but it’s still possible for it to look great when finished and you’ll get better the more you do it!
After your second coat is dry, do a final skim coat with a 12″ knife, feathering out the mud even further than the previous coat. Once your second coat of mud is dry, you are ready to sand! Some people like to sand in between each coat, but sanding just once at the end worked out fine and is less effort overall. Use a sander and sanding screens (make sure to wear a dust mask!) to sand down your bulkiest bumps and then use a fine grit paper to do final sanding (for larger areas, most people use a pole sander, but I still like a hand sander where I can for more control). You can use either a pole sander or a handheld sander (these sanding sponges are great for fine finishing on areas and corners) and sandpaper sheets to sand your wall smooth. Sanding is a super messy job so make sure to have eye goggles and an N95 mask for dust protection.
I also bought this inexpensive contraption to help with dust control when sanding, and while it is a little harder to move the sanding block around with the vacuum suction, it really does a great job of getting the dust into your vacuum rather than the rest of your house. You can also hold a shop vac hose under your sander while you work and that does help some too.
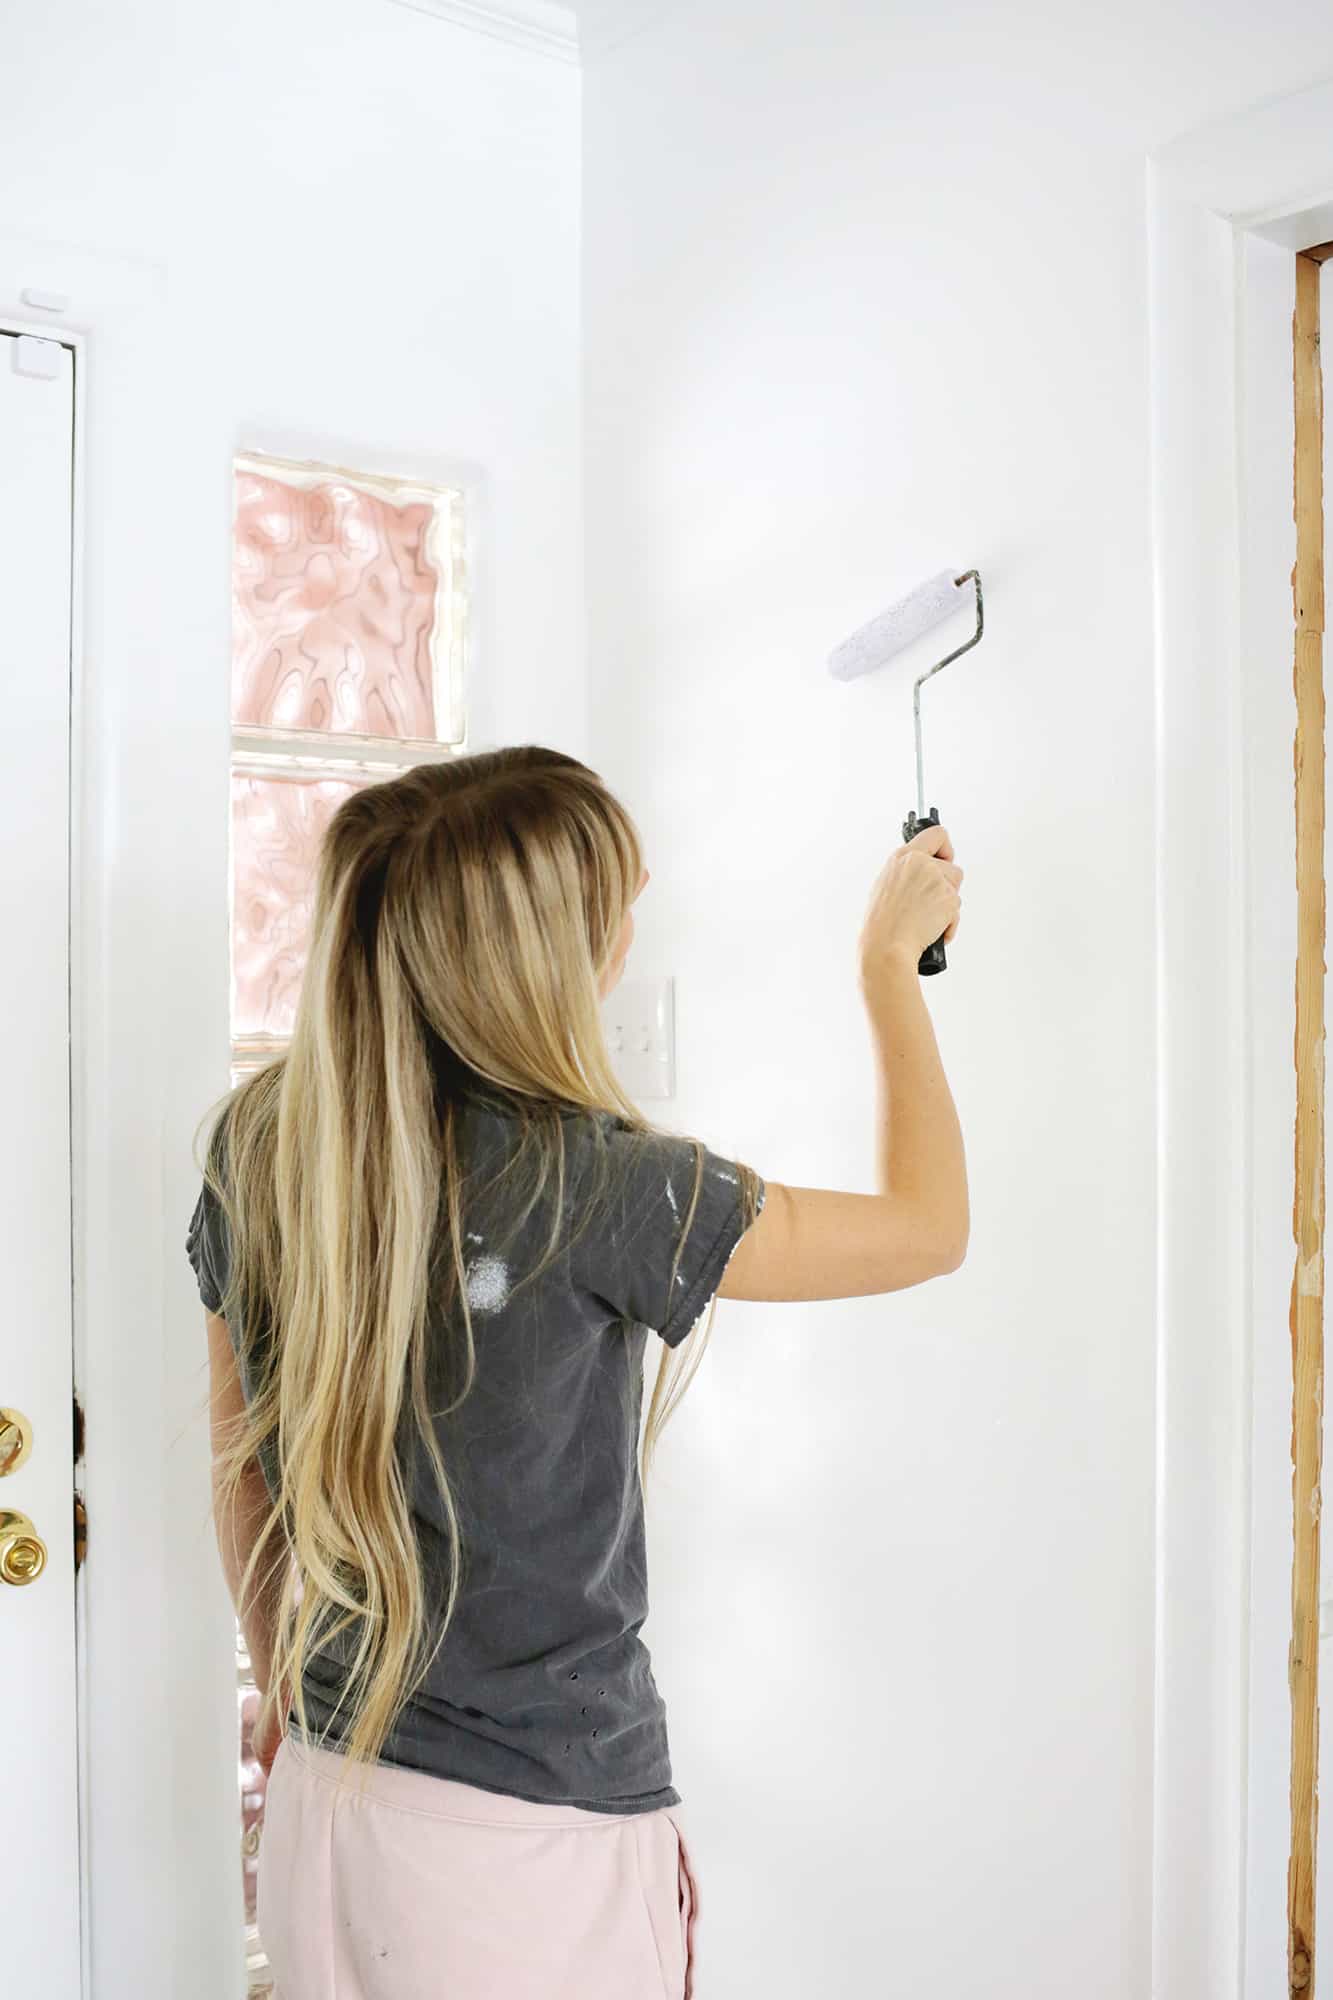 Once both sides of your wall are sanded and smooth, use a drywall sealer primer and you can paint your wall! I would use a thicker nap roller (like 1/2″ to 3/4″) when painting over the drywall mud to give it a little bit of texture to match the surrounding walls (most walls have some texture from being painted a few times—you just don’t notice it until you see something really smooth right next to it!). But once your paint is dry, you can sit back and admire your work!
 Overall, it’s been a challenge to learn how to drywall, but I know it’s a skill that will come in really handy over the years (I love this easy hack I learned to patch a hole in drywall)… and like I said, don’t worry about having a perfect mudding technique as you get started! You can always add more or sand more as needed and you’ll get better as you go. Now, go fill in that window or pass through and make it look like it was never there! xo. Laura
Laura you are a freaking BOSS!!!!
Awwwww thanks!!
Laura
#1. you are a DIY genius, Laura!!! #2. do you have hair extensions or is that your actual hair length? any tips for growing out hair? mine is thin and falls out in every shower and I am struggling!!
It’s normal to loose up to 100 hair per day. It is not the shower that causing it, but it a natural hair growing process. Contrary, not washing the hair can cause some dirt and old build-up that can cause the hair to fall. An other cause could be not exposing enough to sun. Natural sunlight is extra important
Hi Amanda! Thanks!! That’s all my hair but I had trouble growing it until I got pregnant with my daughter…since then it just grows like crazy!
Laura