") While there are lots of pros and cons about moving from one place to another, it certainly becomes clear very quickly what you miss about your old place.
While there are lots of pros and cons about moving from one place to another, it certainly becomes clear very quickly what you miss about your old place.
For example, I didn’t realize until we started the moving process that we had an extraordinarily large walk-in closet in our last home.
I mean, it was bigger than the bathroom it was connected to! I got used to having the extra space and I even made a little jewelry station in the old closet that kept all my accessories organized. I. Loved. It.
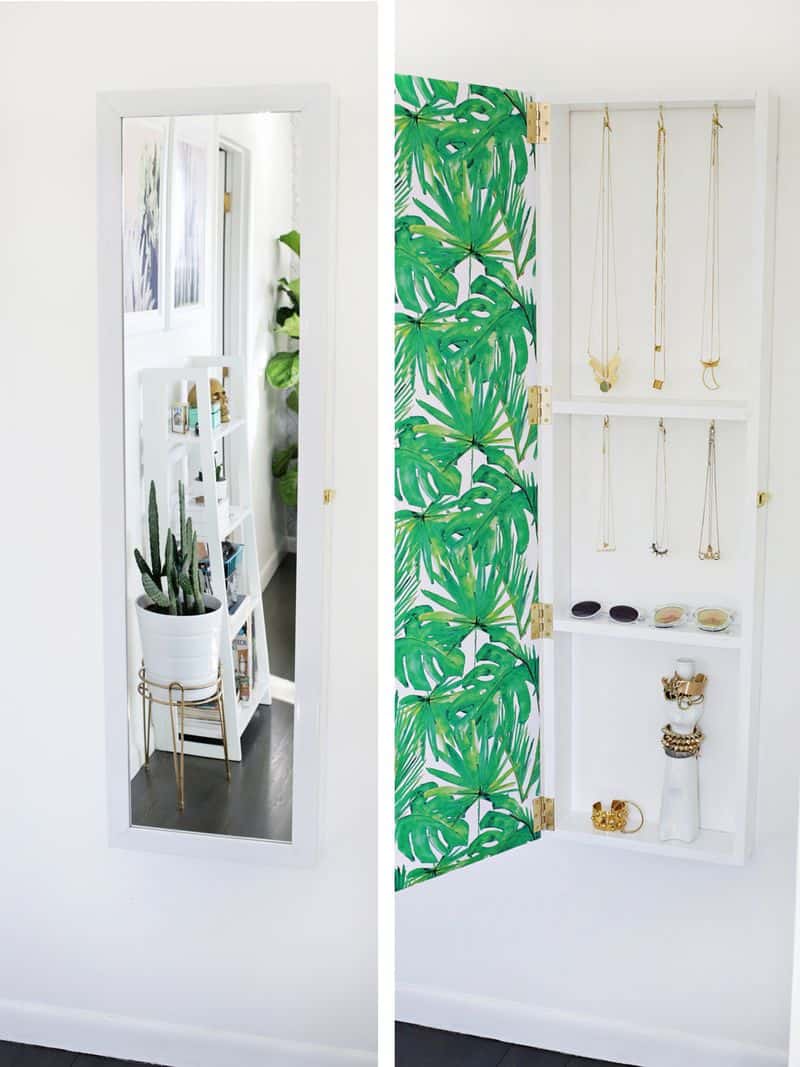
However, the days of my walk-in closet are gone in our new 60s ranch, so I have to be a little more creative when it comes to organization. A jewelry station hidden behind a full length mirror was just the fix I needed!
It takes up only inches more space than just the mirror would, but it keeps all my jewelry neat and tidy. Wanna make your own?
Related: The Best Full Length Mirrors (Splurge + Save)
R
") Supplies:
Supplies:
-6′ x 3 1/2″ boards (I used 3 boards that were 3/4″ thick)
-full length mirror
-wood screws
-super glue
-paint
–D-Ring hangers (x2)
–cabinet catch
–2 1/2″ brass hinges (x4)
–cup hooks
-removable wallpaper and X-Acto knife (optional)
So, basically you are going to make a frame that is the exact same size as your mirror, and your mirror will act as the door to the shelves inside. You can either have your wood cut at the home improvement store or use an inexpensive jig saw if you don’t have access to a miter saw.
Cut two pieces of wood that are the exact length of your mirror. Cut four pieces of wood that will measure out to the exact width of your mirror once placed between the two long boards.
So, if your wood is also 3/4″ thick, your short board measurement would be the width of mirror minus 1 1/2″ that accounts for the two 3/4″ boards on either side.
Two of the boards will go at the top and bottom to complete your rectangle, and the other two can be placed anywhere in between to divide the space into three areas. If you want more shelves, just cut more boards!
")
") Once the boards are cut to size, use a power drill and wood screws to screw the boards into place from the outside edges of the long boards (you may want to pre drill the holes first if using hardwood to make it easier).
Once the boards are cut to size, use a power drill and wood screws to screw the boards into place from the outside edges of the long boards (you may want to pre drill the holes first if using hardwood to make it easier).
Once your frame is complete, you can paint or stain your frame with as many coats as needed.
") For hanging purposes, install your two D-ring hangers on the back of your wood frame about 4″ from the top of the frame.
For hanging purposes, install your two D-ring hangers on the back of your wood frame about 4″ from the top of the frame.
") Before you hang your frame, install the right side of your brass hinges onto the left front edge of your wooden frame (or reverse the side if you want your door to open the opposite way). Close the hinges and place a few dollops of super glue on the top of each hinge.
Before you hang your frame, install the right side of your brass hinges onto the left front edge of your wooden frame (or reverse the side if you want your door to open the opposite way). Close the hinges and place a few dollops of super glue on the top of each hinge.
Quickly place the back of your mirror on top of the frame and let the glue set. The super glue will keep your hinges in place when you open the mirror as you would a door.
The glue is only temporary, so once you know the mirror is placed right and the “door” opens well, screw the hinges into the back of the mirror to fully secure. Now you can hang your frame!
If you use a line of painter’s tape at the top (use a level to keep it straight) you can measure down 4″ from the top so you know where to put the drywall screws to hang the frame on.
") To give the storage cabinet more personality, I added this adorable removable wallpaper to the back of the mirror. I used an X-Acto knife to trim around the hinges and cut parallel to the outside edges.
To give the storage cabinet more personality, I added this adorable removable wallpaper to the back of the mirror. I used an X-Acto knife to trim around the hinges and cut parallel to the outside edges.
") Now that your cabinet is up, you can install your cup hooks into each shelf and a cabinet catch on the side to keep your mirror door closed when not in use. Add all your jewelry to the new hooks and pat yourself on the back!
Now that your cabinet is up, you can install your cup hooks into each shelf and a cabinet catch on the side to keep your mirror door closed when not in use. Add all your jewelry to the new hooks and pat yourself on the back!")
")
")
")
") It’s amazing how little space this system takes up on the wall, and yet when you open the door, there’s a whole world of accessories inside!
It’s amazing how little space this system takes up on the wall, and yet when you open the door, there’s a whole world of accessories inside!
I was excited to do this project to simply solve my necklace clutter problem, but I have to tell you that once it was all put together, it came out even better than I hoped it would.
Hooray! I love that it’s also really customizable for how many compartments you want, how big each one is, how many hooks there are, etc. If you could use a little more storage space and organization in your bedroom, definitely give this one a try! xo. Laura
Love love love! Any suggestions on how to incorporate storage for stud & hook earrings?
So pretty! I love it. I will use in my home decor
it so fine thanks
https://www.imtilak.net/
Wow! Such an amazing idea!! This looks SO good, Laura! You did an amazing job!
Hello,
I was very excited to tackle this project. I got all the way to the point of attaching the mirror with hinges. Unforunately, the Target mirror that you had a link for does not have a wood frame, making it impossible to drill in to. I doubt that the mirror will stay attached on the hinges with just glue. I hate to scrap the project so far in, but I may have wasted a lot of time and money : (
Hi! A frame doesn’t have to be wood to drill into (I drill into LOTS of materials), the original mirror that I linked and used is holding up just fine with the screws I used so it should work on that mirror even if it’s not wood 🙂 Laura
Love this idea and thinking could add shelves and a mirror inside for makeup.
Thank you so much for posting a step by step!!! I have been looking to do this inside my walk in closet. I would have never have thought the paper it either!!! Brilliant!
Hi Laura,
Great post as always. Very much space saving it is . How much cost it would be for this jewelry storage?
http://bestshelvingunits.com
I have already wanted to created something like that, but I’m so afraid that I will destroy the walls! Your result is seriously awesome!
I like the leaf paper too!
Best Regards,
Angelina
www.just-angelina.com
LOOVE
http://anotherfreakyblog.blogspot.com.es/
In six weeks, we are moving to a new house that is big on space and low on storage options. This is exactly what I needed.
It’s a cat shaped wine bottle 🙂
Laura
That’s actually a bookcase but we will be posting a DIY blanket ladder soon!
Laura 🙂
It’s thrifted 🙂
Laura
They are from LuLus 🙂
Laura
Good idea!
Laura 🙂
This is absolutely gorgeous! I really need this since my necklaces always get tangled up on my tiny jewelry tree.
This is an amazingly great idea!!! You rock!!
I am not crafty at all, but may attempt this super cute project. What are your bracelets stacked on? I have too many bracelets and don’t know how to store them! This jewelry cabinet is great. Thanks for sharing!
Brilliant idea and it looks fantastic 🙂