 For years I’ve seen these beautiful, modern address plaques on the front of houses in Palm Springs, and I knew I eventually wanted one for our own home. They’re so fancy!
We recently had our exterior painted white, and it COMPLETELY changed the appearance of our home. Now I get excited every single time we drive up. It’s much more modern and vintage all at the same time.
It’s definitely the most shocking before/after moment we’ve had! We noticed our neighbors driving by veeerrry slooowwly. Haha!
So now that the paint is on, we’re working on tweaking the details of our exterior. This past week we planted two peony bushes, we’re creating a landscaping plan, we swapped out all the light fixtures for simple/modern designs, and of course—I wanted to add some fun GOLD details to the front of the house.
I haven’t blogged about it yet (I will, I promise!), but here’s a photo where you can see the hardware we chose for our entryway—
 That pineapple door knocker is vintage, and it’s one of the first things I picked out when we first found this house!!
Anyway—I could go on all day, but let’s get into the project!!
 Supplies:
–modern brass numbers (5 inches tall)
-wood pieces (guide for measurements below)
-drill and drill bits
-hammer
-small nails
-wood glue
-white paint
Step One: Measure and cut.
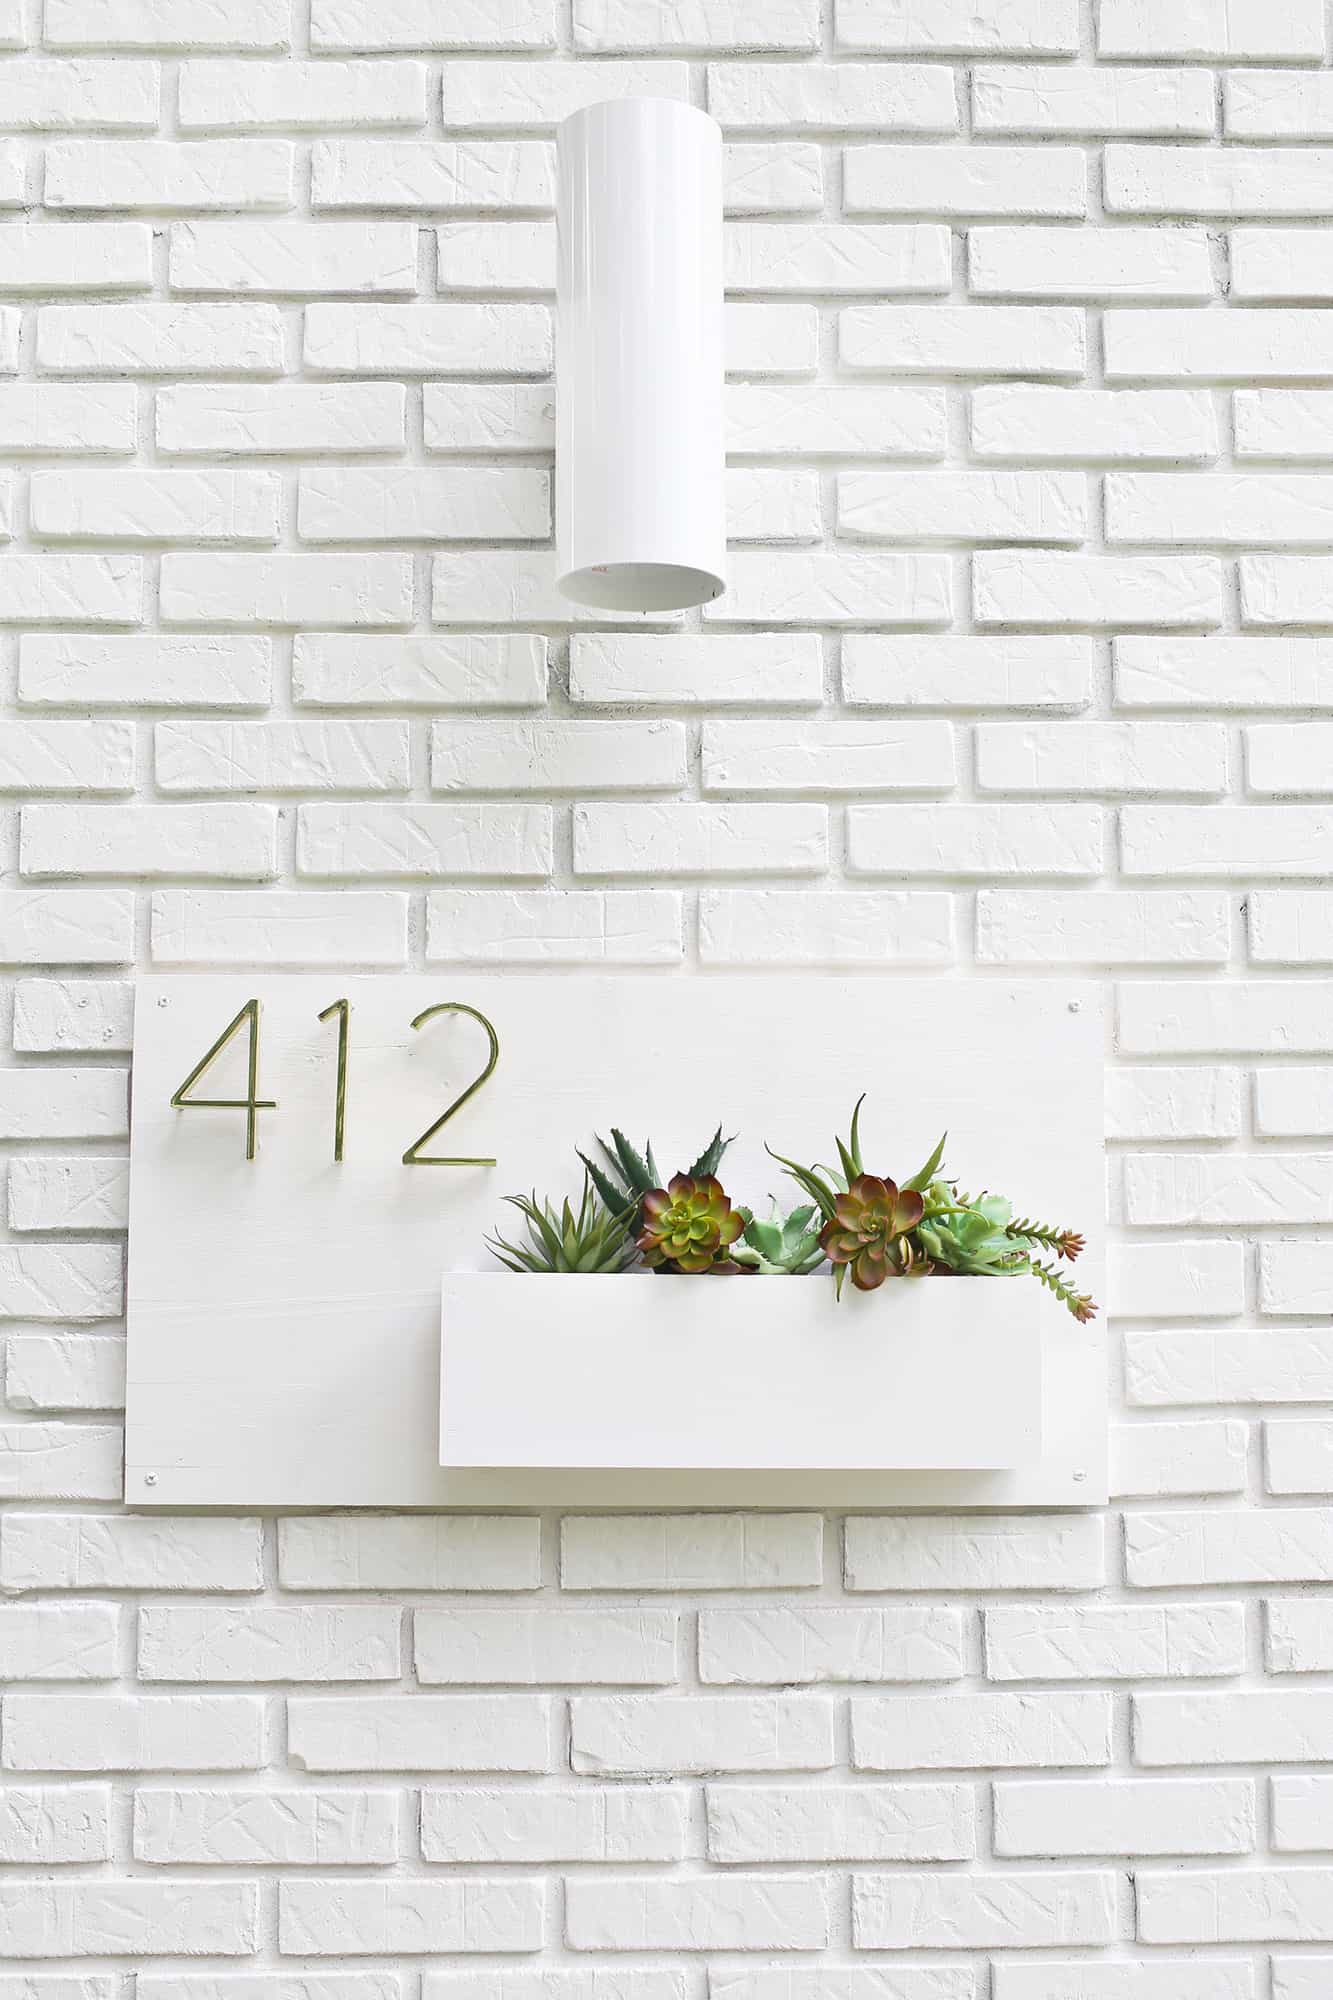
Start by choosing what size you want your sign to be. You can customize it for your space, or if it fits, you can make yours exactly the same size as ours. Ours is 30″ x 16″ with a 17″ x 5.5″ planter. It’s fairly large, but it fits the space nicely.
They can cut all the wood pieces for you at the hardware store if you don’t have a saw. Just make sure you take correct measurements with you!
 Step Two: Assemble the box. Using wood glue before the nails will create a more secure, sealed box. This is best for a planter.
Depending on what you plan to plant in it, you can add drainage holes in the bottom of the box. We did not. When you attach the box to the front, be sure to drill pilot holes through the base.
This will prevent your wood from splitting. Screw the box on from the back of the base.
Step Three: Paint. We used the same white paint as the exterior of my house, to match. If your house isn’t white, we suggest bright white outdoor paint, but you can use any color you like!
 Step Four: Add address numbers. Place the numbers where they will go on the sign, then cover the numbers with a cloth and tap them down with the hammer.
This will leave indentions where each hole should be drilled. After you drill the holes, just stick the numbers on the front of the sign by pressing them into the holes.
 Step Five: Plant some plants in the box. Depending on your climate or the time of year, you can choose what you want to plant in the box.
I will probably do flowers next spring, but since cold weather is relatively close (like I’ll blink and it will be here), I decided to go for faux plants since they will last longer.
Most craft stores have a pretty legit selection of faux succulents these days. If you need help finding places to buy them online, check out this post.
I know a lot of you REALLY hate faux plants, but I stand behind the idea that there is a time and place for them. Obviously I love real plants even more! But there’s no shame in using a few fake succulents here and there!
Here are a few more images of the finished project…
 I’m so happy with this project! It looks a LOT more expensive than it really is, and it’s an afternoon project (meaning it only takes a few hours to make!). Win-win all around.

I definitely need this house number planter. 🙂 So neat and pretty.
The ‘4’ is a bit off but thanks for the idea as I will be making something similar but with bigger, bolder numbers as my house have huge frontage and being able to see the numbers from any angle is a must!
This is very sleek and pretty. You can even change out the plants to anything you want and for holidays. Nice,
Anybody done this and have exact measurements of all 4 wood pieces on the planter?
Very nice. I like the white. We used a cedar stain on ours.
Love this tutorial. Now that the box has weathered a couple of seasons, how is it holding up? Did you end up planting in it this Spring? Did you water proof the box to help prolong life or did you use removable liner so you could water outside of box? Would love here here your followup review!
Oh, wow! Now, that is just lovely. It’s modern and classic all at once! I love the use of the succulents – that really furthers the chic feel. Also, succulents are just so darn easy to take care of, so that helps. I’d like to think that if I had flowers right there, it would be easier for me to remember to water them – not necessarily true!
Love this! I made it with things I had on hand, so all I bought were the flowers. Turned out a little different, but I still love it. Used the numbers I had, just painted them to match the lights and painted the plant box red to match my shutters.
That looks really incredible.
MUST try this out at home.
Thank you so much for sharing!
This is so lovely! Would it be possible for you to share how you affixed it to the brick? Did I miss that? Thank you tons!
Great way to change flowers with the seasons (like Minnesota).
Good article…
nice article thanks for sharing!!!!!!!
Looks so good 🙂
I love the look of this! SO chic! 🙂
Nicole | In The Life of NM
What a cute idea! I wish I had a place on our house to put one!
=) Bridget | http://nuttyhiker.com
Such a cute idea!
www.petiteandhungry.com
Whoa, your house number is 412! That’s like my favorite Switchfoot song, so cool!
https://youtu.be/_sf9eVGSEgo
This is such a cool DIY I will have to do it http://www.hannamarielei.com
Wow. There’s a reason you guys are so popular….you do amazing things with such a simple, but lovely DIY! Would you ever maybe show us a street view of your front door?
Thank you for the answer, Collin!