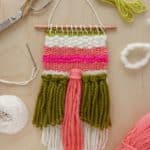
How to Create a Basic Weaving
This post teaches all the basics to create your first full weaving.
Ingredients
- loom
- cotton yarn for the warp The warp is the foundation of your weaving and goes up and down across the pegs of your loom.
- yarn for your weft This can be any size thickness, or color you prefer. All of mine was purchased at Jo-Ann, as they had the best selection of large craft stores, but if you have a local yarn shop in your area, I suggest checking them out for special colors and natural fibers.
- wooden dowel rod copper pipe, stick, etc. Something sturdy and wider than your weaving by 1″ – 2″.
- tapestry needle This will be about 3″ long with a large eye and a blunt end.
- shuttle Mine came with my loom and is shown above with the U-shaped ends. This is for wrapping your weft yarn around and sliding through the opening that is made when your shed stick is raised. I tend to not use mine and just stick with using my needle.
- shed stick This is the wooden object to the right of the shuttle above. It looks like a paint stirrer. This is woven through your warp and left there to help save time when you’re moving your shuttle through to create a new row. Some use two sheds but I find it most efficient to leave only one in on this type of loom.
- scissors
Instructions
- Create your warp. First make a loop knot at the end of your warp yarn, and fasten in to the top left peg. Then wrap it down to the bottom left peg and back up again.
- Continue on to make it as wide as you’d like, and finish with another loop knot. This will allow you to add a tassel to that last peg. You don’t want your warp to be too loose or too tight. As your warp fills with weaving, it will become more taut, so keep that in mind. Gently pressing down should even out any uneven sections.
- To create your tassels at the bottom of your weaving, cut a length of yarn and fold it in half and then in half again. I suggest between 15″ – 20″, and you can always trim it up when you’re done.
- You’ll make one of these per peg at the bottom, and slip the center of your folded fringe over the first warp string and under the second and then back to the top.
- Fold the long ends through the center as shown.
- Pull gently so that the knot tightens.
- Pull your tassel all the way to the bottom of the peg so it rests underneath. Repeat with the rest of the pegs, and then trim the bottoms to make an even or angular bottom.
- Do the same for your last peg by going through the loop knot and finishing it up.
- Thread your tapestry needle with about 4′ of yarn for your first layer of color. I always like to start about three warp strands in so that my tails don’t stick out on the sides. To do this, skip the first three warp strands, and then go under the fourth and over the fifth and under the sixth, etc.
- Repeat over and under until you get to the other side. For the sake of consistency, treat that last loop knot as a single warp strand.
- When you’re pulling your yarn through, pull up to the opposite corner, and then gently push the yarn down so that it rests snugly on top of the previous row. Some use a fork for this step, but I find my own hands to be just as effective with these thicker yarns. If you start with smaller yarn, you’ll want to try using a fork and see what you think.
- When you get to the end of the yarn or would like to switch colors, end on an under, and keep the 3″ – 4″ tail tucked in the back. Be sure to leave about that much so that you can stitch it under and hide it on the backside.
- To continue the same color or add another color, stick the tail of the new cut of yarn under, and leave a 3″ – 4″ tail. It should go under so that it looks like it’s picking up where the last piece of yarn left off.
- Continue on to the next row, and gently press it down from the center out to each side to keep enough slack, not to turn into an hourglass shape!
- Add another layer or two, but finish on the end this time.
- Time to learn a rya knot. I cut three strands of yarn in a contrasting color that measured about 15″ across.
- I chose two warp strands a little bit in from the edge and wove my three green pieces through them both.
- Then, I stuck my finger and thumb between those two warp strands, grabbed the green yarn, and pulled up about 2″.
- Next, I grabbed the loose ends and pulled them down through the raised strands.
- Finally, I pulled down gently and adjusted the knot.
- I counted strands so that I got three rya knots on the left and three on the right. Once I was done, I gave them a trim.
- Now it’s back to weaving with the yarn we set aside. I wrapped it around the edge one extra time to help fill in the blanks from the space the rya knots were taking up. Then I continued under the warp strands that held my rya knots and picked back up for over and under in the center and then went behind all the rya knot strands. This filled in the space between the two sets of rya knots.
- You can see where I went back under the rest of the warp strands that held the rya knots before coming back up on the other side. I only really needed one row like this.
- I then continued back the other way, going over and under all the way across.
- I added a few more rows of that white yarn and decided I wanted another layer of a rya knot, so I cut about six strands of chunky peach yarn measuring about 15″ long each.
- I found the center of my warp and used the same method to make another rya knot. I kept my strands longer than the green ones, but shorter than the white tassels, to create layers and keep the eye moving.
- After adding another section of peach with the basic over and under weaving technique, I decided to start a soumak stitch. This can create a braided effect and add some stronger texture to your piece. This time I did start from the edge and came up from under the outer warp strand and then wrapped back around it and came back up after the second warp strand. I made sure to leave a 4″ tail to tuck in later.
- I wrapped back to the left and then came up after the third warp strand.The trick is to go forward two strands and then back one strand each time.
- Again, I went back to the left and then came back up after the fourth warp strand.
- I finished until I got to the end. You can see how the pattern is different from the basic over and under.
- To go back the other direction, you have to wrap around the outer warp strand once and then twice before coming back up after the second warp strand.
- Wrap back to the right, and then come up after the third strand from the edge.
- Wrap back to the right, and then come up after the fourth strand from the edge. Repeat until you’re all the way across that row. You’ll wrap around the other edge and then be done. It should look like a braid
- I then added another layer of peach before starting with my chunkiest yarn. Again, I started from about four rows in, and instead of going over and under every other strand, I did two strands at a time. This creates a basketweave. It’s just another way to add texture and keep things from feeling monotonous. I added four rows of that and then another few layers of light green in a thin yarn to lock things down.
- Once I was done with adding more yarn, I flipped my weaving over to clean up the back. In the past I’ve just tied random ends together and trimmed them, but that can get bulky. The preferred method is to take each tail in your needle and stitch them through the back side of some of the yarn. Then you remove the needle and trim the ends.
- Flip it back over, and carefully cut your warp strands two at a time and about 4″ – 6″ above your last row of yarn. You’ll want enough that you can tie a knot and then fold them behind your weaving and tuck them in just like the last step. Tying a knot secures your weaving from falling apart. Once all of your warp strands are tied in knots, you can gently pull it off the bottom pegs.
- Tuck the top strands back behind your weaving as you did with the rest of the messy strands.
- Using more warp yarn, tie a knot in one end, and stitch through each knotted strand and up and over your dowel rod, copper pipe, driftwood, etc. I have these on hand, so I used them, but dowel rods are much cheaper.