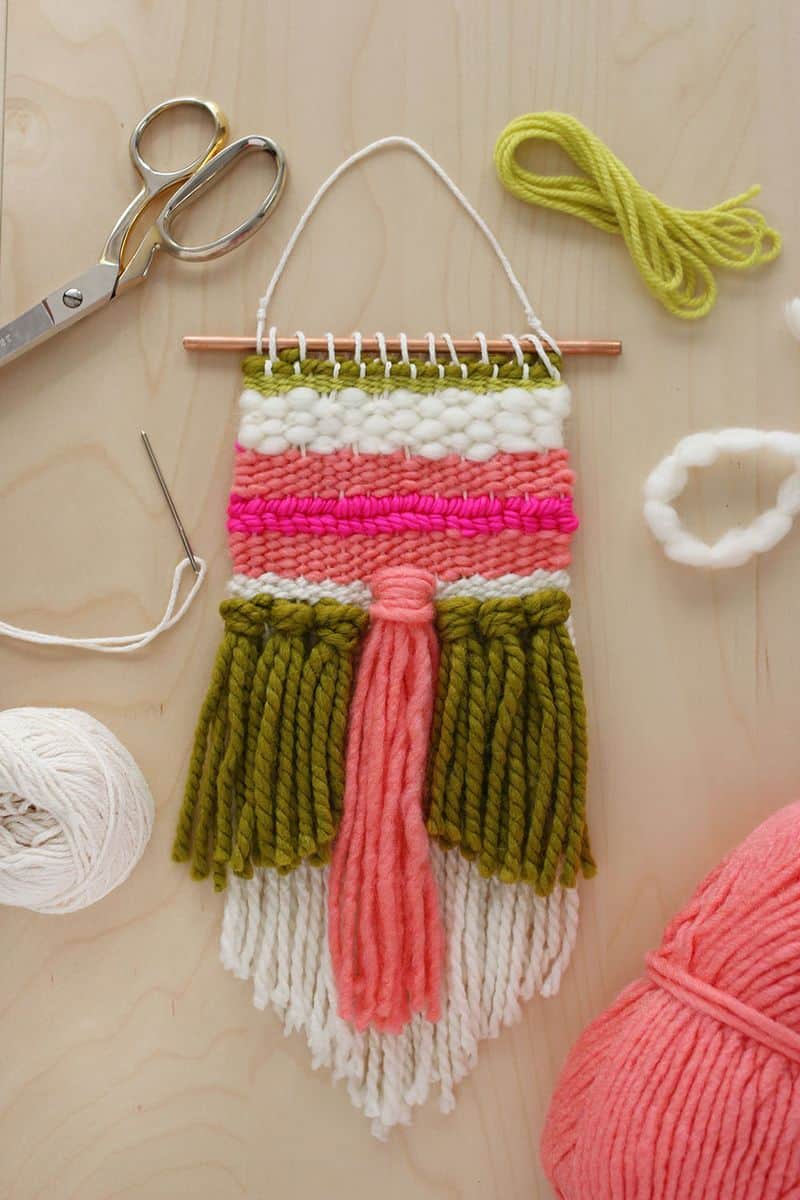
Are you ready to learn to weave? With this blog post (and many others) we have been teaching readers to weave for almost ten years. It’s one of those century old traditions that is both practical and beautiful. This is our beginners guide to weaving.
This tutorial is a simple wall hanging with a few different elements you’ll need to make your own interesting and unique piece. If you want to learn even more techniques, be sure to check out our full weaving archive of projects and ideas.
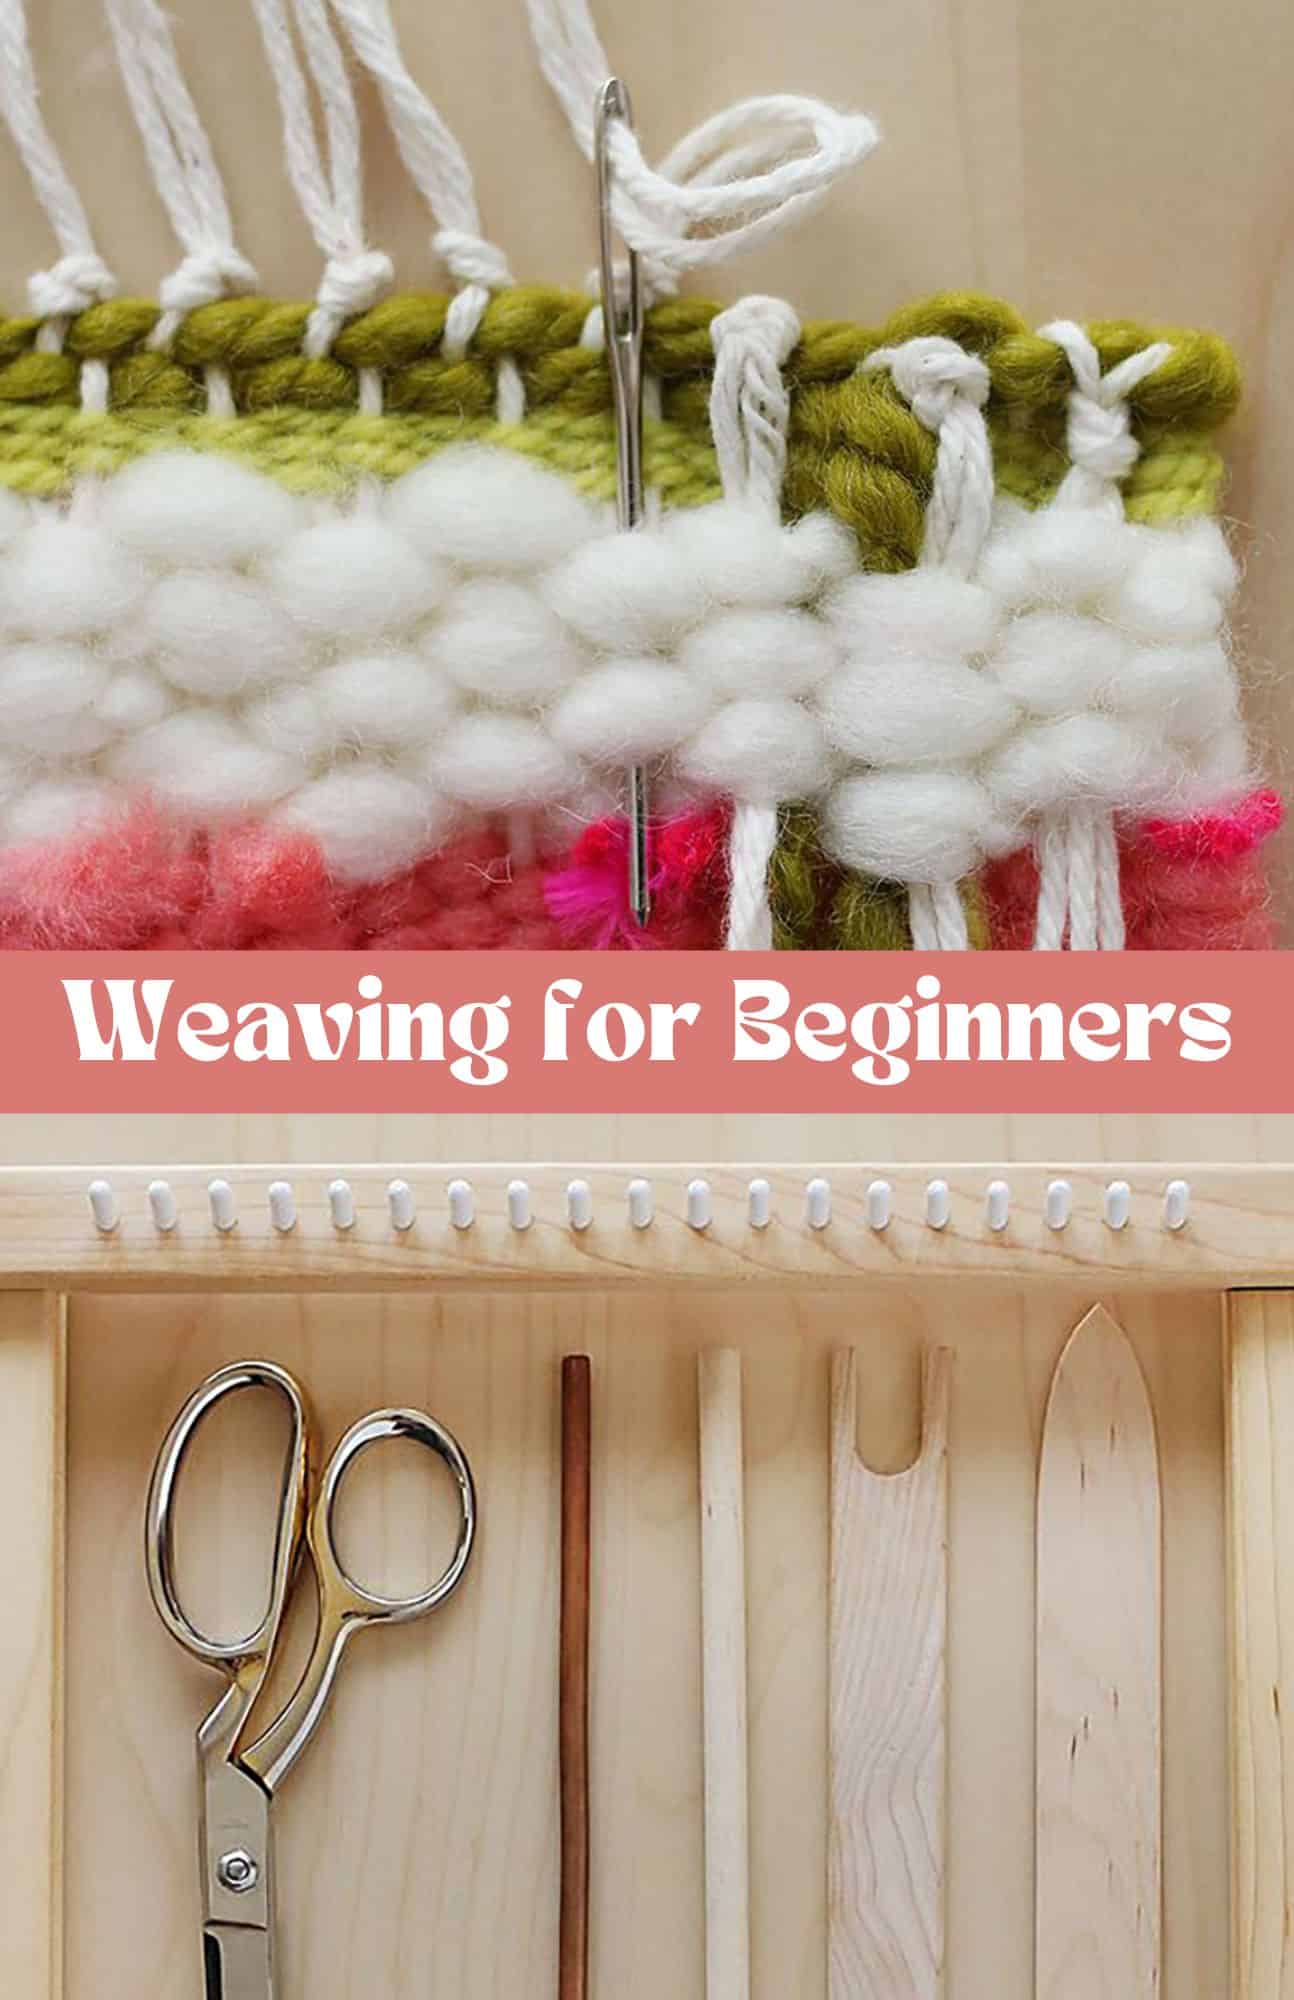
Table of contents

How I Learned to Weave
I decided late one afternoon in 2013 that I wanted to teach myself how to weave. I didn’t want to spend much money on a loom or even wait a few days for one to arrive at my doorstep, so I just found an old drawer from a dresser I had stashed in the garage, flipped it over, and nailed about 20 nails across the top and bottom.
Soon after, I made a weaving that I turned into a clutch, and even took on the monster project of weaving my own 4′ x 6′ rug from strips of fabric.
This year, I’ve woven and sold my first collection of wall hangings, and taught my first class and published my first book- DIY Woven Art in 2016.. So, let this be a warning to you. If you finish your first one, you may or may not be able to stop there.
Weaving Terminology and Vocabulary
- Warp the foundation of your weaving and goes up and down across the pegs of your loom.
- Loom the structure that you use to give your weaving support as you work. There are different types of looms including: floor looms, table looms, lap looms and circle looms among others.
- Weft this is the thread that you weave between, around, and all over the warp threads. This is what creates your patterns and design in the weave.
- Shuttle a tool designed to neatly store the thread of the weft yarn while you work.
- Shed stick a flat piece of wood (or other material) you weave between your warp threads.
- Roving thick but wispy yarn that has air between the fibers, it can add a different texture to weavings.

 My first loom was the lap loom shown above. It’s definitely a starter loom and was great until one of the pegs snapped off.
You can always learn on a makeshift frame or wide piece of wood with nails across the top and bottom (see below) or even a sturdy piece of cardboard.
Once you decide weaving is officially your thing, you’ll likely want to upgrade to a larger, more durable loom.
Supplies for Weaving
–loom
–cotton yarn for the warp
–yarn for your weft. This can be any size, thickness, or color you prefer.
-wooden dowel rod, copper pipe, stick, etc. Something sturdy and wider than your weaving by 1″ – 2″.
–tapestry needle. This will be about 3″ long with a large eye and a blunt end.
–shuttle. Mine came with my loom and is shown above with the U-shaped ends. This is for wrapping your weft yarn around and sliding through the opening that is made when your shed stick is raised. I tend to not use mine and just stick with using my needle.
–shed stick. This is the wooden object to the right of the shuttle above. It looks like a –paint stirrer. This is woven through your warp and left there to help save time when you’re moving your shuttle through to create a new row. Some use two sheds, but I find it most efficient to leave only one in on this type of loom.
–fabric scissors

How to Make a Loom
If you’re going to make your own loom from a piece of wood or a frame, use a ruler and mark every 1/2″ across the top and bottom or as wide as you’d like it.
I suggest only making it about 8″-10″ tall for your first. Mine was made in a hurry, so it ended up being slightly crooked, but it still got the job done.
If you’re using cardboard, just cut a piece the size you’d like and tape one end of your warp yarn to the back near the top left corner and wrap it around every 1/3″ or so, and tape the other end on the back near the bottom right corner.
You’ll just use the warp on the front of the cardboard.
 Gather your yarn. I love mixing textures, so I tend to use at least three different textures in my wall hangings.
Chunky yarns make for quicker work as they take up more space than smaller yarns, so keep that in mind when you’re making your selection.
I gravitate towards tonal colors with lots of white, so I have used two pinks and two greens along with two textures of white. Choose colors that reflect your personal style.
One of the biggest factors in any new project looking great is a great selection of colors. Scan Pinterest for color pairings that catch your eye, and maybe even make a folder to reference when you’re ready to start a new weaving.

How to Weave
Warp (how to start)
Step One: Create your warp. First, make a loop knot at the end of your warp yarn and fasten in to the top left peg. Then, wrap it down to the bottom left peg and back up again.
Step Two: Continue on to make it as wide as you’d like, and finish with another loop knot. This will allow you to add a tassel to that last peg.
You don’t want your warp to be too loose or too tight. As your warp fills with weaving, it will become more taut, so keep that in mind. Gently pressing down should even out any uneven sections.

Tassels
Step 1 To create your tassels at the bottom of your weaving, cut a length of yarn and fold it in half and then in half again. I suggest between 15″-20″, and you can always trim it up when you’re done.
Step 2 You’ll make one of these per peg at the bottom, and slip the center of your folded fringe over the first warp string and under the second and then back to the top.
 Step 5 Fold the long ends through the center as shown.
Step 6 Pull gently so that the knot tightens.
 Step 7 Pull your tassel all the way to the bottom of the peg so it rests underneath. Repeat with the rest of the pegs, and then trim the bottoms to make an even or angular bottom.
Step 8 Do the same for your last peg by going through the loop knot and finishing it up.

Over Under Weave
Step 9 Thread your tapestry needle with about 4′ of yarn for your first layer of color. I always like to start about three warp strands in so that my tails don’t stick out on the sides.
To do this, skip the first three warp strands, and then go under the fourth and over the fifth and under the sixth, etc.
Step 10 Repeat over and under until you get to the other side. For the sake of consistency, treat that last loop knot as a single warp strand.
 This is when your shed can cut your weaving time in half. I wove my shed stick over and under and over and under all the way across and left it there, so that every time I need to weave from the right to the left I can stand it up and easily pull the needle through.
If you’re using a shuttle (the stick with the U-shaped ends above), then you’d wrap your yarn around that instead of using a needle, and then you’d slide it through that space created when you stand your shed up.
Scoot your shed up as you add weaving so that it’s always about 4″ above your last row. Once you get to the top, you may have to ditch it, as there won’t be much room.
 Step 11 When you’re pulling your yarn through, pull up to the opposite corner, and then gently push the yarn down so that it rests snugly on top of the previous row.
Some use a fork for this step, but I find my own hands to be just as effective with these thicker yarns. If you start with smaller yarn, you’ll want to try using a fork and see what you think.
Step 12 Keep going over and under the opposite of the row before until you reach the side where you started. If you end on an under, then wrap it over and continue.
If you pull your yarn out on a row, it’s usually because you didn’t wrap around the outer strand.
 Step 13 When you get to the end of the yarn or would like to switch colors, end on an under, and keep the 3″-4″ tail tucked in the back.
Be sure to leave about that much so that you can stitch it under and hide it on the backside.
Step 14 To continue the same color or add another color, stick the tail of the new cut of yarn under, and leave a 3″-4″ tail. It should go under so that it looks like it’s picking up where the last piece of yarn left off.
 Step 15 Continue on to the next row, and gently press it down from the center out to each side to keep enough slack, not to turn into an hourglass shape!
Step 16 Add another layer or two, but finish on the end this time.

Rya Knot
Step 17 It’s time to learn a rya knot. I cut three strands of yarn in a contrasting color that measured about 15″ across.
Step 18 I chose two warp strands a little bit in from the edge and wove my three green pieces through them both.
 Step 19 Then, I stuck my finger and thumb between those two warp strands, grabbed the green yarn, and pulled up about 2″.
Step 20 Next, I grabbed the loose ends and pulled them down through the raised strands.
 Step 21 Finally, I pulled down gently and adjusted the knot.
Step 22 I counted strands so that I got three rya knots on the left and three on the right. Once I was done, I gave them a trim.
 Step 23 Now it’s back to weaving with the yarn we set aside. I wrapped it around the edge one extra time to help fill in the blanks from the space the rya knots were taking up.
Then, I continued under the warp strands that held my rya knots and picked back up for over and under in the center and then went behind all the rya knot strands.
This filled in the space between the two sets of rya knots.
 Step 24 You can see where I went back under the rest of the warp strands that held the rya knots before coming back up on the other side. I only really needed one row like this.
Step 25 I continued back the other way, going over and under all the way across.
 Step 26 I added a few more rows of that white yarn and decided I wanted another layer of a rya knot, so I cut about six strands of chunky peach yarn measuring about 15″ long each.
Step 27 I found the center of my warp and used the same method to make another rya knot.
I kept my strands longer than the green ones, but shorter than the white tassels to create layers and keep the eye moving.

Soumak Stitch
Step 28 After adding another section of peach with the basic over and under weaving technique, I decided to start a soumak stitch.
This can create a braided effect and add some stronger texture to your piece. This time, I did start from the edge and came up from under the outer warp strand and then wrapped back around it and came back up after the second warp strand.
I made sure to leave a 4″ tail to tuck in later.
Step 29 I wrapped back to the left and then came up after the third warp strand. The trick is to go forward two strands and then back one strand each time.
 Step 30 Again, I went back to the left and then came back up after the fourth warp strand.
Step 31 I finished until I got to the end. You can see how the pattern is different from the basic over and under.
 Step 32 To go back the other direction, you have to wrap around the outer warp strand once and then twice before coming back up after the second warp strand.
Step 33 Wrap back to the right, and then come up after the third strand from the edge.
 Step 34 Wrap back to the right, and then come up after the fourth strand from the edge. Repeat until you’re all the way across that row. You’ll wrap around the other edge and then be done. It should look like a braid.
Step 35 I added another layer of peach before starting with my chunkiest yarn.
Again, I started from about four rows in, and instead of going over and under every other strand, I did two strands at a time. This creates a basketweave.
It’s just another way to add texture and keep things from feeling monotonous. I added four rows of that and then another few layers of light green in a thin yarn to lock things down.

Cleaning the Back
Step 36 Once I was done with adding more yarn, I flipped my weaving over to clean up the back. In the past, I’ve just tied random ends together and trimmed them, but that can get bulky.
The preferred method is to take each tail in your needle and stitch them through the back side of some of the yarn. Then, you remove the needle and trim the ends.
Step 37 Here’s a shot of the messy back and the green that has been tucked in nicely and trimmed.

How to Remove a Weaving from a Loom
Flip it back over and carefully cut your warp strands two at a time and about 4″-6″ above your last row of yarn. You’ll want enough that you can tie a knot and then fold them behind your weaving and tuck them in just like the last step.
Tying a knot secures your weaving from falling apart. Once all of your warp strands are tied in knots, you can gently pull it off the bottom pegs.

Tuck the top strands back behind your weaving as you did with the rest of the messy strands.

Using more warp yarn, tie a knot in one end, and stitch through each knotted strand and up and over your dowel rod, copper pipe, driftwood, etc.
I have these on hand, so I used them, but dowel rods are much cheaper.

After you’ve stitched your wall hanging to your rod, make a simple hanger using the loop knot again.

Once you master the basics of weaving there are endless ways to be creative and build your skills.
More Weaving Projects
- How to Create Shapes in a weaving
- Woven Christmas Stocking DIY
- Weaving with Wool Roving
- Woven Circle Mat DIY
- Woven Throw Pillow DIY
- Woven Infinity Necklace
- 15+ Woven Crafts and DIY Projects
Learn more in Rachel’s Weaving Book- DIY Woven Art
And if you love the look of weavings but don’t have time to make your own, you can also support a weaver and buy a lovely wall hanging of your own. –Rachel
Love this post? Sign up for our newsletter for more ideas!

Get creative ideas for recipes, crafts, decor, and more in your inbox!
 Get the How-To

Supplies
- loom
- cotton yarn for the warp (The warp is the foundation of your weaving and goes up and down across the pegs of your loom.)
- yarn for your weft ( This can be any size thickness, or color you prefer. All of mine was purchased at Jo-Ann, as they had the best selection of large craft stores, but if you have a local yarn shop in your area, I suggest checking them out for special colors and natural fibers.)
- wooden dowel rod (copper pipe, stick, etc. Something sturdy and wider than your weaving by 1″ – 2″.)
- tapestry needle (This will be about 3″ long with a large eye and a blunt end.)
- shuttle (Mine came with my loom and is shown above with the U-shaped ends. This is for wrapping your weft yarn around and sliding through the opening that is made when your shed stick is raised. I tend to not use mine and just stick with using my needle.)
- shed stick (This is the wooden object to the right of the shuttle above. It looks like a paint stirrer. This is woven through your warp and left there to help save time when you’re moving your shuttle through to create a new row. Some use two sheds but I find it most efficient to leave only one in on this type of loom.)
- scissors
Instructions
- Create your warp. First make a loop knot at the end of your warp yarn, and fasten in to the top left peg. Then wrap it down to the bottom left peg and back up again.
- Continue on to make it as wide as you’d like, and finish with another loop knot. This will allow you to add a tassel to that last peg. You don’t want your warp to be too loose or too tight. As your warp fills with weaving, it will become more taut, so keep that in mind. Gently pressing down should even out any uneven sections.
- To create your tassels at the bottom of your weaving, cut a length of yarn and fold it in half and then in half again. I suggest between 15″ – 20″, and you can always trim it up when you’re done.
- You’ll make one of these per peg at the bottom, and slip the center of your folded fringe over the first warp string and under the second and then back to the top.
- Fold the long ends through the center as shown.
- Pull gently so that the knot tightens.
- Pull your tassel all the way to the bottom of the peg so it rests underneath. Repeat with the rest of the pegs, and then trim the bottoms to make an even or angular bottom.
- Do the same for your last peg by going through the loop knot and finishing it up.
- Thread your tapestry needle with about 4′ of yarn for your first layer of color. I always like to start about three warp strands in so that my tails don’t stick out on the sides. To do this, skip the first three warp strands, and then go under the fourth and over the fifth and under the sixth, etc.
- Repeat over and under until you get to the other side. For the sake of consistency, treat that last loop knot as a single warp strand.
- When you’re pulling your yarn through, pull up to the opposite corner, and then gently push the yarn down so that it rests snugly on top of the previous row. Some use a fork for this step, but I find my own hands to be just as effective with these thicker yarns. If you start with smaller yarn, you’ll want to try using a fork and see what you think.
- When you get to the end of the yarn or would like to switch colors, end on an under, and keep the 3″ – 4″ tail tucked in the back. Be sure to leave about that much so that you can stitch it under and hide it on the backside.
- To continue the same color or add another color, stick the tail of the new cut of yarn under, and leave a 3″ – 4″ tail. It should go under so that it looks like it’s picking up where the last piece of yarn left off.
- Continue on to the next row, and gently press it down from the center out to each side to keep enough slack, not to turn into an hourglass shape!
- Add another layer or two, but finish on the end this time.
- Time to learn a rya knot. I cut three strands of yarn in a contrasting color that measured about 15″ across.
- I chose two warp strands a little bit in from the edge and wove my three green pieces through them both.
- Then, I stuck my finger and thumb between those two warp strands, grabbed the green yarn, and pulled up about 2″.
- Next, I grabbed the loose ends and pulled them down through the raised strands.
- Finally, I pulled down gently and adjusted the knot.
- I counted strands so that I got three rya knots on the left and three on the right. Once I was done, I gave them a trim.
- Now it’s back to weaving with the yarn we set aside. I wrapped it around the edge one extra time to help fill in the blanks from the space the rya knots were taking up. Then I continued under the warp strands that held my rya knots and picked back up for over and under in the center and then went behind all the rya knot strands. This filled in the space between the two sets of rya knots.
- You can see where I went back under the rest of the warp strands that held the rya knots before coming back up on the other side. I only really needed one row like this.
- I then continued back the other way, going over and under all the way across.
- I added a few more rows of that white yarn and decided I wanted another layer of a rya knot, so I cut about six strands of chunky peach yarn measuring about 15″ long each.
- I found the center of my warp and used the same method to make another rya knot. I kept my strands longer than the green ones, but shorter than the white tassels, to create layers and keep the eye moving.
- After adding another section of peach with the basic over and under weaving technique, I decided to start a soumak stitch. This can create a braided effect and add some stronger texture to your piece. This time I did start from the edge and came up from under the outer warp strand and then wrapped back around it and came back up after the second warp strand. I made sure to leave a 4″ tail to tuck in later.
- I wrapped back to the left and then came up after the third warp strand.The trick is to go forward two strands and then back one strand each time.
- Again, I went back to the left and then came back up after the fourth warp strand.
- I finished until I got to the end. You can see how the pattern is different from the basic over and under.
- To go back the other direction, you have to wrap around the outer warp strand once and then twice before coming back up after the second warp strand.
- Wrap back to the right, and then come up after the third strand from the edge.
- Wrap back to the right, and then come up after the fourth strand from the edge. Repeat until you’re all the way across that row. You’ll wrap around the other edge and then be done. It should look like a braid
- I then added another layer of peach before starting with my chunkiest yarn. Again, I started from about four rows in, and instead of going over and under every other strand, I did two strands at a time. This creates a basketweave. It’s just another way to add texture and keep things from feeling monotonous. I added four rows of that and then another few layers of light green in a thin yarn to lock things down.
- Once I was done with adding more yarn, I flipped my weaving over to clean up the back. In the past I’ve just tied random ends together and trimmed them, but that can get bulky. The preferred method is to take each tail in your needle and stitch them through the back side of some of the yarn. Then you remove the needle and trim the ends.
- Flip it back over, and carefully cut your warp strands two at a time and about 4″ – 6″ above your last row of yarn. You’ll want enough that you can tie a knot and then fold them behind your weaving and tuck them in just like the last step. Tying a knot secures your weaving from falling apart. Once all of your warp strands are tied in knots, you can gently pull it off the bottom pegs.
- Tuck the top strands back behind your weaving as you did with the rest of the messy strands.
- Using more warp yarn, tie a knot in one end, and stitch through each knotted strand and up and over your dowel rod, copper pipe, driftwood, etc. I have these on hand, so I used them, but dowel rods are much cheaper.
I needed this tutorial! I have your loom and yarn but haven’t started yet. Thank you!
I needed this tutorial. Thank you!
This weaving basics guide is fantastic! Weaving and embroidery share such a beautiful connection in the world of textile arts. Combining embroidered details with woven textures can create truly unique and artistic pieces.
Amazing – love the detail in these instructions!! My daughter has a Melissa&Doug loom that she has played with a bit – definitely going to use this tutorial to teach her some new things and increase her confidence!
I’m using this post RIGHT NOW and having so much fun!
Love this tutorial!
Thanks for sharing with us about weaving class the basics.
This is the best resource for those just starting to get into weaving!
The best weaving guide for beginners!
This is such a great tutorial!
This is so detailed and helpful!
Big big BIG thankyou for this tutorial. very informative and beautifully laid out, step by step. This has been a very big help to me. thankyou xx
Rachel, I just received your loom and tools that I bought online at Smile and Wave and am excited to start using it. I’ve been making small tapestry items with cardboard looms I make. For this larger loom, I’m wondering what size warp thread should I purchase? TYIA…
Hi! Feel free to contact Rachel on Instagram at @smileandwave 🙂
I am very excited to begin learning how to weave. I have always been interested in it and now that I am retired I will have the time. The tutorial is very informative and clear but I am having trouble printing it. What is the best way to print the tutorial? Thank you.
Hi Susan! We don’t have a print button for the post, but I would just print the entire post so you can review it. 🙂
Hi! Thanks so much for the tutorial – this was great!
I had a question about “starting a few cords in” for the basic over and under technique. How did you then go back and fill in the cords that you skipped – because in the final product it doesn’t look like there are any open spaces?
Thank you!
Oooh, I remember doing weavings when I was a kiddo. So cool that it’s done a full circle and is trendy again! Wish I’d kept my old ones, they’d be super cool to have up in my house now!! man!
This is so cool. I’ve been knitting but I think I must start weaving now too as this looks super awesome 🙂
http://fairytaleprettypicture.co.uk
VERY NICE! I wanna try as soon as possible!
Great ! thank you !
I’ve been dying to get my hands on a funky weaving, but now I am SO excited to try it myself! This tutorial is fantastic for visual learners like me! Thank you!